Reimagining front-end web development with htmx and hyperscript
 Owen Jones
We all know that to create an interactive front end for your website you need JavaScript. Not just vanilla JS, mind: we're in 2022, and to create an acceptable UI you need to be using a framework like React or Vue.js. Right?
Wrong.
In recent years, a few mavericks and renegades have started to turn away from the world of JS frameworks and the inevitable bloated node_modules folders. But what if you want a smooth single-page app experience, rather than waiting for the whole page to render every time you click a button? Of course, nobody wants to write a load of boilerplate JS for every little interaction. This is where hypermedia in the form of htmx and hyperscript come in.
These two open-source toolkits, both developed by Big Sky Software and collaborators, provide a host of HTML attributes to deal with AJAX requests, partial DOM updates, CSS transitions, event handling, Server-Sent Events and WebSockets in a clear, user-friendly syntax. There are a number of excellent tutorials online demonstrating the capabilities of these tools; I particularly like BugBytes' tutorials on YouTube. In this article, I'm going to show you how I used them in my current project, which is a simple membership/subscription tracking site made with Django.
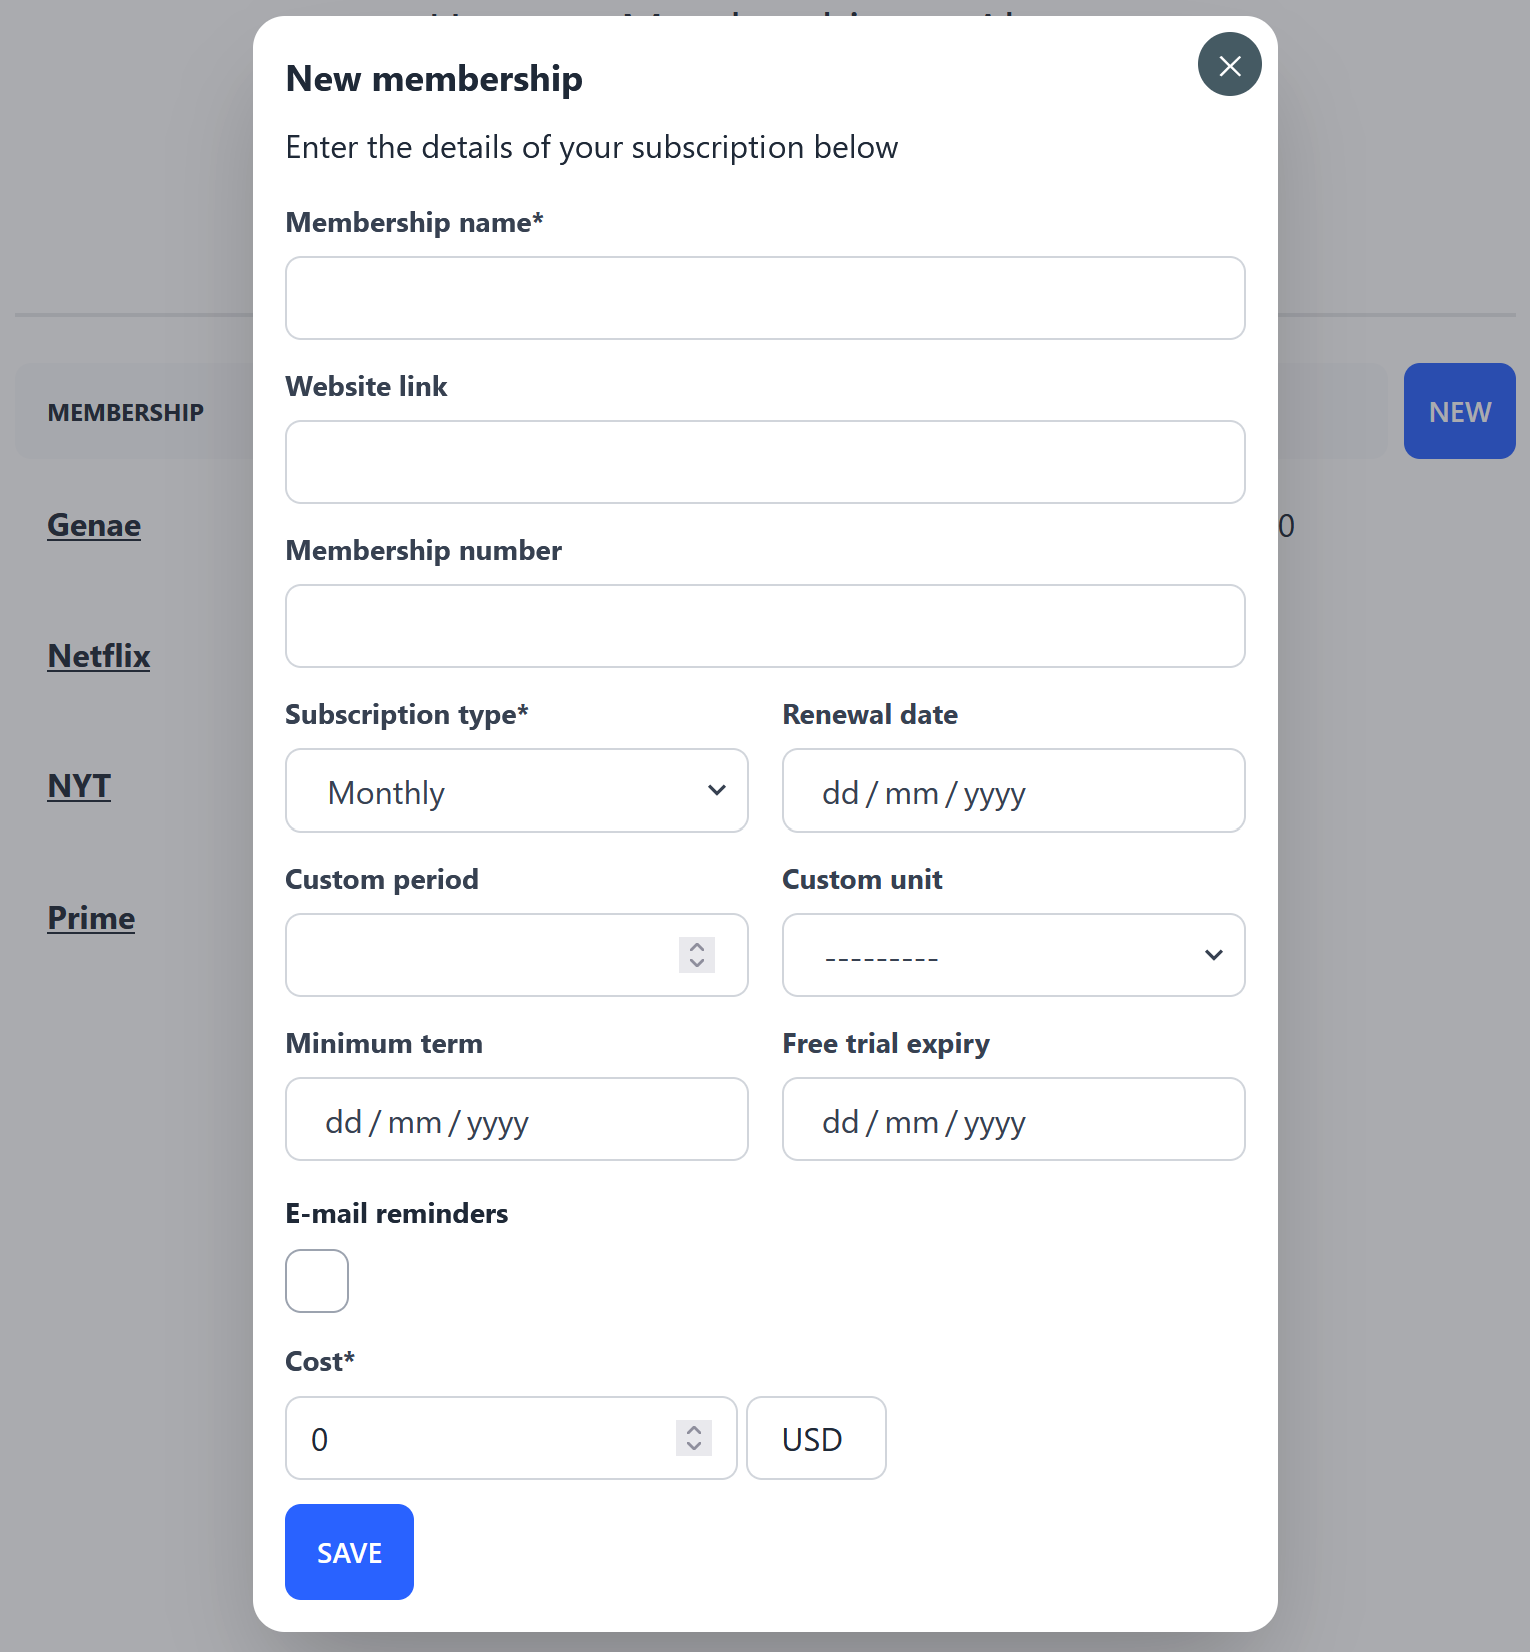
My goal was to allow users to add memberships to their personal lists via a form in a modal (pop-up) dialog, and to edit or delete existing memberships from a table which would be updated with no page reload. The starting point was this excellent article by Benoit Blanchon; in Benoit's article he uses htmx, but eschews the less-mature hyperscript in favour of some simple JS functions. Since htmx and hyperscript are developed with the same philosophy and are designed to work well together, I decided to go all-in on the hypermedia hype train and try not to use a single line of 'pure' JavaScript. Another minor difference is that I'm using TailwindCSS whereas Benoit uses Bootstrap, so the names of some of the utility classes will be different.
Modal dialog and form submission
The first step is to allow the modal dialog containing the form to be opened and closed, with the possibility of submitting the form. Since I'm using daisyUI, a ready-made modal component is available which can be opened or closed by adding or removing the .modal-open class.
 This is a classic use-case for hyperscript; the 'New' button adds the class to the modal, while the 'Close' button removes it.
<!-- 'New' button on the main 'my-memberships' page -->
<button _="on htmx:afterRequest add .modal-open to #modal"
        hx-get="{% url 'my-memberships' %}" hx-select="#modal-box" hx-target="#modal"
        class="mx-auto md:ml-2 btn btn-primary btn-square border-none basis-14">New
</button>

<!-- 'Close' button on the top-right corner of the modal dialog -->
<button _="on click remove .modal-open from #modal"
        class="btn btn-sm btn-circle absolute right-2 top-2">✕
</button>
Note the use of the htmx:afterRequest event on the 'New' button, as opposed to the simple click event on the 'Close' button. This is because we wait for the new, empty form to be returned from the back end at 'my-memberships' before showing the form (otherwise a 'dirty' version of the form with previous entries and validation errors might be shown before the 'clean' form is returned from the server). Note also that we use the hx-select attribute to select only the #modal-box element from the response, and hx-target to place it in the #modal element (the response to the GET request otherwise contains the whole 'my-memberships' page, which is not what we want in our modal!).
There's also the 'Save' button on the form, which submits the form with a POST request to the 'my-memberships' back end. hyperscript is used to disable the button until the response has been loaded, to prevent repeat submission.
<button type="submit" class="btn btn-primary border-none"
        _="on click toggle @disabled until htmx:afterOnLoad">Save
</button>
The class-based view associated with the 'my-memberships' URL is as follows:
class MembershipView(LoginRequiredMixin, TemplateView):
    template_name = 'memberships.html'
    extra_context = {'form': MembershipEditForm()}

    def post(self, request, *args, **kwargs):
        form = MembershipEditForm(request.POST)
        success = False
        if form.is_valid():
            membership = form.save(commit=False)
            if kwargs:
                if kwargs['update']:
                    membership.pk = kwargs['pk']
            membership.user = request.user
            membership.save()
            success = True
            self.request.path = reverse_lazy('my-memberships')
            form = MembershipEditForm()

        response = render(request, 'partials/modal-form.html', {'form': form})
        if success:
            response['HX-Trigger'] = 'membershipsChanged'
        return response
There are two possible outcomes of form submission:
- the submitted form is returned with validation errors, in which case htmx will swap the existing modal dialog with the response and display the errors:
<div id="modal-box" class="modal-box p-4 scrollbar-thin" hx-target="this" hx-swap="outerHTML"> ... {% if form.non_field_errors %} <div class="mt-2"> {{ form|as_crispy_errors }} </div> {% else %} <p class="pt-2 pb-4">Enter the details of your subscription below</p> {% endif %} ... </div> - the new membership is saved to the database and a clean form is returned. In this case, we attach the 'HX-Trigger' header to the response with the value
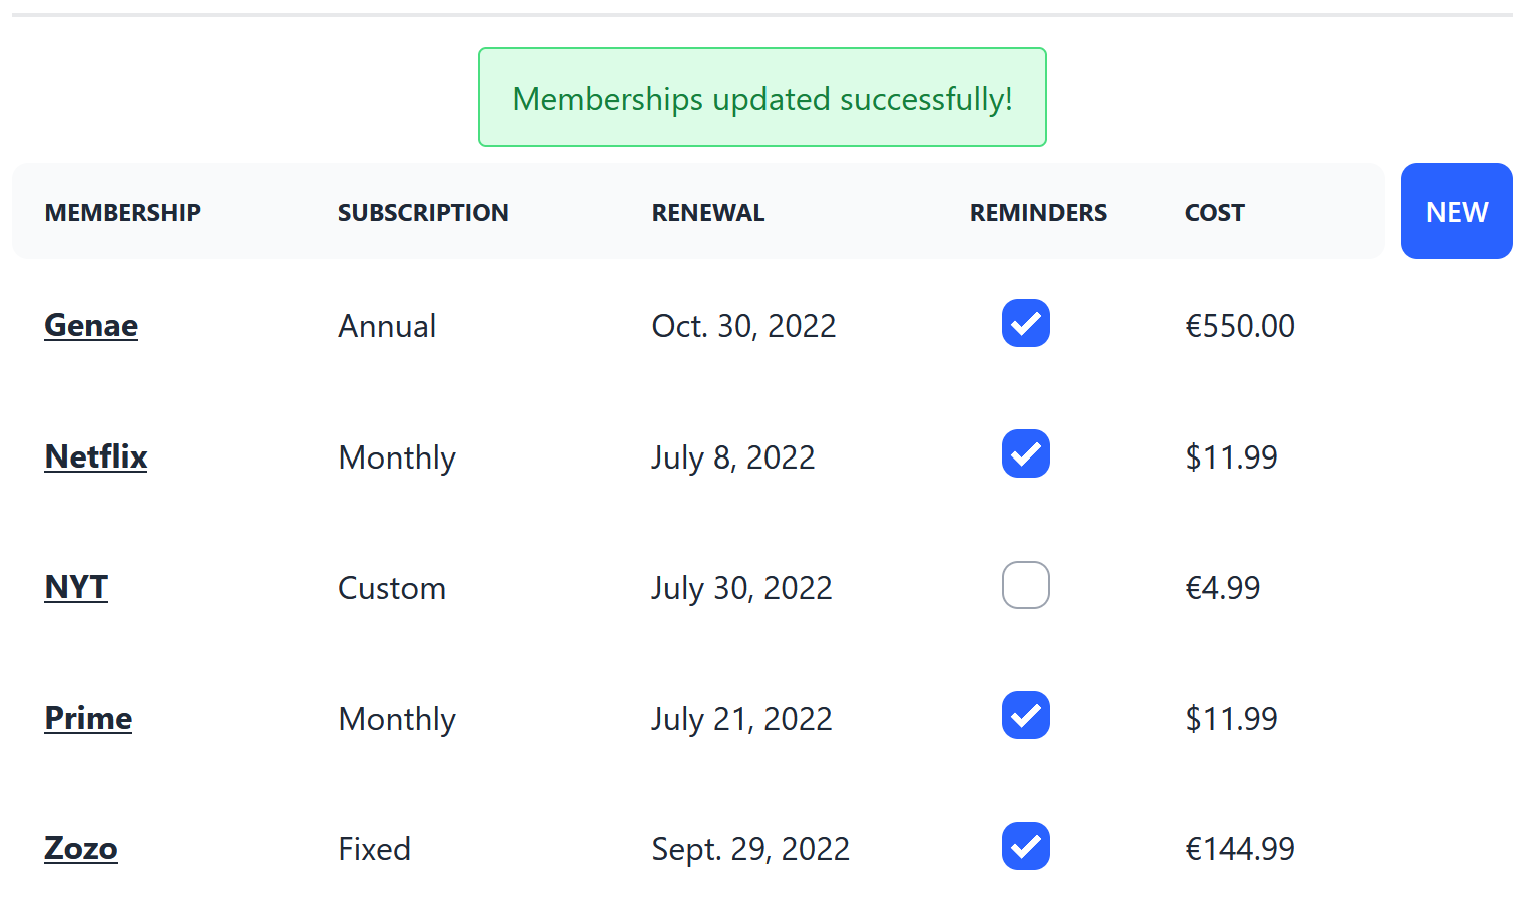
membershipsChanged. This is the cue to our frontend to close the modal and update the table displaying the user's memberships:<table class="table table-fixed grow"> <thead class="w-auto"> ... </thead> <tbody id="membership-table-body" hx-trigger="load, membershipsChanged from:body" hx-get="{% url 'update-memberships' %}" hx-target=this _="on htmx:afterOnLoad add .hidden to #spinner"> </tbody> </table>loadevent occurs (on page load) and hide the 'loading' spinner once htmx has loaded the response into the table.
Updating the memberships table
If the membershipsChanged event is received, we know that the new membership has been saved successfully and we can update the form. I included a small (hyper)script on the 'my-memberships' page which temporarily shows a success alert in this case:
<script type="text/hyperscript">
  on membershipsChanged
    remove .modal-open from #modal
    show #alert-success
    wait 3s
    hide #alert-success
  end
</script>
 The table display includes a column to allow reminders (of renewal, free trial expiry etc.) to be toggled on or off with a simple click. htmx is used to send a PATCH request to the server with the primary key of the relevant membership included in the URL.
<input type="checkbox"
       class="checkbox checkbox-primary border-gray-400 mt-1"
       {% if membership.reminder %}checked{% endif %}
       hx-patch="{% url 'toggle-reminders' membership.pk %}"
       hx-swap="none"/>
This is picked up on the back end by a simple function which toggles the reminder state of the given membership:
@login_required()
def toggle_reminders(request, pk):
    if request.method == 'PATCH':
        membership = Membership.objects.get(pk=pk)
        if membership.user == request.user:
            membership.reminder = not membership.reminder
            membership.save()
There is no return value, and htmx does not expect any since we specified hx-swap="none" (no content is swapped into the target in this case, even if such content is present in the body of the response). If we wanted to handle the possibility that the object is not found, we could use get_object_or_404() and send an 'HX-Redirect' header in the response to prompt htmx to redirect to a 404 page.
We also have a dropdown menu accessible by clicking the name of each membership, which allows us to edit or delete this membership.
<ul tabindex="0" class="dropdown-content menu p-2 shadow bg-base-100 rounded-box w-24">
  <li>
    <a hx-get="{% url 'edit-membership' membership.pk %}" hx-target="#modal"
       _="on htmx:afterRequest add .modal-open to modal">Edit
    </a>
  </li>
  <li>
    <a hx-post="{% url 'delete-membership' membership.pk %}"
       hx-confirm="Are you sure you want to delete the membership '{{ membership.membership_name }}'?"
       hx-target="closest tr" hx-swap="delete">Delete
    </a>
  </li>
</ul>
 Clicking 'Edit' brings up the modal populated with the details of the existing membership; as a consequence of this request, the target URL on form submission is updated to a URL specific to this membership (although in the end the POST request is forwarded to the same function as for creation, just with the optional 'update' keyword).
class EditMembershipView(LoginRequiredMixin, UpdateView):
    model = Membership
    fields = "__all__"
    template_name = 'partials/modal-form.html'

    def get(self, request, *args, **kwargs):
        self.object = self.get_object()
        if self.object.user == request.user:
            return super().get(request, *args, **kwargs)

    def post(self, request, *args, **kwargs):
        self.object = self.get_object()
        if self.object.user == request.user:
            return MembershipView.as_view()(request, update=True, pk=self.object.pk)
Clicking 'Delete' causes the page to prompt for confirmation and then POSTs the request to the back end (we are using POST rather than DELETE here because the view extends Django's 'DeleteView', which expects a POST request).
class DeleteMembershipView(LoginRequiredMixin, DeleteView):
    model = Membership

    def post(self, request, *args, **kwargs):
        self.object = self.get_object()
        if self.object.user == self.request.user:
            self.object.delete()
            return HttpResponse()
            # Unfortunately we cannot return status 204 or else htmx will ignore the response (see docs at htmx.org)
        return redirect('my-memberships')
The response code in case of success is 200 - OK rather than 204 - No Content because otherwise htmx will not trigger a delete of the closest tr as requested by the hx-swap and hx-target attributes (we could always do this by triggering an event with an 'HX-Trigger' header in the 204 response and using hyperscript, but this adds an extra step for no functional gain).
Final thoughts
So there you have it: a modal form and a table handled entirely with htmx and hyperscript, with no JavaScript or page reloads in sight. Once you get into the hypermedia mindset, it turns out to be a fairly intuitive and extremely powerful and flexible way of building responsive UIs. Occasionally the built-in htmx attributes don't quite have the desired behaviour (as in the case of the reaction to a 204 response when deleting), but the available headers allow us to trigger events and handle these cases on the front end. This makes the combination of htmx and hyperscript all the more powerful, and hyperscript's readability is second to none.
Both htmx and hyperscript are available through the public unpkg CDN, or as standalone .js or npm packages. It's really easy to get started by following a few tutorials, and I encourage anyone who wants to build a website without having to bundle React, Vue or Angular to give it a try. Next steps on a project like mine could include infinite scroll with pagination on the table, clicking column headers to sort results without page reload, or the addition of tabs to switch smoothly between table and calendar views.
I hope you enjoyed this post, and that you'll come back for the next one!
Subscribe to my newsletter
Read articles from Owen Jones directly inside your inbox. Subscribe to the newsletter, and don't miss out.
Written by

Owen Jones
Owen Jones
I am a full-stack web and desktop application developer currently working on portfolio projects. I'm looking to transition to a more development-oriented career (until now I have worked on development projects alongside systems engineering, data validation and documentation in various roles over the years). Preferred languages and frameworks are Python (Django, Flask) and C# (WPF, ASP.NET).