CI for Detox Mobile Test Automation framework using GitHub Actions and Azure Pipelines
 Avinash Kannan

Overview
In continuation to my last detailed blog on setting up Detox test automation framework, We will set up CI for the same using GitHub Actions and Azure Pipelines.
GitHub Actions
Actions is a feature released by GitHub that allows you to set up CI/CD workflows using a configuration file right in your Github repository.
GitHub provides Linux, Windows, and macOS virtual machines to run your workflows, or you can host your own self-hosted runners in your own data centre or cloud infrastructure.
GitHub Actions Free Plan
GitHub Actions usage is free for both public repositories and self-hosted runners. For private repositories, each GitHub account receives a certain amount of free minutes and storage, depending on the product used with the account.
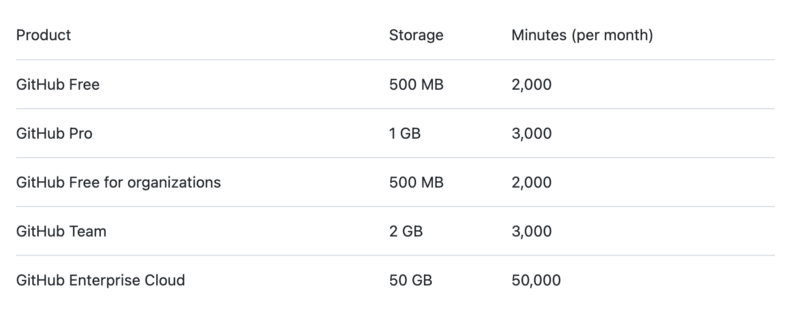
Jobs that run on Windows and macOS VM’s that GitHub hosts consume minutes at 2 and 10 times the rate that jobs on Linux VM’s. For example, let’s assume your tests / build duration is 5 minutes. If you run in Linux it’ll be considered as 5 minutes, in Windows it’ll be 5*2 minutes , in MacOS it’ll be 5*10 minutes.

Integrating Detox Tests ( Android & iOS ) with GitHub Actions
Create workflows in your project ( use any one )
- Using IDE :
Create .github/workflows folder in your project root directory. Now create two YAML files i.e., android-tests.yml and ios-tests.yml under the workflows folder.
- Using GitHub Repository :
Open your Project Repository and click on Actions tab. Now choose suggested Build tool / configurations or you can also click on set up a workflow yourself option.
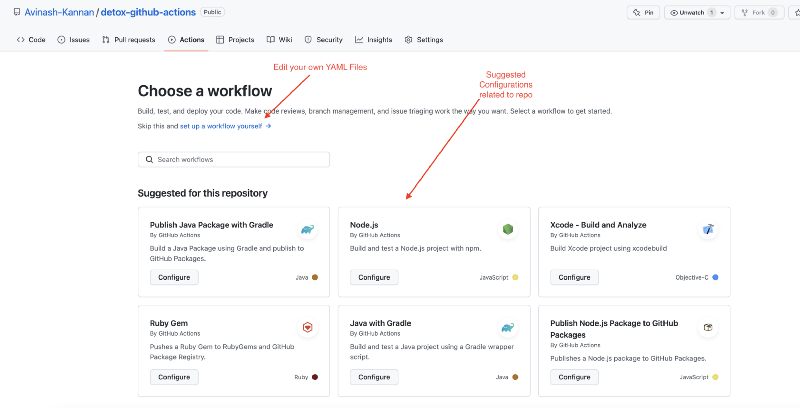
Actions Workflow YAML File Steps Explained
Agent/ Runner Image : Decide upon which agent to use as per requirements. Available labels : windows-latest , macos-latest, ubuntu-latest ( with different versions ). I have used macos-latest label in below YAML File.
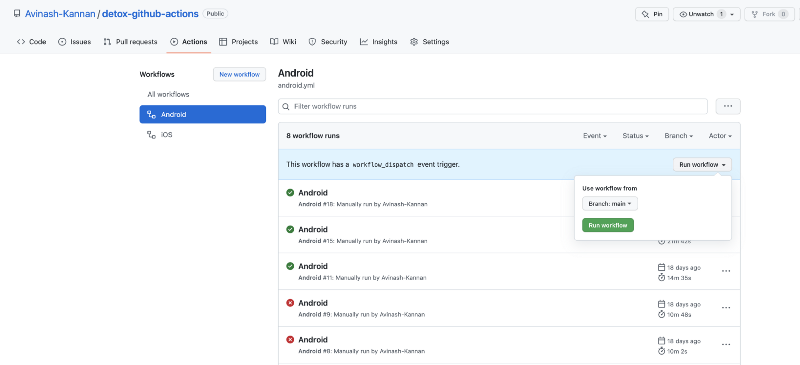
Event Trigger : User can run a workflow manually / automatically using various events provided by Actions , examples - workflow_dispatch , pull_request ,push . Please visit Trigger Events page for various options and to use it effectively as per need. I have used workflow_dispatch which allows me to trigger workflows manually from Actions tab.
Install Node , JDK with compatible version : GitHub Actions provides numerous tasks that can be used in our project to reduce manual shell script execution. Checkout the Marketplace to explore available tasks. Simply specify the task name using uses key , example uses: actions/setup-node@v3
Set up Android Test environment : To run detox android tests , we need to install android image (check which android versions are available in agent) and create an emulator. This can be achieved directly by using command line.
$ANDROID\_HOME/tools/bin/sdkmanager - install "system-images;android-29;google\_apis;x86"

$ANDROID\_HOME/tools/bin/avdmanager create avd - force -n <Emulator Name> -d pixel - package 'system-images;android-29;google\_apis;x86'

$ANDROID\_HOME/emulator/emulator -list-avds
Set up iOS Test environment :
- Pod Install : Run
pod installfrom yourios directoryto install new pods in your project. - Install AppleSimulatorUtils : This is a collection of utils for Apple simulators , which Detox uses it to query and communicate with the simulator. Run
brew install applesimutils - Install Xcode : You can use /select Xcode application available in your mac agent. Check for available simulators ( iOS version and model) provided by Xcode. Use the same in your detox iOS configuration.
Build and Run Detox : You can build your app using detox build command npx detox build -c android/ios. In case of using debug build, you need to start your react native metro server by running command npx react-native start &. After setting all this, you can execute your test by running npx detox test -c android/ios command.
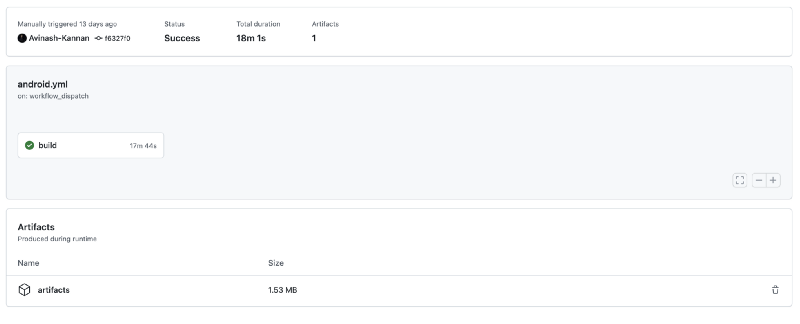
Upload Test Artifacts : To upload artifacts created from your test execution , search for relevant tasks in Marketplace. In this demo, I have used actions/upload-artifact@v2 to upload artifacts from agent VM to Actions.
Android YAML File
name: Android

on: [workflow_dispatch]

jobs:
  build:
    runs-on: macos-latest
    timeout-minutes: 30

    steps:
    - name: Checkout
      uses: actions/checkout@v3
      with:
        fetch-depth: 1

    - name: Node
      uses: actions/setup-node@v3

    - name: Install JDK
      uses: actions/setup-java@v3
      with:
        java-version: '8'
        distribution: 'zulu'
        architecture: 'x64'

    - name: Download and Create Android Emulator Image
      run: |
        $ANDROID_HOME/tools/bin/sdkmanager --install "system-images;android-29;google_apis;x86"
        $ANDROID_HOME/tools/bin/avdmanager create avd --force -n TestEmulator -d pixel --package 'system-images;android-29;google_apis;x86'
        $ANDROID_HOME/emulator/emulator -list-avds
    - name: Install node_modules
      run: |
        npm install

    - name: Start RN Packager
      run: |
        npx react-native start &
    - name: Build detox
      run: |
        npx detox build -c android
    - name: Android Run Detox
      run: |
        npx detox test --record-videos all --take-screenshots all -c android
    - name: Upload Test Artifact - GitHub Action
      if: always()
      uses: actions/upload-artifact@v2
      with:
        name: artifacts
        path: artifacts
iOS YAML File
name: iOS

on: [workflow_dispatch]

jobs:
  build:
    runs-on: macos-latest
    timeout-minutes: 50

    env:
      DEVELOPER_DIR: /Applications/Xcode_13.1.app

    steps:
    - name: Checkout
      uses: actions/checkout@v3
      with:
        fetch-depth: 1

    - name: Node
      uses: actions/setup-node@v3

    - name: Install node_modules
      run: |
        npm install
    - name: Pod Install
      run: |
        cd ios && pod install && cd ..
    - name: Install Applesimutils
      run: |
        brew tap wix/brew
        brew install applesimutils
    - name: Start RN Packager
      run: |
        npx react-native start &
    - name: Build Detox
      run: |
        npx detox build -c ios
    - name: Run Detox tests
      run: |
        npx detox test --record-videos all --take-screenshots all -c ios
    - name: Upload Test Artifact - GitHub Action
      if: always()
      uses: actions/upload-artifact@v2
      with:
        name: artifacts
        path: artifacts
Step by Step Screenshots from GitHub Actions Workflow
Android and iOS Workflows created under Actions
Build Details with artifacts
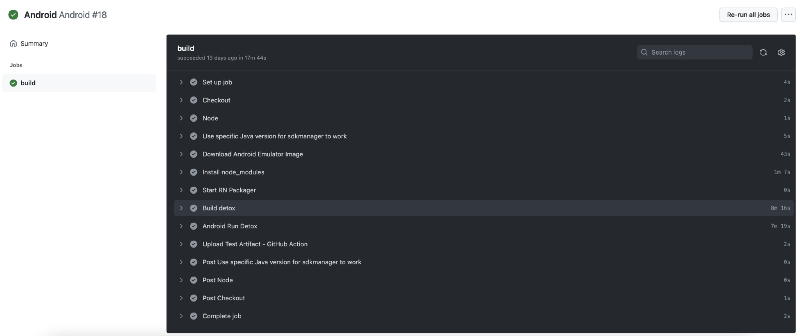
Android Build Logs captured in each stage/ task
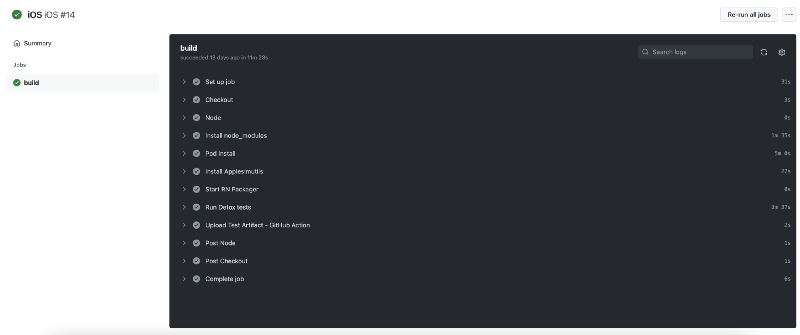
iOS Build Logs captured in each stage/ task
Azure Pipelines
Azure pipeline defines the continuous integration and deployment process for your app. It’s made up of one or more stages. It can be thought of as a workflow that defines how your tests, build, and deployment steps are run. It works with just about any language or project type.
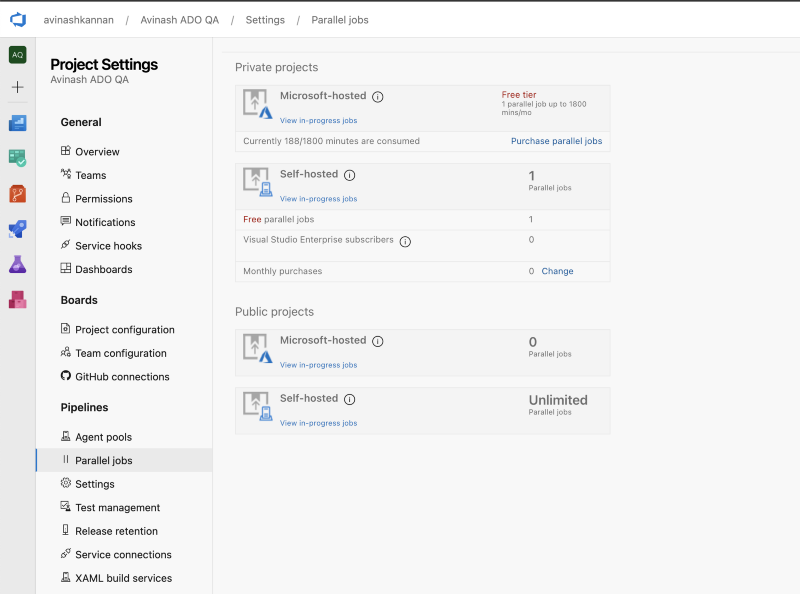
Azure Pipelines Free Tier
Please find below the steps I followed :
- Singed up Azure DevOps using my GitHub Account
- Created New Project , which allows me to access Boards, Repos, Pipelines.
- Imported repository from my GitHub account.
- To request the free grant of Microsoft hosted agents for public or private projects, submit a request. Check out this link for detailed info.
[Note : It takes 2–3 business days to get your free tier agent request.]

Integrating Detox Tests ( Android & iOS ) with Azure Pipelines
Azure-Pipelines YAML File Steps Explained
Agent/ Runner Image : Decide upon which agent to use as per requirements. Available labels : windows-latest , macos-latest, ubuntu-latest ( with different versions )
Trigger Definition : User can trigger a pipeline manually / automatically using various triggers provided by Azure , examples - none ,main , paths. Please visit Trigger Definitions page for various options and to use it effectively as per need.
Install Node , JDK with compatible version : Azure provides various built-in tasks, allows user to create custom task extensions and also can find extensions from VS Marketplace. Simply specify the task name using task key , example task: NodeTool@0
Set up Android Test environment : To run detox android tests , we need to install android image (check which android versions are available in agent) and create an emulator. This can be achieved directly by using command line provided by Microsoft Azure.
Set up iOS Test environment :
- Pod Install : Run
pod installfrom yourios directoryto install new pods in your project. - Install AppleSimulatorUtils : This is a collection of utils for Apple simulators , which Detox uses it to query and communicate with the simulator. Run
brew install applesimutils - Install Xcode : You can use /select Xcode application available in your mac agent. Check for available simulators ( iOS version and model) provided by Xcode. Use the same in your detox iOS configuration.
Build and Run Detox : You can build your app using detox build command npx detox build -c android/ios. In case of using debug build, you need to start your react native metro server by running command npx react-native start &. After setting all this, you can execute your test by running npx detox test -c android/ios command.
Upload Test Artifacts : To upload artifacts created from your test execution , search for relevant tasks in built-in utility tasks. In this demo, I have used PublishBuildArtifacts@1 to upload artifacts from agent VM to Azure.
Azure Android Tests YAMl File
trigger:
- main

pool:
  vmImage: macos-latest

steps:
- task: NodeTool@0
  displayName: Install Node.js
  inputs:
    versionSpec: '14.1'

- script: |
    npm install
  displayName: NPM install

- script: |
    echo "y" | $ANDROID_HOME/tools/bin/sdkmanager --install 'system-images;android-27;google_apis;x86'
    echo "no" | $ANDROID_HOME/tools/bin/avdmanager create avd -n TestEmulator -k 'system-images;android-27;google_apis;x86' --force
    $ANDROID_HOME/emulator/emulator -list-avds
  displayName:  Download Android Emulator Image

- script: |
    nohup $ANDROID_HOME/emulator/emulator -avd TestEmulator -no-snapshot > /dev/null 2>&1 &
    $ANDROID_HOME/platform-tools/adb wait-for-device shell 'while [[ -z $(getprop sys.boot_completed | tr -d '\r') ]]; do sleep 1; done; input keyevent 82'
    $ANDROID_HOME/platform-tools/adb devices
  displayName: Start Emulator

- script: |
    npx detox build -c android
  displayName: Build detox

- script: |
    npx react-native start &
  displayName: Start RN Packager

- script: |
    npx detox test --record-videos all --take-screenshots all -c android
  displayName: Android Run Detox

- task: PublishBuildArtifacts@1
  displayName: Get Test Artifacts
  condition: always()
  inputs:
    pathToPublish: 'artifacts'
Azure iOS Tests YAML File
trigger:
- main

pool:
  vmImage: macos-latest

steps:
- task: NodeTool@0
  displayName: Install Node.js
  inputs:
    versionSpec: '14.1'

- script: |
    sudo xcode-select -s /Applications/Xcode_13.1.app
    xcodebuild -version
  displayName: Install Xcode 13.1

- script: |
    brew tap wix/brew
    brew install applesimutils
  displayName: Install Applesimutils

- script: |
    npm install
  displayName: NPM install

- script: |
    cd ios && pod install && cd ..
  displayName: Pod Install

- script: |
    npx react-native start &
  displayName: Start RN Packager

- script: |
    npx detox build -c ios
  displayName: Build iOS Detox

- script: |
    npx detox test --record-videos all --take-screenshots all -c ios
  displayName: Run iOS Detox

- task: PublishBuildArtifacts@1
  displayName: Get Test Artifacts
  condition: always()
  inputs:
    pathToPublish: 'artifacts'
Step by Step Screenshots from Azure Pipelines
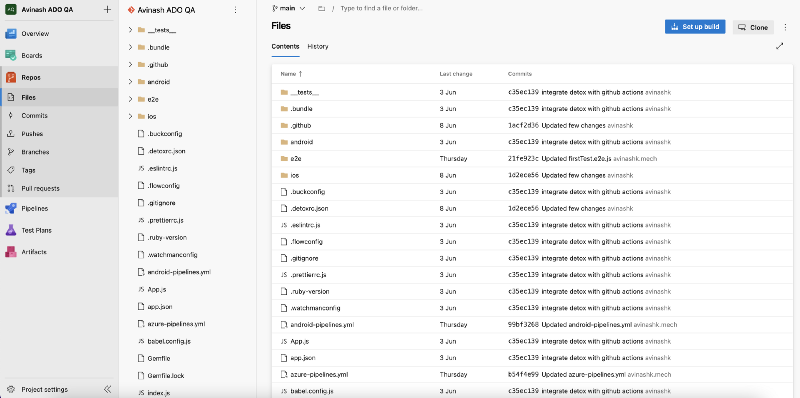
Import Git Repository to Azure Repos
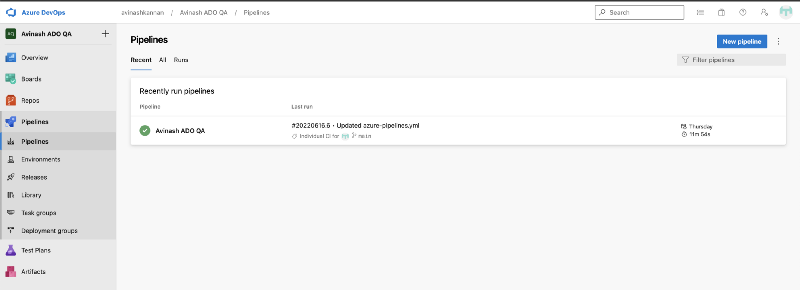
Create a Pipeline for your repo in Pipelines section
Request for Microsoft hosted free pool of agents
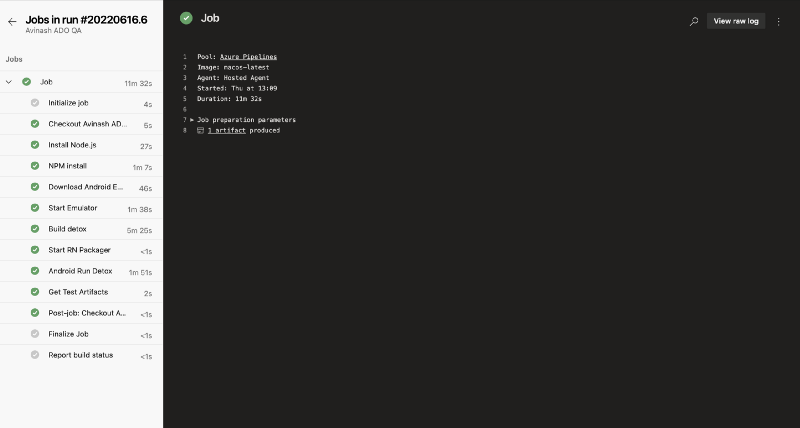
Android Job Run logs with published artifacts
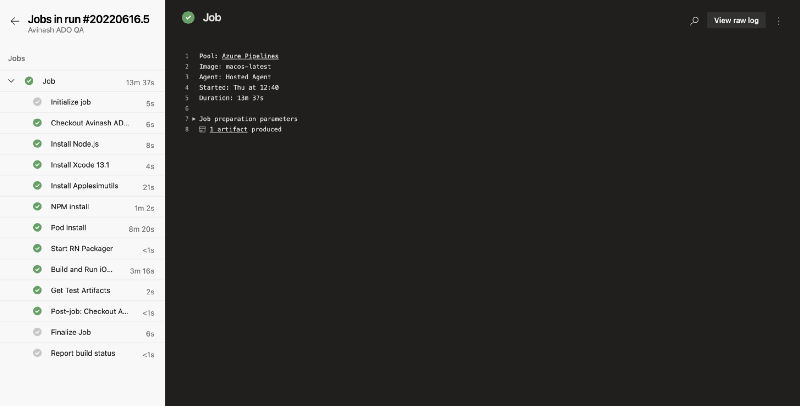
iOS Job Run logs with published artifacts
References
Subscribe to my newsletter
Read articles from Avinash Kannan directly inside your inbox. Subscribe to the newsletter, and don't miss out.
Written by

Avinash Kannan
Avinash Kannan
Software Development Engineer in Test