AWS Systems Manager (AWS SSM) Hybrid Activation - Windows.
 Dilaawez Khan
AWS Systems Manager as the name suggests is a infrastructure wide configuration mangement toll. It can manage both AWS hosted instances and on-Prem instance. Let's do on-Prem server activation in AWS Systems Manager in order to manager it.
Connectivity
Generally in organizations DEV servers have internet access however PROD servers have network access restricted. If our on-Prem windows server has limited network access then the on-Prem server should have outbound connectivity with following AWS Systems Manager endpoints at port 443.
ssm.region.amazonaws.com
ssm.messages.region.amazonaws.com
ec2messages.region.amazonaws.com
NOTE: SSM agent initiates all connections to AWS Systems Manager hence inbound access to server on firewall is not required.
If the server is behind a proxy the environment variable for the proxy must be set in the current shell based on whether its HTTP or HTTPS.
HTTP
http_proxy=http://hostname:port
https_proxy=http://hostname:port
HTTPS
http_proxy=http://hostname:port
https_proxy=https://hostname:port
Service Role
This IAM service role is required by ssm agent installed on on-Prem servers to make connection with AWS Systems Manager and vice-versa. It grants AWS STS AssumeRole trust to the systems manager service.
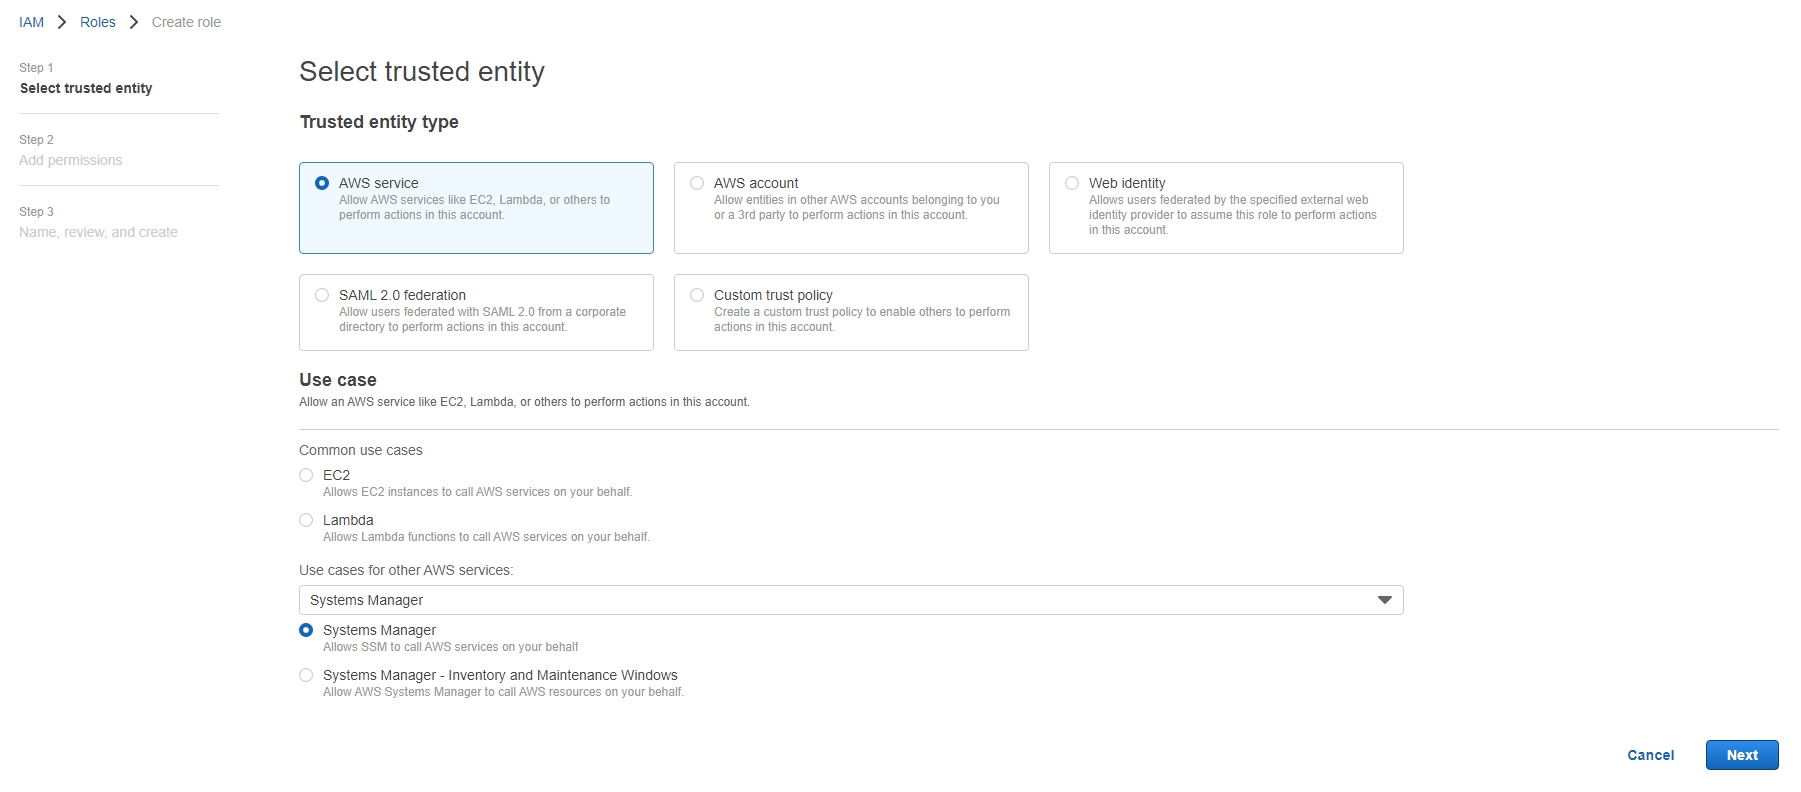
Login to AWS console-->Go to IAM-->Roles-->Create role-->AWS Service-->Under 'use case for other AWS services' search for 'systems manager'--> select Systems Manager radio button-->Next
We have selected the trusted entity here which is Systems Manager now on current page we have to select a policy that has the access (permission) defined, we'll use an AWS managed policy AmazonSSMManagedInstanceCore to provide permissions to Systems Manager.
NOTE: Here you can add more managed policies based on what you want AWS Systems Manager role to do.
Select the policy and click next--> Give it a name AWS-Systems-Manager-Role-->Create Role.
Role is created!
Here we can create more policies (permissions) for Systems Manager apart from SSM services. Let's give Systems Manager access to s3. But before that create a bucket in s3 to do a demo with objects.
C:\>aws s3api create-bucket --bucket ssm-demo-bucket-01 --profile Administrator
{
    "Location": "/ssm-demo-bucket-01"
}
copy/type the arn arn:aws:s3:::ssm-demo-bucket-01
Now move on to creating policy
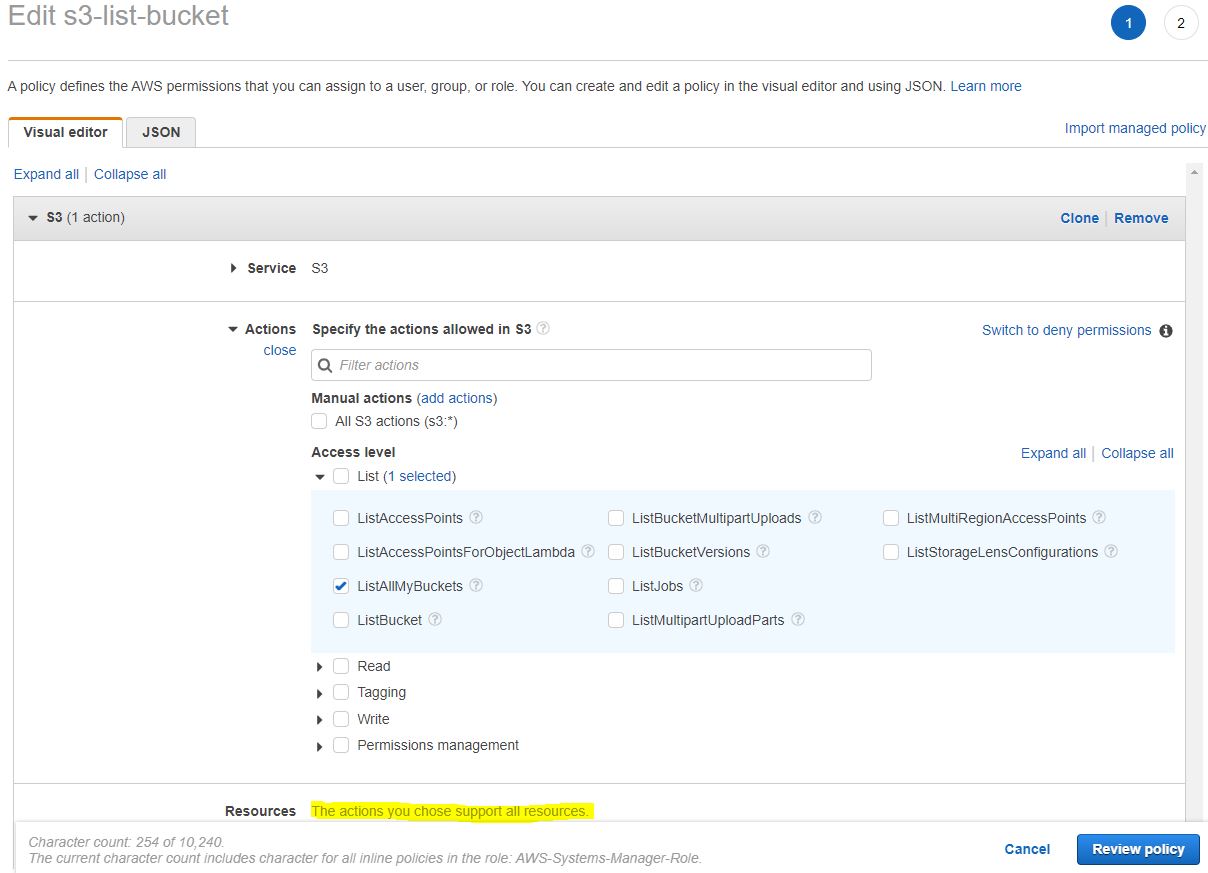
Go to Roles-->Select AWS-Systems-Manager-Role-->on Permissions tab-->Click Add Permissions-->Create inline policy.
It takes you to this screen. Select s3 in Service then in Actions under Access Level-->List select just ListAllMyBuckets.
It does not require any Resource selection since it applies to all.
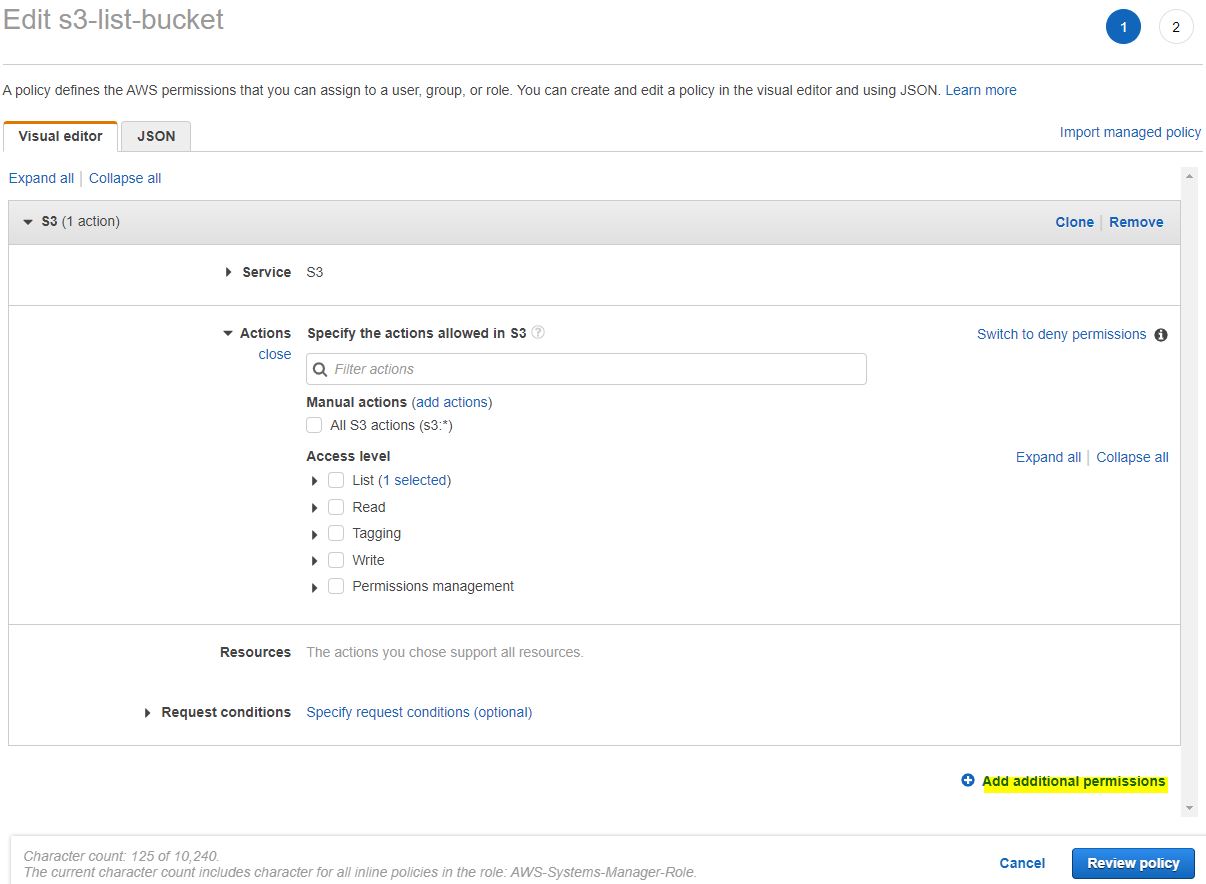
If you want to work with the bucket ssm-demo-bucket-01 we have created before, click on Add additional permissions
Again do, select s3 in Service then in Actions under Access Level-->Under...
Read select GetObject (to list the objects within bucket.)
Write select PutObject (To upload the objects.)
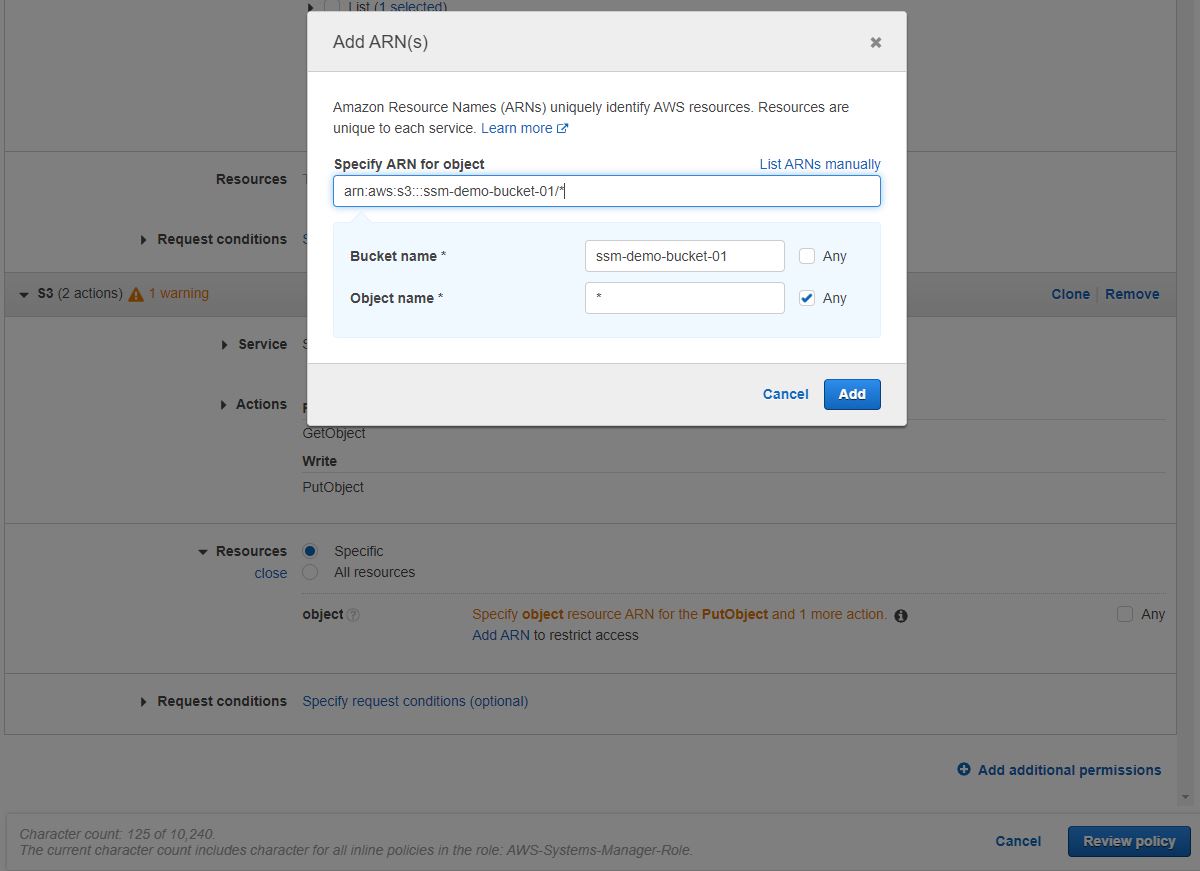
Then under Resources keep Specific radio button selected and click on Add ARN
Add s3 bucket ARN like this arn:aws:s3:::ssm-demo-bucket-01/* here. By adding /* it denotes everything under the bucket.
And click on Add.-->Review Policy-->Give it a Name s3-list-bucket-->Create policy.
We have provided the Systems Manager role access to list all buckets and work on one s3 bucket- ssm-demo-bucket-01.
on-Prem Server Activation
Now we will create an activation which is a process by which AWS Systems Manager on boards an on-Prem server to be managed from it.
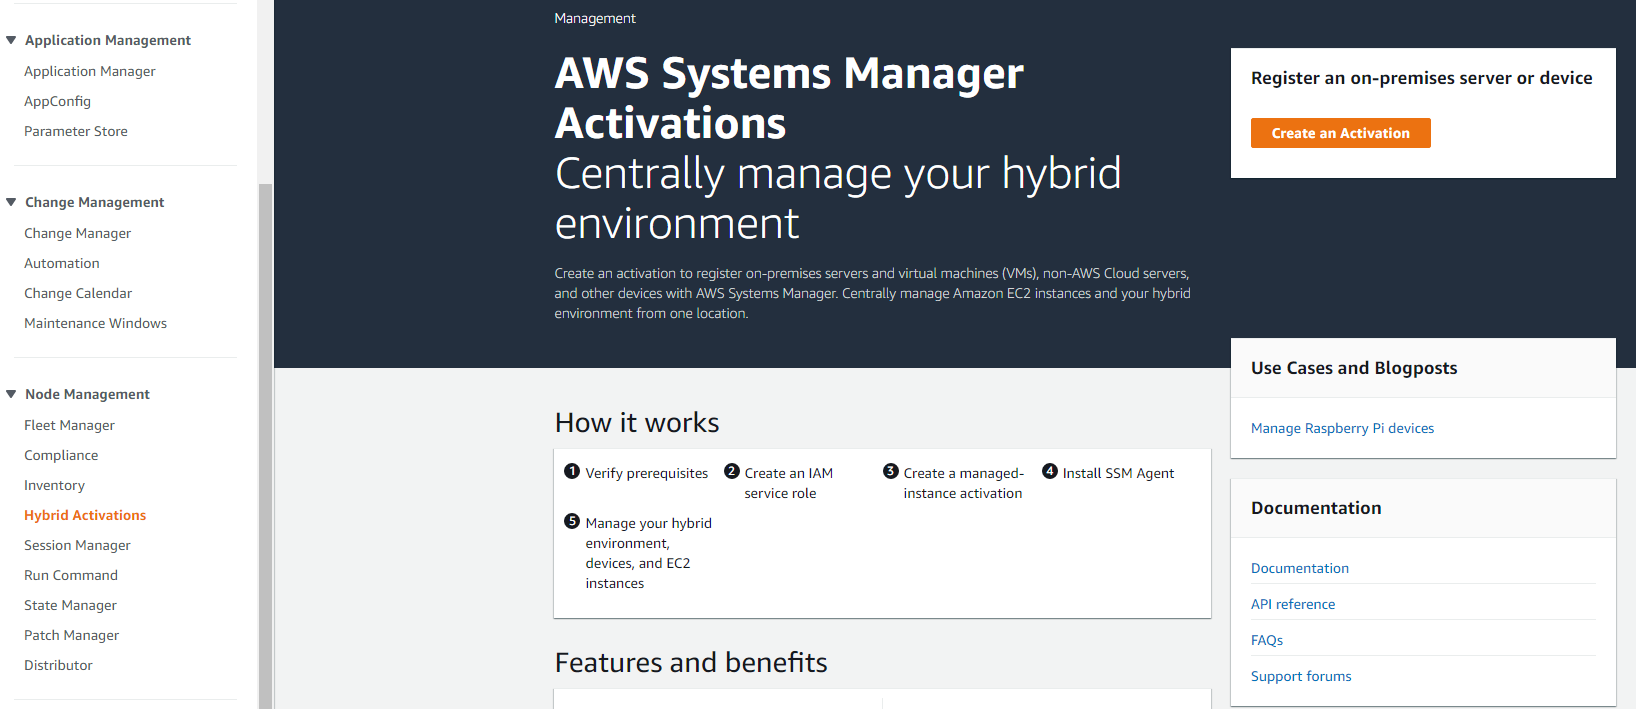
Go to AWS console and search for Systems Manager. Select and open it then on the left hand side under Node Management --> select Hybrid Activations --> click button Create an Activation.
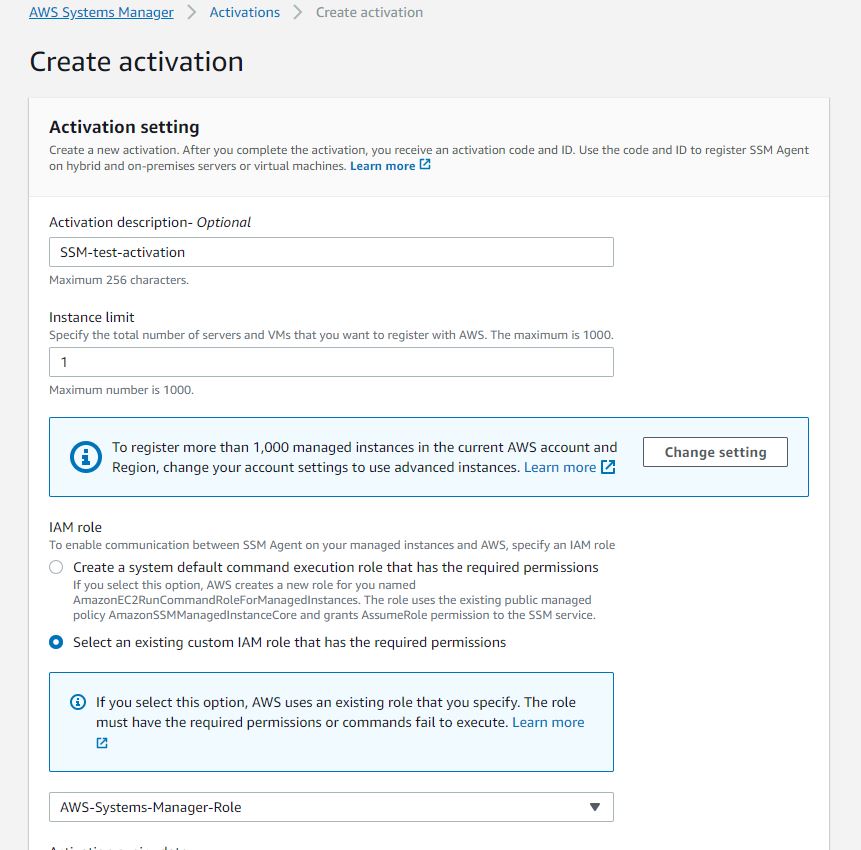
Activation description- Optional - SSM-test-activation
Instance limit - 1
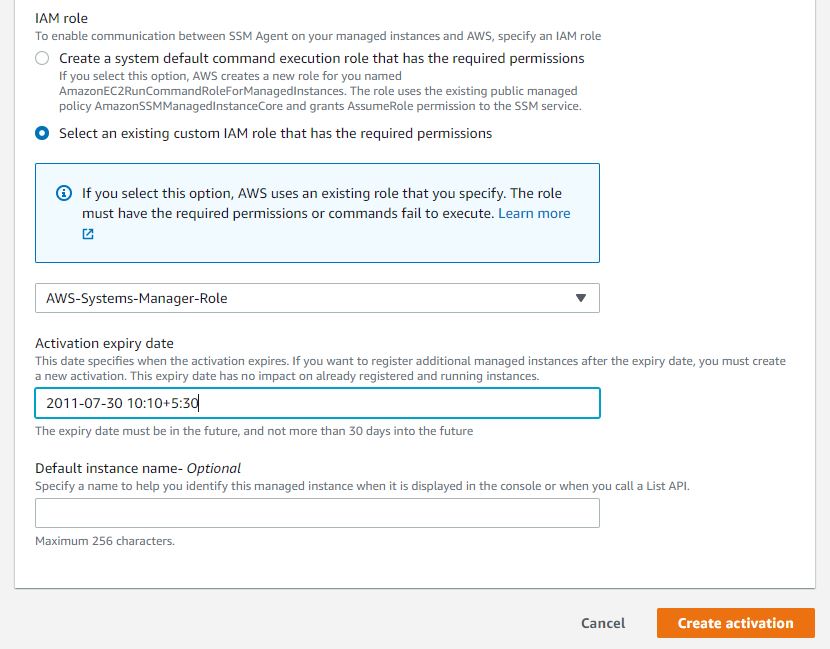
IAM role - Select AWS-Systems-Manager-Role
Activation expiry date - I gave it 2022-07-30 10:10+5:30
Default instance name- Optional - Windows-2019-SSM
Click Create activation
Be careful here since both Activation Code and Activation ID will not be available once you move away from this page. Ensure both the codes are copied completely and verify.

Now since we are armed with the codes lets move to a different territory, our on-Prem server.
Login to on-Prem server with Administrator level access.
This is the script which is required to be run on on-Prem server. Analyse each line for its function.
$code = "PASTE-ACTIVATION-CODE"
$id = "PASTE-ACTIVATION-CODE"
$region = "REGION"
$dir = $env:TEMP + "\ssm"
New-Item -ItemType directory -Path $dir -Force
cd $dir
(New-Object System.Net.WebClient).DownloadFile("https://amazon-ssm-$region.s3.$region.amazonaws.com/latest/windows_amd64/AmazonSSMAgentSetup.exe", $dir + "\AmazonSSMAgentSetup.exe")
Start-Process .\AmazonSSMAgentSetup.exe -ArgumentList @("/q", "/log", "install.log", "CODE=$code", "ID=$id", "REGION=$region") -Wait
Get-Content ($env:ProgramData + "\Amazon\SSM\InstanceData\registration")
Get-Service -Name "AmazonSSMAgent"
Open PowerShell_ise on on-Prem server, paste the script with all required values replaced and run it. It should show output as following.
PS C:\> $code = "ACTIVATION-CODE"
$id = "ACTIVATION-ID"
$region = "us-east-1"
$dir = $env:TEMP + "\ssm"
New-Item -ItemType directory -Path $dir -Force
cd $dir
(New-Object System.Net.WebClient).DownloadFile("https://amazon-ssm-$region.s3.$region.amazonaws.com/latest/windows_amd64/AmazonSSMAgentSetup.exe", $dir + "\AmazonSSMAgentSetup.exe")
Start-Process .\AmazonSSMAgentSetup.exe -ArgumentList @("/q", "/log", "install.log", "CODE=$code", "ID=$id", "REGION=$region") -Wait
Get-Content ($env:ProgramData + "\Amazon\SSM\InstanceData\registration")
Get-Service -Name "AmazonSSMAgent"


    Directory: C:\Users\<username>\AppData\Local\Temp


Mode                LastWriteTime         Length Name
----                -------------         ------ ----
d-----        /15/2022  10:07 AM                ssm
{"ManagedInstanceID":"mi-0a677d17a2e595e06","Region":"us-east-1"}

Status      : Running
Name        : AmazonSSMAgent
DisplayName : Amazon SSM Agent
Once Amazon SSM Agent is installed on local server it makes a contact to AWS Systems Manager endpoint on port 443 which then identifies the request based on the Activation ID and Activation code and activates the connection with a ManagedInstanceID. For AWS Systems Manager this ID is the server identifier.
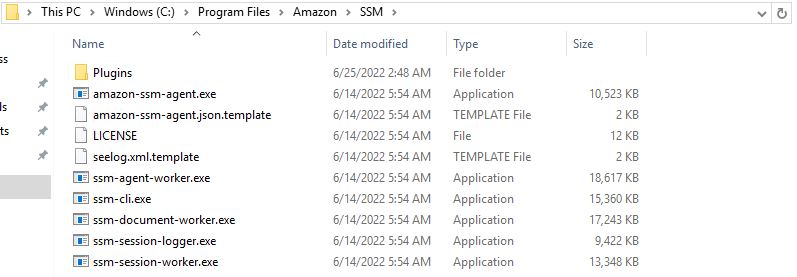
It has created following folders. You might not have access to first one. But with Admin account access can be obtained.
C:\Program Files\Amazon\SSM
C:\ProgramData\Amazon\SSM
If there is an error check the log file from here.
C:\ProgramData\Amazon\SSM\Logs
Go to services and check that following service is created and must be running.
Display Name : Amazon SSM Agent
Service Name : AmazonSSMAgent
Running from path : "C:\Program Files\Amazon\SSM\amazon-ssm-agent.exe"

This service runs under the LOCAL SYSTEM ACCOUNT in the OS which means highest privileges!! So when AWS Systems Manager gives a command to managed instance (on-Prem) the AWS-Systems-Manager-Role contacts Amazon SSM Agent running locally on server which in turn use Local System Account to execute it. So imagine what can be done and how it can be controlled.
NOTE: Whenever any changes are made locally on server related to AWS Systems Manager restart this service so that changes are recorded by Amazon SSM Agent.
Install AWS CLI V2 on-Prem Windows server.
If you run aws s3 ls from on-Prem server. you will get error.
PS C:\Users\Administrator> aws s3 ls

Unable to locate credentials. You can configure credentials by running "aws configure".
But why?? all permissions and role is set up! lets check the identity which is providing permissions to our AWS shell session.
{
    "UserId": "AROAWB7BAEB5ECI5G2KGV:mi-0a677d17a2e595e06",
    "Account": "123456789101",
    "Arn": "arn:aws:sts::123456789101:assumed-role/AWS-Systems-Manager-Role/mi-0a677d17a2e595e06"
}
Well the role is ok and mi id of instance is same as was in activation output. Still??
That is because it can't detect any defaul AWS credentails which we have not set yet post activation. Each api call to AWS Systems Manager is signed by these credentials. When AWS Systems Manager activation is successful it saves aws credentials at following location in a credentials file on on-Prem server.
C:\Windows\System32\config\systemprofile\.aws\credentials
We will create an environment variable referencing this file, basically reading credentials from it.
setx AWS_SHARED_CREDENTIALS_FILE Complete\PATH\to\file /M
C:\> setx AWS_SHARED_CREDENTIALS_FILE
C:\Windows\System32\config\systemprofile\.aws\credentails /M

SUCCESS: Specified value was saved.
Setx /M sets the credentials at environment level not user level.
However before moving on verify here that the credentails are set
C:\>echo %AWS_SHARED_CREDENTIALS_FILE%

C:\Windows\System32\config\systemprofile\.aws\credentials
Well file reference is ok now check the actual credentials.
more %AWS_SHARED_CREDENTIALS_FILE%
C:\>more %AWS_SHARED_CREDENTIALS_FILE%
[default]
aws_access_key_id     = ASIAAFRICAB5EOAFRICA
aws_secret_access_key = ZiMBaBWeEC2J21OXinstAncEKyAELbKafKApche8
aws_session_token     = A_BIG_token_should_show_up_here
NOTE: Remember whenever a session token is included with aws credentials that means these credentials are valid for a time. The session token denotes an expiry after a particular time period.
Now check the s3 buckets. It should work. Second bucket is what we have created earlier.
C:\> aws s3 ls
C:\>aws s3 ls
2022-01-17 02:55:10 cloudwatch-logs-2022-001
2022-01-17 20:41:56 ssm-demo-bucket-01
Lets try to upload something to this bucket.
C:\>aws s3 cp Temp\s3-upload-test-doc.txt s3://ssm-demo-bucket-01
upload: Temp\s3-upload-test-doc.txt to s3://ssm-demo-bucket-01/s3-upload-test-doc.txt
Well credentials are set and we have checked these are working.
There is one thing to note here.
If you get following error that means AWS SSM Agent service can't contact AWS Systems Manager and hence credentials are not refreshed. (Remember session token.)
C:\>aws s3 ls

An error occurred (ExpiredToken) when calling the ListBuckets operation: The provided token has expired.
What is with the credential refresh in AWS Systems Manager?
The credentials file updated every 30 mins in with new credentials by Amazon SSM agent.
In case you want to change the default value you can set the config in following location.
C:\Program Files\Amazon\SSM
Here, make a copy of file amazon-ssm-agent.json.template but save it as amazon-ssm-agent.json and open it in notepad.
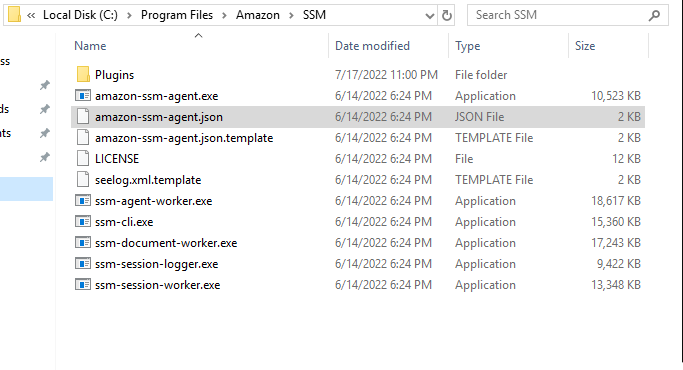
Look for Profile change the property KeyAutoRotateDays to required value in place of 0. This is an interesting file worth analysing.
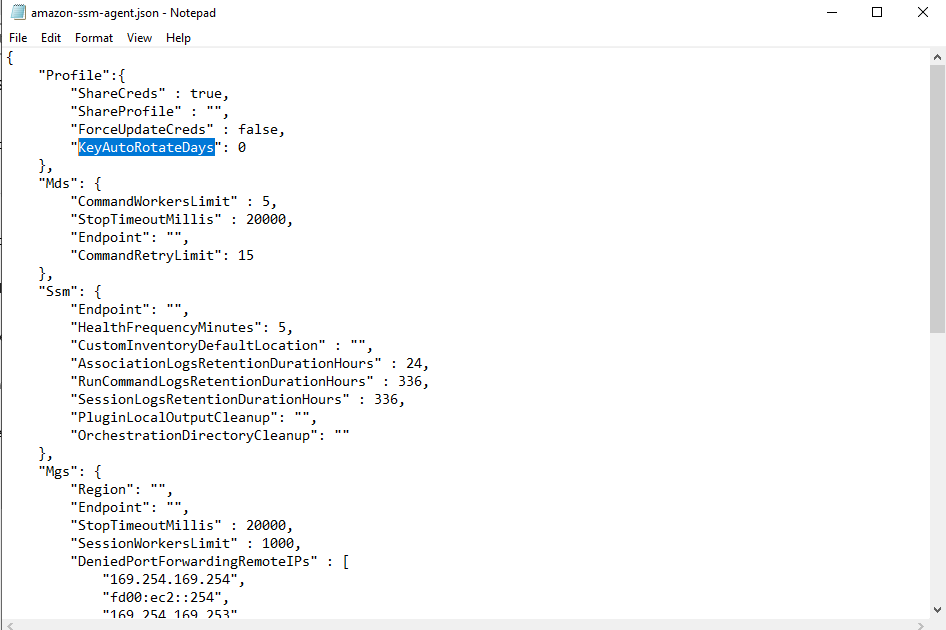
Save the file and restart AWS SSM agent service to record the changes and communicate it to AWS Systems Manager.
Verification
Let's verify. Go to AWS console and to Systems Manager--> On the left hand side Node Management-->Fleet Manager.
Server is showing in the fleet manager.
on-Prem server has instace id starting from mi - Managed Instance.
AWS instaces have id starting from i - Instance.
Just in case you do not want this on-Prem server to be managed via AWS Systems Manager just de-register it.
C:\> aws ssm deregister-managed-instance --instance-id "mi-0a677d17a2e595e06"
And to Re-register.
'yes' | & 'C:\Program Files\Amazon\SSM\amazon-ssm-agent.exe' -register -code activation-code -id activation-id -region region; Restart-Service AmazonSSMAgent
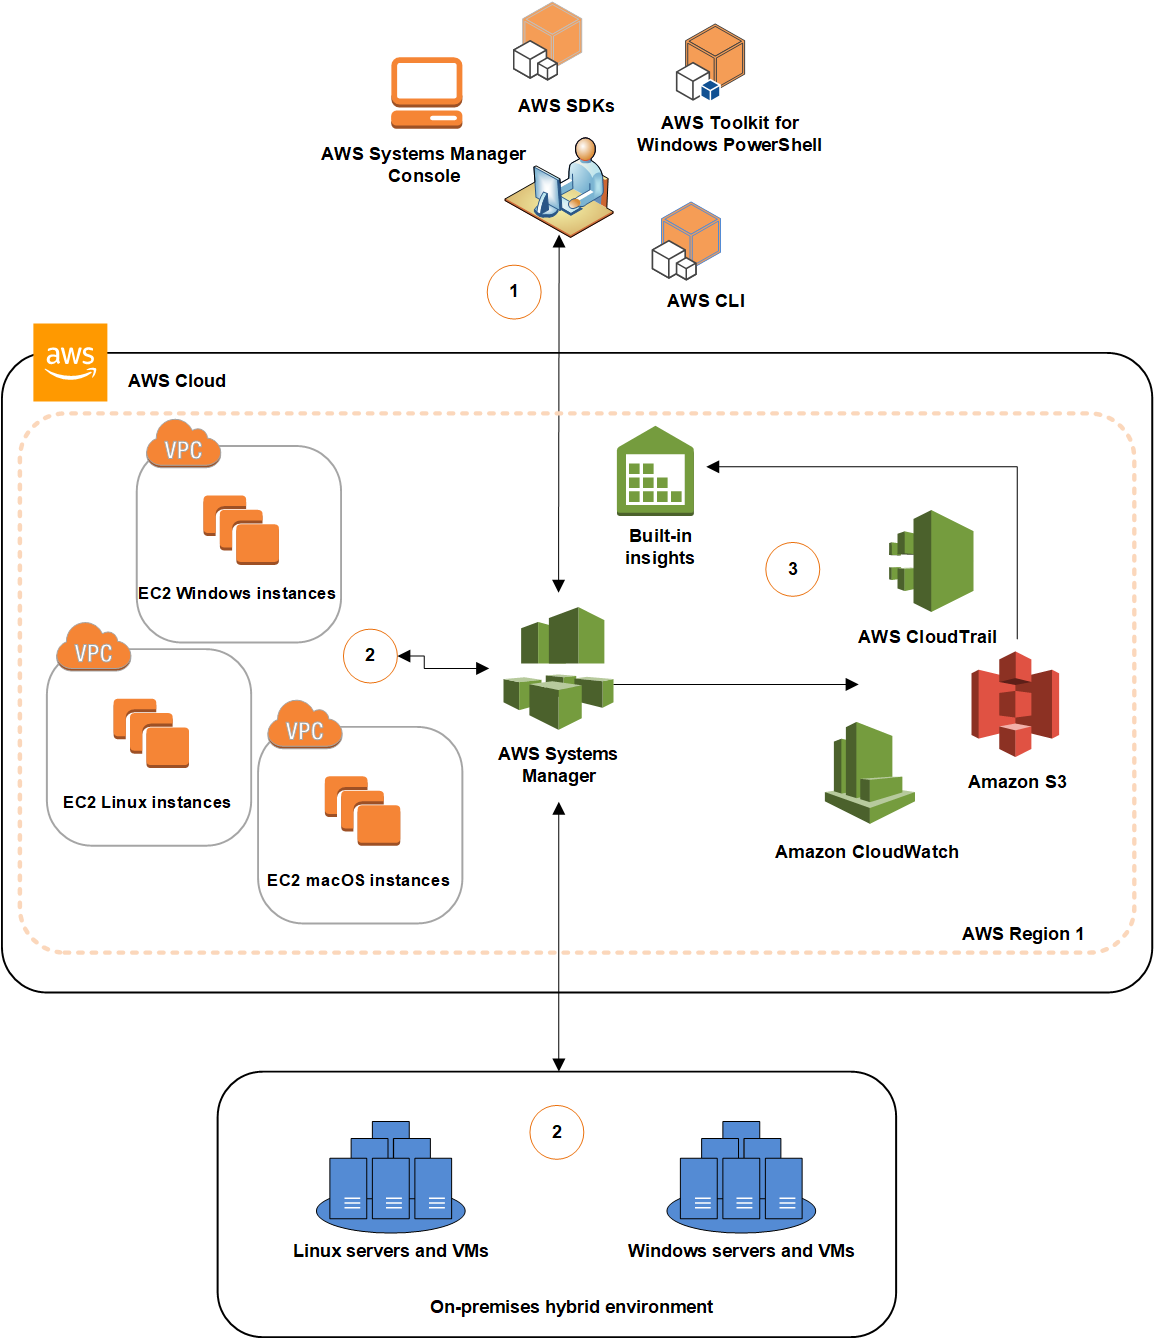
This was just about on boarding the on-Prem Windows server to AWS Systems Manager, post that there is plethora of operations that we can do. Both on-Prem and AWS Instances can be mass managed from AWS Systems Manager.
That's it.
Conclusion
Hope this knowledge i've shared helps and be of value.
Feedback, Suggestion and criticism is welcome. Keep sharing, Thank you.
Subscribe to my newsletter
Read articles from Dilaawez Khan directly inside your inbox. Subscribe to the newsletter, and don't miss out.
Written by

Dilaawez Khan
Dilaawez Khan
Cloud | IaC | Version | SysAdmin
