Card Slider Component : How to Build an Card Slider With React Hooks
 chanchal panpaliya
Table of contents

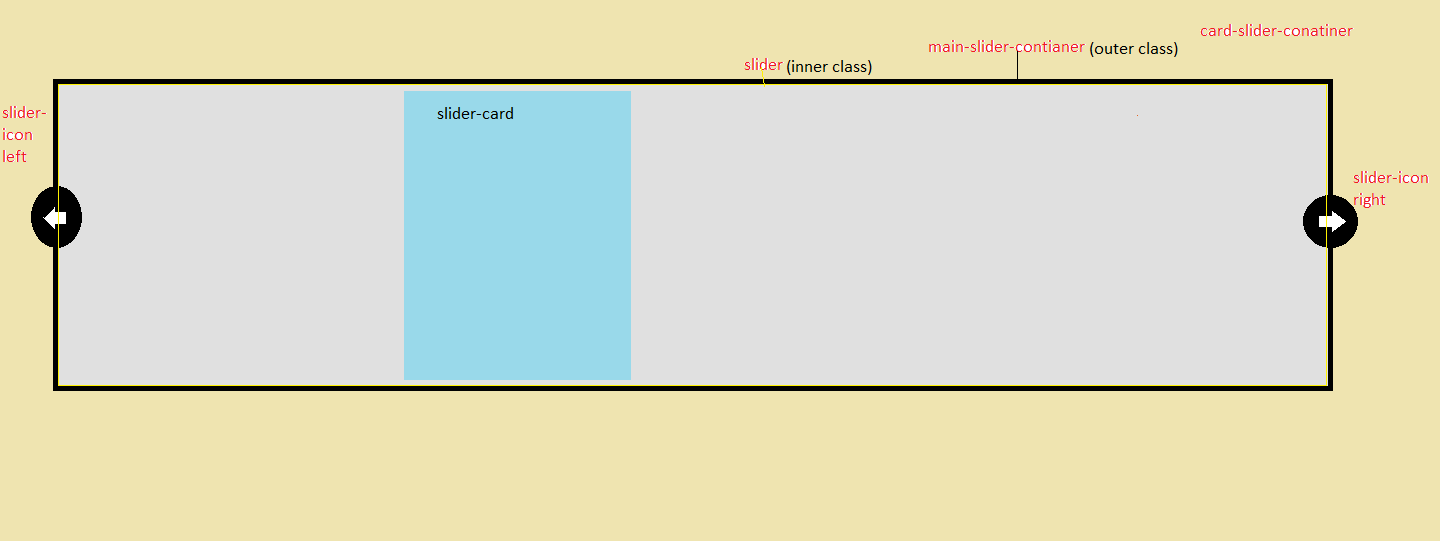
In this application , so as you can see it's a basic list of card components and to do this we just be passing along as array to our slider component with the list of objects that consists of images and description and heading.
Step 1] - To start, make a new project
npx create-react-app react-slider
After the project is finished, change into the directory cd react-slider
start the project npm start
You will get a local running server http://localhost:3000/
Step 2] - src/App.js
Next, remove the unwanted code and link and create "Card_Slider" component
import React from 'react';
import './App.css';

const Card_Slider =()=>{
    return(
      <section className="card-slider-conatiner">
        .....
        .....
        .....
      </section>
    )
}

function App() {
  return (
    <div>
        <Card_Slider/>
    </div>
  )
}
export default App;
add CSS for to display slider in center of the screen using flex
.card-slider-conatiner{
    width:100%;
    height:100%;
    display:flex;
    justify-content : center;
    align-item : center;
    position:absolute;
}
Step 3] - First, we create the UI for the Card_Slider Component.

Inside the ".main-slider-container" class, create two buttons for left and right direction and one div for the main slider code. For the icon, we are using a font-awsome icon.
import './App.css'
const Card_Slider =()=>{
    return(
      <section className="card-slider-conatiner">
         <div className="main-slider-contianer">
             <button className="slider-icon left"> left</button>
             <div className="slider">
             {
                 [1,2,3,4,5,6,7,8,9,10].map((item,index)=>{
                      return(
                        <div className="slider-card">

                        </div>
                      )
                 })
             }
             </div>
             <button className="slider-icon right"> right </button>
         </div>
      </section>
    )
}
Add CSS to all of the above classes.
.main-slider-contianer{
    width:90%;
    height:305px;
    position:relative;
    display:flex;
    align-item:center;
}
.slider{
    width:100%;
    height:100%;
}
//both icon display above ".main-slider-contianer"
.slider-icon.left , .slider-icon.right{
    background:white;
    border-radius:100%;
    position:absolute;
    opacity:0.2;
    box-shadow: 5px 5px 1.25rem 0px rgb(0 0 0 / 12%);
    curser:pointer;
}
.slider-icon.left{
    left:0;
}
.slider-icon.right{
    right:0;
}
.slider-icon.left:hover , .slider-icon.right:hover{
    opacity:1;
}
Adjust the card to fit the slider container and add a scrolling effect to the slider.
.slider-card{
    display:inline-block;
    width:320px;
    height:300px;
    background:white;
    border-radius:10px;
    margin-left:5px;
    margin-right:5px;
    box-shadow: 5px 5px 1.25rem 0px rgb(0 0 0 / 12%);
    position: relative;
}
// add nowrap for to display card in horizontally
.slider{
    width:100%;
    height:100%;
    white-space:nowrap;
}
// problem is that , slider component overflow outside to fixed that we'll just add overflow
.slider{
    width:100%;
    height:100%;
    white-space:nowrap;
    overflow-x:scroll;
}
// set overflowx scroll effect
.slider::-webkit-scrollbar{
    display:none;
}
.slider{
    width:100%;
    height:100%;
    // safari scrollbar width removed
    scrollbar-width:none;
}
Step 4] - Add left and right onclick functionality
import './App.css'
import { useEffect, useRef, useState } from 'react';

const Card_Slider =()=>{
    let [scrollcard,setscrollcard]=useState(0);
    const containerRef = useRef();

    const handlescrollLeft=()=>{
         containerRef.current.scrollLeft -= 500;
    }

    const handlescrollRight=()=>{
        containerRef.current.scrollLeft += 500;
    }

    return(
      <section className="card-slider-conatiner">
         <div className="main-slider-contianer">
             <button className="slider-icon left" onclick={(e)=>handlescrollLeft(e)}> left</button>
             <div className="slider" style={{scrollLeft:scrollcard}} ref={containerRef}>
             {
                 [1,2,3,4,5,6,7,8,9,10].map((item,index)=>{
                      return(
                        <div className="slider-card">

                        </div>
                      )
                 })
             }
             </div>
             <button className="slider-icon right" onclick={(e)=>handlescrollRight(e)}> right </button>
         </div>
      </section>
    )
}
Here, we are using the ref ,
Refs are commonly assigned to an instance property when a component is constructed so they can be referenced throughout the component. When a ref is passed to an element in render, a reference to the node becomes accessible at the current attribute of the ref.
When a user clicks the left slider button, it should slide in the left direction and When a user clicks on the right slider button, it should slide in the right direction. we're basically doing here is adding 500 pixels, if Scrolling 500 pixels to the left and then filling the right side just minus 500 pixels.
So now if I click on the left here, it is moving but it's not really smooth, and then if I click on the right side, it's also moving but also not smooth.
update slider CSS class
.slider{
    width:100%;
    height:100%;
    white-space:nowrap;
    overflow-x:scroll;
    // safari scrollbar width removed
    scrollbar-width:none;
    //scroll-smooth
    scroll-behavior : smooth;
}
Step 5 ] - We are now adding content(image ,title , description) to the card
<div className="slider" style={{scrollLeft:scrollcard}} ref={containerRef}>
             {
                 [1,2,3,4,5,6,7,8,9,10].map((item,index)=>{
                      return(
                        <div className="slider-card">
                            <div className="slider-card-image"  style={{backgroundImage:`https://picsum.photos/200/30${index}`}}> </div>
                            <p className="slider-card-title"> card title </p>
                            <p className="slider-card-description"> card description </p>
                        </div>
                      )
                 })
             }
             </div>
Add CSS for slider-card content.
.slider-card-image{
    width:100%;
    height:210px;
    background:grey;
    border-top-left-radius:10px;
    border-top-right-radius:10px;
    object-fit: cover;
    background-size: contain;
    background-repeat: no-repeat;
    background-position: center;
}

.slider-card-title{
      font-weight: 500;
      white-space: pre-wrap;
      font-size: 0.625rem;
      padding: 0.5rem;
      margin: 0px 0px 0.313rem 0.625rem;
}

.slider-card-description{
        opacity: 0.5;
        font-size: 0.625rem;
        margin: 0px 0px 0.313rem 0.625rem;
}
Now your card slider component is ready to use on your website.

Subscribe to my newsletter
Read articles from chanchal panpaliya directly inside your inbox. Subscribe to the newsletter, and don't miss out.
Written by
