COVID-19 Detector Flask App based on Chest X-rays and CT Scans using Deep Learning
 Robin kumar
OVID-19, or more commonly known as the Novel Coronavirus disease is a highly infectious disease that appeared in China towards the end of 2019. This disease is caused by SARS-CoV-2, a virus that belongs to the large family of coronaviruses. The disease first originated in Wuhan, China in December 2019 and soon became a global pandemic, spreading to more than 213 countries.
The most common symptoms of COVID-19 are fever, dry cough, and tiredness. Other symptoms that people may experience include aches, pains, or difficulty in breathing. Most of these symptoms show signs of respiratory infections and lung abnormalities which can be detected by radiologists.
Thus, it is possible to use Machine Learning algorithms to detect the disease from images of Chest X-rays and CT scans. Automated applications can be created to help support radiologists. This article is an attempt to use four Deep Learning algorithms, namely: VGG16, ResNet50, InceptionV3 and Xception.
The entire code for training and testing the models as well as running the Flask app is available on my Github repository.
The Dataset
The dataset for the project was gathered from two open source Github repositories:
Chest X-ray images (1000 images) were obtained from:
CT Scan images (750 images) were obtained from:
Four algorithms:
VGG16, ResNet50, InceptionV3 and Xception were trained separately on Chest X-rays and CT Scans, giving us a total of 8 deep learning models. 80% of the images were used for training the models and the remaining 20% for testing the accuracy of the models.
Building the Model:
I first added 3 custom layers to the pretrained models so that they can be trained on our dataset. The code for adding custom layers, for example, to the ResNet50 model is shown below. The code for the rest of the models remains the same. One just needs to change ResNet50 in the first line to the name of the desired model.
             res = ResNet50(weights="imagenet", include_top=False, input_tensor=Input(shape=(224, 224,
                          3)))
             outputs = res.output
             outputs = Flatten(name="flatten")(outputs)
             outputs = Dropout(0.5)(outputs)
             outputs = Dense(2, activation="softmax")(outputs)
             model = Model(inputs=res.input, outputs=outputs)
             for layer in res.layers:
                                layer.trainable = False
             model.compile(loss='categorical_crossentropy', optimizer='adam', metrics=['accuracy'])
The images in the dataset were of different sizes. Thus, I needed to resize them to a fixed size before they can be fed to the deep learning models for training. I resized the images to a size of 224 x 224 px which is considered to be the ideal size for the ResNet50 model. Therefore, I added the input tensor of shape (224, 224 , 3) to the pretrained ResNet 50 model, 3 being the number of channels.
Next, I added a Flatten layer to flatten all our features and a Dropout layer to overcome overfitting. Finally, I added the Dense output layer using softmax function as the activation function. Since the first half of the model is already pretrained, the trainable attribute of the previous layers was set to False. Finally, I compiled the model with the adam optimizer and using categorical cross entropy as the loss function.
Training the Model
I first defined an Image Data Generator to train the models at modified versions of the images, such as at different angles, flips, rotations or shifts.
         train_aug = ImageDataGenerator(rotation_range=20, width_shift_range=0.2,
         height_shift_range=0.2, horizontal_flip=True)
Next, training of the model was performed, with all the required parameters specified as follows:
             history = model.fit(train_aug.flow(X_train, y_train, batch_size=32),
             validation_data=  (X_test,y_test),validation_steps=len(X_test) / 32, steps_per_epoch=len(X_train) /
              32, epochs=500)
As you can see, I have trained the model for 500 epochs with a batch size of 32 images.
Making Predictions
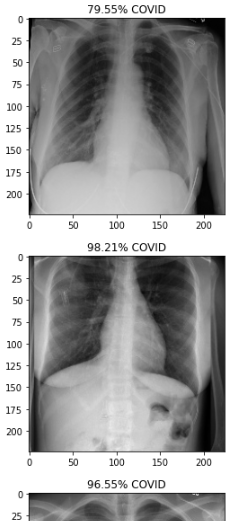
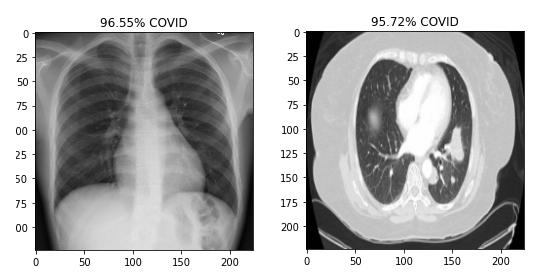
Predictions were generated by running the trained models on images of the test set. The predictions for the first 10 images of the dataset were plotted as shown below:
              y_pred = model.predict(X_test, batch_size=batch_size)
              prediction=y_pred[0:10]
              for index, probability in enumerate(prediction):
              if probability[1] > 0.5:
              plt.title('%.2f' % (probability[1]*100) + '% COVID')
              else:
                      plt.title('%.2f' % ((1-probability[1])*100) + '% NonCOVID')
                      plt.imshow(X_test[index])
                      plt.show()
The following snippet shows the plots of first 10 predictions of Chest X-rays:
 Evaluation & Results of Machine Learning
Following are a few important results and plots that help estimate the accuracy of the models and get insights their performance.
Classification Report:
- Classification Reports of VGG16 model for Chest X-rays and CT scans

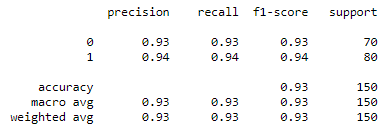 Fig : Classification Reports of VGG16 model for Chest X-rays (Left) and CT scans (Right)
- Classification Reports of ResNet50 model for Chest X-rays and CT scans:
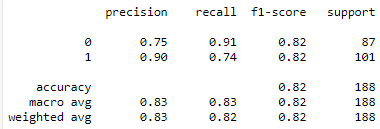

Fig :Classification Reports of ResNet50 model for Chest X-rays (Left) and CT scans (Right)
- Classification Reports of InceptionV3 model for Chest X-rays and CT scans
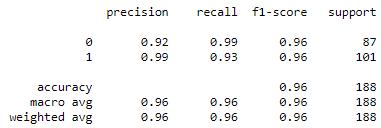
 Classification Reports of InceptionV3 model for Chest X-rays (Left) and CT scans (Right)
Confusion Matrix:
- Confusion Matrix of VGG16 model for Chest X-rays and CT scans
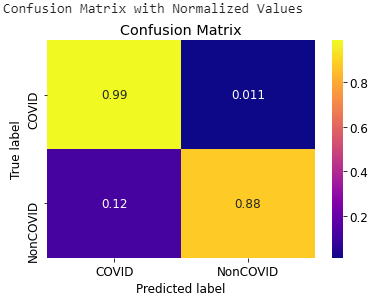
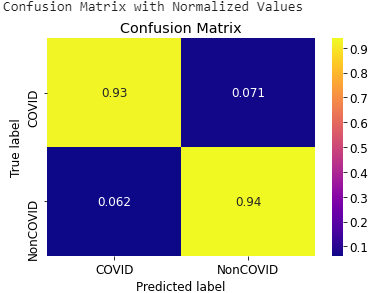 Fig: Confusion Matrix of VGG16 model for Chest X-rays (Left) and CT scans (Right)
Building the Flask App
Now, I used the code created by me so far to build a Flask app by pasting particular segments of my code in certain flask functions. For example, the code for using the four models to generate predictions of Chest X-rays looks like:
               def uploaded_chest():
               resnet_chest = load_model('models/resnet_chest.h5')
               vgg_chest = load_model('models/vgg_chest.h5')
               inception_chest = load_model('models/inceptionv3_chest.h5')
               xception_chest = load_model('models/xception_chest.h5')
               image = cv2.imread('./flask app/assets/images/upload_chest.jpg')
               # read file
               image = cv2.cvtColor(image, cv2.COLOR_BGR2RGB)
               # arrange format as per keras
               image = cv2.resize(image,(224,224))
               image = np.array(image) / 255
               image = np.expand_dims(image, axis=0)

               resnet_pred = resnet_chest.predict(image)
               probability = resnet_pred[0]
               print("Resnet Predictions:")
              if probability[0] > 0.5:
              resnet_chest_pred = str('%.2f' % (probability[0]*100) + '% COVID')
             else:
                 resnet_chest_pred = str('%.2f' % ((1-probability[0])*100) + '% NonCOVID')
            print(resnet_chest_pred)
            vgg_pred = vgg_chest.predict(image)
           probability = vgg_pred[0]
           print("VGG Predictions:")
           if probability[0] > 0.5:
           vgg_chest_pred = str('%.2f' % (probability[0]*100) + '% COVID')
           else:
                 vgg_chest_pred = str('%.2f' % ((1-probability[0])*100) + '% NonCOVID')
           print(vgg_chest_pred)
           inception_pred = inception_chest.predict(image)
           probability = inception_pred[0]
           print("Inception Predictions:")
           if probability[0] > 0.5:
           inception_chest_pred = str('%.2f' % (probability[0]*100) + '% COVID')
           else:
                 inception_chest_pred = str('%.2f' % ((1-probability[0])*100) + '% NonCOVID')
           print(inception_chest_pred)
           xception_pred = xception_chest.predict(image)
           probability = xception_pred[0]
           print("Xception Predictions:")
           if probability[0] > 0.5:
                  xception_chest_pred = str('%.2f' % (probability[0]*100) + '% COVID')
           else:
                xception_chest_pred = str('%.2f' % ((1-probability[0])*100) + '% NonCOVID')
           print(xception_chest_pred)
            return
            render_template('results_chest.html',resnet_chest_pred=resnet_chest_pred,
            vgg_chest_pred=vgg_chest_pred,inception_chest_pred=inception_chest_pred,
            xception_chest_pred=xception_chest_pred)
Screenshots of Flask App:

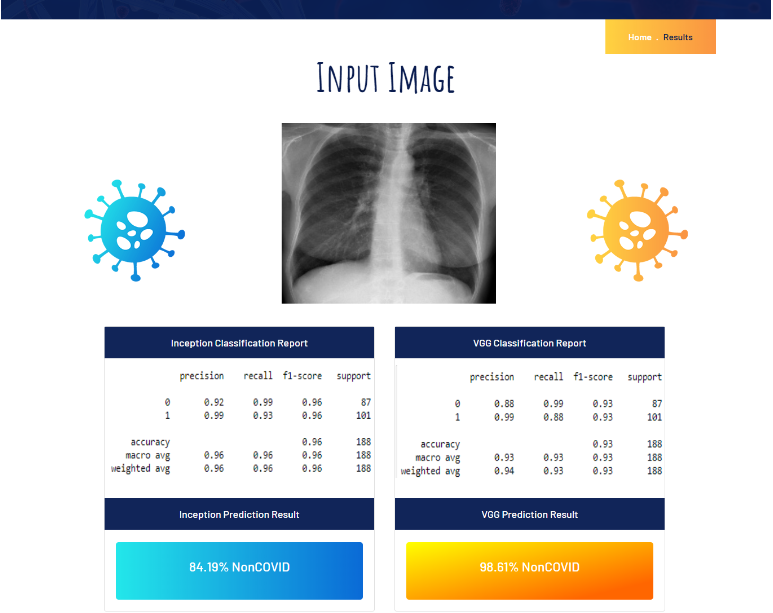
Source Code The source code for the entire project along with the datasets, models and flask app are available on my Github repo.
Conclusion In conclusion, I would like to throw light on the fact that the analysis has been done on a limited dataset and that the results are preliminary. Medical validations have not been done on the approach and hence the results might differ from those observed in practical use cases.
In future, I plan to improve the performance of the models by training them on more images and possibly including other factors like age, nationality, gender, etc. Furthermore, I encourage the readers of this article to experiment with the code on their own to increase the precision of the model.
Feel free to share this article with others if you found it useful. Thank you so much for reading. Stay safe!
Subscribe to my newsletter
Read articles from Robin kumar directly inside your inbox. Subscribe to the newsletter, and don't miss out.
Written by

Robin kumar
Robin kumar
I am a Post grad in Bioinformatics . My field of interest and expertise lies mainly in Data Analytics, Machine Learning & Bioinformatics.