Adding a Ribbon button for AutoCAD API
 Anwesh Gangula
If you have a AutoCAD plugin and you want to run the plugin using a button in the ribbon, you can follow the steps below:
Introduction
AutoCAD is a command based application. This means that most of the actions that you do in AutoCAD are essentially commands in the command line - including the buttons that you see by default in the AutoCAD ribbon.
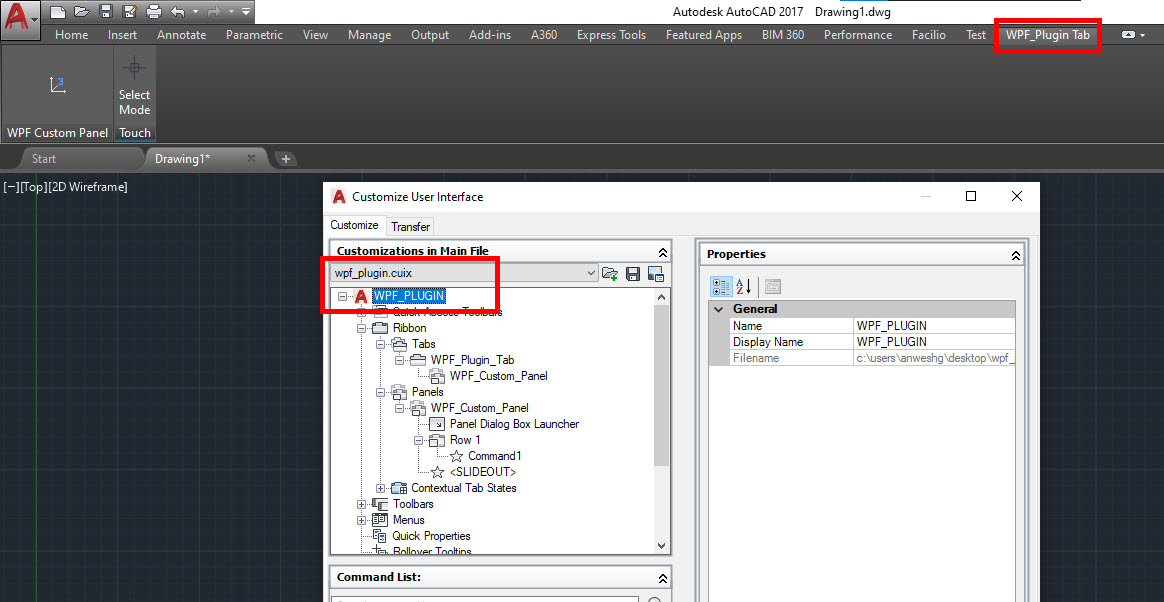
And AutoCAD has also provided us with the ability to customize the Ribbon and add your own buttons or layout using the Customize User Interface (CUI) Editor and save it as a Partial Customization (CUIx) file. A common use-case for CUI is to create a separate tab in the ribbon with your frequently used commands.
So with this feature available, we can create a separate tab in the Ribbon with various buttons calling various commands from the plugin that we are creating and distribute the .cuix along with the .dll to the users who are installing the plugin.
Creating a Partial Customization (CUIx) File
You can follow this video which explains how to customize AutoCAD Ribbon in detail.
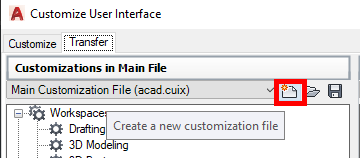
To create a Partial Customization (CUIx) File, you need to first run the command cui which will open up the CUI window. Then go to "transfer" tab which will allow you to create a blank cuix file.

Click the save button to save the customization you're about to create in a file (eg: wpf_plugin.cuix). Then close the CUI window and type CUILOAD command and browse the wpf_plugin.cuix that you just created to load it into the current AutoCAD session.
Add custom tab & panel to the ribbon
Once the customization file is loaded, you can view/edit the cuix file from the "Customize" tab. To view the cuix, click on the drop-down "All Customization Files" and then choose wpf_plugin.cuix.
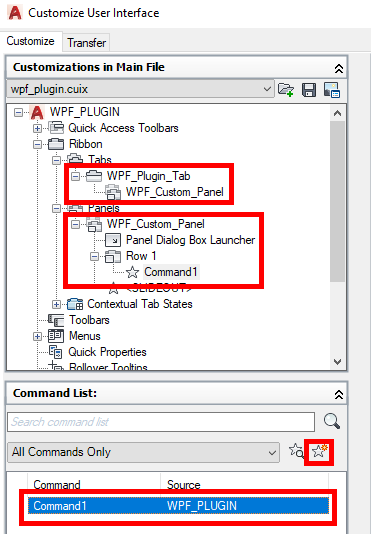
To add custom button/panels/tab in the ribbon, you need to expand the "Ribbon" section in the CUI window and then
- right-click on "Tabs" and choose "New Tab" and then name your tab as you need (eg: WPF_Plugin_Tab).
- right-click on the "Panels" section and choose "New Panel" to create a custom panel (eg: wpf_custom_panel)
then click & drag the "wpf_custom_panel" on top of the "WPF_Plugin_Tab" that you created. Then "Apply" the changes and close the CUI window to see the custom tab that you just created.
Add button to the ribbon
Now Open the CUI window again and switch to the custom CUI File (wpf_plugin.cuix). You'll see "Command List" at the bottom left section of the CUI window- which could be empty. We need to create custom commands that need to be added as buttons in the above created panel.
To do that, click on the "Create a new command" button, which will add a new item in the "Command List". You can rename the command as per your requirement and then change the "Macro" of the command to your desired command (eg: ^C^COpenWPFWindow) - where ^C^C at the beginning is to trigger the escape button and the OpenWPFWindow is the actual command.
Once the button is created, click & drag the button on top of the Row 1 under wpf_custom_panel created above. This will add the button in the custom tab in the UI.

Save the cuix file
You can now click the save button to save the CUIX file.
If you'd like to save it as a new file, you need to go to the "transfer" tab and choose wpf_plugin.cuix from the "Main Customization file (acad.cuix)" drop-down. And the click the same drop-down again to choose "Save As" to save it as a new file.
This file can then be distributed to anyone and they will be able to load it using CUILOAD or from the CUI window as required.
Sample Code
I've published an example repository on GitHub which you can clone and test this functionality
Subscribe to my newsletter
Read articles from Anwesh Gangula directly inside your inbox. Subscribe to the newsletter, and don't miss out.
Written by
