Application Configuration Management with AWS AppConfig in .NET
 Raul Naupari

Usually, when we develop an application, it is necessary to have configuration data to work properly. This data can come from multiple sources:
- Files: The solution is simple to implement. But to change or apply a new configuration change a deployment is needed.
- Environment variables: The configuration is decoupled from the source code. But any change requires a restart of the application.
- External service: Applications can dynamically receive configuration changes without the need to restart. But we are increasing the complexity of the application due to the introduction of an additional component.
This external service is also known as Configuration Management System. In the AWS ecosystem, we have the AppConfig. There are three main concepts in AppConfig:
- Application: It is an organizational construct like a folder.
- Environment: For each application, you define one or more environments. An environment is a logical place where we deploy our configuration data.
- Configuration profile: It is our configuration data. We could have more than one by application.
In today's post, we will see how to integrate AppConfig with a .NET application (at the configuration manager level). But first let's create the resource on AWS:
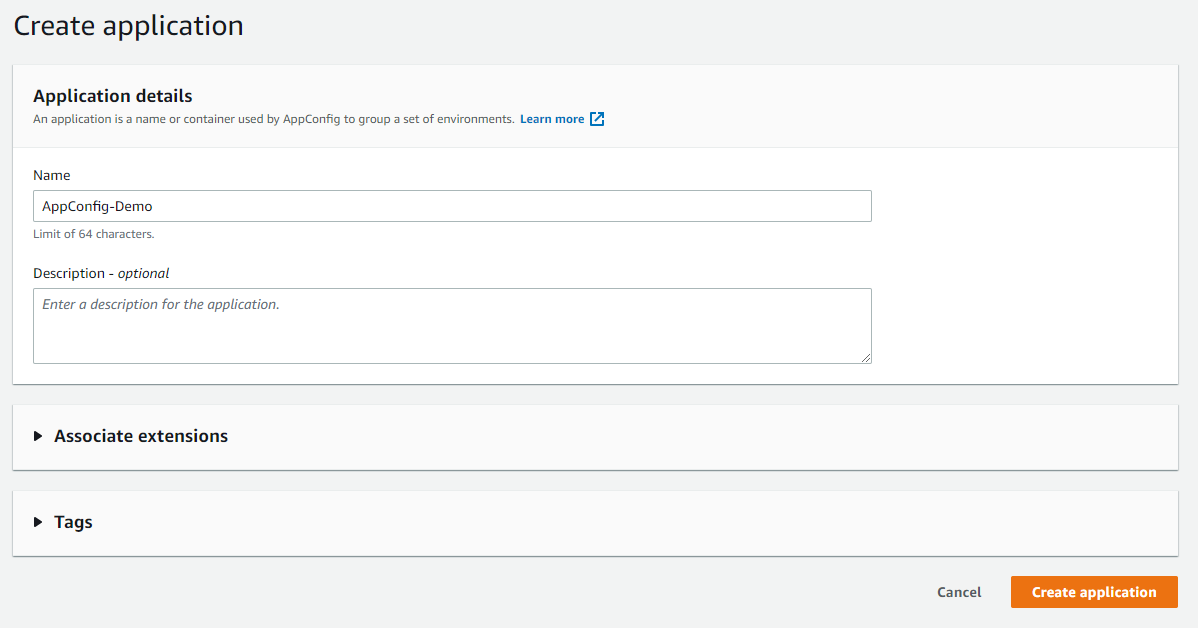
Create the application:
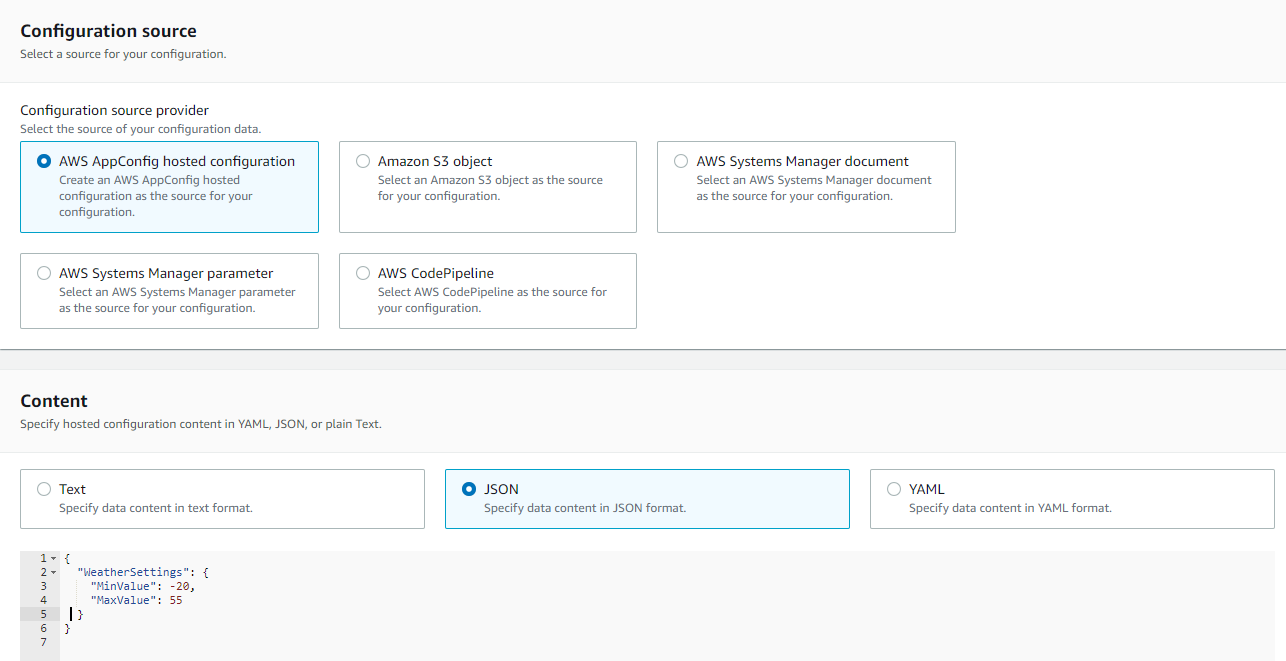
Create the profile (freefrom configuration option):
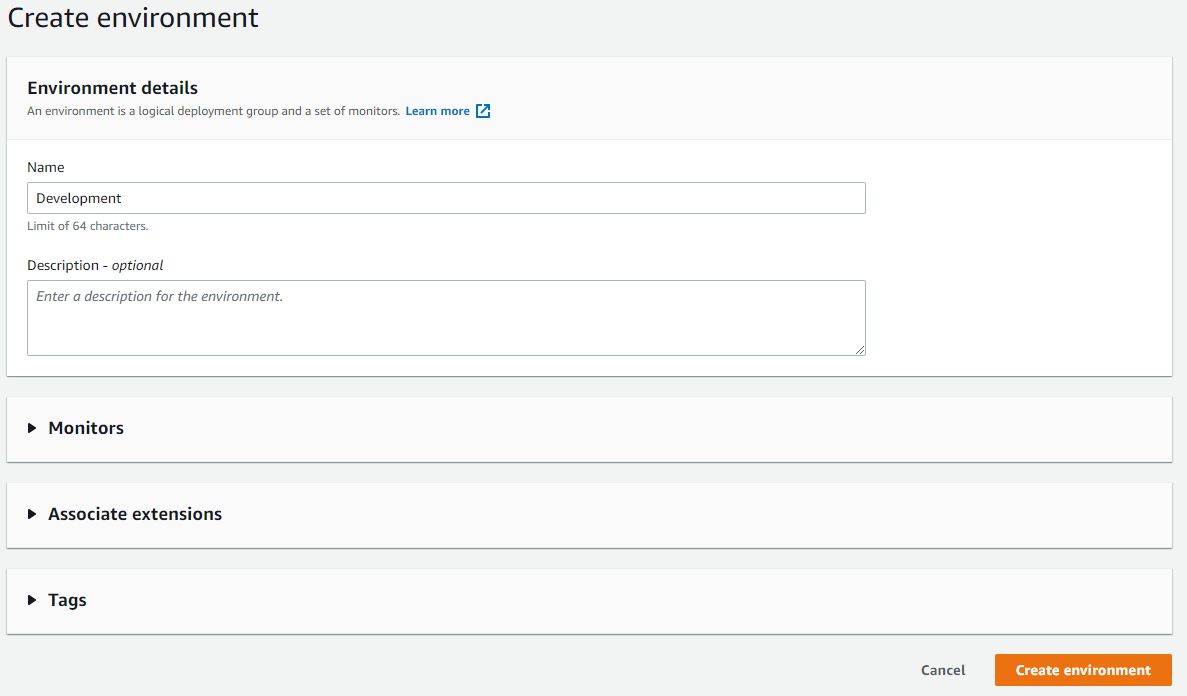
Create the environment:
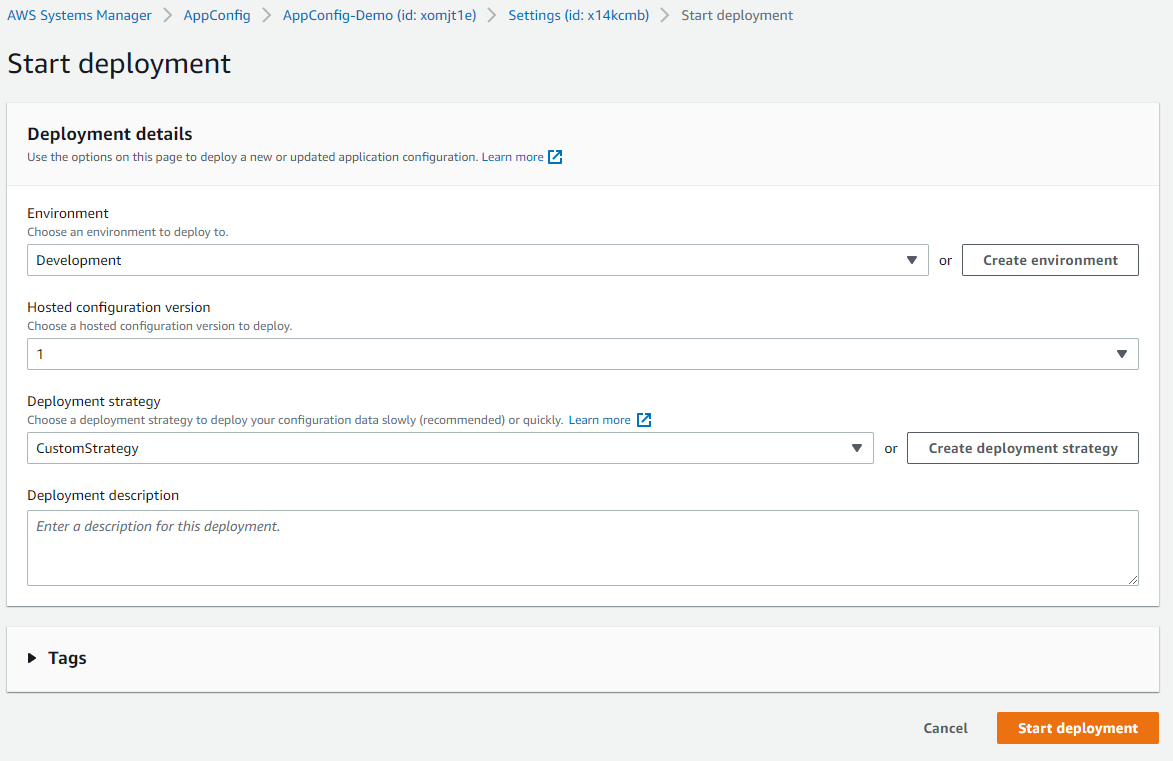
And finally, start a deployment (the option is available from the environment or profile view):
Time to create the application:
dotnet new webapi -n WeatherApi
dotnet new sln -n appconfig-sandbox
dotnet sln add WeatherApi
Open the solution and add the WeatherSettings.cs file with content as follows:
public class WeatherSettings
{
    public int MinValue { get; set; }
    public int MaxValue { get; set; }
}
Modify the WeatherForecastController.cs file with the following content:
[ApiController]
[Route("[controller]")]
public class WeatherForecastController : ControllerBase
{
    private static readonly string[] Summaries = new[]
    {
        "Freezing", "Bracing", "Chilly", "Cool", "Mild", "Warm", "Balmy", "Hot", "Sweltering", "Scorching"
    };
    private readonly ILogger<WeatherForecastController> _logger;
    private readonly WeatherSettings _settings;

    public WeatherForecastController(IOptions<WeatherSettings> settings, ILogger<WeatherForecastController> logger)
    {
        _logger = logger;
        _settings = settings.Value;
    }

    [HttpGet(Name = "GetWeatherForecast")]
    public IEnumerable<WeatherForecast> Get()
    {
        return Enumerable.Range(1, 5).Select(index => new WeatherForecast
        {
            Date = DateTime.Now.AddDays(index),
            TemperatureC = Random.Shared.Next(_settings.MinValue, _settings.MaxValue),
            Summary = Summaries[Random.Shared.Next(Summaries.Length)]
        })
        .ToArray();
    }
}
Edit the appsettings.json file with content as follows:
{
  "Logging": {
    "LogLevel": {
      "Default": "Information",
      "Microsoft.AspNetCore": "Warning"
    }
  },
  "WeatherSettings": {
    "MinValue": 0,
    "MaxValue": 100
  },
  "AllowedHosts": "*"
}
And update the Program.cs file with the following content:
using WeatherApi;

var builder = WebApplication.CreateBuilder(args);
builder.Services.AddControllers();
builder.Services.AddEndpointsApiExplorer();
builder.Services.AddSwaggerGen();
builder.Services.Configure<WeatherSettings>(builder.Configuration.GetSection("WeatherSettings"));
var app = builder.Build();
if (app.Environment.IsDevelopment())
{
    app.UseSwagger();
    app.UseSwaggerUI();
}
app.UseHttpsRedirection();
app.UseAuthorization();
app.MapControllers();
app.Run();
At this point, if we run the application we are only getting the configuration data from the appsettings.json file. Let's integrate AppConfig into our code. Add the following Nuget Package to the project:
And add the following lines in the Program.cs file:
var options = builder.Configuration.GetAWSOptions();
builder.Services.AddDefaultAWSOptions(options);
builder.Host.ConfigureAppConfiguration((context, configuration) =>
{
    configuration.AddAppConfig("<YOUR APPLICATION ID>", "<YOUR ENVIRONMENT ID>", "<YOUR PROFILE ID>", TimeSpan.FromSeconds(60));
});
Run the application and check how we are using the configuration data from AppConfig instead of the appsettings.json file. Now let's see how we could add a feature flag to our application. First, we need to add the NuGet package:
Modify the WeatherForecastController.cs as follows:
[ApiController]
[Route("[controller]")]
public class WeatherForecastController : ControllerBase
{
    private static readonly string[] Summaries = new[]
    {
        "Freezing", "Bracing", "Chilly", "Cool", "Mild", "Warm", "Balmy", "Hot", "Sweltering", "Scorching"
    };
    private readonly ILogger<WeatherForecastController> _logger;
    private readonly WeatherSettings _settings;
    private readonly IFeatureManager _featureManager;

    public WeatherForecastController(IOptions<WeatherSettings> settings, ILogger<WeatherForecastController> logger, IFeatureManager featureManager)
    {
        _logger = logger;
        _settings = settings.Value;
        _featureManager = featureManager;
    }

    [HttpGet(Name = "GetWeatherForecast")]
    public async Task<IEnumerable<WeatherForecast>> Get()
    {
        if (await _featureManager.IsEnabledAsync("IsActive"))
        {
            return Enumerable.Range(1, 5).Select(index => new WeatherForecast
            {
                Date = DateTime.Now.AddDays(index),
                TemperatureC = Random.Shared.Next(_settings.MinValue, _settings.MaxValue),
                Summary = Summaries[Random.Shared.Next(Summaries.Length)]
            }).ToArray();
        }
        else
        {
            return Array.Empty<WeatherForecast>();
        }

    }
}
And the Program.cs file:
using Microsoft.FeatureManagement;
using WeatherApi;

var builder = WebApplication.CreateBuilder(args);
builder.Services.AddControllers();
builder.Services.AddEndpointsApiExplorer();
builder.Services.AddSwaggerGen();
builder.Services.AddFeatureManagement();
var options = builder.Configuration.GetAWSOptions();
builder.Services.AddDefaultAWSOptions(options);
builder.Host.ConfigureAppConfiguration((context, configuration) =>
{
    configuration.AddAppConfig("<YOUR APPLICATION ID>", "<YOUR ENVIRONMENT ID>", "<YOUR PROFILE ID>", TimeSpan.FromSeconds(60));
});
builder.Services.Configure<WeatherSettings>(builder.Configuration.GetSection("WeatherSettings"));
var app = builder.Build();
if (app.Environment.IsDevelopment())
{
    app.UseSwagger();
    app.UseSwaggerUI();
}
app.UseHttpsRedirection();
app.UseAuthorization();
app.MapControllers();
app.Run();
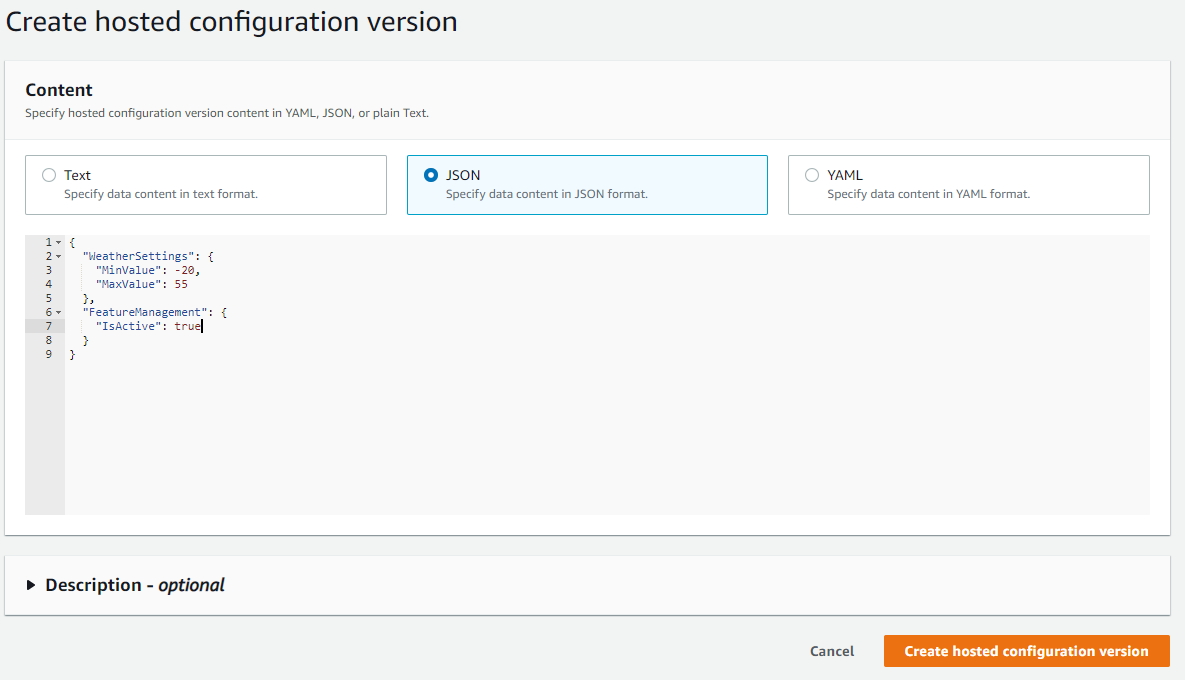
Run the application and see how the endpoint is returning an empty array. Go to the AppConfig page and add a new version to our profile with the following content:
{
  "WeatherSettings": {
    "MinValue": -20,
    "MaxValue": 55
  },
  "FeatureManagement": {
    "IsActive": true
  }
}
Start a new deployment to our environment and wait to finish. Run the application to start to see a non-empty array. AppConfig is a great tool to create, manage, and deploy configuration data that you should consider in your development (if you really need it). The source code is available here. Thanks, and happy coding.
Subscribe to my newsletter
Read articles from Raul Naupari directly inside your inbox. Subscribe to the newsletter, and don't miss out.
Written by

Raul Naupari
Raul Naupari
Somebody who likes to code


