My Secret Sauce to Cache a dynamic menu
 Emmanuel Tissera
Caching a website's menu should be a simple task. But on numerous occasions, we run into situations where we cannot build and cache a single instance of a menu for the entire website.
Some of these situations are legitimate reasons where we would have multiple instances of a website menu cached. The reasons could be:
- Language-specific (localized) content
- Region-specific content (i.e. - Menu items specific for a country)
But what other reasons make it impossible for us to cache a single instance of a menu on a single language website that does not have any region-specific content? Some of the reasons which could prevent a single cache instance could be as follows:
- UI look and feel (i.e. - Highlighting the current page/section within the menu structure)
- Logged in Status (i.e. - Welcome message when logged in)
- Shopping Cart Status (i.e. - Displaying number of items purchased)
The secret sauce to highlight a page/section on the website
The secret sauce is to add a few sprinkles of data attributes on the rendered HTML along with a dab of JavaScript to have a fully cached header menu. I'll describe this with a real-world example.
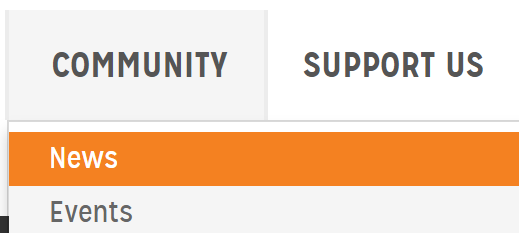
In the following example, the Community section and the News page are highlighted.
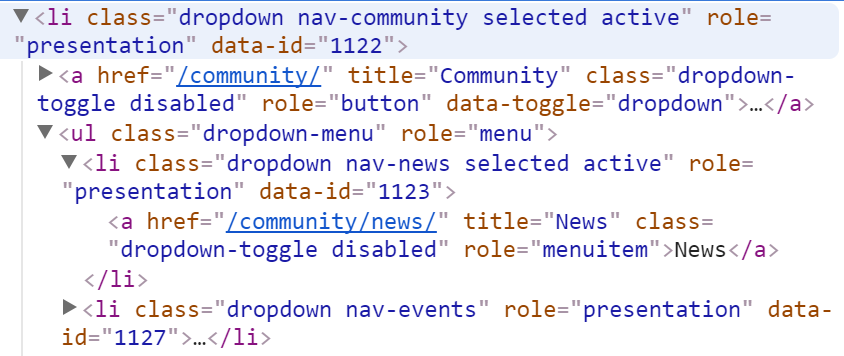
In order to do this, the rendered HTML for the top menu is decorated with a data-id attribute. In the example, the parent li element for Community has a data id of 1122 and News li element has a data id of 1123.
In Umbraco, you might use a snippet like the following to generate the header menu. In Kentico CMS, you can generate the same using the NodeId.
<ul class="dropdown-menu sub-menu" role="menu">
@foreach (var level3Page in l3Pages)
{
cssClass = "dropdown nav-" + level3Page.UrlName;
<li class="@cssClass" role="presentation" data-id="@level3Page.Id">
<a class="dropdown-toggle disabled" href="@level3Page.Url" title="@level3Page.Title" role="menuitem">> @level3Page.Title</a>
</li>
}
</ul>
That, in turn, would generate HTML as follows:
<li class="dropdown nav-community" role="presentation" data-id="1122">
  <a href="/community/" title="Community" class="dropdown-toggle disabled" role="button" data-toggle="dropdown">
    Community <b class="caret"></b>
  </a>
  <ul class="dropdown-menu" role="menu">
    <li class="dropdown nav-news" role="presentation" data-id="1123">
      <a href="/community/news/" title="News" class="dropdown-toggle disabled" role="menuitem">News</a>
    </li>
  </ul>
</li>
Then we need to make sure that each individual page renders out its position on the menu using more data-id attributes. The easiest way for this is to use the breadcrumbs present on that page. If your site does not display breadcrumbs, this could be a hidden tag or even a Javascript variable representing an array.
Once again in Umbraco, you might use a snippet like the one below to add data-id attributes to the breadcrumbs. Similarly in Kentico CMS, you can generate the same using the NodeId.
@{ var selection = CurrentPage.Ancestors().Where("DocumentTypeAlias <> @0", "folder"); }

@if (selection.Any())
{
    <div class="content-header-breadcrumbs">
        <div class="container">
            <div class="row">
                <ol class="breadcrumb">
                    @foreach (var item in selection.Where("TemplateId > 0").OrderBy("Level"))
                    {
                        <li data-id="@item.Id"><a href="@item.Url" title="@item.Title">@pageTitle</a></li>
                    }
                    <li class="active" data-id="@CurrentPage.Id">@CurrentPage.Title</li>
                </ol>
            </div>
        </div>
    </div>
}
The rendered HTML for the breadcrumbs would be as follows:
Then we use this nifty JavaScript function to highlight the current page on the header menu. I have used JQuery as it was handy, but feel free to write your own vanilla Javascript implementation if JQuery rocks your boat.
$(function () {
    $(".breadcrumb li").each(function() {
        var menuId = $(this).attr("data-id");
        var menuElementSelector = '.nav.navbar-nav li[data-id="' + menuId + '"]';
        $(menuElementSelector).addClass("selected active");
    });
});
Voila! An aggressively cached menu with dynamic behaviour. If this was rendered on a website with 100 pages, either you might not cache it at all or cache it 100 times based on the URL. With this nifty trick you get a single cached instance, which seems dynamic to the user.
Secret Sauce for Logged-in Status / Shopping cart status
In order to make either the logged-in status or the shopping cart status dynamic, the HTML could be rendered elsewhere on the page and replaced on the front end.
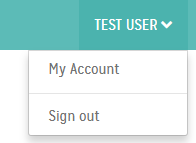
In the example below, a list element with the class "loginStatus" is rendered by the cached header menu.

If the user is logged-in, another hidden blob of HTML (such as the following) will be rendered somewhere on the page.
<ul class="hidden">
    <li class="dropdown loginStatusReplace">
        <a href="#" class="dropdown-toggle" data-toggle="dropdown">Test User<i class="fa fa-chevron-down " title=""></i></a>
        <ul class="dropdown-menu" role="menu">
            <li><a href="/account">My Account</a></li>
            <li class="divider"></li>
            <li><a href="/logout">Sign out</a></li>
        </ul>
    </li>
</ul>
Then the following script can be used to replace the element on the header menu.
$(function () {
    var replacement = $(".loginStatusReplace");
    if (!replacement.length) {
        return;
    }
    $(".loginStatus").replaceWith(replacement);
});
Drawbacks
However, there is one drawback. If JavaScript is disabled, this solution would not work. Whereas highlighting a menu is not critical, displaying login status is quite critical in letting the user know that they have logged in securely. If this is used in either a shopping cart or a login scenario, I would advise adding a no-script tag to let the user know that this would not work correctly if JavaScript is disabled.
Try this out on your next project and let me know how it goes.
This article was originally written on Google's Blogger platform and ported to Hashnode on 17 Sep 2022.
Subscribe to my newsletter
Read articles from Emmanuel Tissera directly inside your inbox. Subscribe to the newsletter, and don't miss out.
Written by

Emmanuel Tissera
Emmanuel Tissera
Technical Director at Luminary. Umbraco 3x MVP.


