How To Turn KUBERNETES SERVICES Into Success
 Sourav Kumar
Although the microservices-driven architecture aims to decouple the components of an application, microservices still need agents to logically tie or group them together for management purposes, or to load balance traffic to the ones that are part of such a logical set.
In this Bolg, we will learn about Service objects used to abstract the communication between cluster internal microservices, or with the external world. A Service offers a single DNS entry for a containerized application managed by the Kubernetes cluster, regardless of the number of replicas, by providing a common load-balancing access point to a set of pods logically grouped and managed by a controller such as a Deployment, ReplicaSet, or DaemonSet.
We will also learn about the kube-proxy daemon, which runs on each control plane and worker node **to implement the services' configuration and to provide access to services. In addition we will discuss service discovery and service types**, which decide the access scope of a service
Connecting Users or Applications to Pods
To access the application, a user or another application need to connect to the Pods. As Pods are ephemeral in nature, resources like IP addresses allocated to them cannot be static.
Let's take, for example, a scenario where an operator manages a set of Pods and a user/client is accessing the Pods directly by using their individual IP addresses.
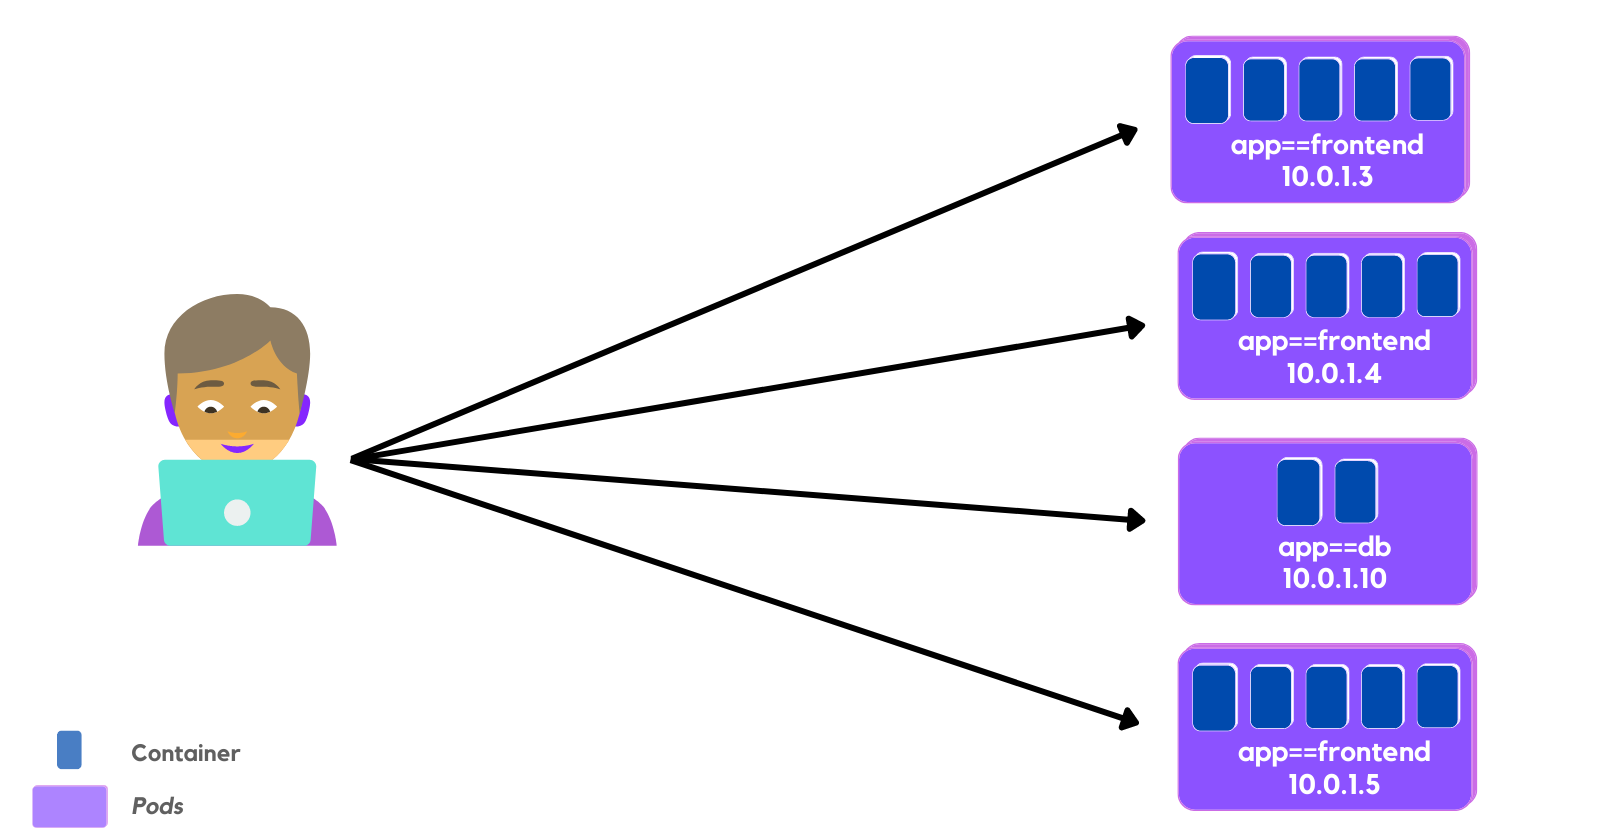
A Scenario Where a User Is Accessing Pods via their IP Addresses
Unexpectedly, one of the Pods the user/client is accessing is terminated, and a new Pod is created by the controller. The new Pod will have a new IP address, that will not be immediately known by the user/client.
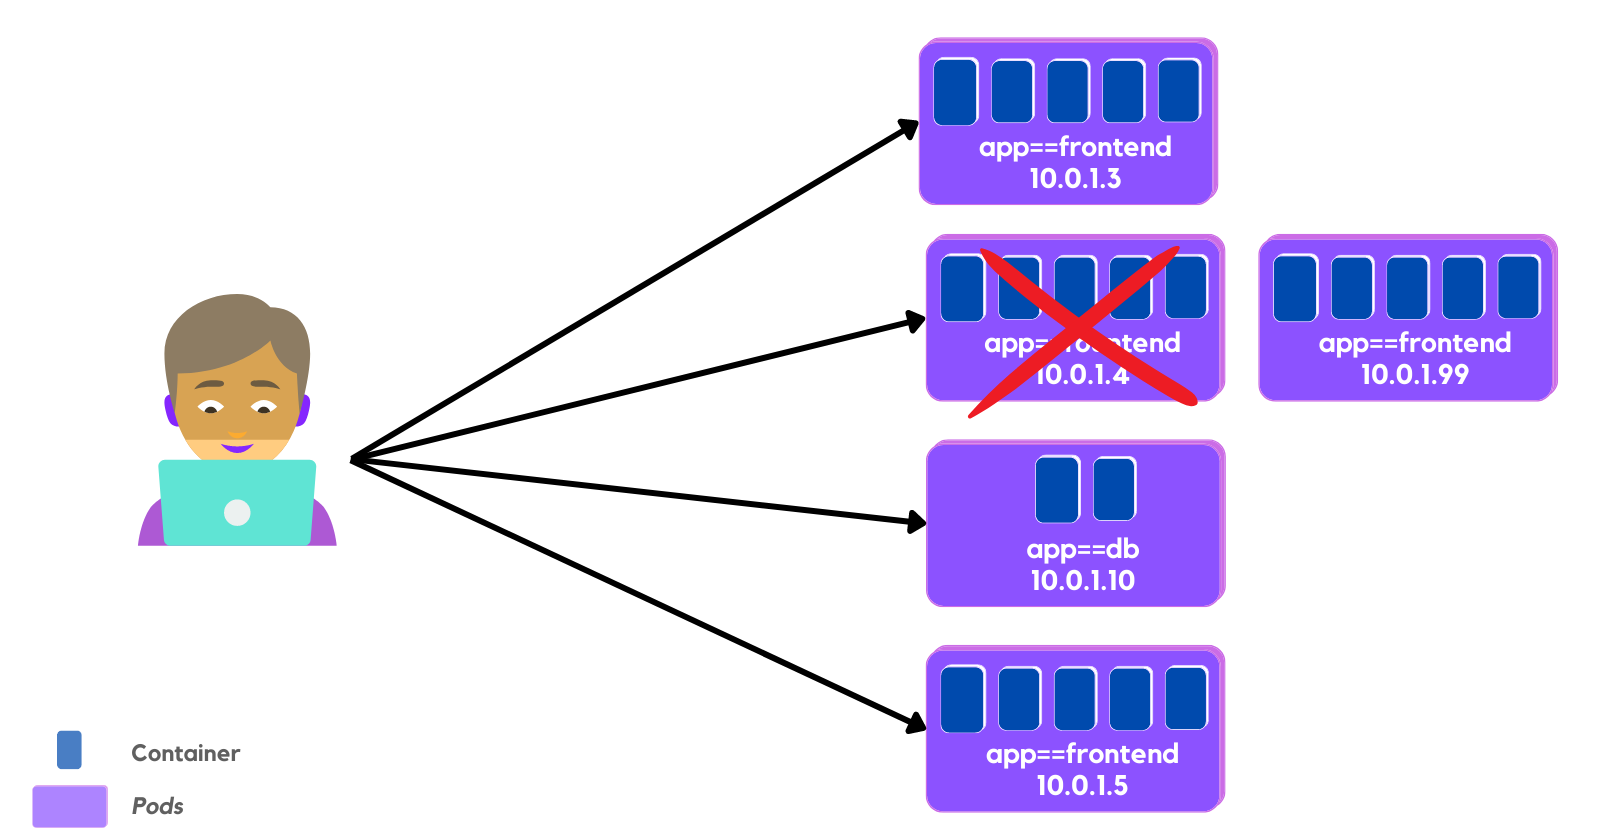
A New Pod Is Created After an Old One Terminated Unexpectedly
To overcome this situation, Kubernetes provides a higher-level abstraction called Service, which logically groups Pods and defines a policy to access them. This grouping is achieved via Labels and Selectors.
Services
Labels and Selectors use a key-value pair format. In the following graphical representation, app is the Label key, frontend and db are Label values for different Pods.
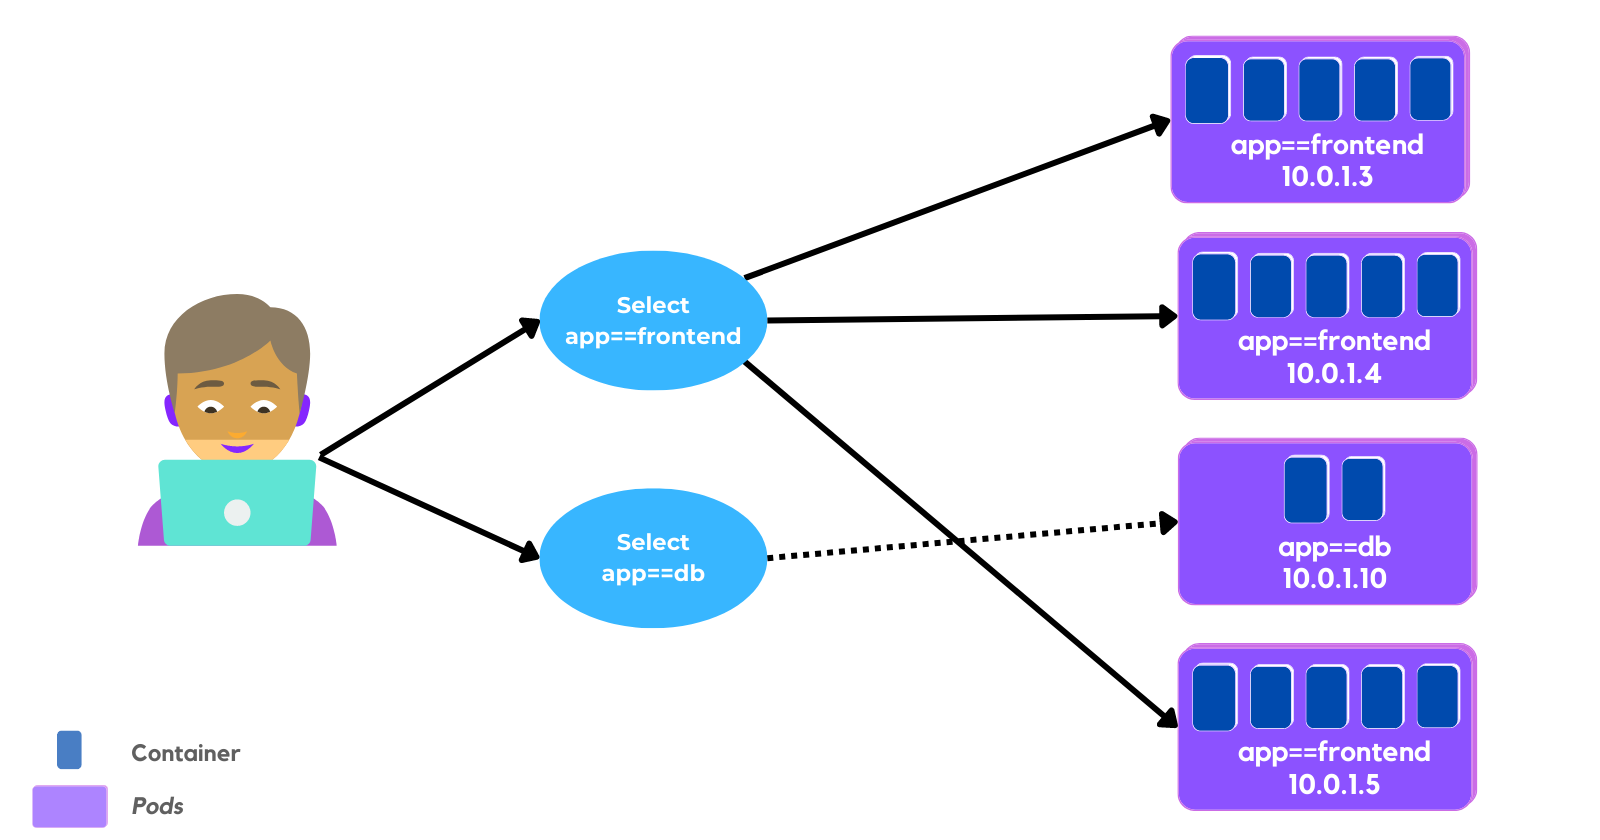
Grouping of Pods using Labels and Selectors
Using the selectors app==frontend and app==db, we group Pods into two logical sets: one set with 3 Pods, and one set with a single Pod.
We assign a name to the logical grouping, referred to as a Service. The Service name also is registered with the cluster's internal DNS service. In our example, we create two Services, frontend-svc, and db-svc, and they have the app==frontend and the app==db Selectors, respectively.
Services can expose single Pods, ReplicaSets, Deployments, DaemonSets, and StatefulSets. When exposing the Pods managed by an operator, the Service's Selector may use the same label(s) as the operator.
Service Object Example
apiVersion: v1
kind: Service
metadata:
     name: frontend-svc
spec:
    selector:
        app: frontend
    ports:
    - protocol: TCP
       port: 80
       targetPort: 5000
In this example, we are creating a frontend-svc Service by selecting all the Pods that have the Label key=app set to value=frontend. By default, each Service receives an IP address routable only inside the cluster, known as ClusterIP. In our example, we have 172.17.0.4 and 172.17.0.5 as ClusterIPs assigned to our frontend-svc and db-svc Services, respectively.
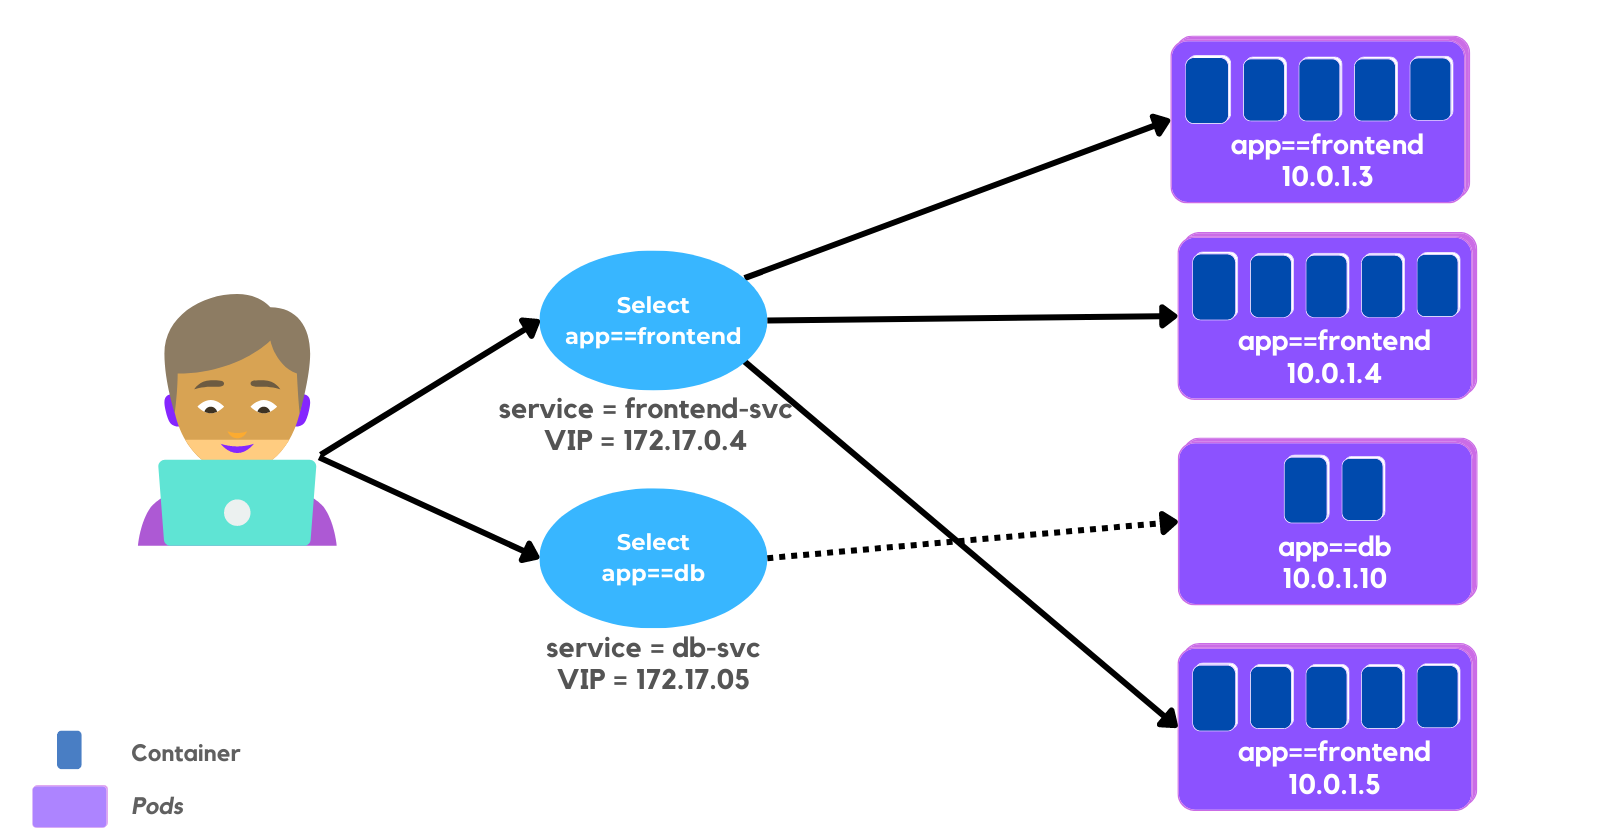
Accessing the Pods Using Service Object
The user/client now connects to a Service via its ClusterIP, which forwards traffic to one of the Pods attached to it. A Service provides load balancing by default while selecting the Pods for traffic forwarding.
While the Service forwards traffic to Pods, we can select the targetPort on the Pod which receives the traffic. In our example, the frontend-svc Service receives requests from the user/client on port: 80 and then forwards these requests to one of the attached Pods on the targetPort: 5000. If the targetPort is not defined explicitly, then traffic will be forwarded to Pods on the port on which the Service receives traffic. It is very important to ensure that the value of the targetPort, which is 5000 in this example, matches the value of the containerPort property of the Pod spec section.
A logical set of a Pod's IP address, along with the targetPort is referred to as a Service endpoint. In our example, the frontend-svc Service has 3 endpoints: 10.0.1.3:5000, 10.0.1.4:5000, and 10.0.1.5:5000. Endpoints are created and managed automatically by the Service, not by the Kubernetes cluster administrator.
kube-proxy
Each cluster node runs a daemon called kube-proxy, a node agent that watches the API server on the master node for the addition, updates, and removal of Services and endpoints. kube-proxy is responsible for implementing the Service configuration on behalf of an administrator or developer, in order to enable traffic routing to an exposed application running in Pods. In the example below, for each new Service, on each node, kube-proxy configures iptables rules to capture the traffic for its ClusterIP and forwards it to one of the Service's endpoints. Therefore any node can receive the external traffic and then route it internally in the cluster based on the iptables rules. When the Service is removed, kube-proxy removes the corresponding iptables rules on all nodes as well.
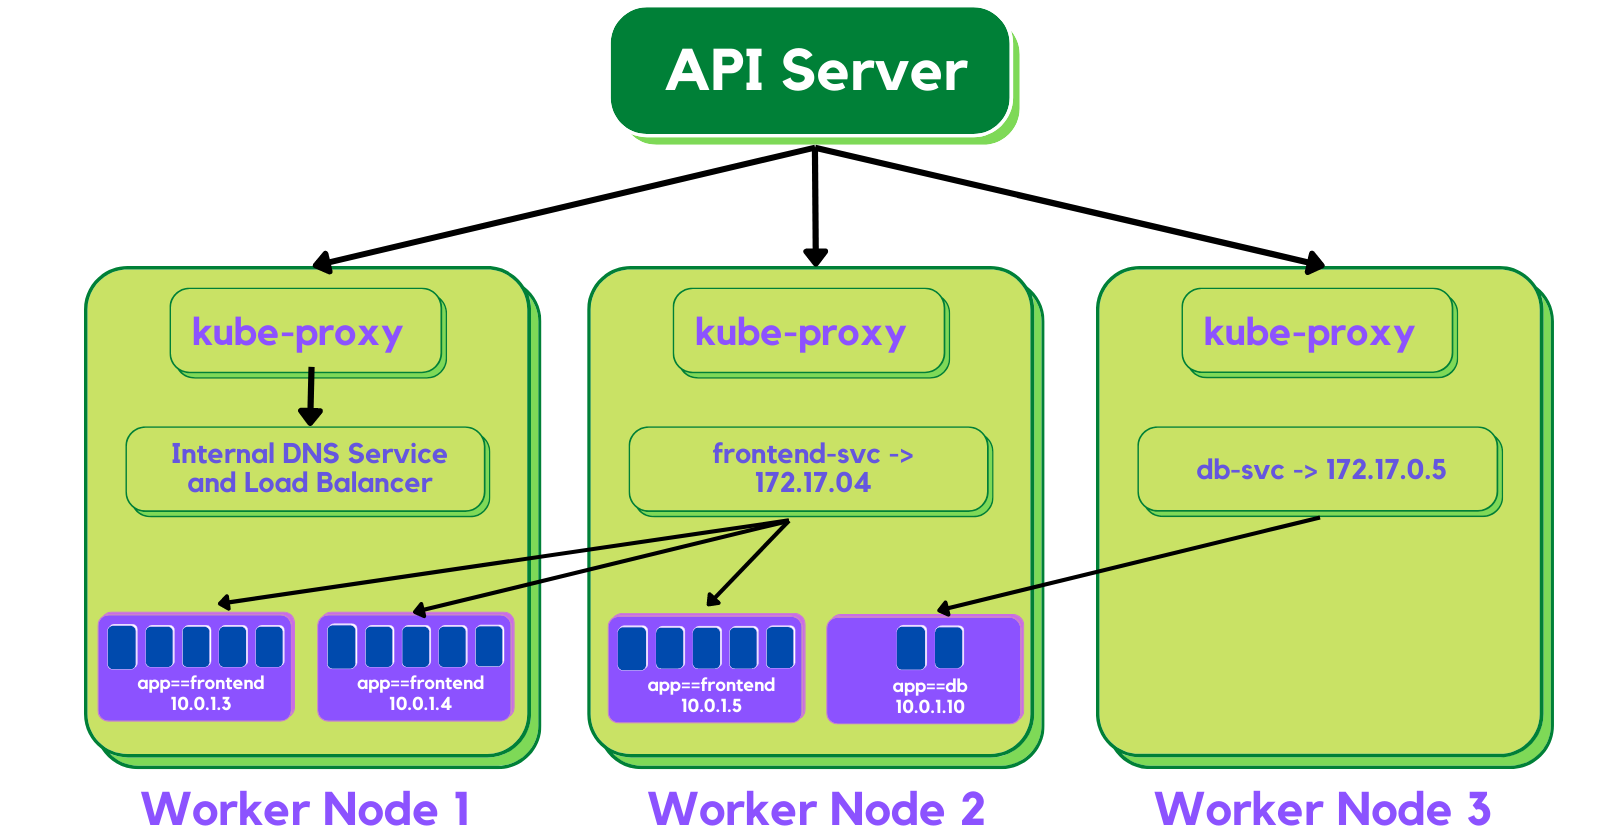
kube-proxy, Services, and Endpoints
Traffic Policies
The kube-proxy node agent together with the iptables implements the load-balancing mechanism of the Service when traffic is being routed to the application Endpoints. Due to the restricting characteristics of the iptables this load-balancing is random by default. This means that the Endpoint Pod to receive the request forwarded by the Service will be randomly selected out of many replicas. This mechanism does not guarantee that the selected receiving Pod is the closest or even on the same node as the requester, therefore not the most efficient mechanism. Since this is the iptables-supported load-balancing mechanism, if we desire better outcomes, we would need to take advantage of traffic policies.
Traffic policies allow users to instruct the kube-proxy on the context of the traffic routing. The two options are Cluster and Local:
- The Cluster option allows kube-proxy to target all ready Endpoints of the Service in the load-balancing process.
- The Local option, however, isolates the load-balancing process to only include the Endpoints of the Service located on the same node as the requester Pod. While this sounds like an ideal option, it does have a shortcoming - if the Service does not have a ready Endpoint on the node where the requester Pod is running, the Service will not route the request to Endpoints on other nodes to satisfy the request.
Both the Cluster and Local options are available for requests generated internally from within the cluster, or externally from applications and clients running outside the cluster.
Service Discovery
As Services are the primary mode of communication between containerized applications managed by Kubernetes, it is helpful to be able to discover them at runtime. Kubernetes supports two methods for discovering Services:
- Environment Variables
- DNS
Environment Variables
As soon as the Pod starts on any worker node, the kubelet daemon running on that node adds a set of environment variables in the Pod for all active Services. For example, if we have an active Service called redis-master, which exposes port 6379, and its ClusterIP is 172.17.0.6, then, on a newly created Pod, we can see the following environment variables:
REDIS_MASTER_SERVICE_HOST=172.17.0.6
REDIS_MASTER_SERVICE_PORT=6379
REDIS_MASTER_PORT=tcp://172.17.0.6:6379
REDIS_MASTER_PORT_6379_TCP=tcp://172.17.0.6:6379
REDIS_MASTER_PORT_6379_TCP_PROTO=tcp
REDIS_MASTER_PORT_6379_TCP_PORT=6379
REDIS_MASTER_PORT_6379_TCP_ADDR=172.17.0.6
With this solution, we need to be careful while ordering our Services, as the Pods will not have the environment variables set for Services which are created after the Pods are created.
DNS
Kubernetes has an add-on for DNS, which creates a DNS record for each Service and its format is my-svc.my-namespace.svc.cluster.local. Services within the same Namespace find other Services just by their names. If we add a Service redis-master in my-ns Namespace, all Pods in the same my-ns Namespace lookup the Service just by its name, redis-master. Pods from other Namespaces, such as test-ns, lookup the same Service by adding the respective Namespace as a suffix, such as redis-master.my-ns or providing the FQDN of the service as redis-master.my-ns.svc.cluster.local.
This is the most common and highly recommended solution. For example, in the previous section's image, we have seen that an internal DNS is configured, which maps our Services frontend-svc and db-svc to 172.17.0.4 and 172.17.0.5 IP addresses respectively.
ServiceType
While defining a Service, we can also choose its access scope. We can decide whether the Service:
- Is only accessible within the cluster.
- Is accessible from within the cluster and the external world.
- Maps to an entity which resides either inside or outside the cluster.
Access scope is decided by ServiceType property, defined when creating the Service.
ClusterIP and NodePort
ClusterIP is the default ServiceType. A Service receives a Virtual IP address, known as its ClusterIP. This Virtual IP address is used for communicating with the Service and is accessible only from within the cluster.
With the NodePort ServiceType, in addition to a ClusterIP, a high-port, dynamically picked from the default range 30000-32767, is mapped to the respective Service, from all the worker nodes. For example, if the mapped NodePort is 32233 for the service frontend-svc, then, if we connect to any worker node on port 32233, the node would redirect all the traffic to the assigned ClusterIP - 172.17.0.4. If we prefer a specific high-port number instead, then we can assign that high-port number to the NodePort from the default range when creating the Service.
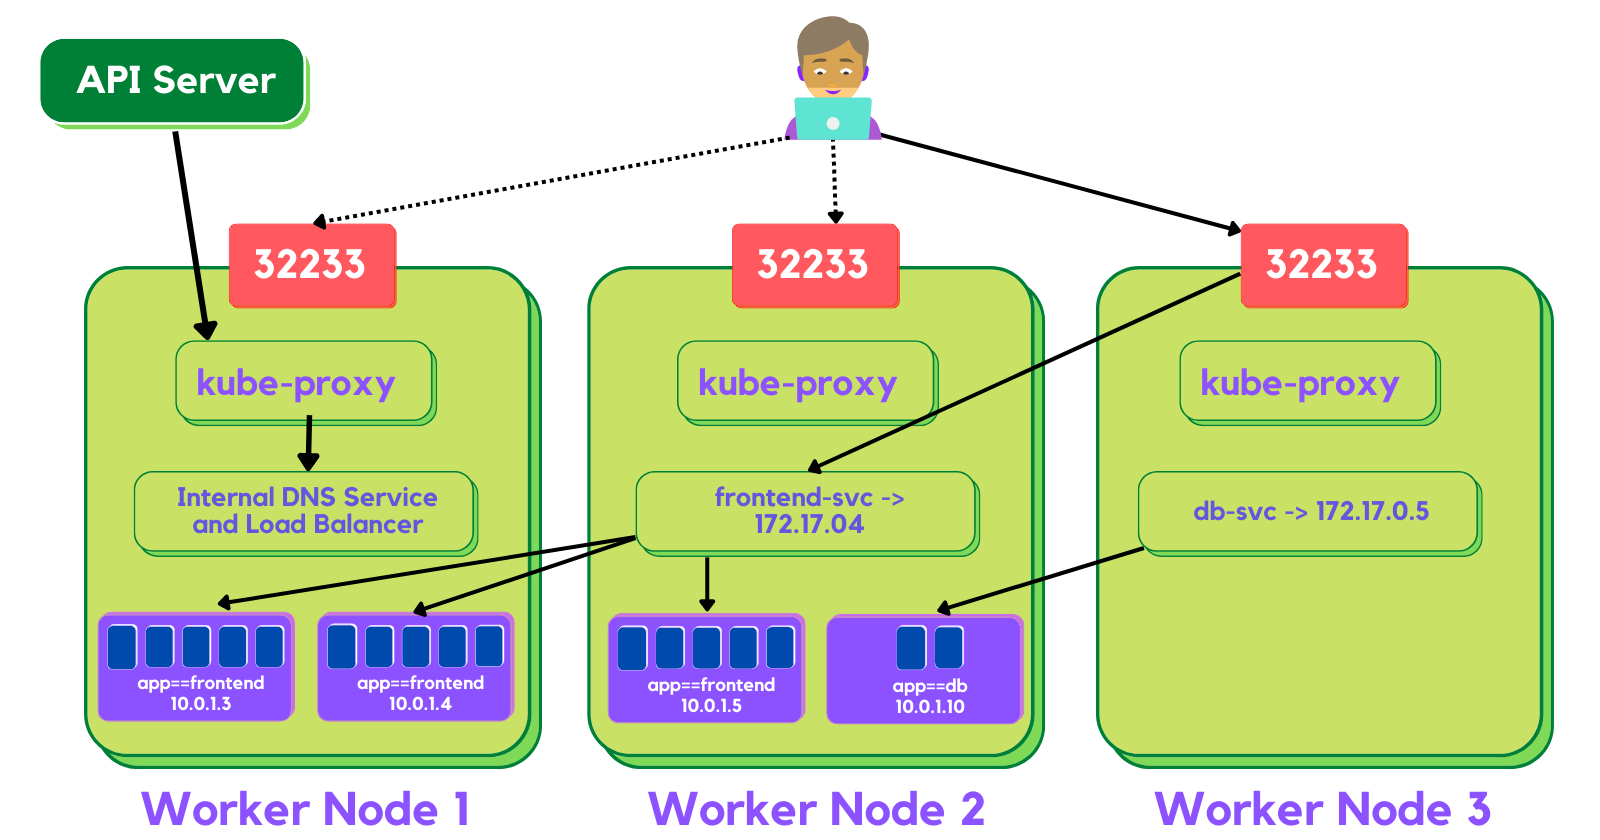
NodePort
The NodePort ServiceType is useful when we want to make our Services accessible from the external world. The end-user connects to any worker node on the specified high-port, which proxies the request internally to the ClusterIP of the Service, then the request is forwarded to the applications running inside the cluster. Let's not forget that the Service is load balancing such requests, and only forwards the request to one of the Pods running the desired application. To manage access to multiple application Services from the external world, administrators can configure a reverse proxy - an ingress, and define rules that target specific Services within the cluster.
LoadBalancer
with the LoadBalancer ServiceType:
- NodePort and ClusterIP are automatically created, and the external load balancer will route to them.
- The Service is exposed at a static port on each worker node.
- The Service is exposed externally using the underlying cloud provider's load balancer feature.
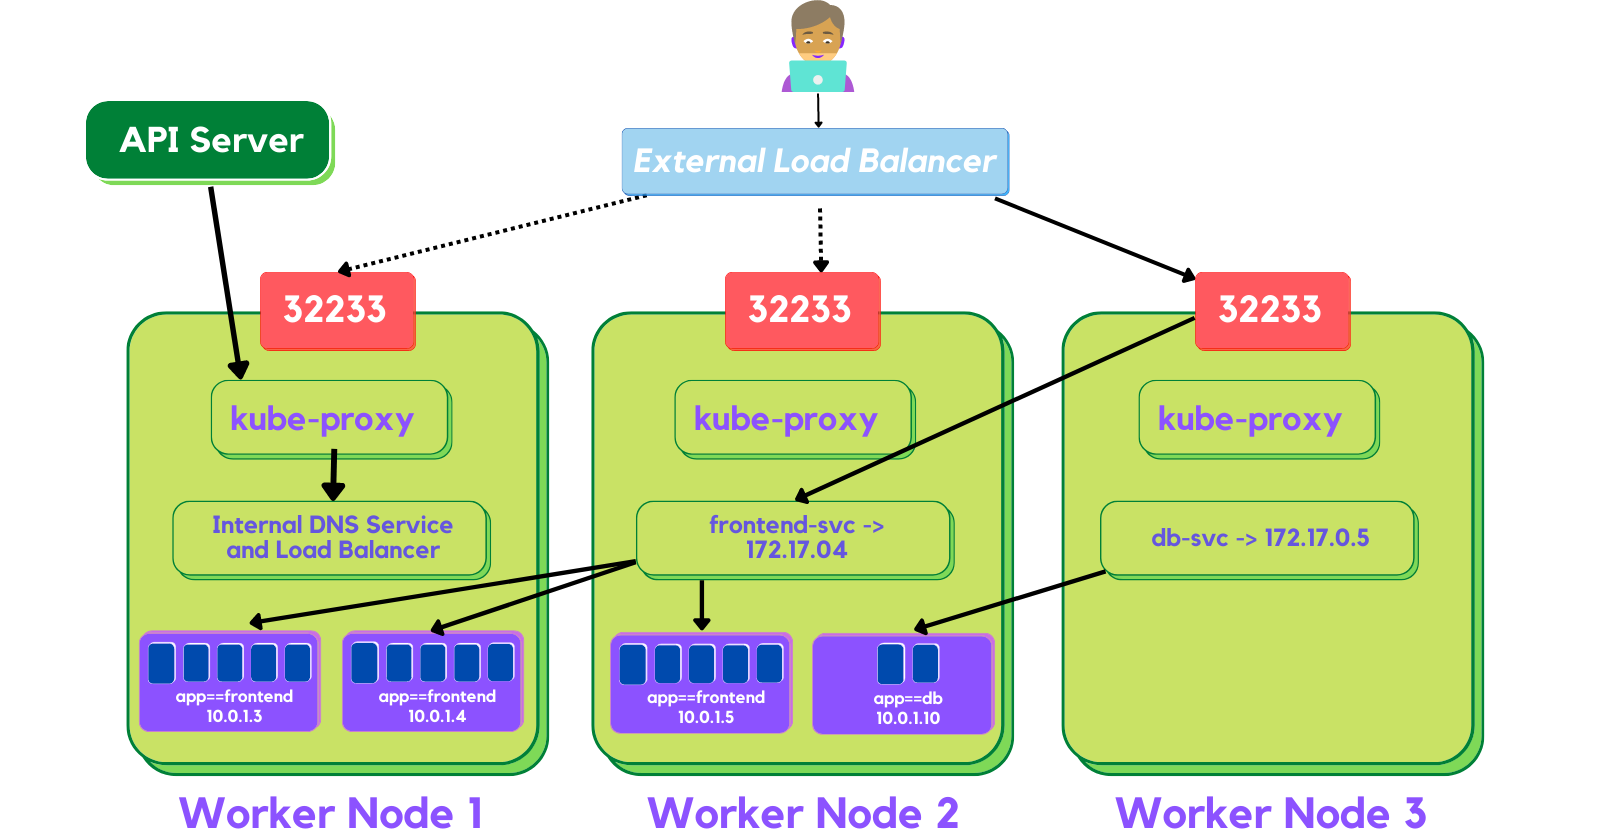
LoadBalancer
The LoadBalancer ServiceType will only work if the underlying infrastructure supports the automatic creation of Load Balancers and have the respective support in Kubernetes, as is the case with the Google Cloud Platform and AWS. If no such feature is configured, the LoadBalancer IP address field is not populated, it remains in the Pending state, but the Service will still work as a typical NodePort type Service.
ExternalIP
A Service can be mapped to an ExternalIP address if it can route to one or more of the worker nodes. Traffic that is ingressed into the cluster with the ExternalIP (as destination IP) on the Service port, gets routed to one of the Service endpoints. This type of service requires an external cloud provider such as Google Cloud Platform or AWS and a Load Balancer configured on the cloud provider's infrastructure.
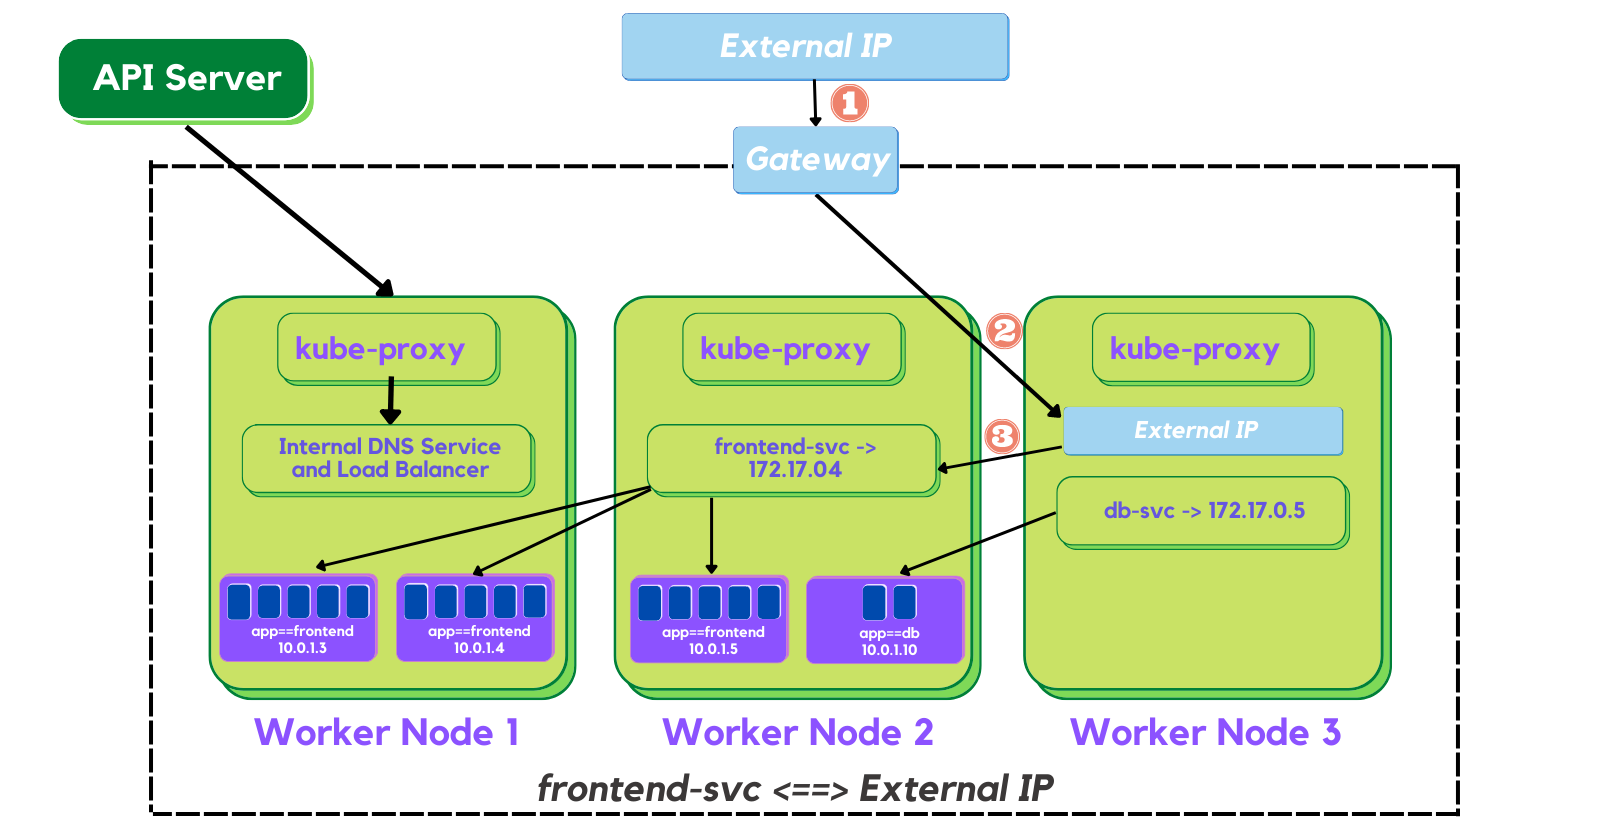
ExternalIP
Please note that ExternalIPs are not managed by Kubernetes. The cluster administrator has to configure the routing which maps the ExternalIP address to one of the nodes.
ExternalName
ExternalName is a special ServiceType, that has no Selectors and does not define any endpoints. When accessed within the cluster, it returns a CNAME record of an externally configured Service.
The primary use case of this ServiceType is to make externally configured Services like my-database.example.com available to applications inside the cluster. If the externally defined Service resides within the same Namespace, using just the name my-database would make it available to other applications and Services within that same Namespace.
Multi-Port Services
A Service resource can expose multiple ports at the same time if required. Its configuration is flexible enough to allow for multiple groupings of ports to be defined in the manifest. This is a helpful feature when exposing Pods with one container listening on more than one port, or when exposing Pods with multiple containers listening on one or more ports.
A multi-port Service manifest is provided below:
apiVersion: v1
kind: Service
metadata:
     name: my-service
spec:
    selector:
        app: myapp
    type: NodePort
    ports:
    - name: http
       protocol: TCP
       port: 8080
       targetPort: 80
       nodePort: 31080
    - name: https
       protocol: TCP
       port: 8443
       targetPort: 443
       nodePort: 31443
The my-service Service resource exposes Pods labeled app==myapp with possibly one container listening on ports 80 and 443, as described by the two targetPort fields. The Service will be visible inside the cluster on its ClusterIP and ports 8080 and 8443 as described by the two port fields, and it will also be accessible to incoming requests from outside the cluster on the two nodePort fields 31080 and 31443. When manifests describe multiple ports, they need to be named as well, for clarity, as described by the two name fields with values http and https respectively. This Service is configured to capture traffic on ports 8080 and 8443 from within the cluster, or on ports 31080 and 31443 from outside the cluster, and forward that traffic to ports 80 and 443 respectively of the Pods running the container.
THE END
Thank You for reading my blog. Hope you understand what I'm trying to explain. If You like what are you reading then please follow my page and also on Twitter and do share it.
Subscribe to my newsletter
Read articles from Sourav Kumar directly inside your inbox. Subscribe to the newsletter, and don't miss out.
Written by

Sourav Kumar
Sourav Kumar
Learning Kubernetes in DevOps journey and Sharing my Learning