Amplify-ing Bears
 Ed Miller
Introduction
Many years ago, when I first got started in machine learning, I was looking for a project I could work on to help solidify my understanding of the concepts I was learning. Around this same time, I got hooked on the wildlife webcams on Explore.org, especially the Brooks Falls Brown Bears in Katmai National Park. By watching the cams and following the discussions, I started to learn how do identify some of the bears. Then it hit me - if I can identify bears, surely machine learning can do it too. The BearID Project was born.
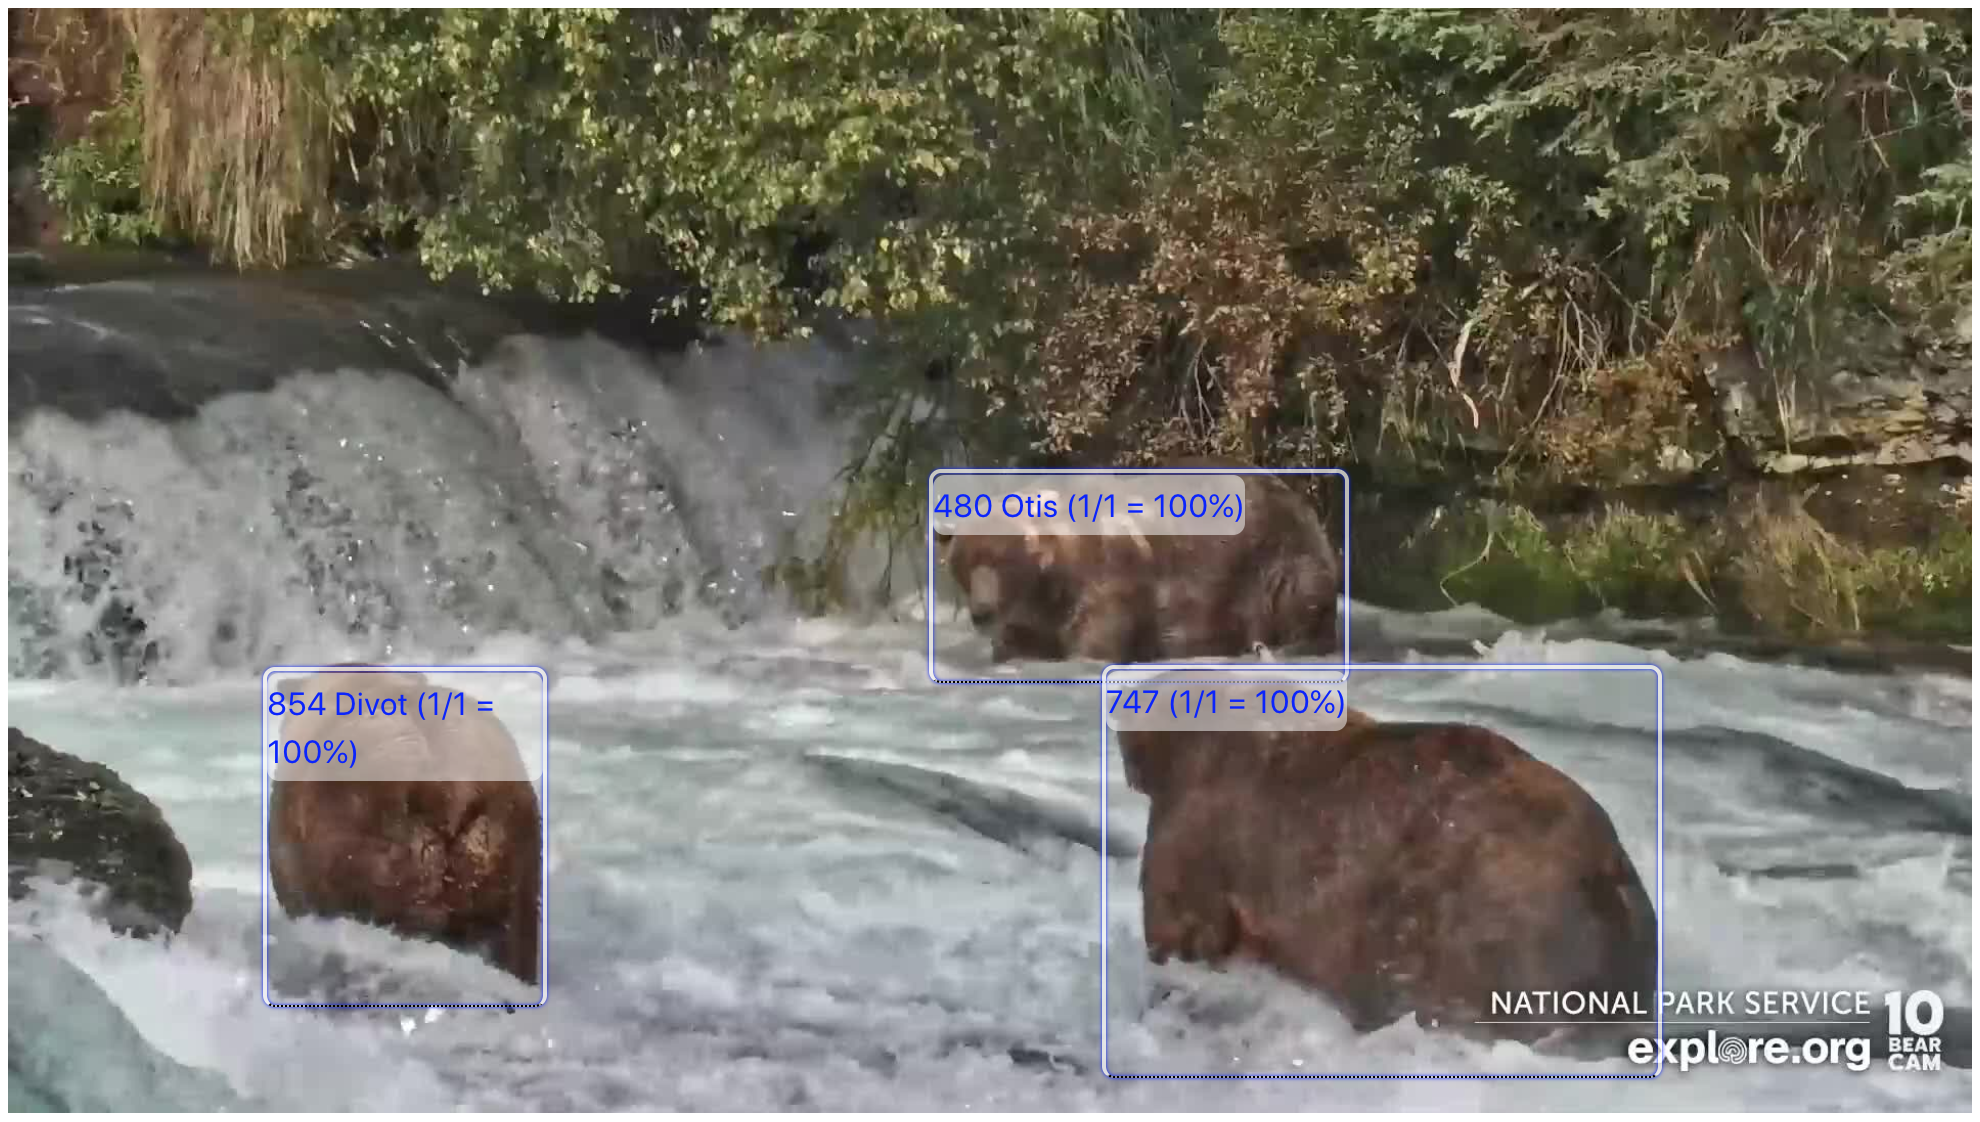
We have made a lot of progress with the BearID Project, including the development of the bearid application. It uses a similar ML pipeline to FaceNet, except that it is trained on photos of bears. My grand vision was to build something that worked for the bear cams, and we did have some limited success (see video below). However, bearid expects frontal face shots of the bears, but the ones on the camera rarely seem to pose like this:
To build a new bear identification model which works for the webcam feeds, I need a lot of labeled data. I was sure I could enlist the help of the bearcam community, but I needed something they would find engaging. I thought about a website which could capture images from the feeds, use an object detection model to find the bears, enable users to identify them then use the data to train a classification model - a human-in-the-loop machine learning system. Newer user could use the site to learn to identify the bears, while more experienced viewers could share their knowledge more easily.
Unfortunately, I didn't know much about building complex web applications: AWS Community Builders and AWS Amplify to the rescue!
Demo
Here is a brief overview and demonstration of what I have built so far:
Here's a recap of the key functionality:
- Grab a frame from the webcam snapshots
- Automatically detect the bears (and possibly other animals) in the frame
- Display the frame and bounding boxes on a webpage
- Allow users (and eventually an ML model) to identify the bears, and display identifications
- Provide an Admin mode for adding content and adding/editing bounding boxes
AWS Community Builders
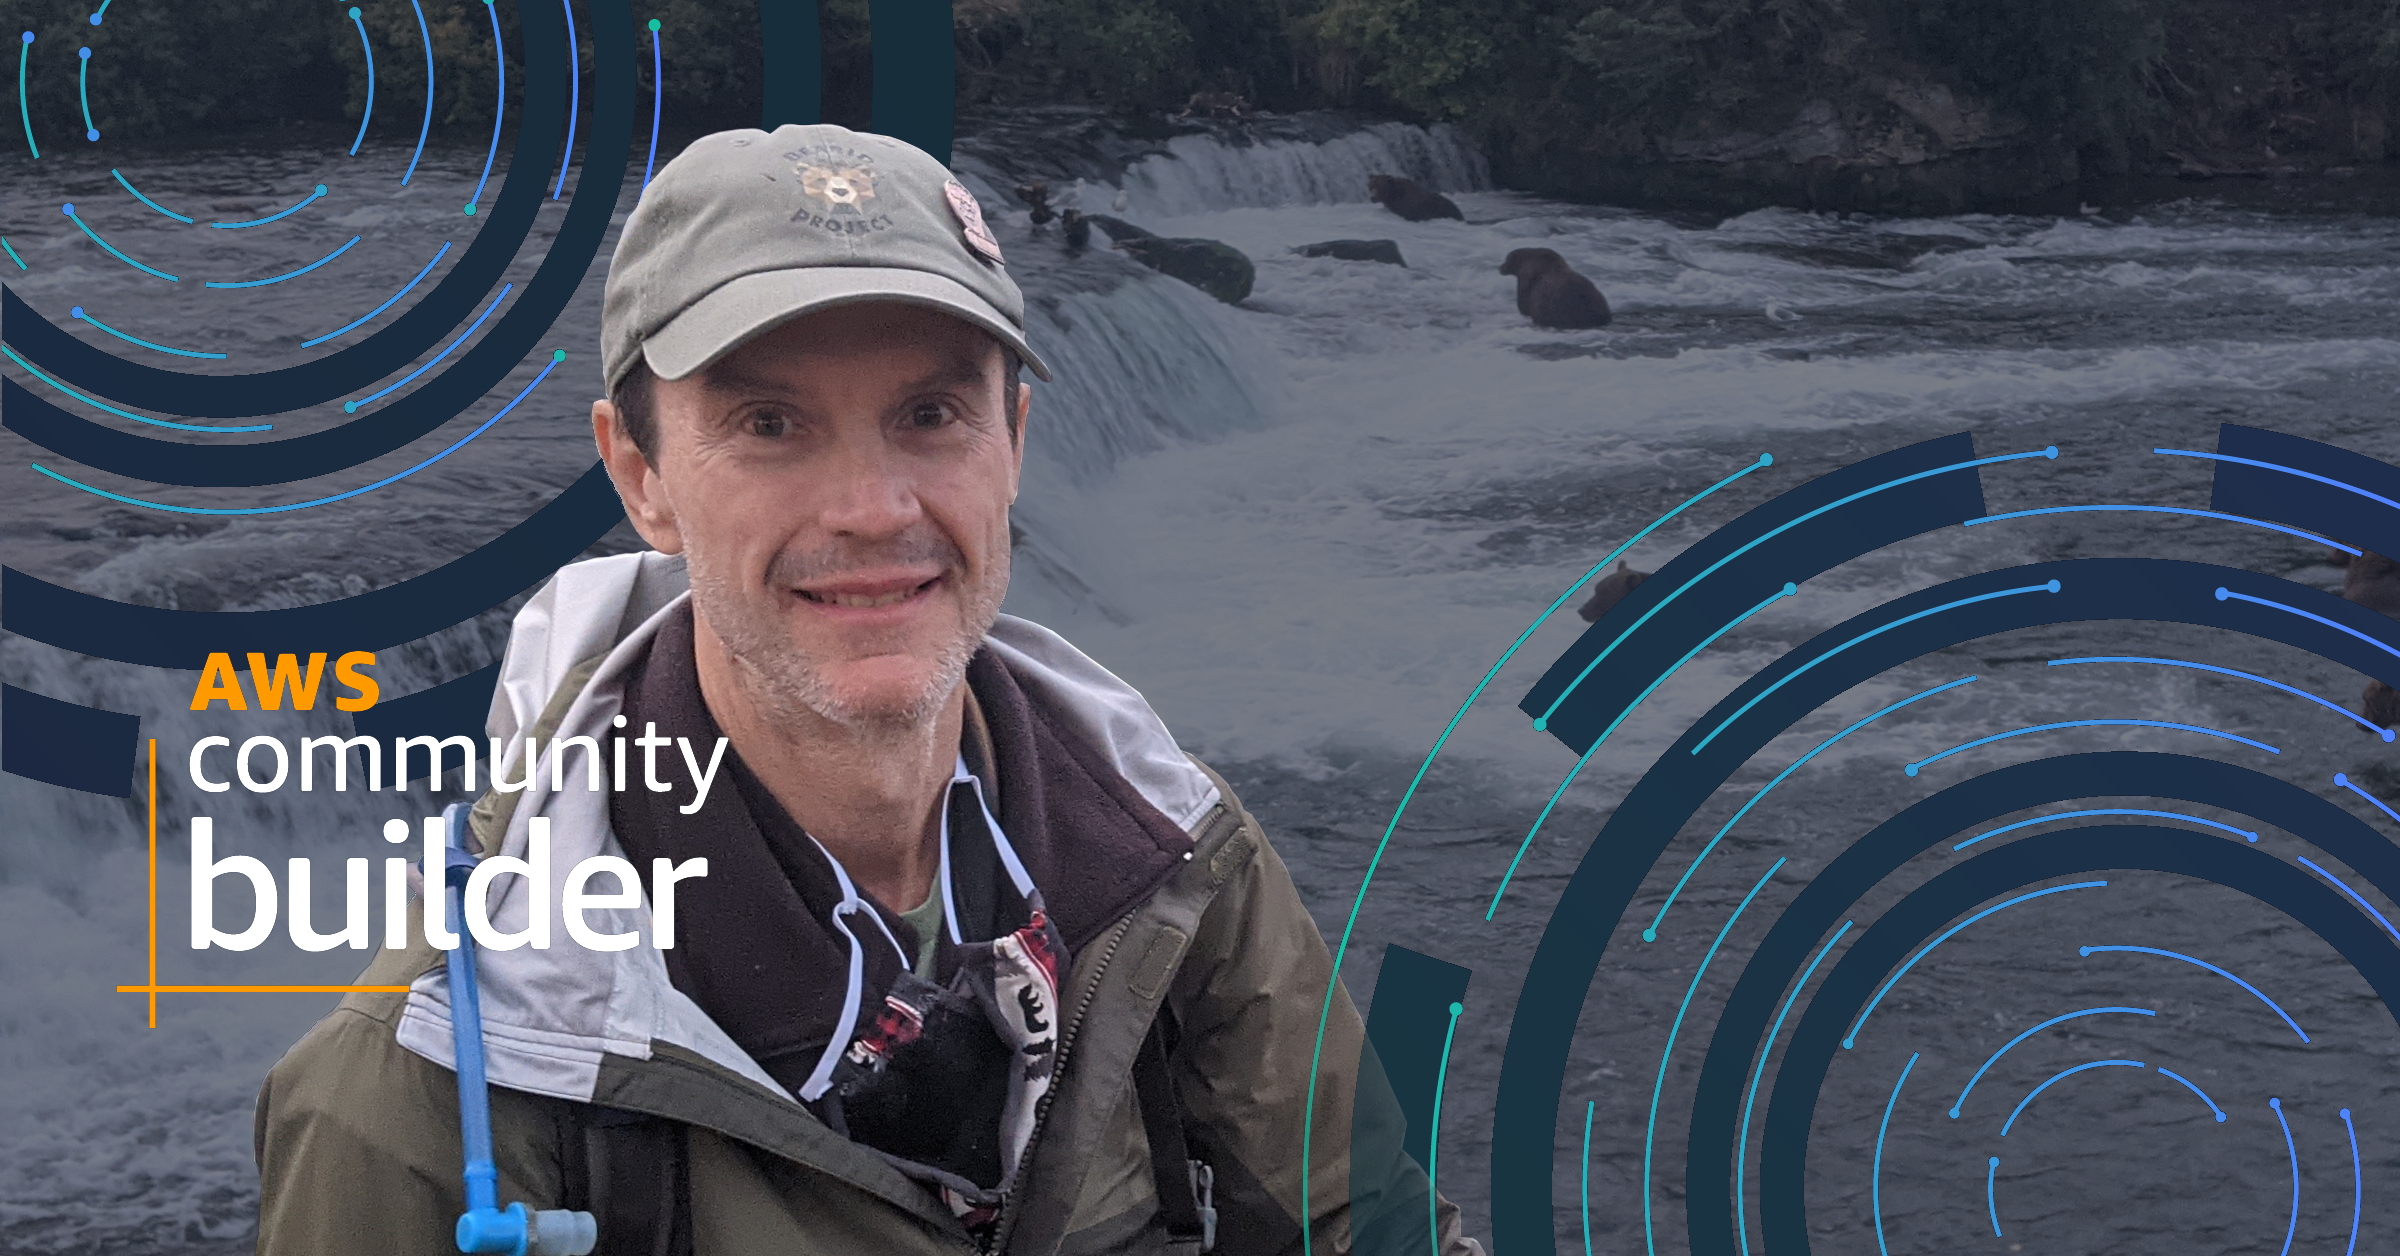
Earlier in 2022 I was accepted into the AWS Community program (yes, as depicted in my banner image, I had finally made it to Brooks Falls in 2021!). The program provides resources, networking and education opportunities to developers passionate about sharing their knowledge. I joined the machine learning track and also share my experience in IoT (which has not track in the CB program). In turn, I hoped to gain a better understanding of the myriad of AWS services and how to use them. As a Community Builder, I now had the confidence and support (not to mention the AWS credits) to begin building the web application I envisioned.
Amplify-ing Bears
One of the first services I learned about during my short time in the AWS Community Builders program was AWS Amplify. Amplify is a complete solution for building full-stack application on AWS. It's essentially a suite of tools, mainly Amplify Studio and the Command Line Interface (CLI), which enable connecting backend services like DynamoDB, S3, Rekognition and Lambdas with frontend applications.
Amplify Studio
AWS Amplify Studio is a visual interface for Amplify. It is a great way to become familiar with the basic capabilities of Amplify while getting started with development.
Data Model: Images and Objects
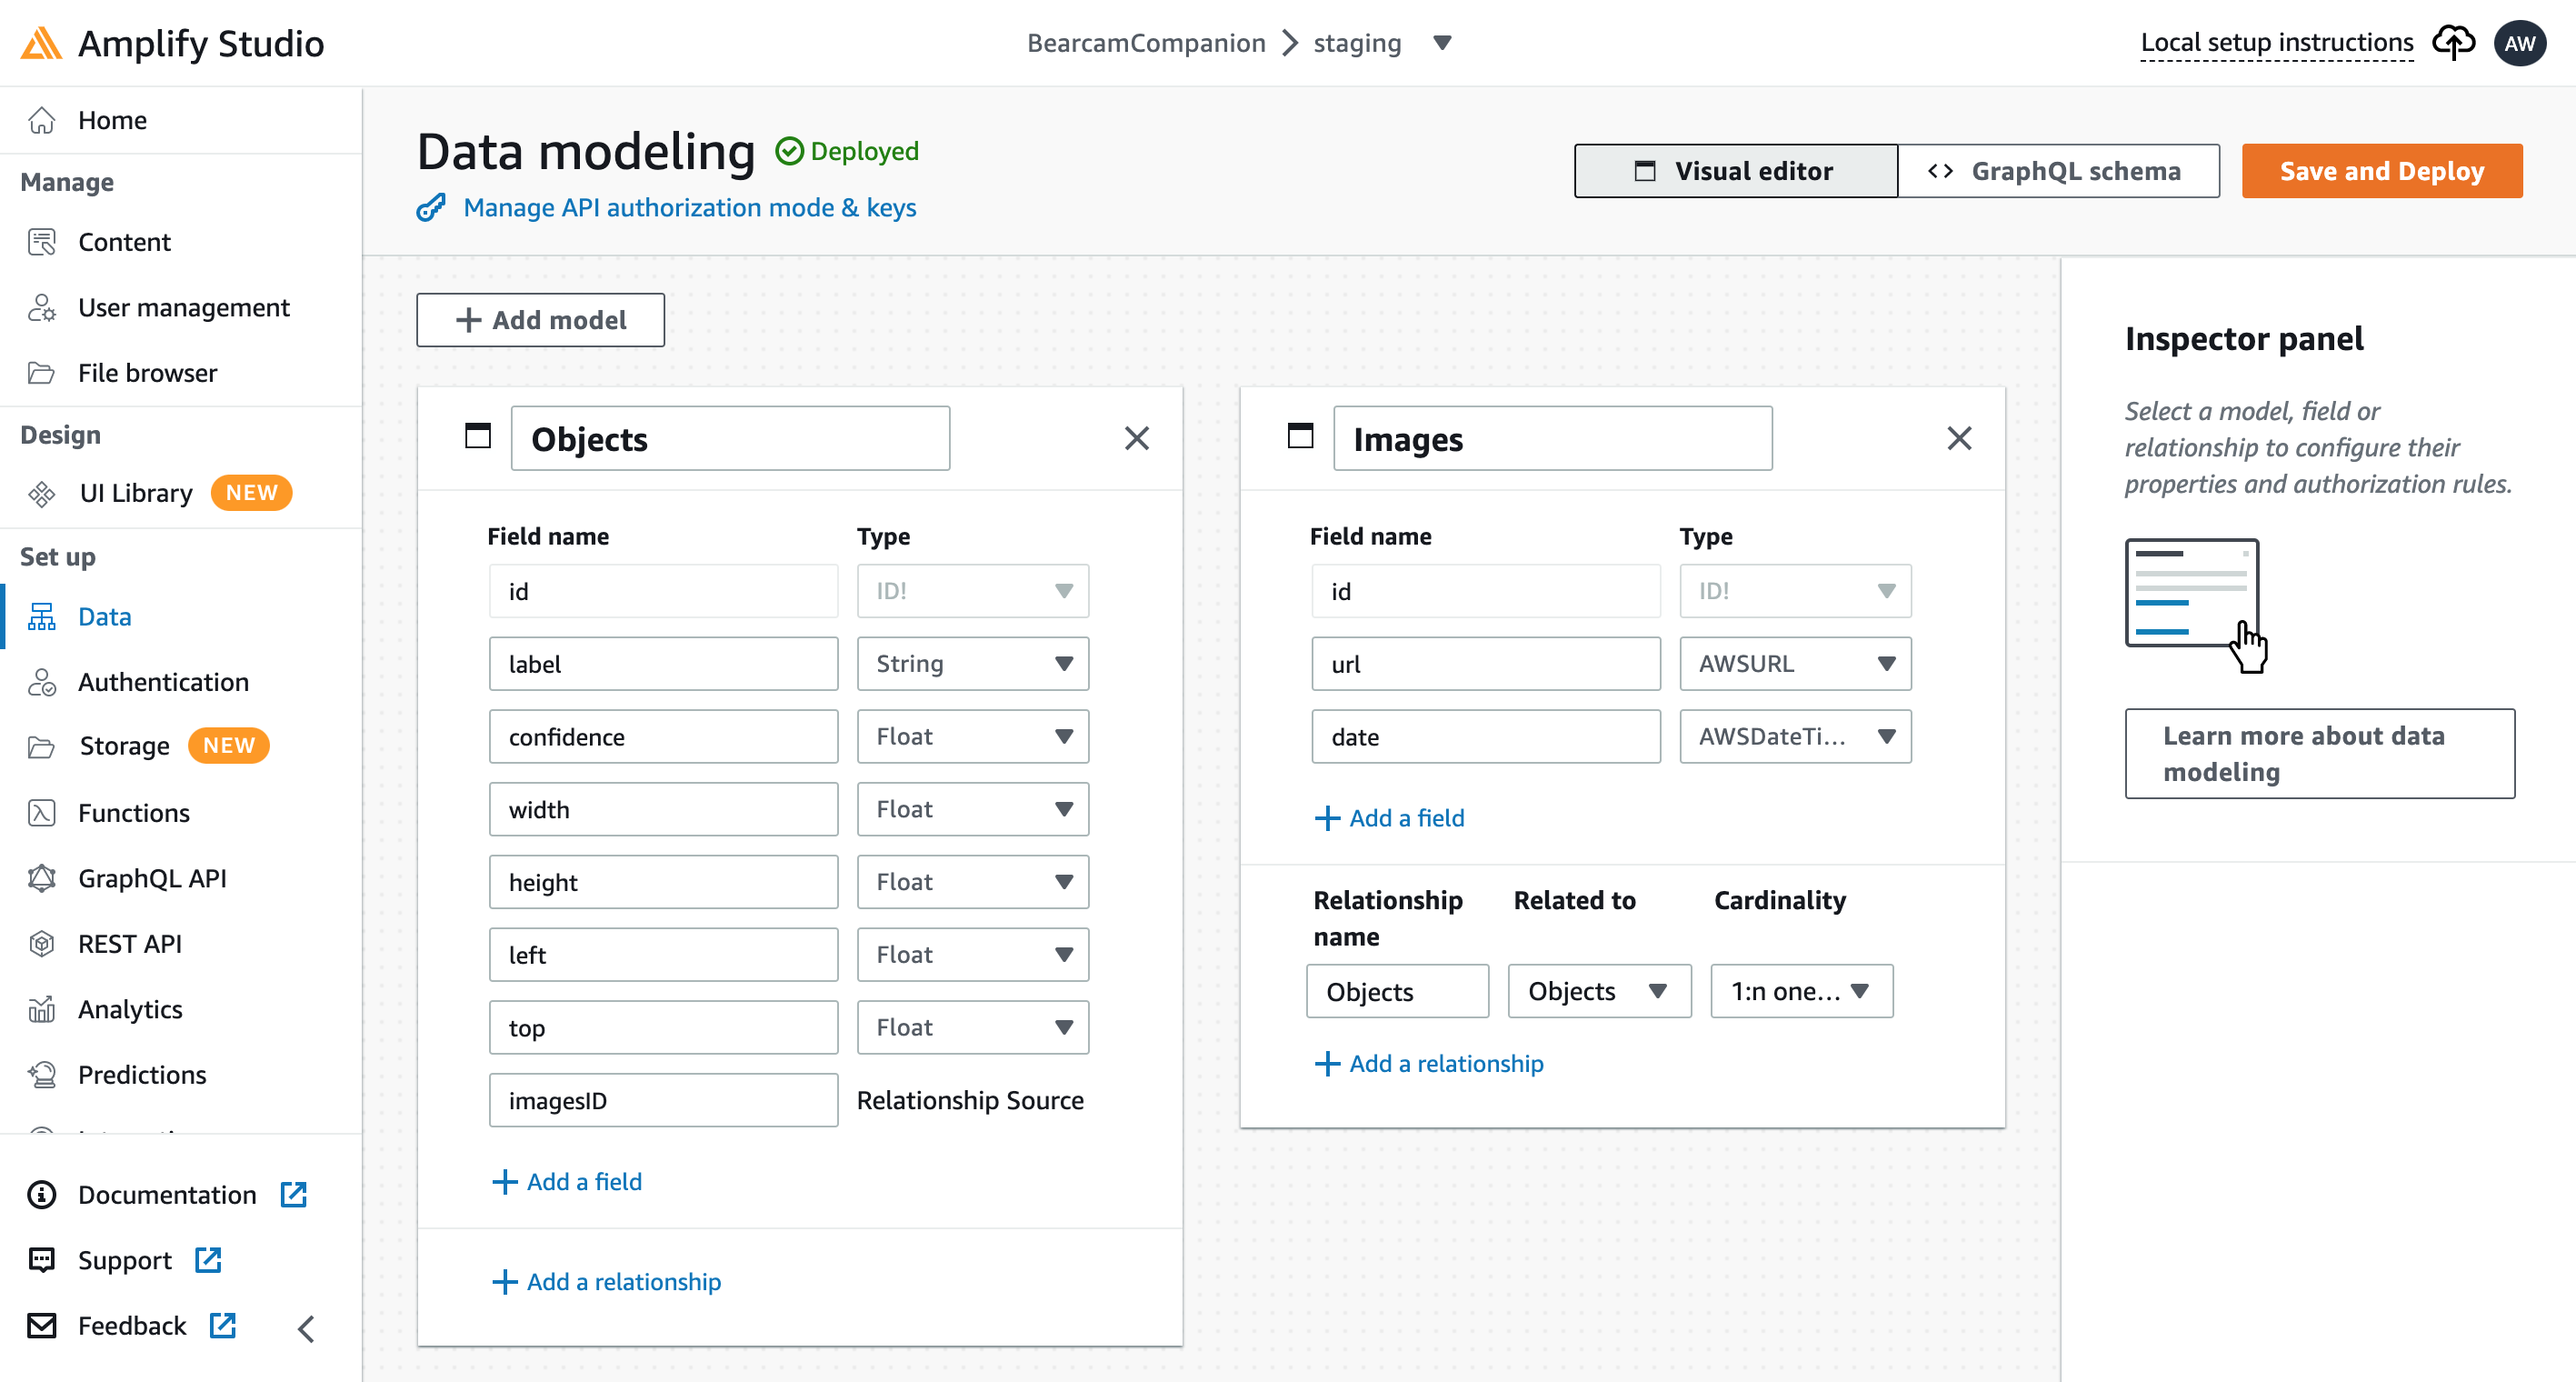
The first thing I did in Amplify Studio was to define the data models I would need. There were 3 main tables I came up with:
- Images: the source images from the bearcam feed
- Objects: the bounding boxes for the bears in each image
- Identifications: the name of each bear as labeled by users
I defined the first two in Amplify Studio, and when I clicked Save & Deploy, the DynamoDB tables and related schema were created. I'll add the Identifications later.
Content
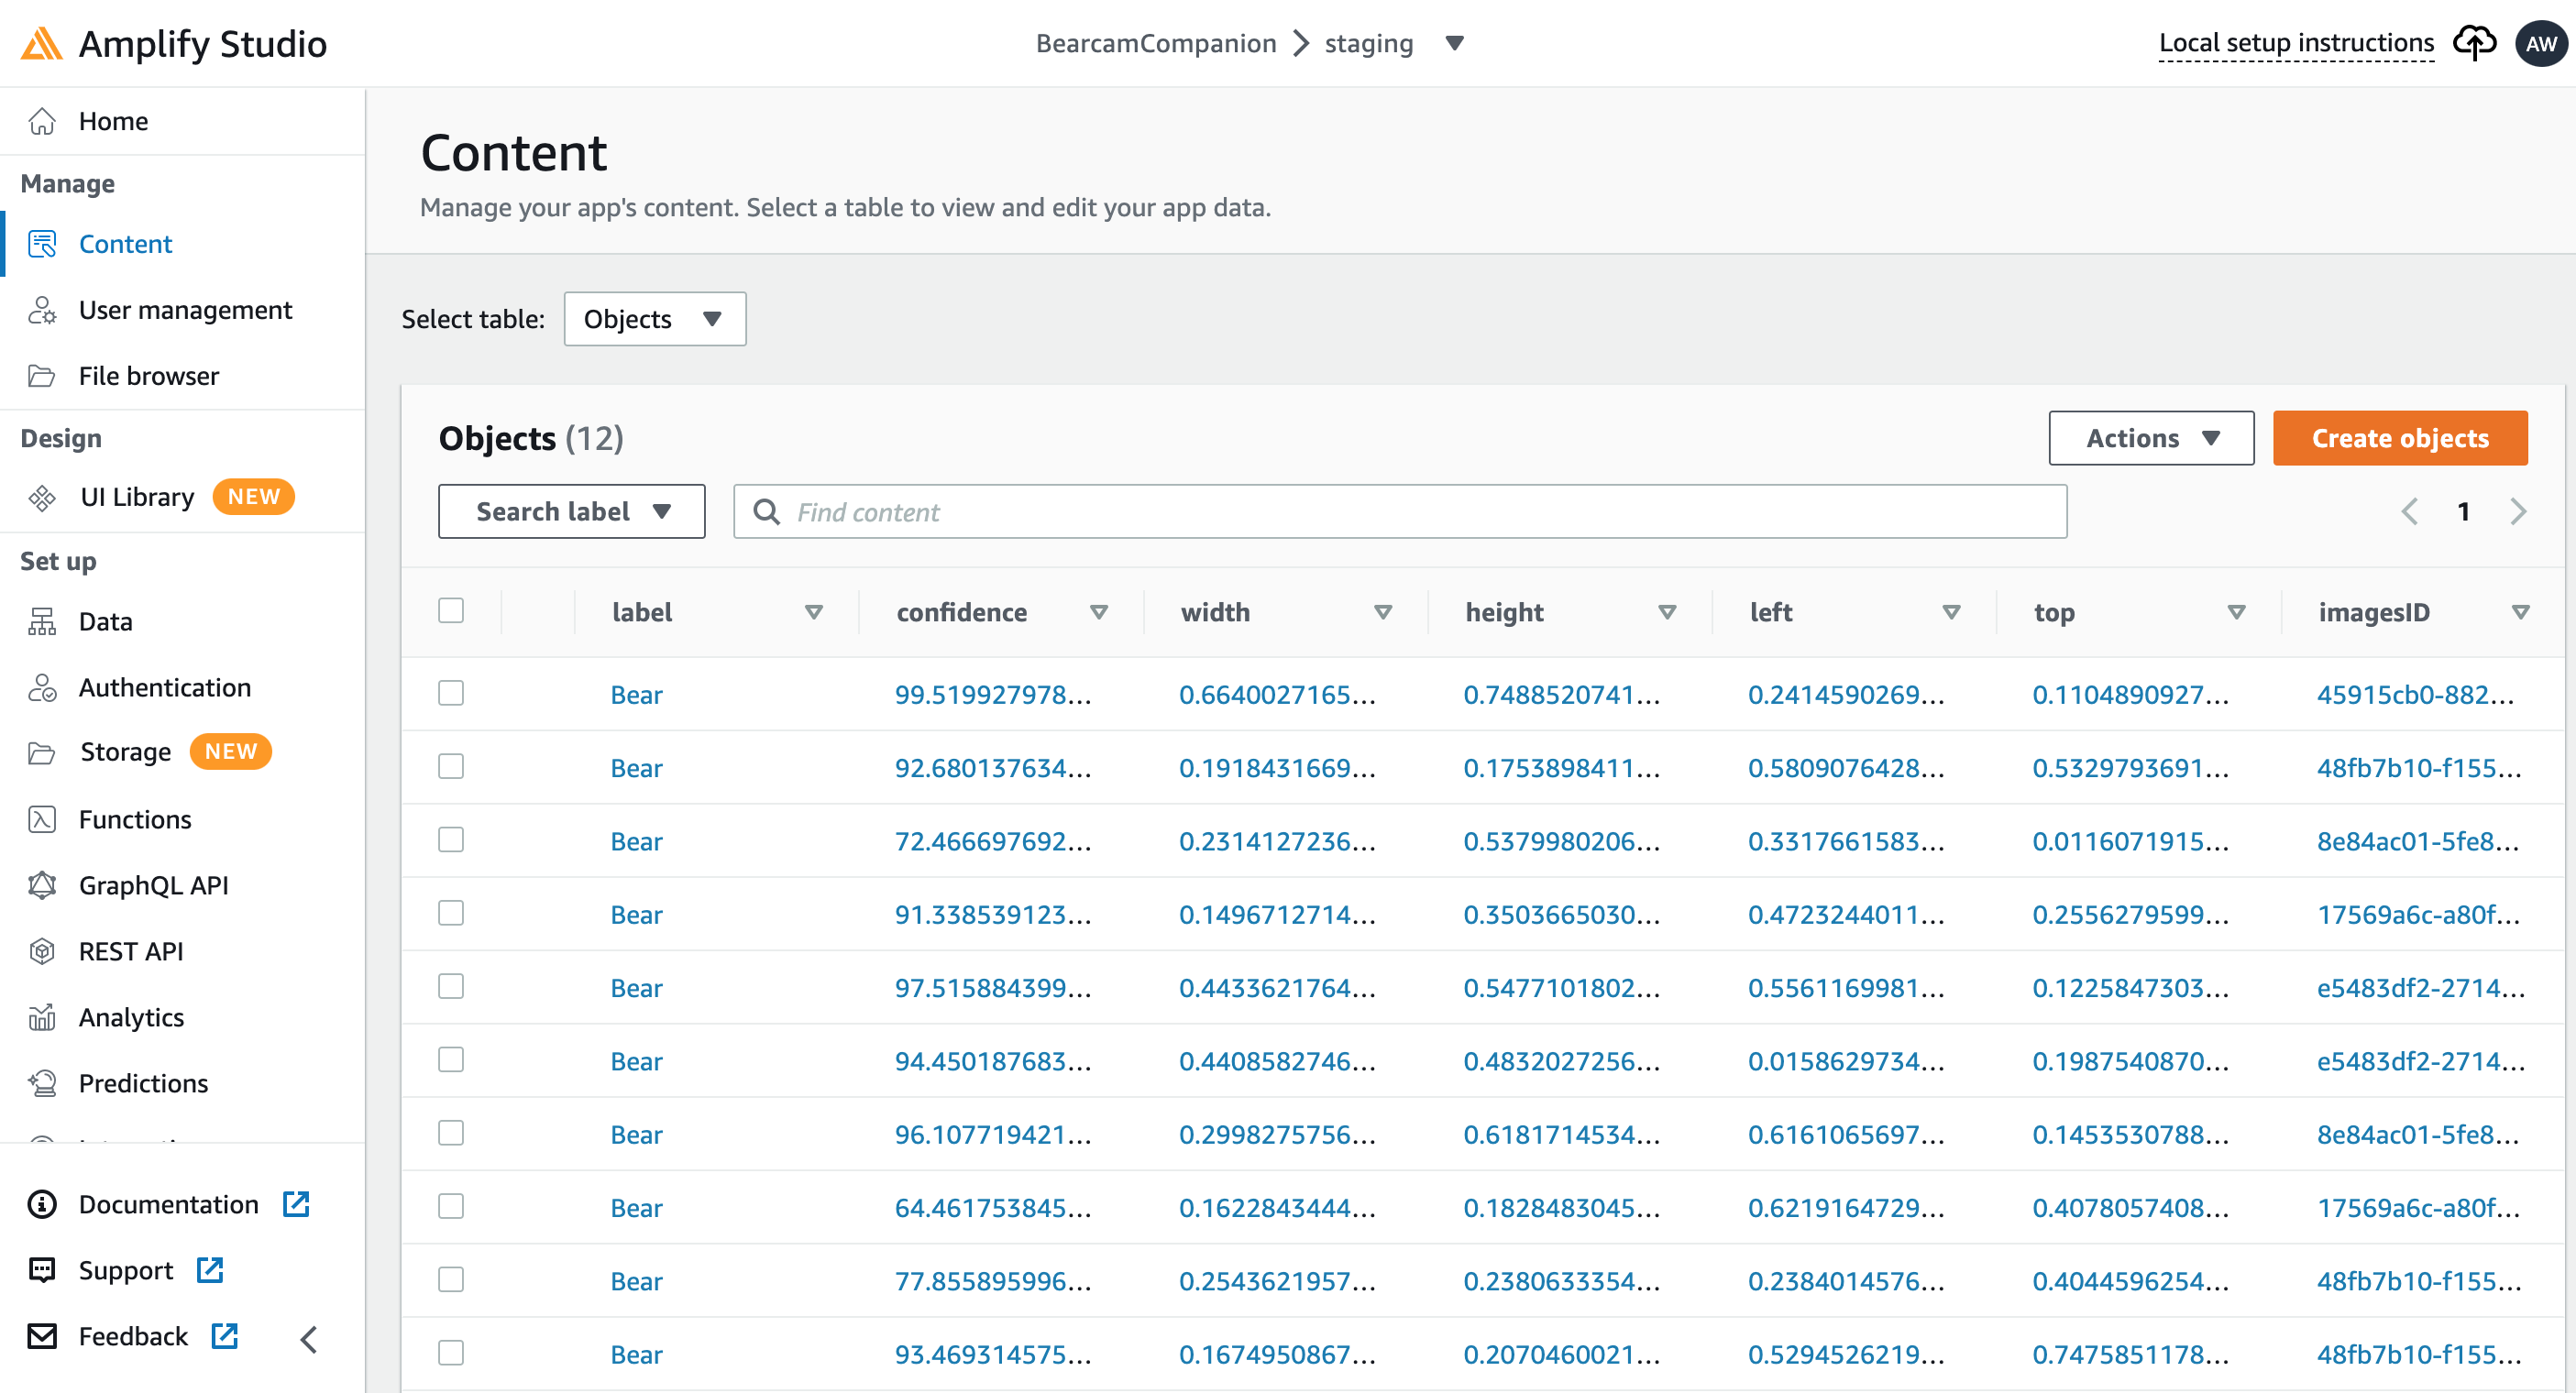
Once I had the tables, I was able to populate them in Amplify Studio as well. Fields can be auto-populated algorithmically, but I opted to manually fill some in with representative data:
- Images: rather than build a video pipeline to extract images from the feeds, I opted to use the Explore.org Snapshot gallery by copying the URL and date to the table
- Objects: I ran the images through Amazon Rekognition and manually entered the detected bear label, confidence and bounding box values into the table
UI Library
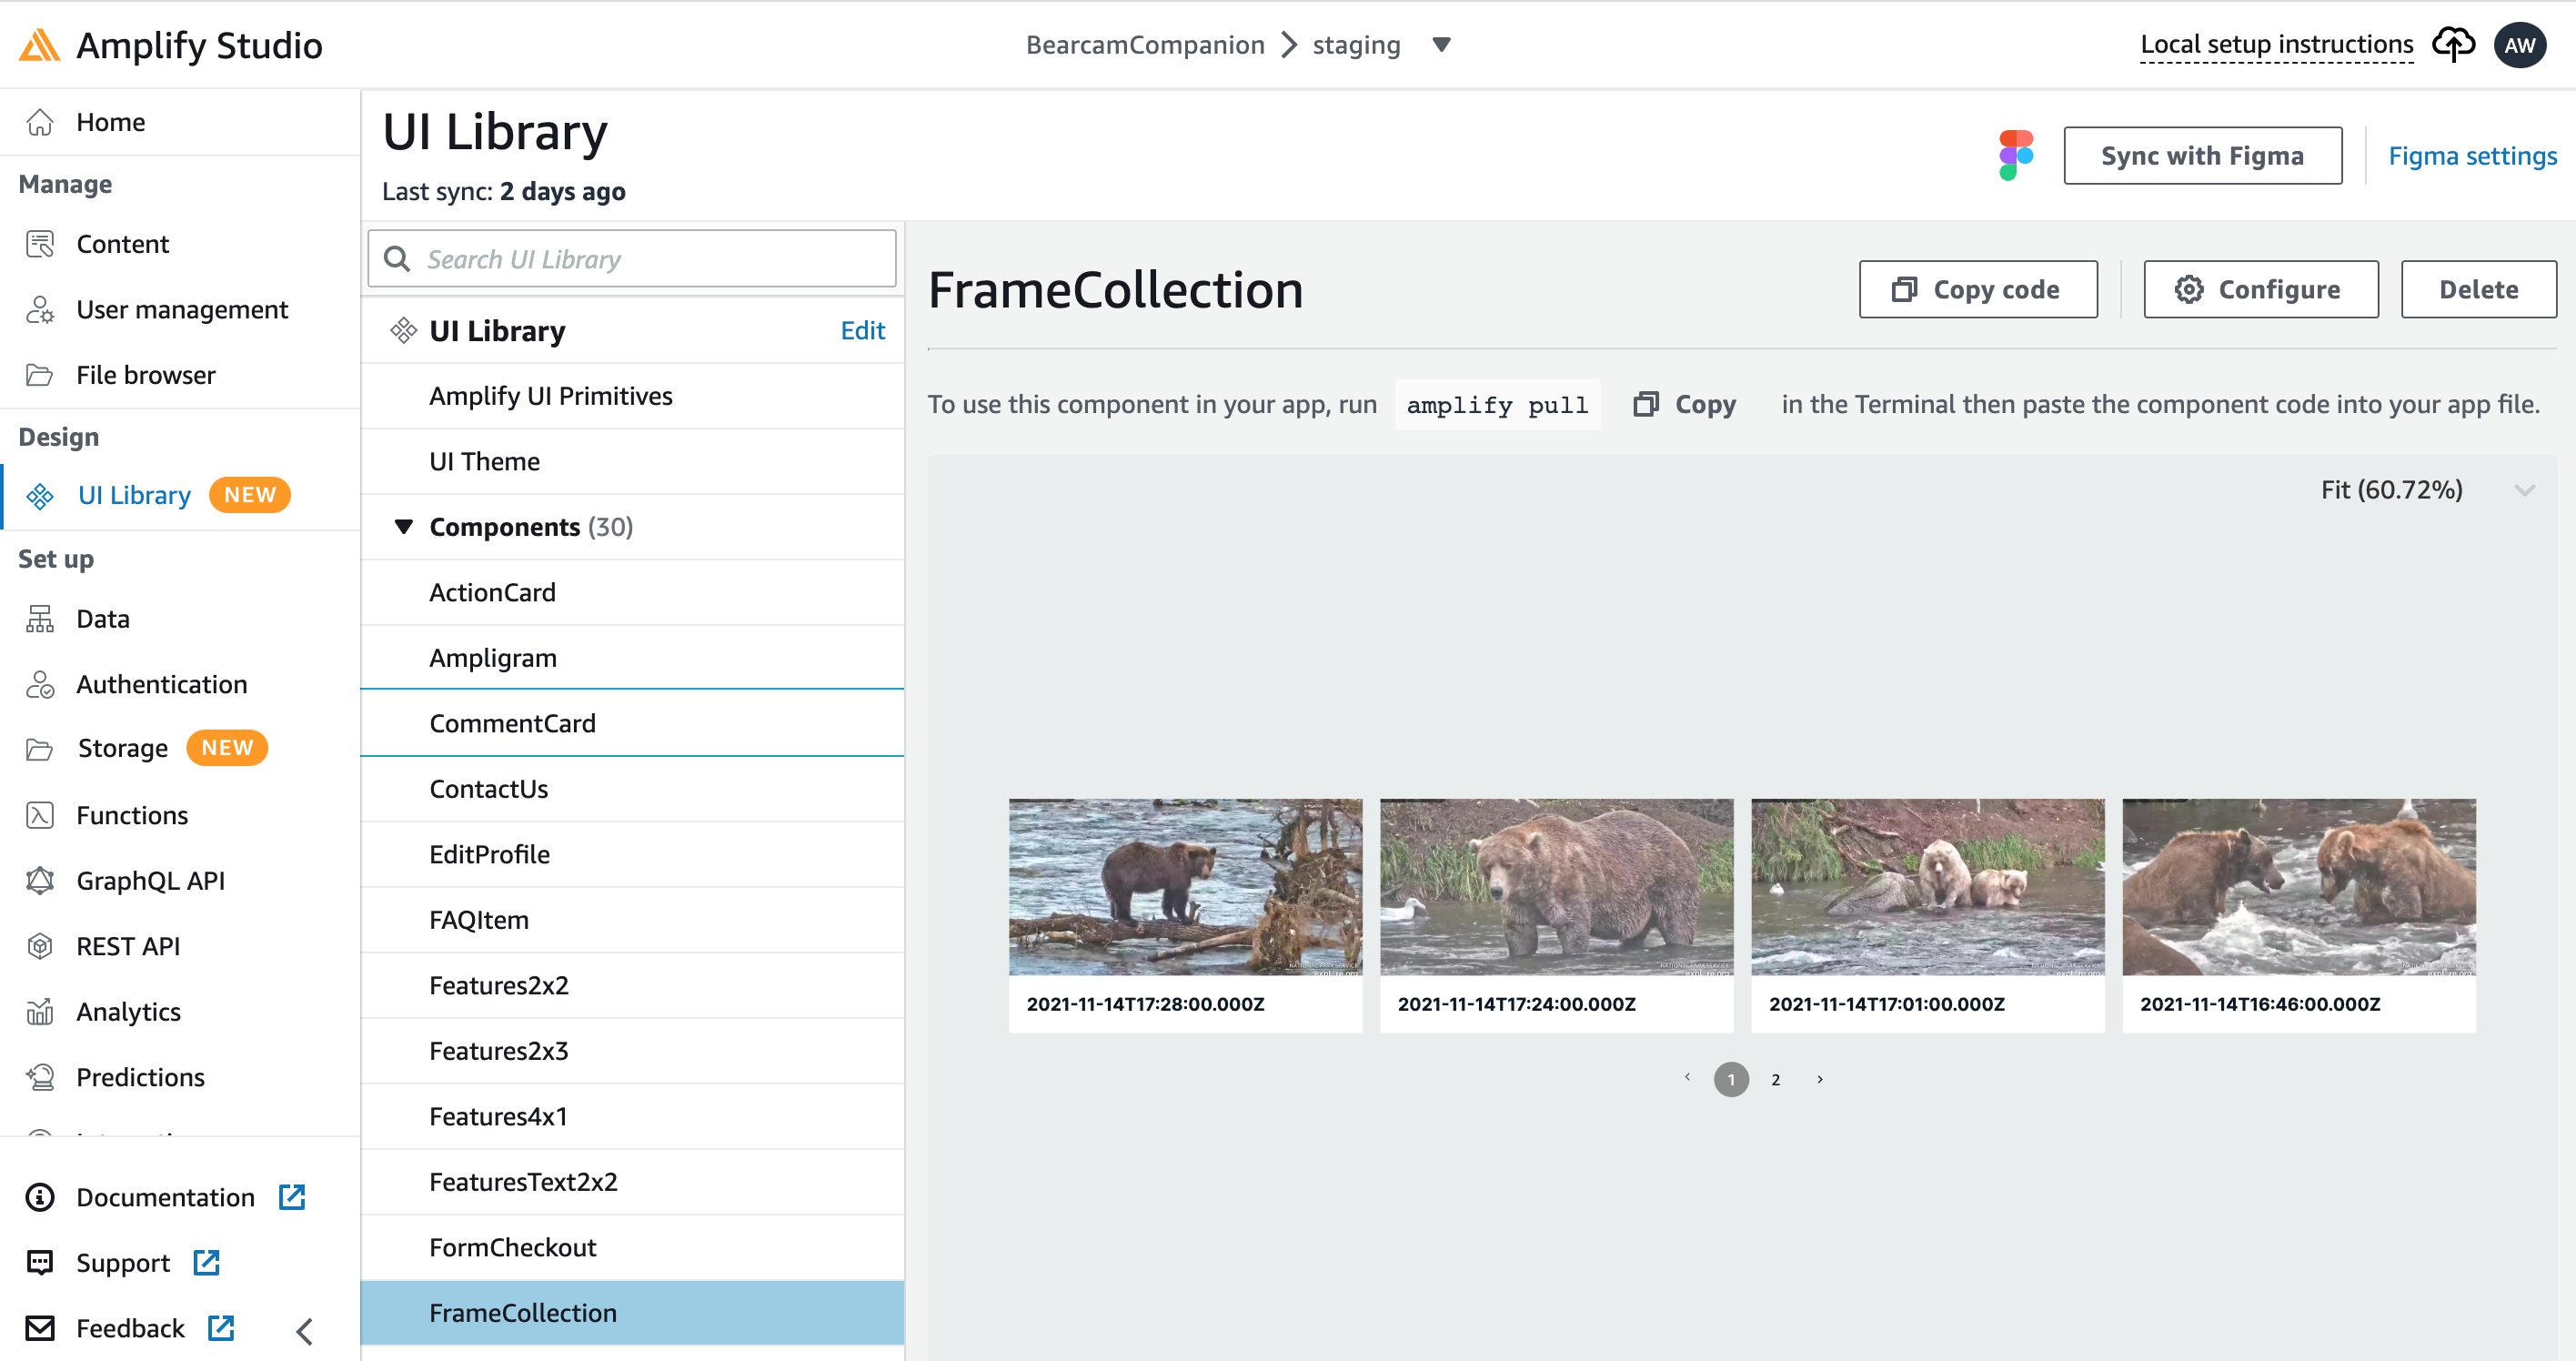
Amplify Studio has a UI Library which can connect with Figma, a collaborative web tool for UI design. The Amplify Studio demos provide sample Figma components. I adapted the StandardCard for an image thumbnail view and used the Collection functionality to create a paginated row of images. You can configure the collection to change the layout, page size, etc., by clicking the Configure button. You can also connect it to the data models. You can see the collection with real data right in Amplify Studio!
Frontend
For the frontend, I decided to use React. I have some experience with JavaScript, but haven't really used any of the frameworks. I mainly chose React because there are so many Amplify examples. Setting up the React framework for myapp is as simple as:
npx create-react-app@latest myapp
cd myapp
See the Getting Started page for more info.
Amplify CLI
Much of the heavy lifting from here on will be done by the Amplify CLI. The first thing is to pull in the code generated by Amplify Studio into the local application code base:
amplify pull --appId <app-ID> --envName <environment>
You can get the exact command for your application and environment from Local setup instructions in Amplify Studio. This pulls in a bunch of stuff under ./amplify, the data schema under ./src/models and the UI components under ./src/ui-components. I created a FrameView component which uses the FrameCollection component I created in Amplify Studio:
import { FrameCollection } from './ui-components'

export default function FrameView () {

    return(
      <div>
        <FrameCollection width={"100vw"} itemsPerPage={4} />
      </div>
    )
}
I can view may application in the browser by running npm start and going to http://localhost:3000/:

Authentication
I want each user to have a username so I can keep track of the bears they identify. I used Amplify Studio to enable authentication (I could also use the CLI) and did an amplify pull to get the changes. I added the Sign In and Create Account functionality to my application by wrapping it in withAuthenticator provided by @aws-amplify/ui-react. The default sign-in UI looks like this:
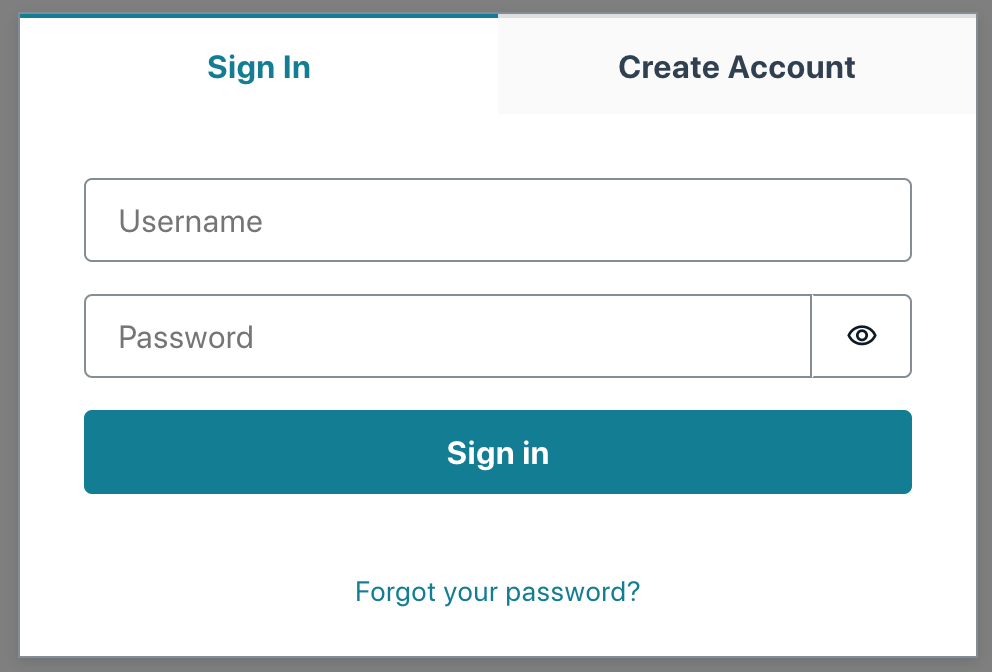
Aside from the default UI, Amplify automatically sets up the necessary authentication resources, like Amazon Cognito. Users and groups can be managed in Amplify Studio.
Data Model: Identifications
Now that I have users, I created the Identification data model, which includes the user:
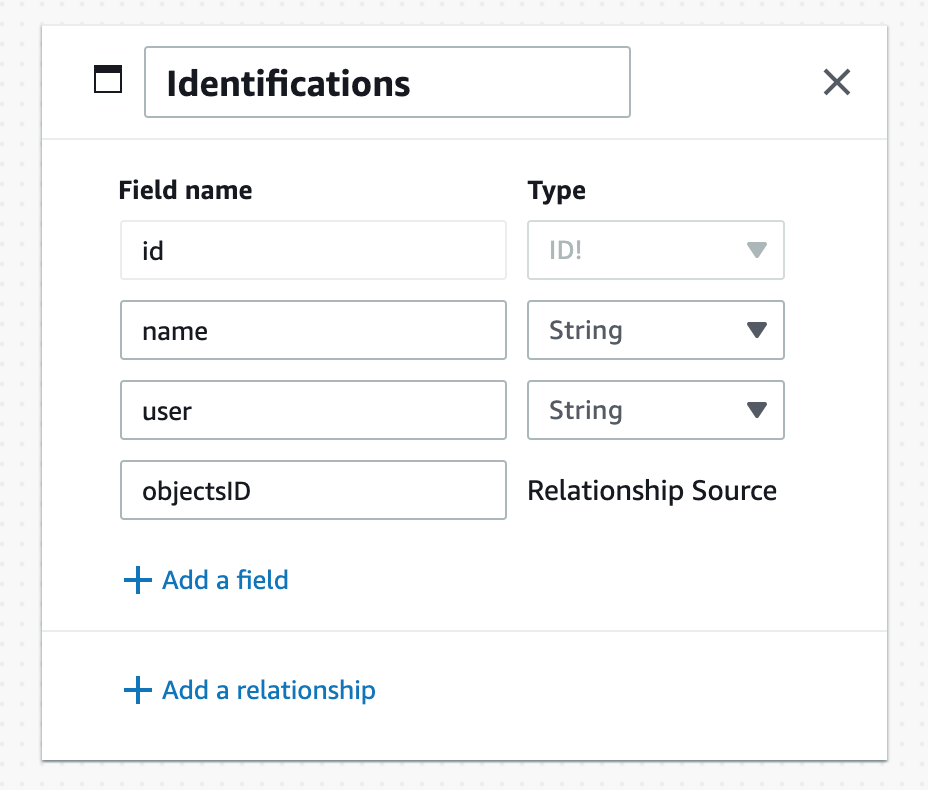
Once again I filled in some example data in Amplify Studio.
GraphQL and DataStore
The data models created in Amplify Studio get the appropriate GraphQL APIs for basic CRUD operations. They also get APIs for distributed data and offline use through Amplify DataStore. Querying the Identifications table for all that match a box.id from the Objects table looks like this:
var idents = await DataStore.query(Identifications, c => c.objectsID("eq", box.id));
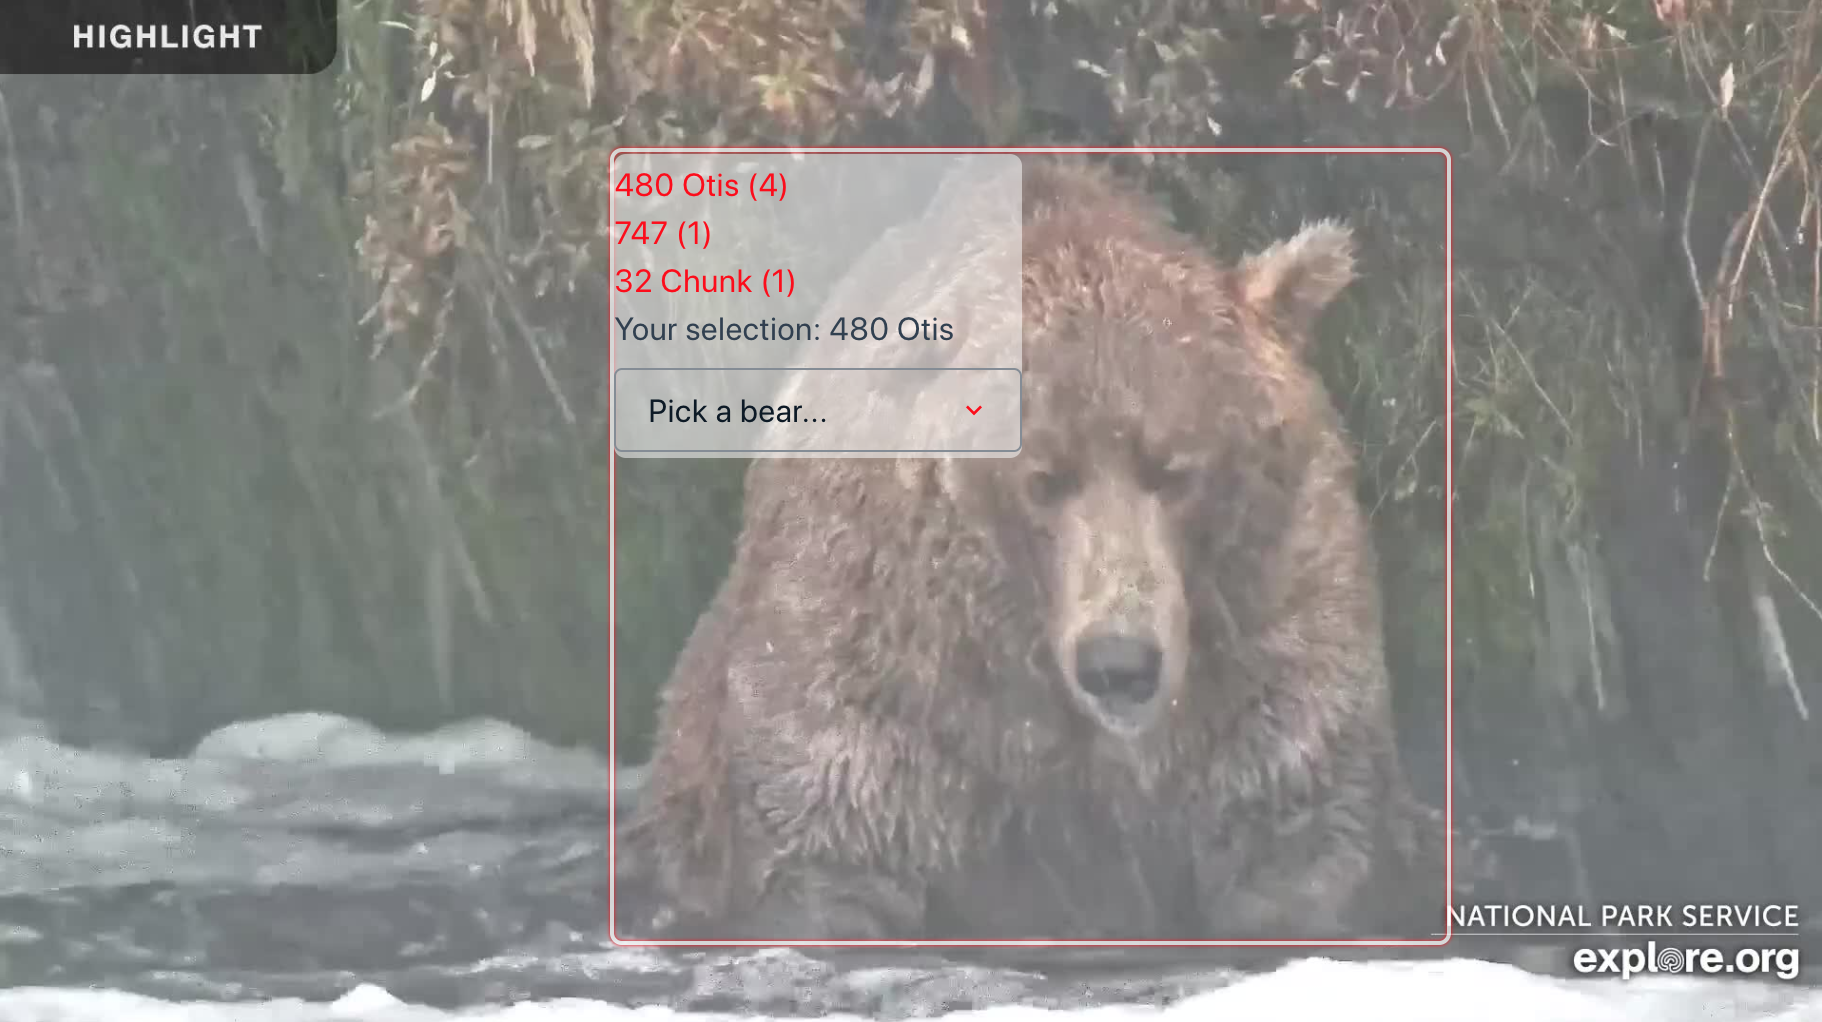
Aggregation is not provided by DataStore. I utilized React's useState() and useEffects() hooks along with DataStore queries to aggregate the number of users identifying a bear with a given id. This information is displayed when the user hovers over a box:
Predictions
Once I had the basic user interfaces developed, I needed to start adding more data. Running images through Amazon Rekognition and manually adding results to the Objects table is time consuming. So I built a simple interface in the application to upload an image to Rekognition and automatically add the results to the table.
I added Rekognition to the project by running amplify add predictions and selecting Identify Labels. In the application, I added a form to select and image which is sent to Recognition using the Predictions.identify() API from aws-amplify. The JSON response contains the predictions results. For each bounding box in the result, I extract the relevant fields and save them to Objects using DataStore.save().
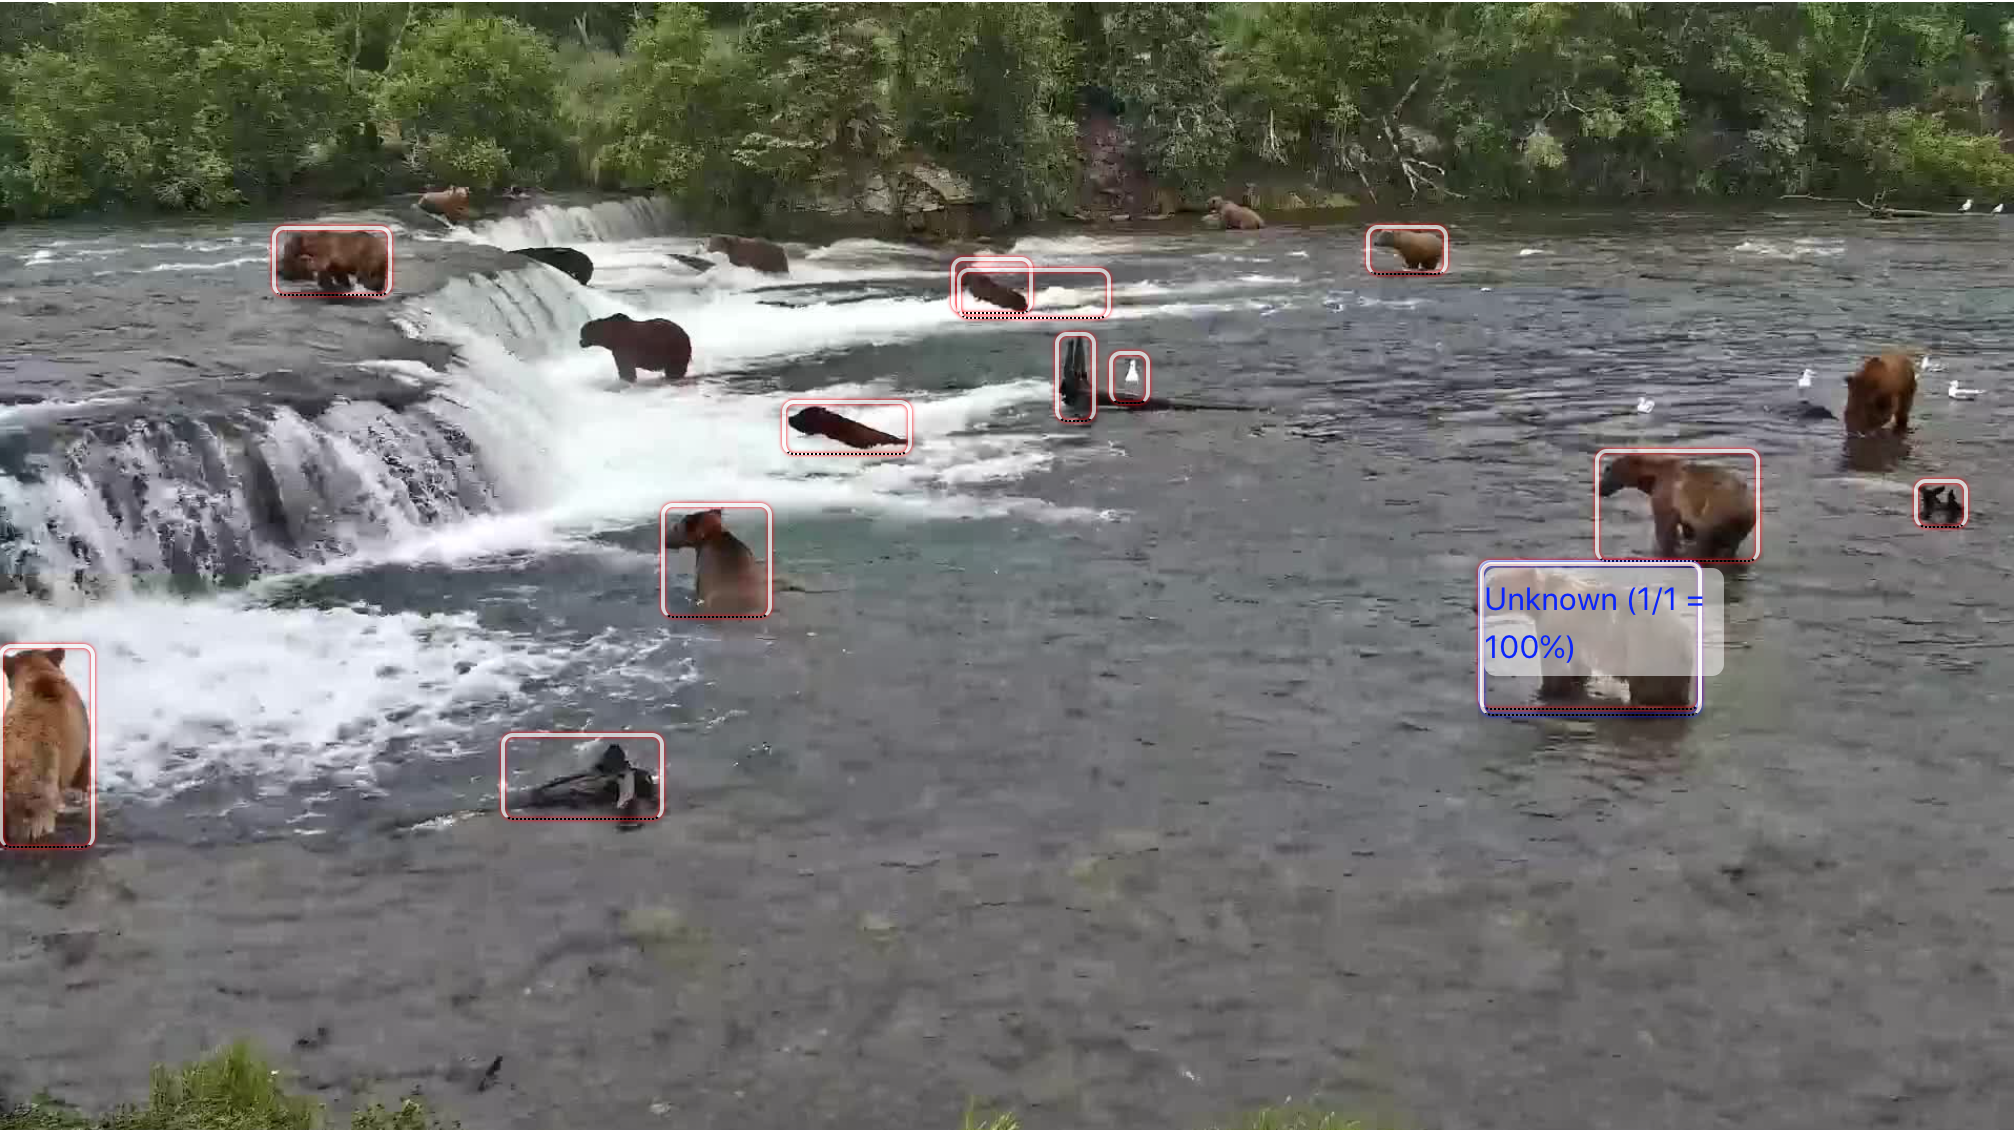
While Rekognition does identify bears, it often misidentifies them, so I save all the boxes. In the image below, only the bear showing "Unknown" was identified as a bear. The others were identified as other species (e. g. dog, cow, bird, etc.). There are also some non-bear objects. These can be edited in the application later.
Storage
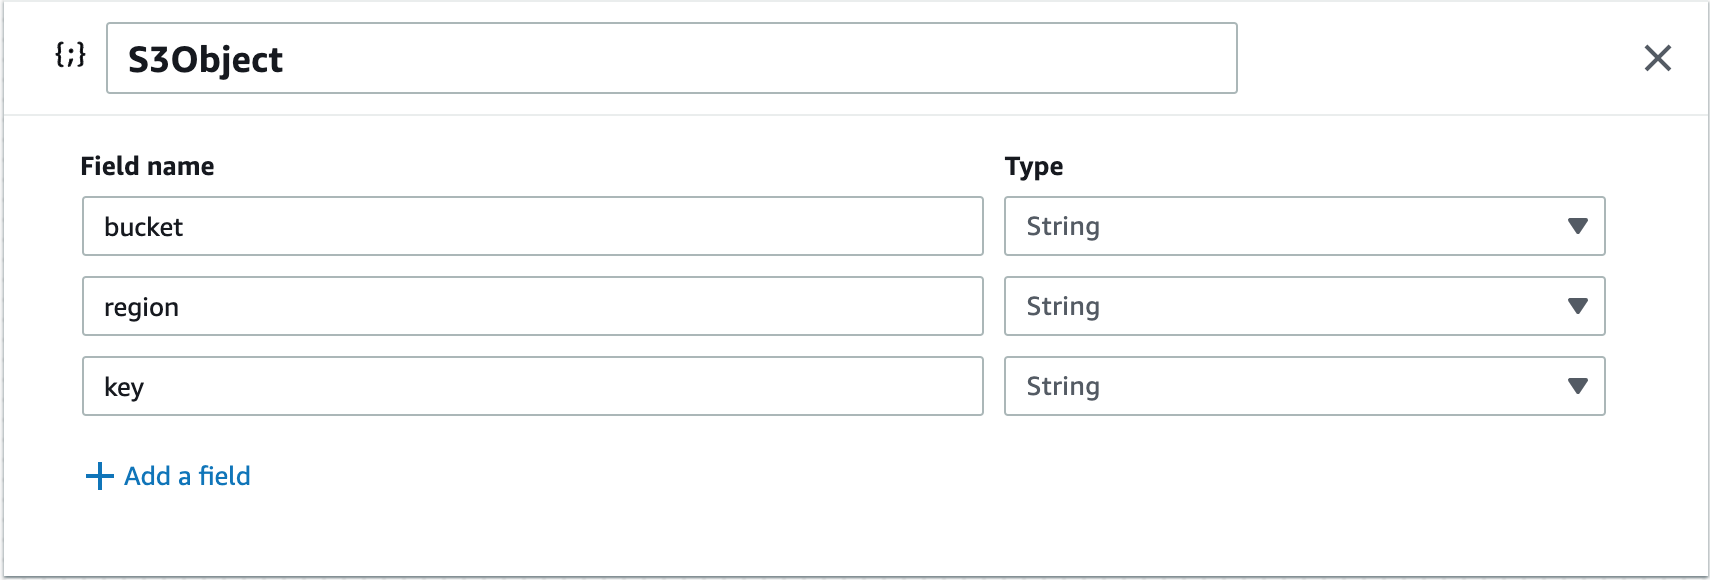
So far I had been working with the images directly from the Explore.or Snapshot gallery. To save these in my application for later use, I added an S3 bucket using the Amplify CLI command, amplify add storage. In Amplify Studio Data modeling, I added a new model, which I called S3Object. This model contains a bucket, region and key:
Then I added S3Object as file to Images:
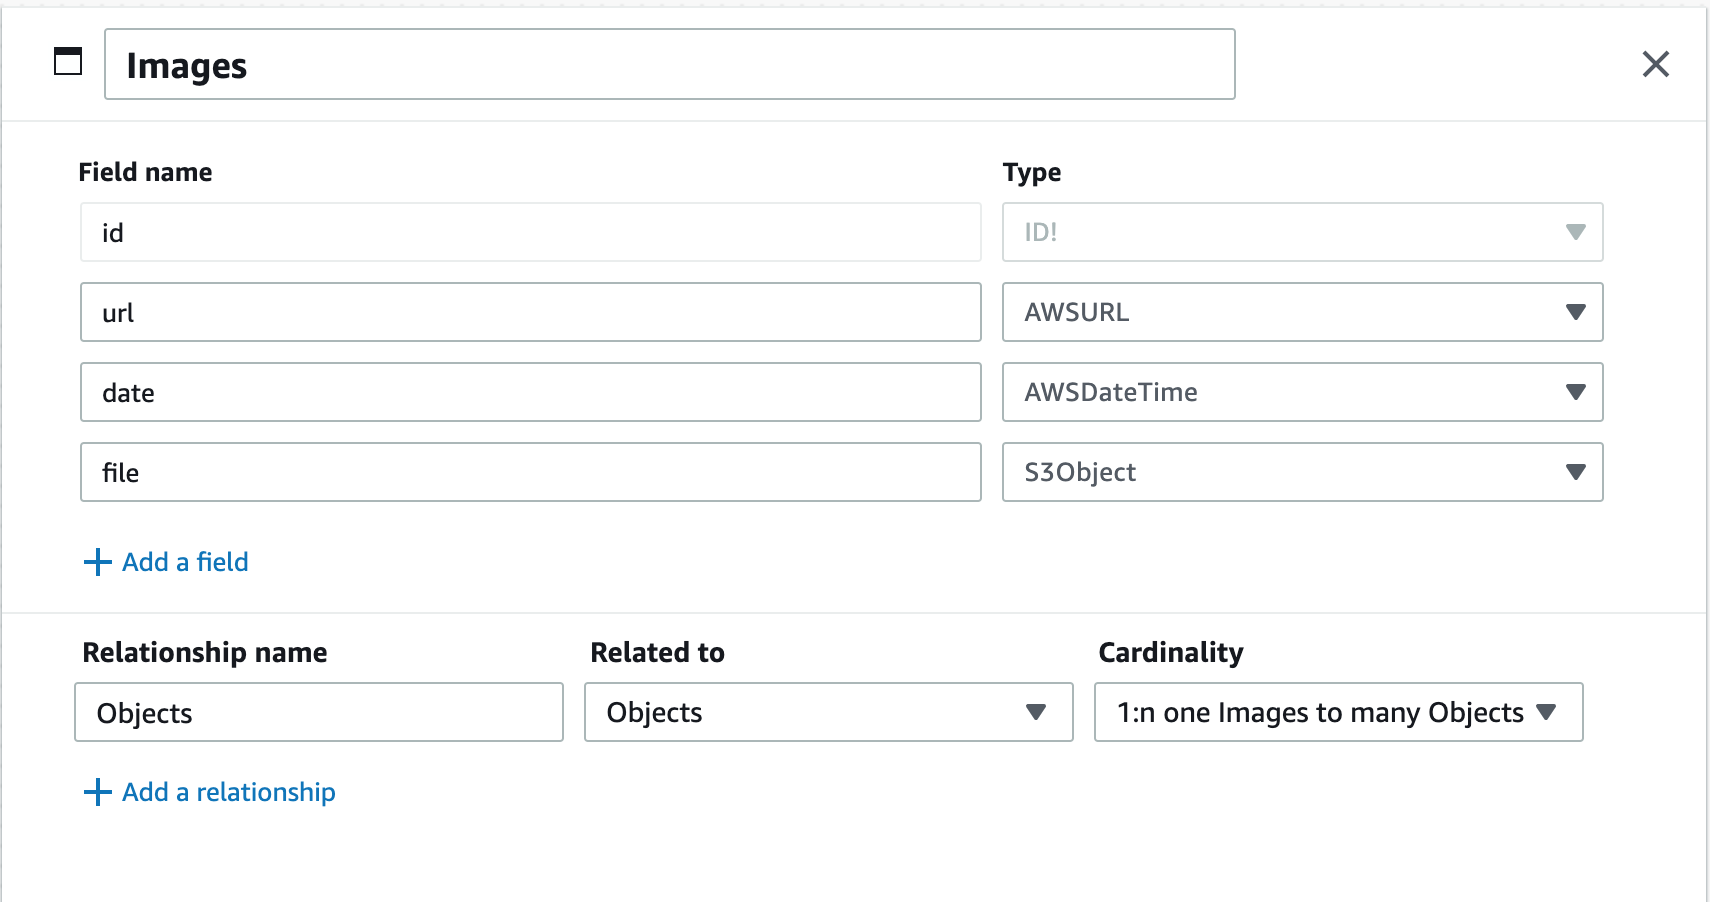
From my application, I can now upload images to S3 using the Storage.put API and include the S3Object information when writing the Images table with DataStore.save().
Functions
There are functions I want to run in the cloud rather than in the application. For example, I envision a function running periodically which will get the latest image from the Explore.org Snapshot gallery and add it to the application. When a new image is saved, it should be sent to Rekognition to run object detection. To accomplish these functions without managing a server, I utilized AWS Lambda.
Lambda for Rekognition
Since I already had a way to upload images, I decided to start with the Lambda for Rekognition. The idea is to automatically trigger the function when an item is added to the Images table. Setup starts with the Amplify CLI command amplify add function. This will walk you through several options. For this function, here are my key settings:
- Function Name: bcOnImagesFindObjects
- Runtime: NodeJS
- Function template: CRUD function for Amazon DynamoDB, since I will be reading from the Images table and saving the Rekognition results in the Objects table
- Resource access: GraphQL endpoints for Images and Objects
- Trigger: DynamoDB Lambda Trigger for Images
After creating the function, a template appears in the project directory at
amplify/backend/function/<function-name>/src/index.js
When there is a change to the Images table, this function is invoked with an event stream (multiple events can be batched for efficiency). I only care about INSERT events, so I parsed those from the stream and extracted the S3 information for the image. Next I loop through the images and send them to Rekognition using the AWS SDK API rekognition.detectLabels. I pull out the detections from the JSON response along with the associated image id. Finally, I use fetch() to POST the data to the Objects GraphQL endpoint. I need to include aws-sdk and node-fetch along with setup for Rekognition:
const AWS = require('aws-sdk');
const rekognition = new AWS.Rekognition();
const fetch = require('node-fetch');
Testing Lambdas Locally
I tested this Lambda function locally using amplify mock function. This runs the Lambda in a local runtime and feeds it with event data from a JSON file. I captured a DynamoDB stream event from CloudWatch and used it for testing. I was able to find and resolve some problems this way. One issue was related to writing directly to the Objects DynamoDB table. Some of the auto-generated fields were not being filled in. Using the GraphQL endpoints to write through AppSync fixed this.
Testing Lambdas in the Console
Once the function was working locally, I did an amplify push to deploy it. It immediately failed on the following line:
const fetch = require('node-fetch');
The package, node-fetch is not part of the standard NodeJS runtime used by Lambdas. I needed to include this package. You can further test and modify code in the Lambda console:
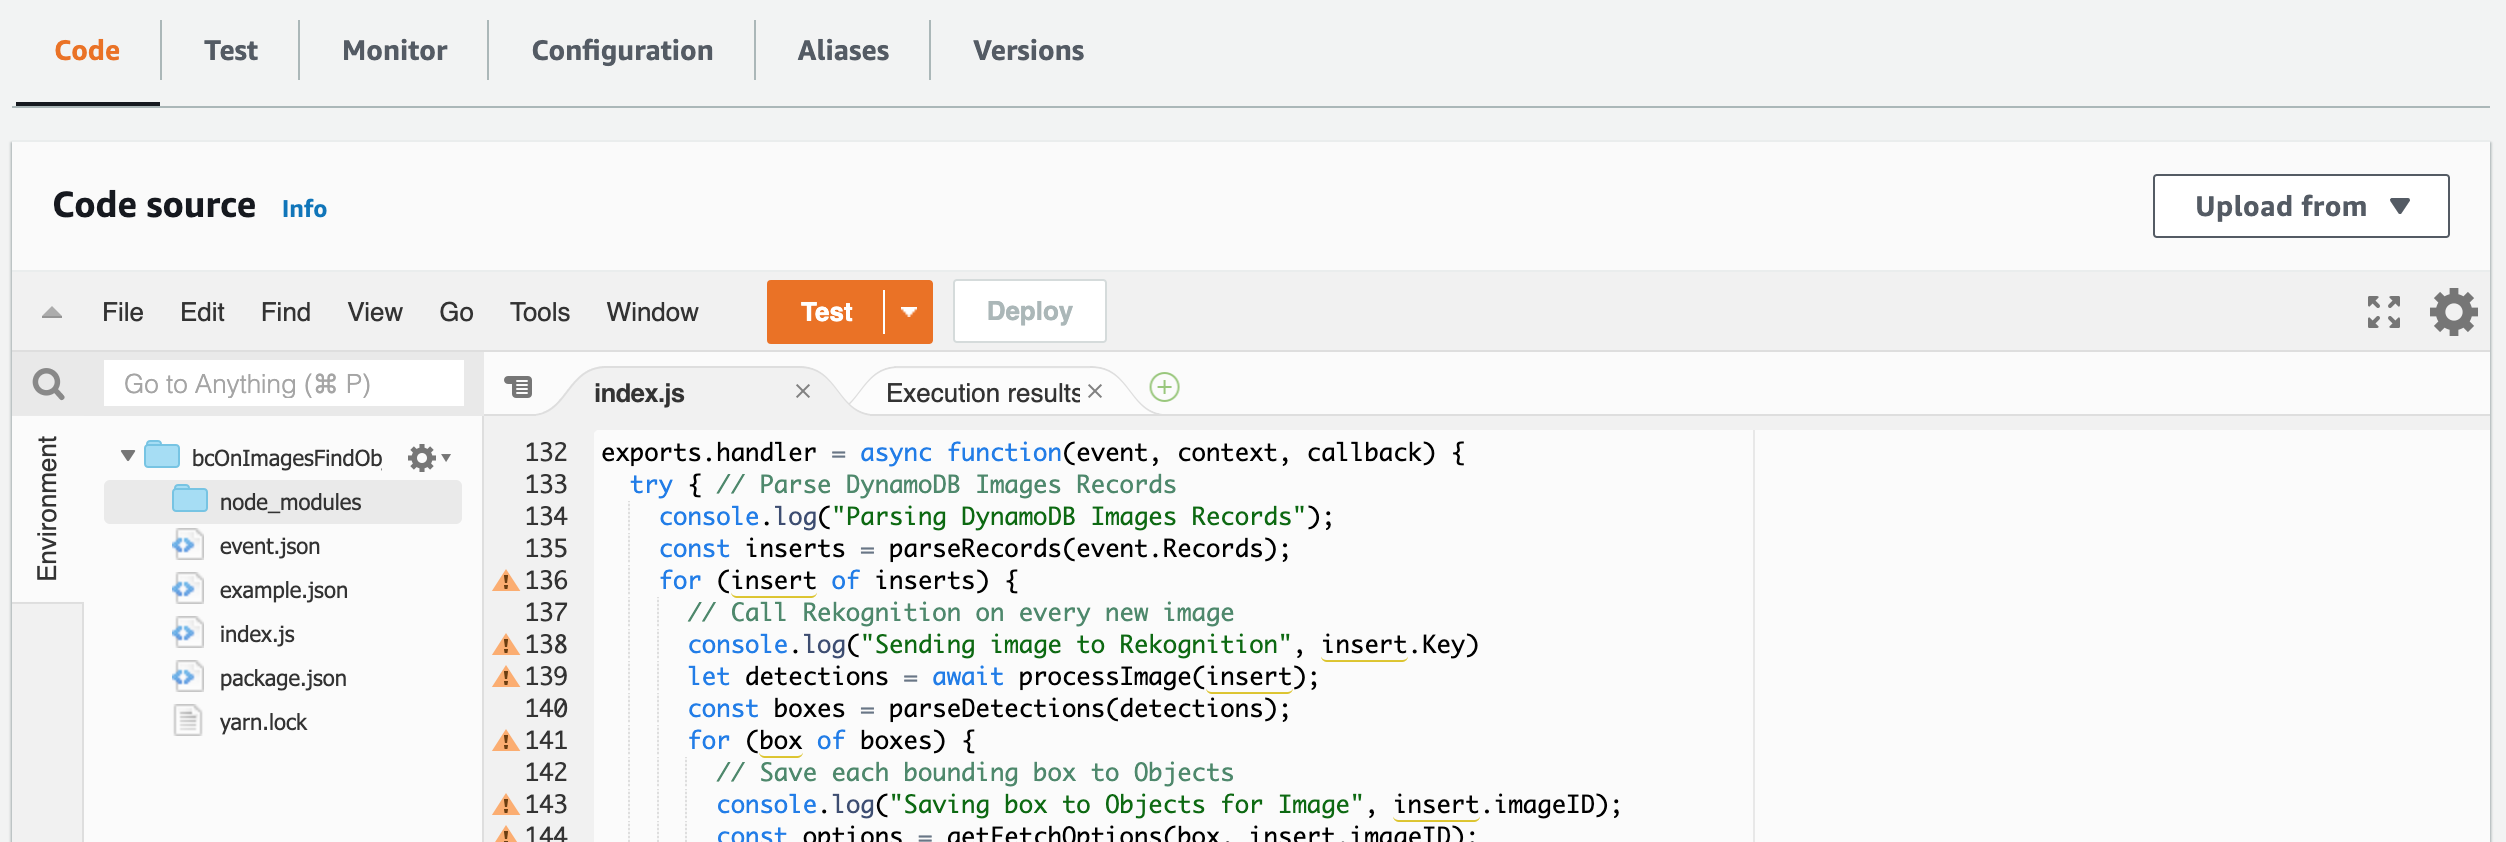
You can test the function from the console using JSON event files (similar to amplify mock function). You can also access various logs and jump to the CloudWatch LogStream for more details:

Lambda for API
As I mentioned, I want to eventually have a function fetch the latest image from Explore.org Snapshots automatically. In the meantime, I need to pull in these images manually. Rather than managing this with copy & paste, I would like to add something to the application to browse recent Snapshot and save some to the application. Since I have a few different actions to achieve, I would like to build a REST API using Amazon API Gateway. Here are the APIs I want to create:
| Method | Path | Description |
| GET | /explore/list | fetch recent images from Explore |
| POST | /explore/latest | load most recent image from explore to S3 and write to Images |
| POST | /explore/upload | load selected image (url and date) from explore to S3 and write to Images |
Once again I run amplify add function, but for the Function template I choose: Serverless express function (Integration with Amazon API Gateway). I also enable access to api (Images) and storage (my S3 bucket). As before, the function template is in:
amplify/backend/function/<function-name>/src/index.js
The template already includes variables to access the resources I specified. Once I implemented the APIs, I tested them locally using amplify mock function with different JSON files for /explore/list, /explore/latest and /explore/upload API calls. For example, I tested the /explore/latest API with this command:
amplify mock function bcExploreLambda --event src/event-latest.json
The event-latest.json file looks like this:
{
  "httpMethod": "POST",
  "path": "/explore/latest",
  "headers": {
    "Content-Type": "application/json"
  },
  "queryStringParameters": {},
  "body": '{"feed": "brown-bear-salmon-cam-brooks-falls"}'
}
Once all the APIs were working, I deployed the new function with amplify push. At this point, I added components to the application using the new APIs. For example:
- a list of recent images using
/explore/listand a button to Save Image using/explore/upload - a button to trigger
/explore/latest
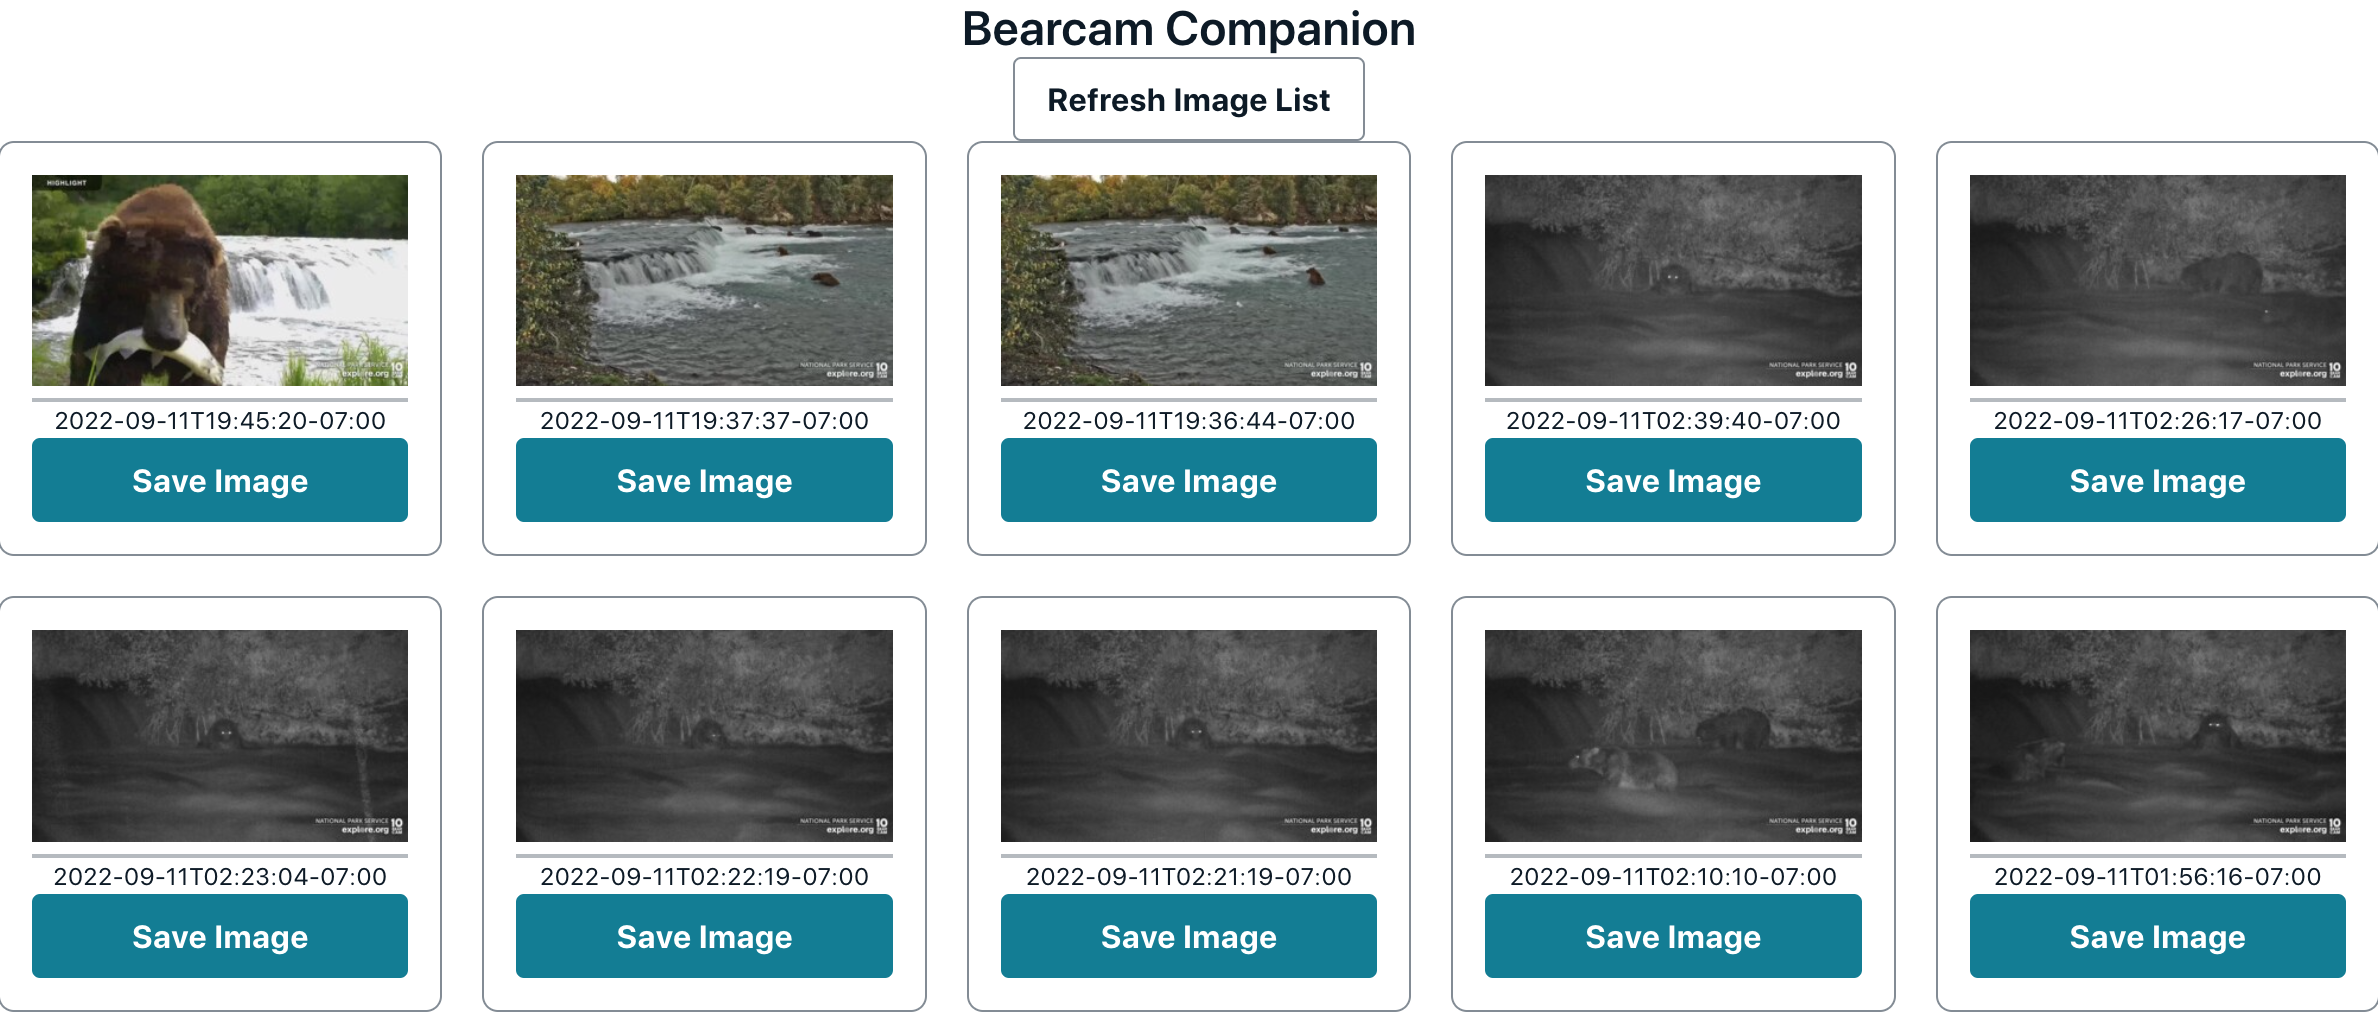
In addition to triggering /explore/latest from the application, I want it to trigger on a schedule. I achieved this using Amazon EventBridge. I created a rule which triggers on a schedule of every 10 minutes between 9AM and 10PM Pacific Time every day. The time needs to be in UTC, and it crosses midnight. Here's the cron syntax I used:
0/10 0-4,16-23 ? * * *
Here's the EventBridge target:
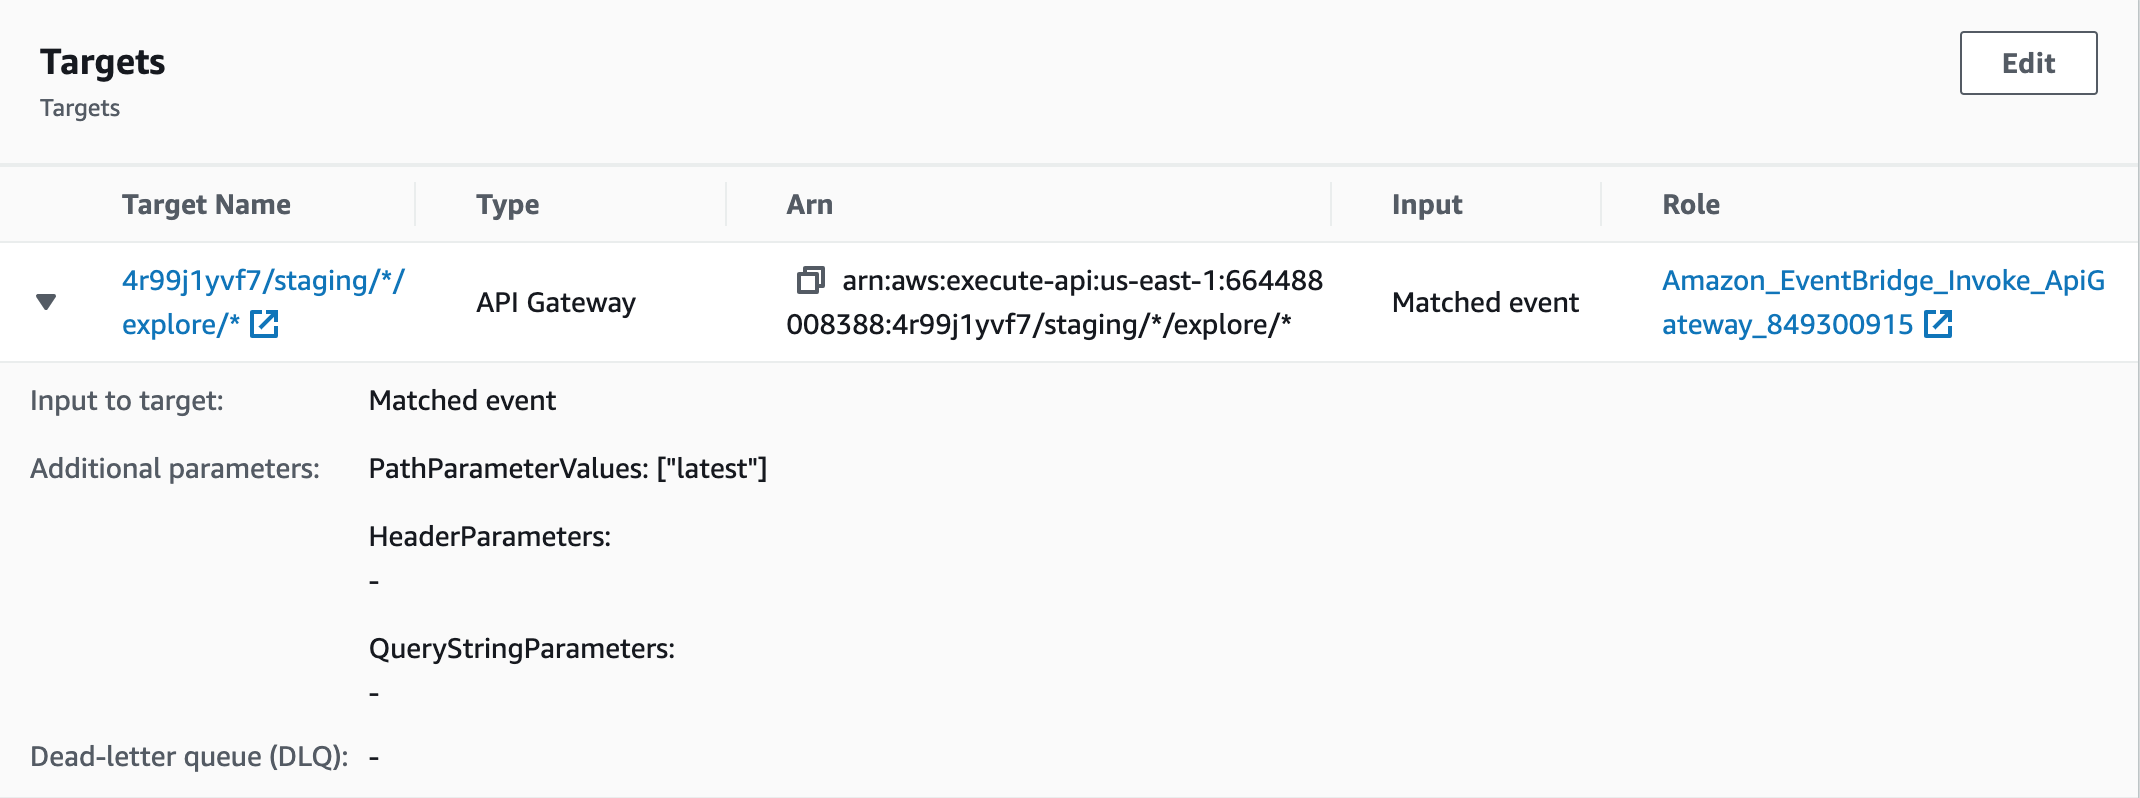
Since I already trigger the Rekognition function whenever the Images table is updated, that function triggers at the end of this one.
Lambda Layers
If you use the same libraries across multiple Lambda functions, you may want to utilize Lambda Layers. Here's a diagram from the Amplify docs on Layers:

Using the Amplify CLI, you can add a Lambda Layer much like you add a Lambda function
amplify add function
The layer is added to your project at amplify/backend/function/<layer-name>. You can add packages in this directory with the appropriate package manager, in my case, npm for NodeJS:
npm i node-fetch
After setting up the Lambda Layer, update the Lambda function to have it use the layer:
amplify update function
Deploy the function updates and new layer with amplify push.
NOTE: once you add a Layer to a Function, you can no longer use
mockto test it.
Lambda Runtime
The final thing I did related to Lambdas is switch the runtime to the lower cost arm64 instruction set (makes use of Graviton instances). Per the Lambda info:
Functions that use arm64 architecture offer lower cost per Gb/s compared with the equivalent function running on an x86-based CPU.
I did this for both Lambda functions I created. Since they run on Node.js which is supported on arm64, I simply had to edit the Runtime settings:

Amplify Hosting
Once I had the baseline functionality implemented in the frontend and backend, I was ready to publish the application using AWS Amplify Hosting. I used the Amplify Console Get Started.
Build and Deploy
I connected my repository on GitHub, confirmed some settings and clicked Save and Deploy. This kicked off the following 4-stage process:
- Provision - Sets up the build environment on a default host.
- Build - Clones the repo, deploys the backend and builds the front end.
- Deploy - Deploys artifacts to a managed hosting environment.
- Verify - Screen shots of the application are rendered.
My first build attempt failed because I didn't have aws-amplify in the repository. I ran the following in my project directory:
npm install aws-amplify
When I committed and pushed the change to GitHub, the process started again automatically.
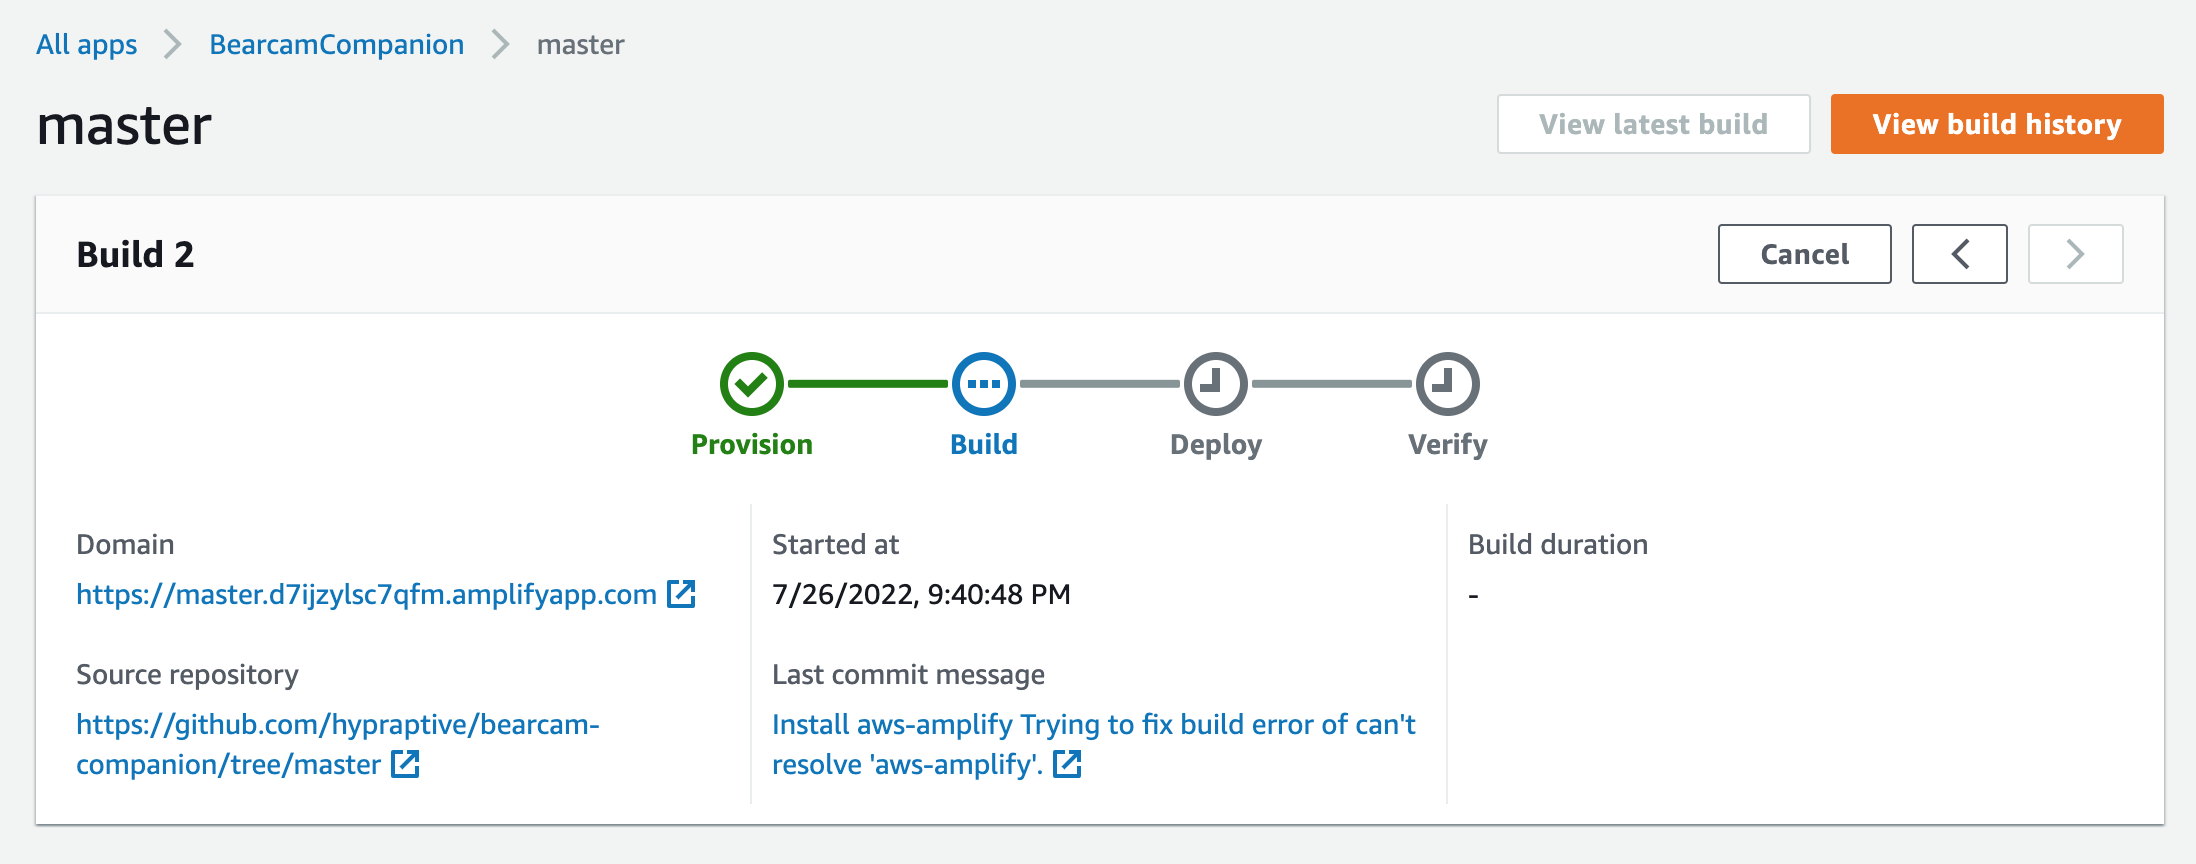
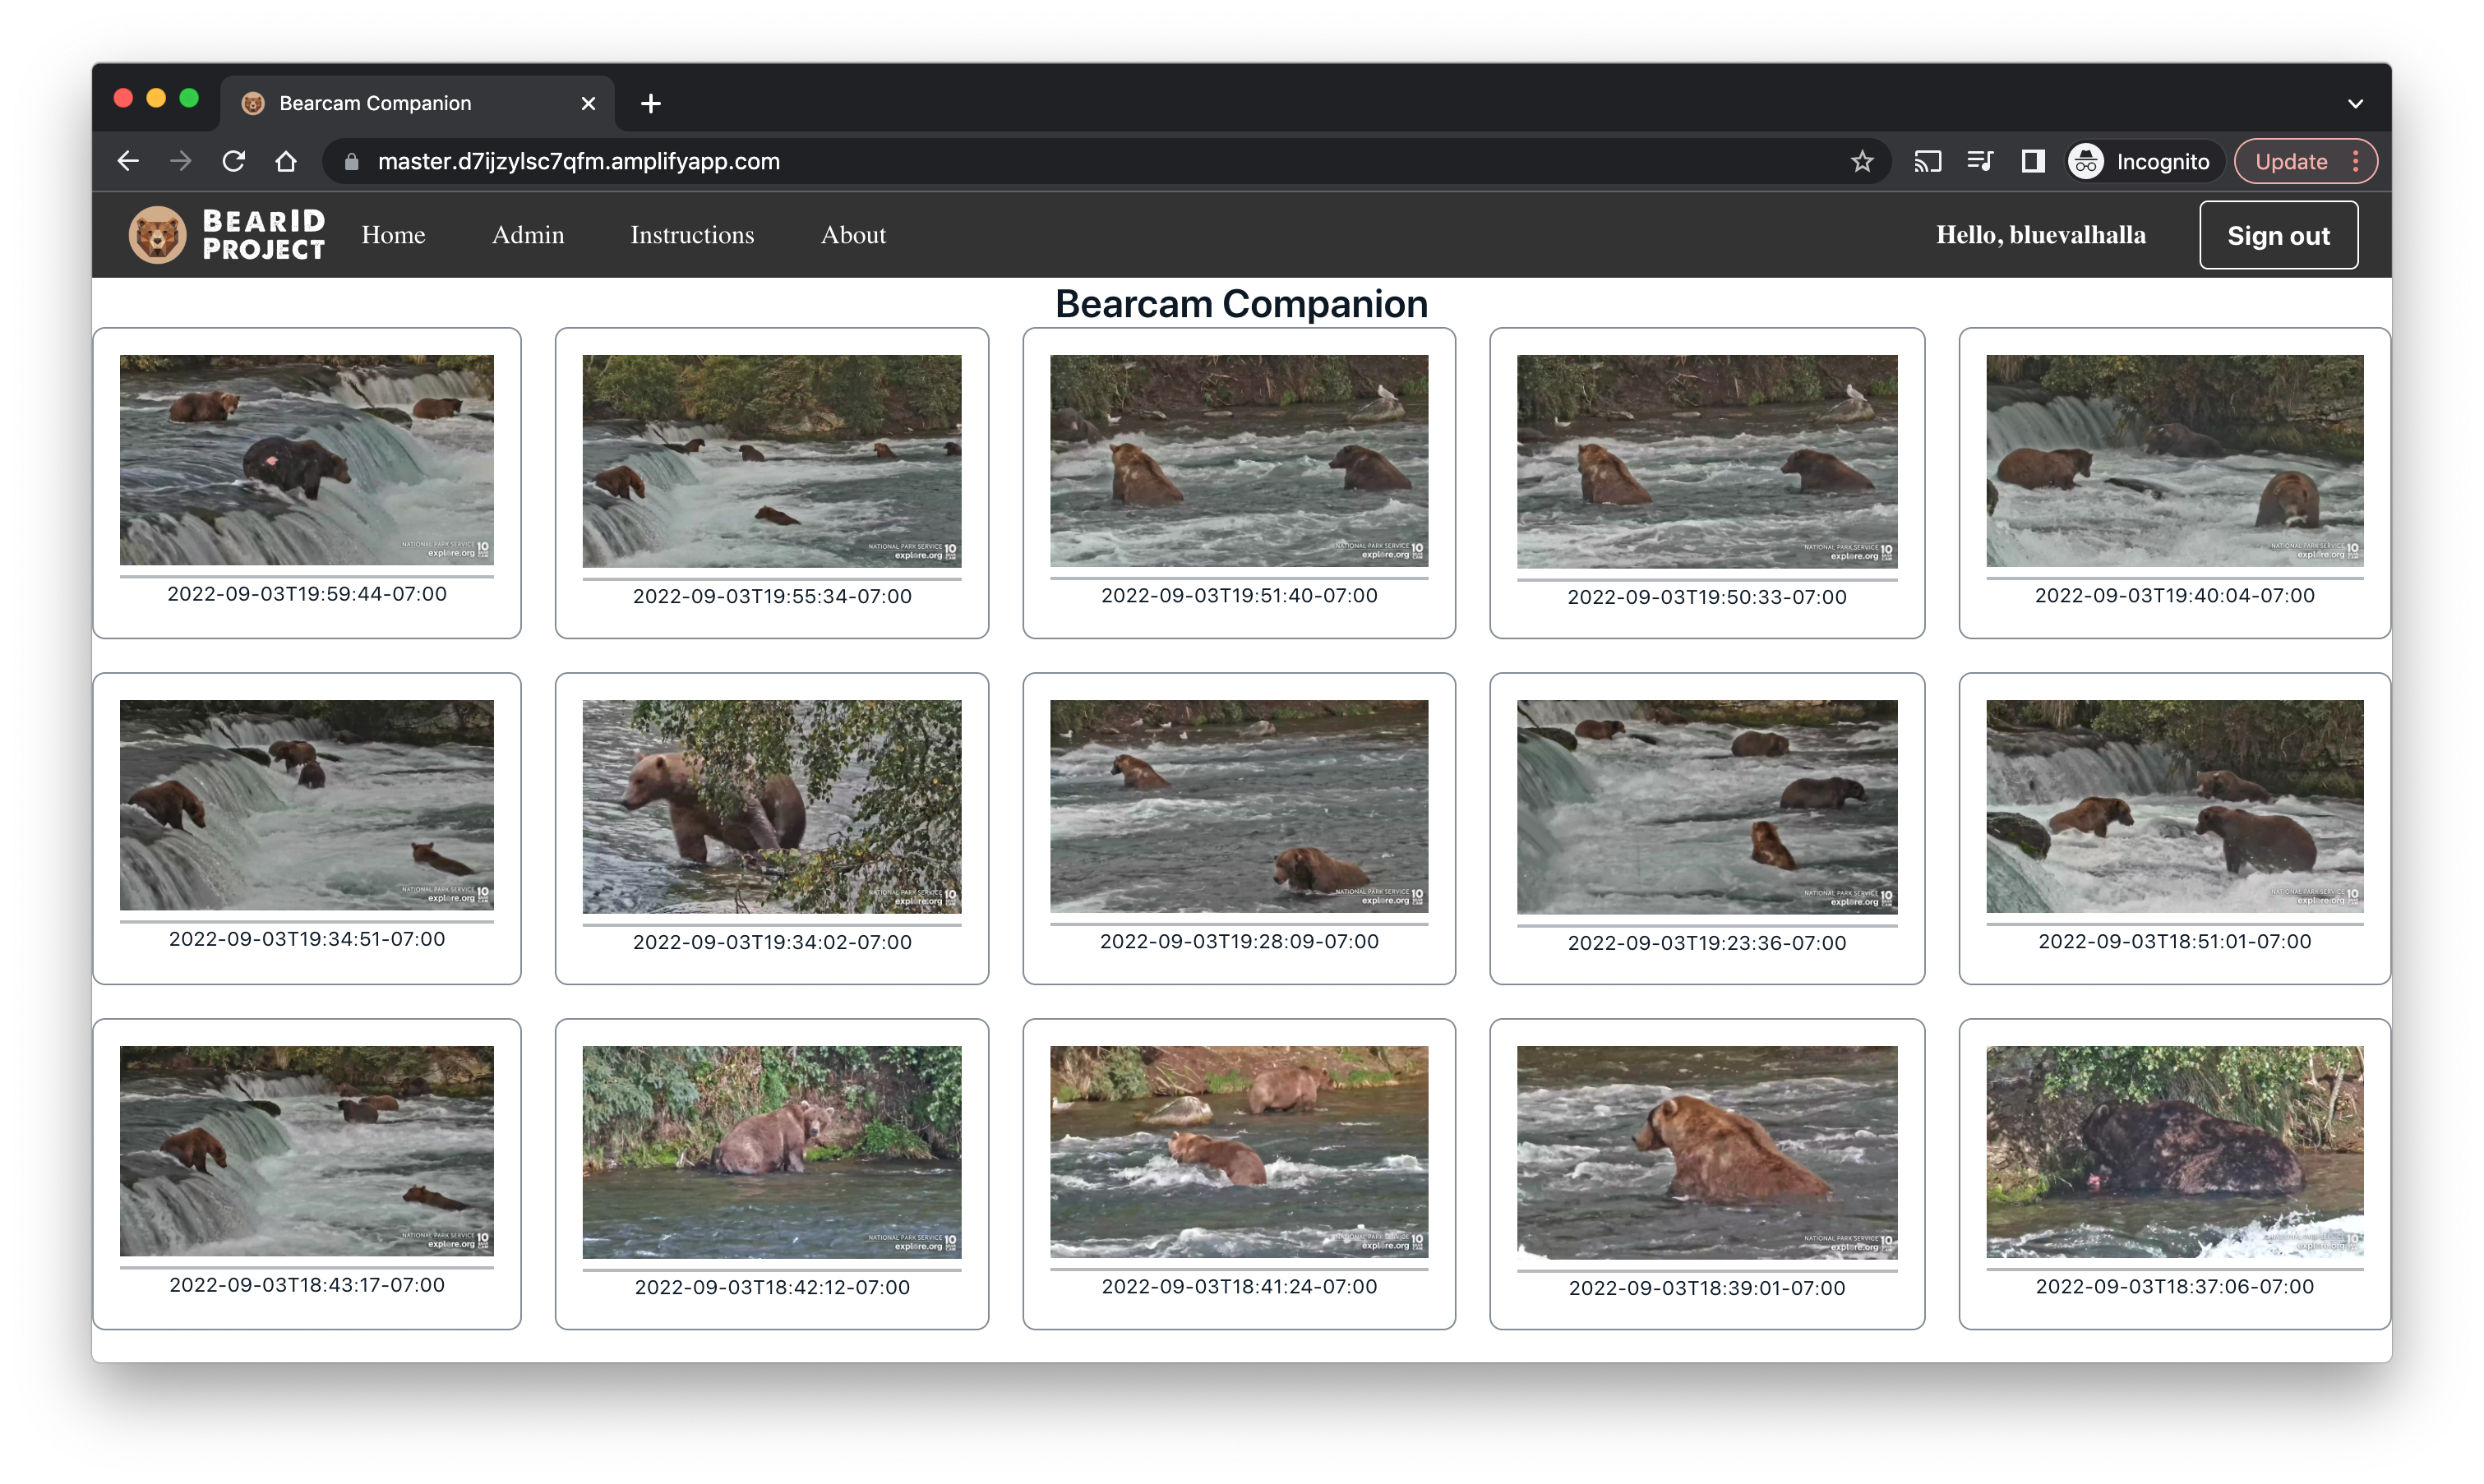
This time the build was successful, and I was able to view the application at the provided URL:
https://master.d7ijzylsc7qfm.amplifyapp.com/
Custom URL
I want the web application to be part of the BearID Project (http://bearid.org/), at app.bearid.org. Following the Set up custom domains section of the Amplify User Guide, I added two CNAME records to my domain's DNS records. One maps the subdomain (app) to the default Amplify url. The second points to the AWS Certificate Manager (ACM) validation server, which enables TLS. I also set up a subdomain forward so all accesses to my URL go to the Amplify application.
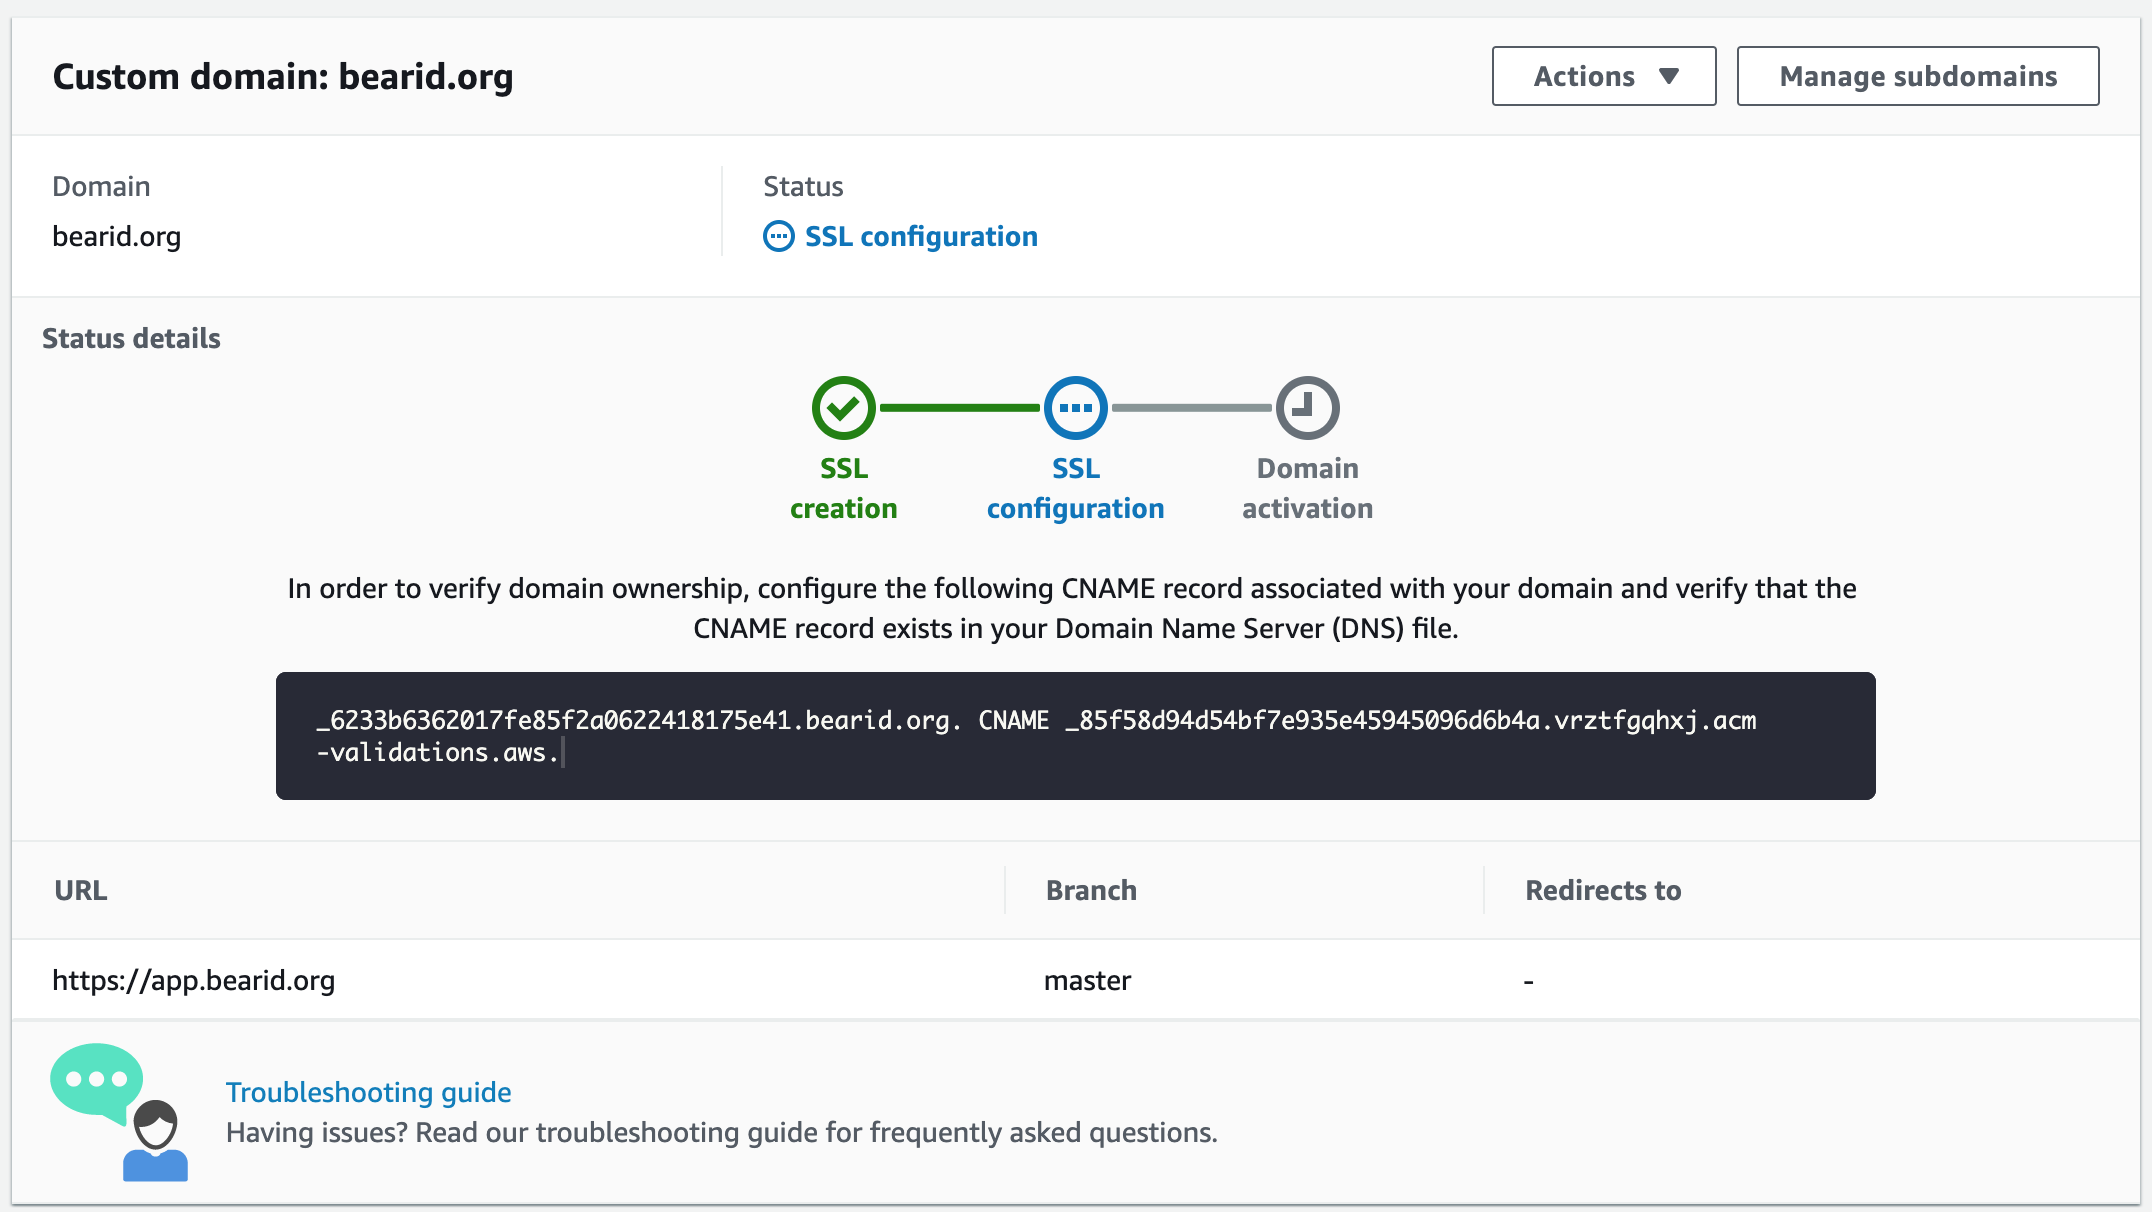
After a few hours, the SSL configuration was complete. Now I can access Bearcam Companion at https://app.bearid.org/:
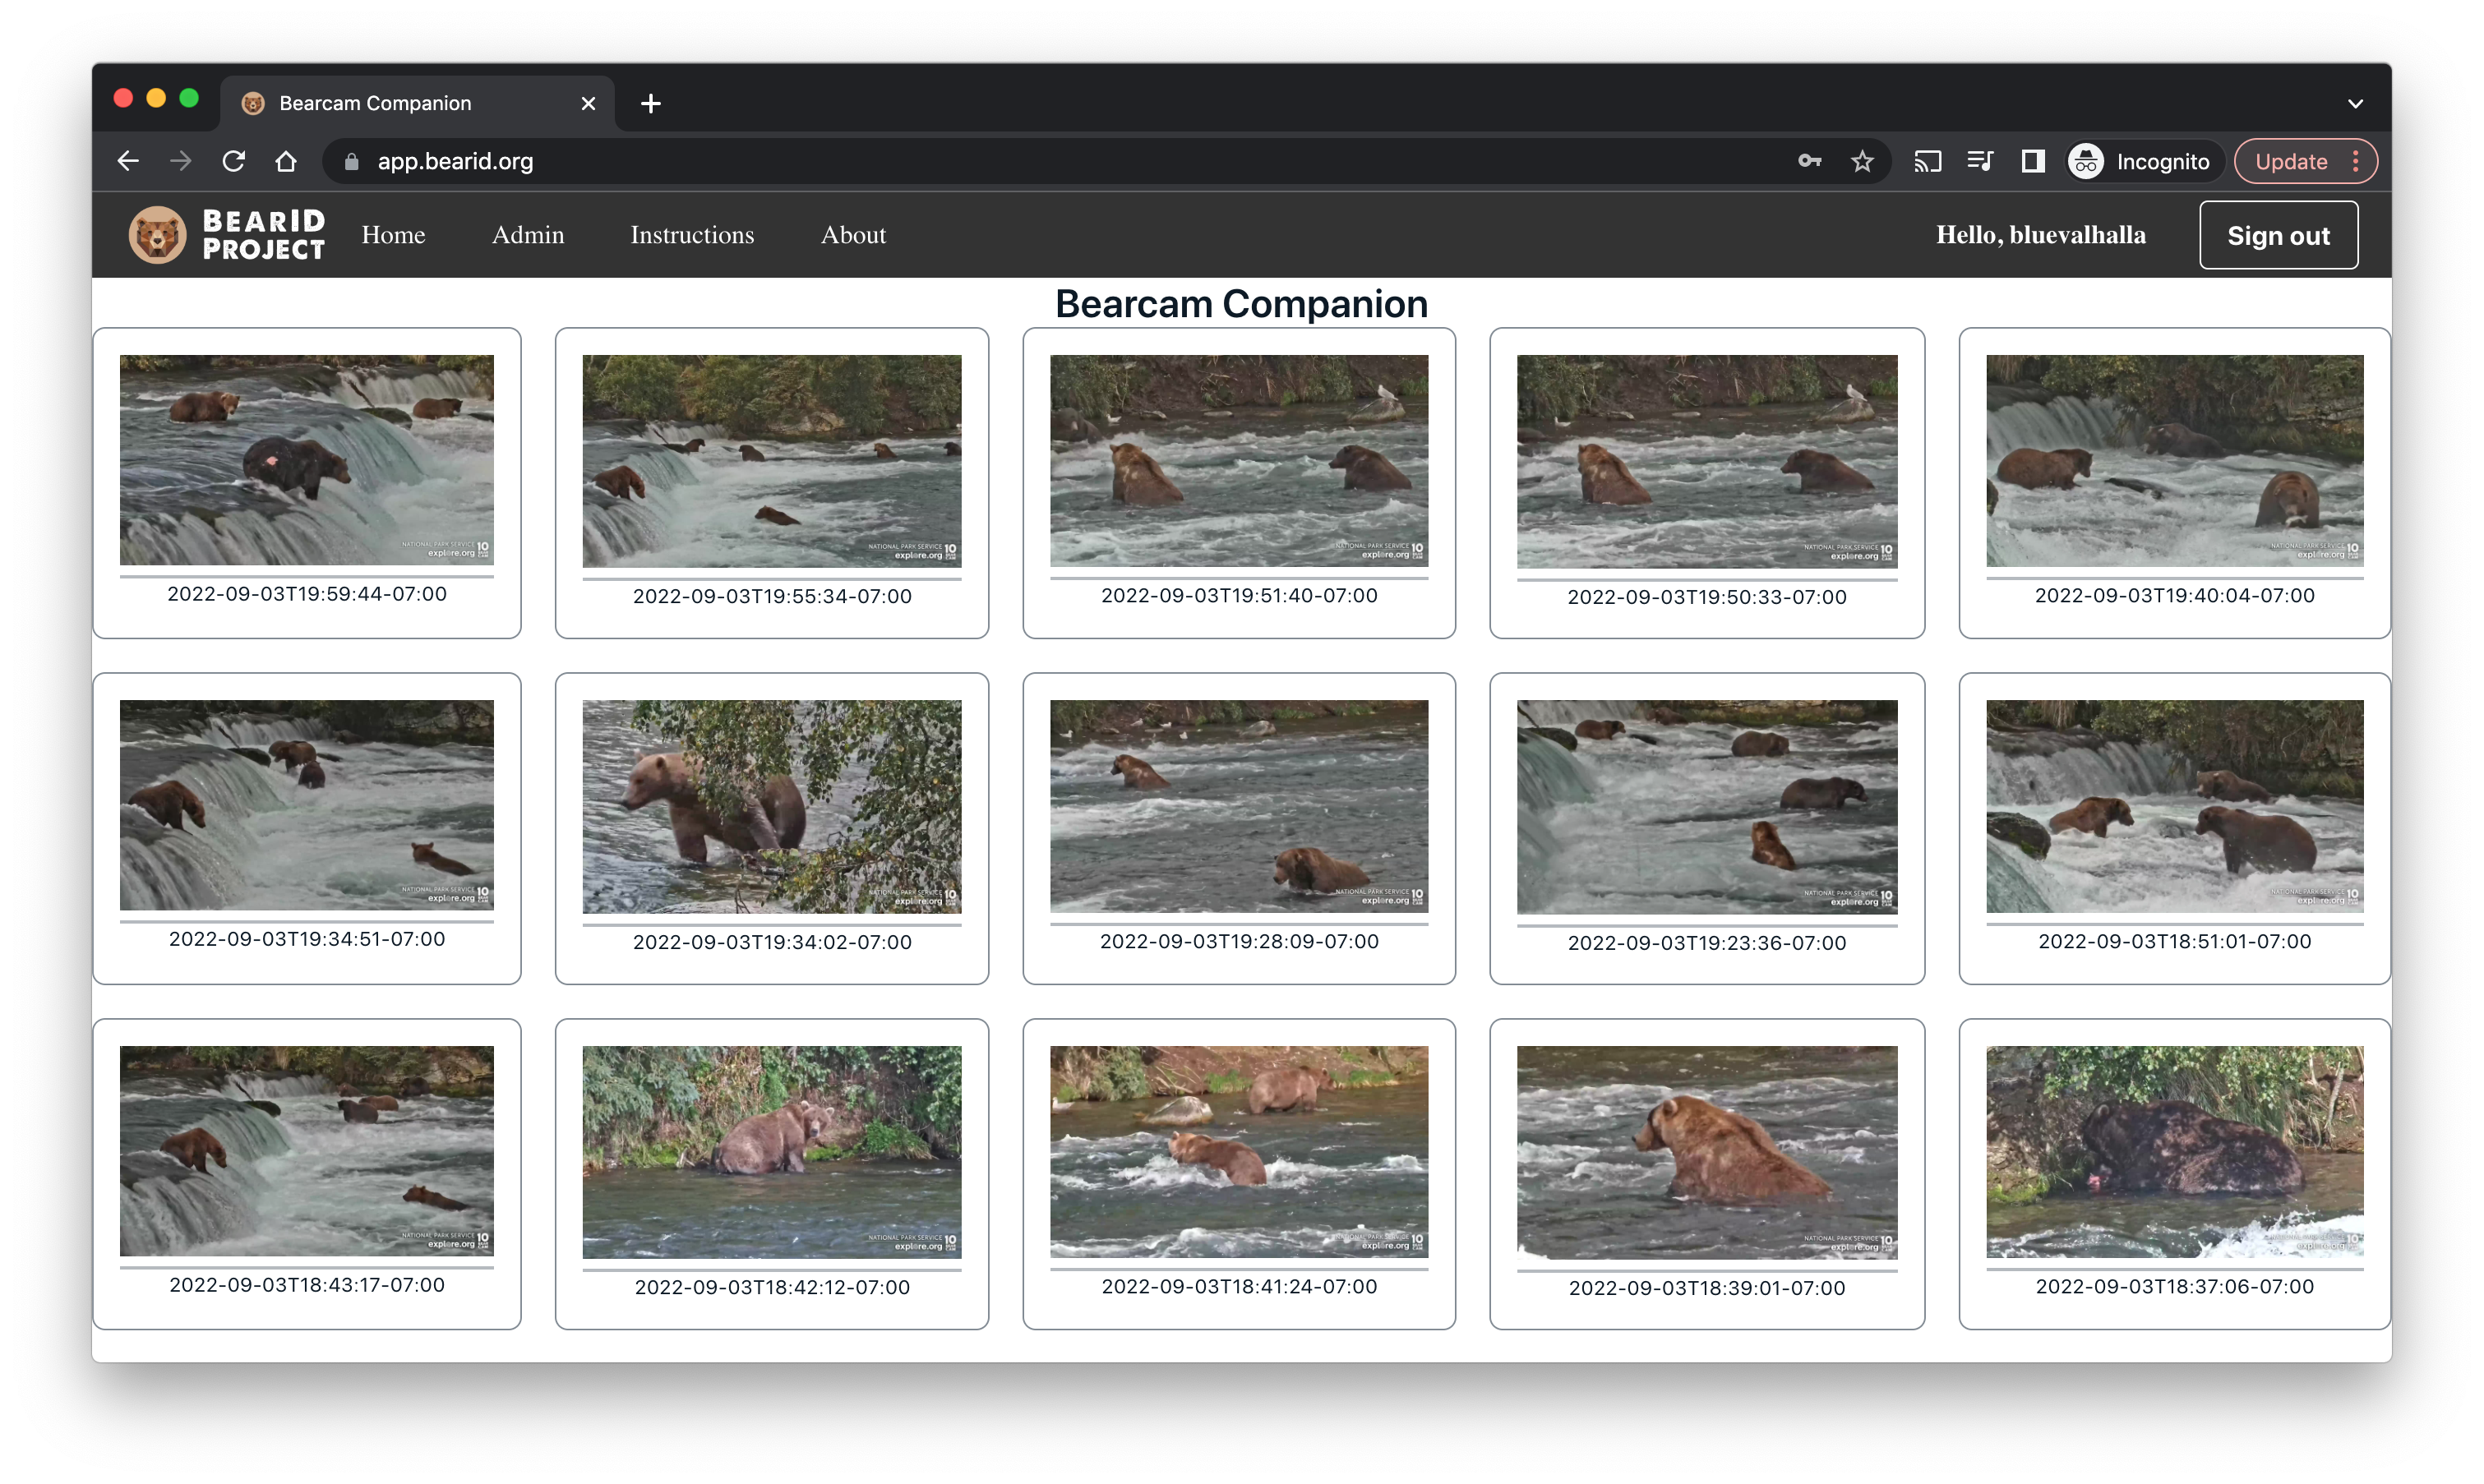
Launching Bearcam Companion
I announced the Bearcam Companion web application to the bearcam community around the end of August. I quickly had a handful of users checking out the website.
Verification Emails
The next day exceeded the daily limit on the free verification emails from Cognito (50). I had to switch over to AWS Simple Email Service and request production access to make sure I had sufficient email verification capacity. This took about 24 hours, and in the meantime I was manually approving accounts.
Analytics
For basic usage analytics for Cognito, I enabled Amazon Pinpoint by following Configuring user pool analytics (30 days, up to September 26, 2022):

As you can see, the user base was growing nicely for the first week or so. More than 250 users had signed up. Unfortunately, the bearcam started having technical problems around the September 10th. With no new content for a while, usage dropped off dramatically.
I also set up Amplify Analytics by following the Getting started guide. With this setup, I can directly record events from my application. For example, I record an event every time a user identifies one of the bears (30 days, up to September 26, 2022):

Again, you can see the growth until the cams went offline.
The bearcams came back online on September 17th. You can see uptick in usage and creation events once the cams were streaming again. The spikes follow reminders posted to the bearcam chat and Facebook pages. Hopefully users will make a habit of visiting Bearcam Companion.
Note: It's quite amazing Explore.org is able to stream these cams at all, given the remote location. See more about the cams on Google Earth.
Conclusion
The thought of building a full-stack, serverless web application to detect and identify bears from the Explore.org bearcams was daunting. AWS Amplify provided me with easy access to all the AWS services I needed, such as DynamoDB, Cognito, Rekognition, S3, and Lambda, without having to learn each of them in great depth. I was easily able to integrate these services with a front end web application using React and host it with Amplify Hosting. Amplify Hosting plus GitHub even provided me with a basic DevOps flow, something I have very little experience with. I was able to build this application in a matter of weeks where I feared it would take months or even years.
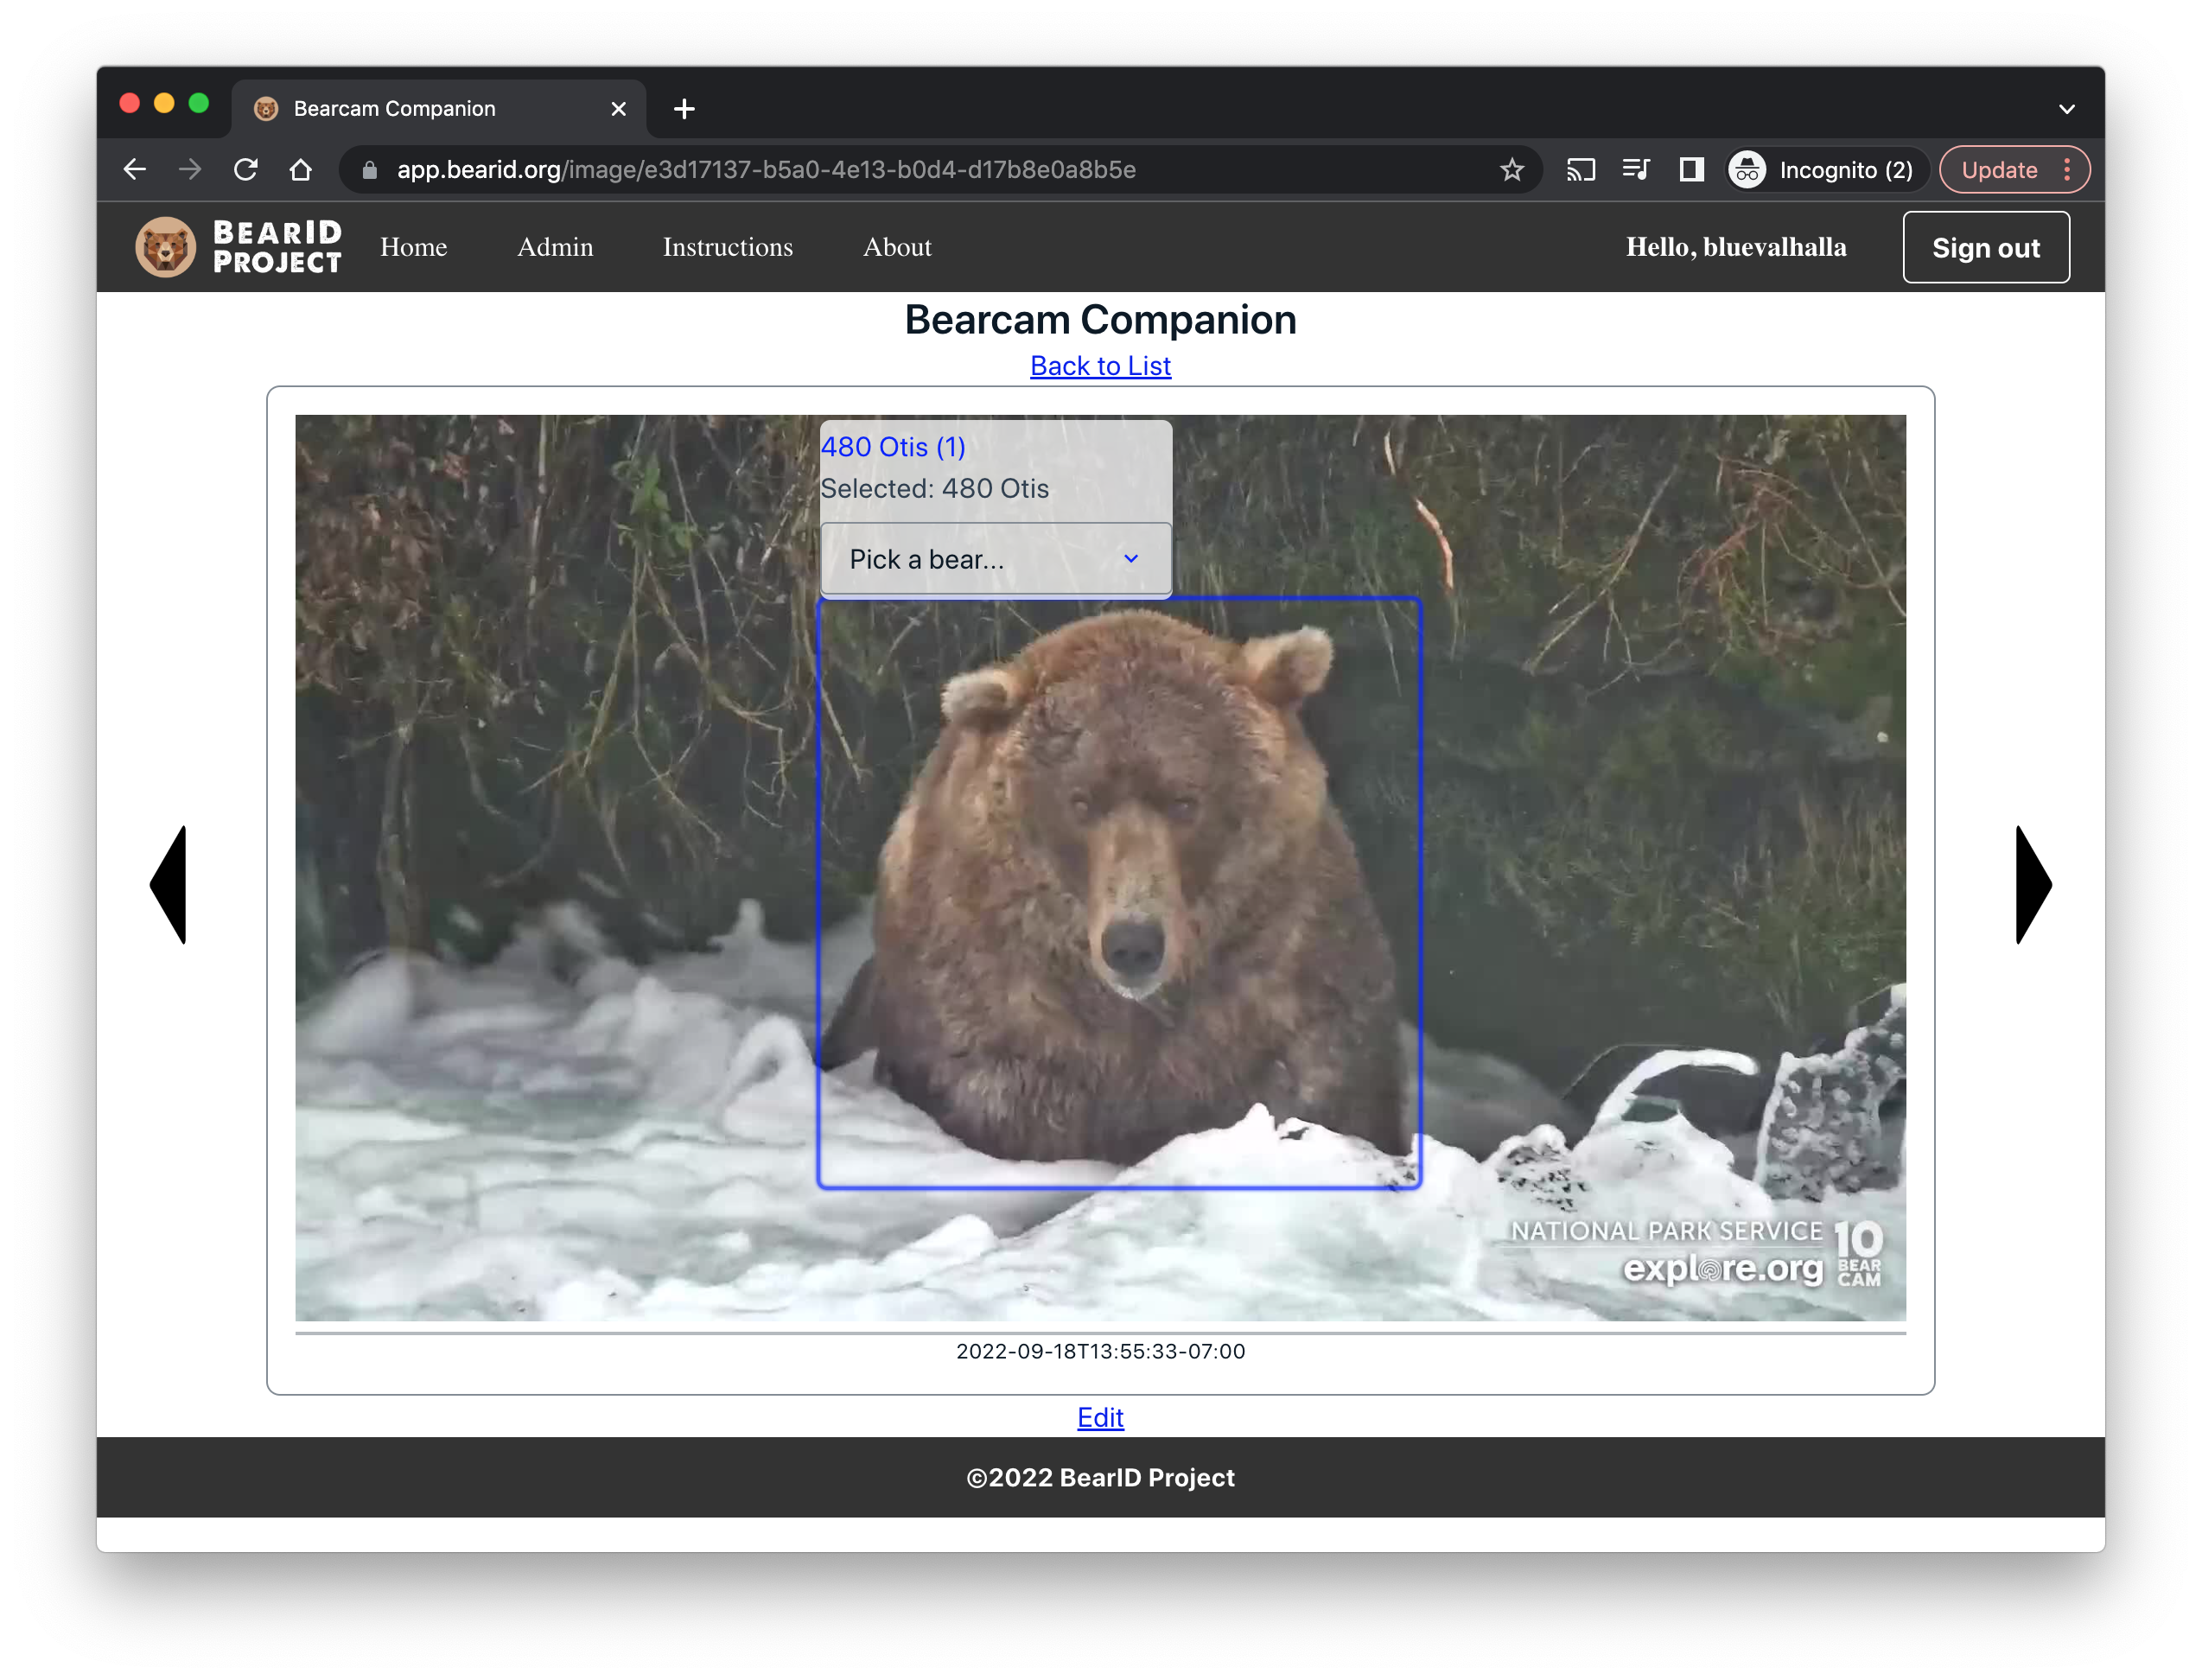
My journey is far from over. Now that I have the base application and the start of a user base, the fun really begins. The next step is to train a new object detector with better performance for the bearcam images. Then I can focus on building the machine learning model to identify the individual bears. Hopefully I will have something with decent performance for the 2023 bearcam season!
Additional links
Subscribe to my newsletter
Read articles from Ed Miller directly inside your inbox. Subscribe to the newsletter, and don't miss out.
Written by

Ed Miller
Ed Miller
Senior Principal Engineer at Arm and co-founder/developer at BearID Project. AWS Community Builder. Views are my own.