Understand Babel Plugin
 Weiping LarryD
Babel as a transpiler
In old days, JavaScript used to be interpreted directly, it means what you write in the code editor is the same as what's running in the browser, well maybe just with minified source code. However when writing modern apps, we often need some language features that have not been supported in the browser or NodeJS. So there is a need to compile them to something that can be runnable in the targeting platform.
That's why Babel is an essential part of modern JS projects. It is source-to-source JavaScript compiler (or transpiler), simply means it takes one piece of source code and transform to another piece at the same level, i.e the output is still JS code, not like Java code to byte code which is not same level of abstraction. Some transpiling examples are:
- ECMAScript Stage-X proposals to supported syntax in the runtime
- TypeScript to JavaScript
- JSX to
React.createElementfunction call
You probably already manually configured Babel, more often use starter kits (e.g create-react-app) or frameworks like Next.js that have it configured for you.
One thing to note, we normally don't use Babel independently, most time it is part of tooling chain, e.g integrated with Webpack via babel-loader. All source code is transpiled when Webpack is resolving your entire source code dependency.
swc and esbuild are two main alternatives that focus on better performance.
Next.js started with Babel as default, then it introduces a new faster Rust compiler based on swc.
How Babel transpile
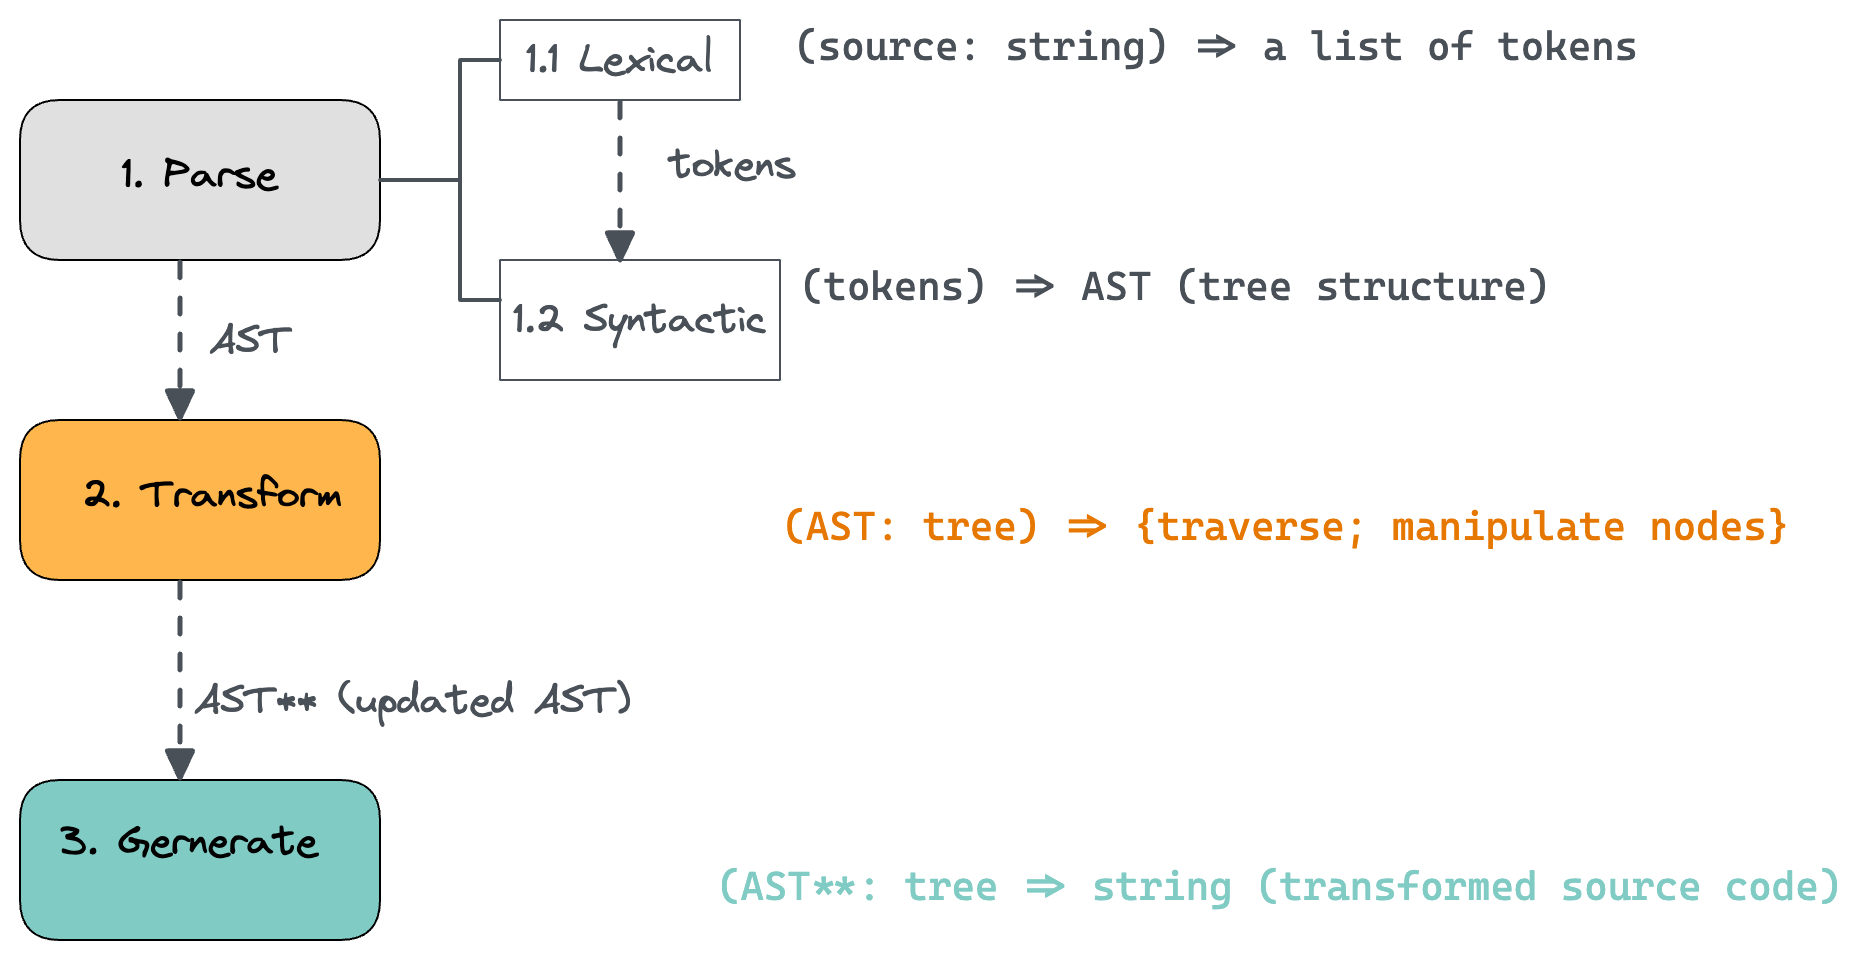
The illustration is based on this well written Babel Handbook, you can go to read more details. In general, the whole transpling process can be broken down to 3 main stages:
❶ Parse
This is the first step for Babel to restructure your human readable code in a way for it to be easily processed by Babel.
The lexical analysis is to take the source code as input and output a list of tokens. Each token is an object containing a few properties to describe what the token is about:
{type: 'Identifier', name: 'variable name', start: 20 , end: 30, loc: {...}}
{type: 'BinaryExpression', left: {...}, right: {...}, operator: '*', start: 20 , end: 30, loc: {...}}
There are some properties that are common for all token objects, e.g start, end and loc describe the position of tokens in the source code.
The syntactic analysis is to take the list of tokens from lexical step and build a tree structure known as Abstract Syntax Tree, representing the hierarchy of the source code. Each token object becomes a node in the AST, e.g an Identifier token could be a child of BinaryExpression token object. With tree structure, Babel can start traversing which is needed for next stage.
❷ Transform
This stage is to take the AST from Parse and make necessary transformation while traversing it. This is the stage where plugins (both built-in or custom written functions) start executing, it is the only stage we can sort of 'interact' with Babel to manipulate the code.
❸ Generate
This stage is to take the updated AST**, a mutated tree structure from Transform, and output the corresponding source code again. So if we don't have any plugin functions during transformation, AST won't be mutated. Essentially the final output will be the same as original input source code.
Plugin as the unit of transformation
We will focus on the Transform stage as this is the place we can plug in custom transformation. All plugins work at this stage, each performs a specific transformation against certain nodes, which is essentially mutating AST: e.g insert, update or removing tree nodes.
Babel already baked in a set of plugins that are common in most JavaScript projects (e.g React with TypeScript). These plugins are bundled as 'preset', so it's easier to just specify one preset instead of many plugins one by one.
These are common ones provided by Babel:
- @babel/preset-env: compiling ES2015+ syntax
- @babel/preset-react
- @babel/preset-typescript
The way each plugin is written is very similar. Each plugin is a function returning a visitor object. Inside visitor, we register functions against certain nodes via babel types.
The plugin function signature looks as below:
const MyPlugin =  ({types: t}) => {
  return {
    visitor: {
       // each visitor function receives two params
       // path exposes methods to let you manipulate nodes
       // state stores some meta data, we will see later
       FunctionDeclaration(path, state)  {
          // when babel is visiting function declaration in any file
          // it will run code here to transform
       },
    }
  }
}
So a plugin's main concern is to decide where custom logic should happen and what transformation should be performed.
Implement one simple plugin
Enough talking. Can you show me something real? Imagine we have App component file, if we want to dynamically insert another import utils statement like below:
import react from 'react'
// by Babel -> import utils from './utils'

export default function App() {
  return (
      <h2>My App</h2>
  )
}
utils is basically a dummy module under the same directory. We put some logs to check in console if it's actually imported in runtime if the log is printed out.
console.log("### auto imported by babel plugin cool!!!");

export default function utils() {
  //
}
❶ Visualise AST
This helps understand how Babel 'sees' your code.
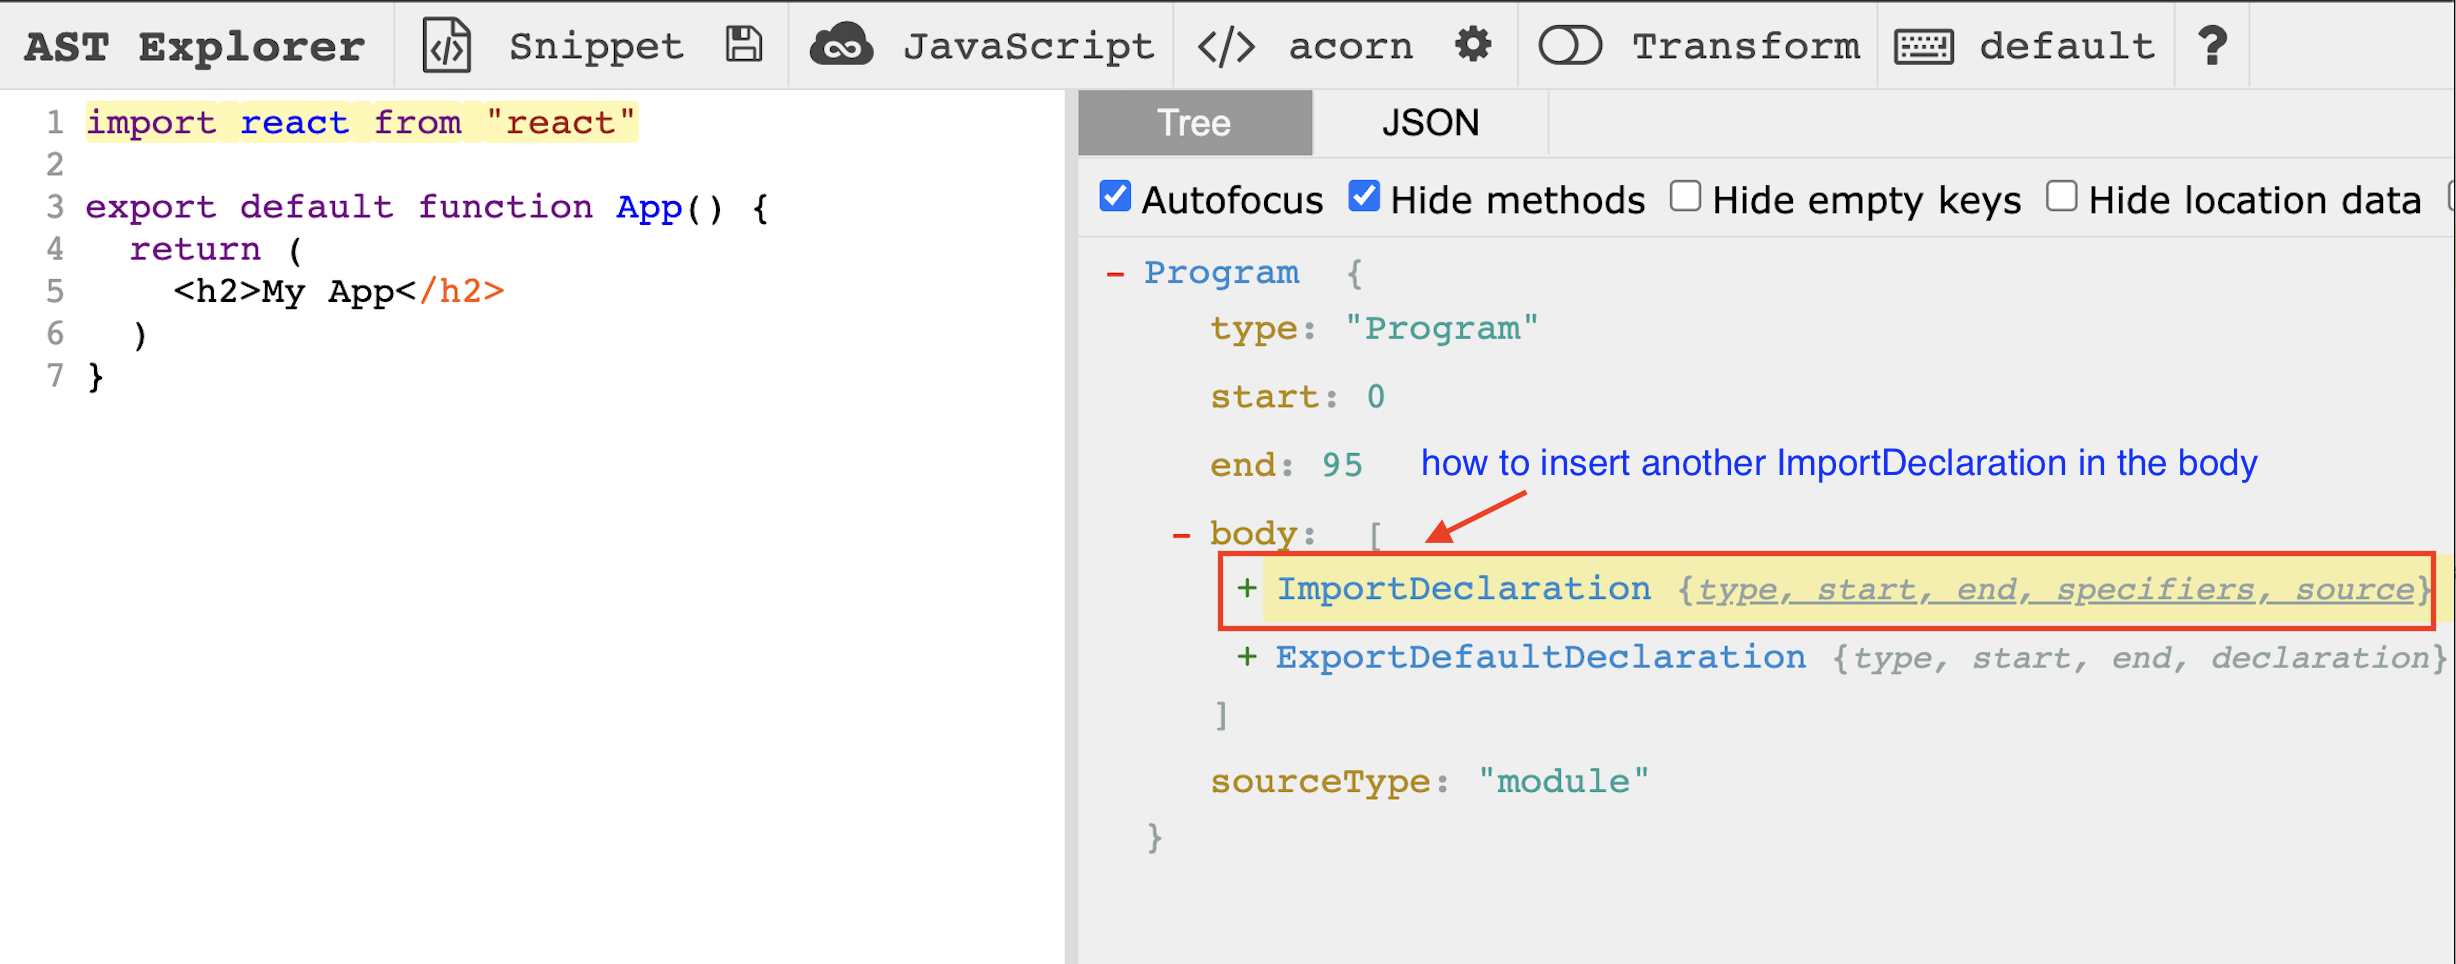 As you can see, the entire
 import statement is a ImportDeclaration node, so what we need is to find how to insert another ImportDeclaration for our own utils module, into body which belongs to root Program node.
With the tree structure in mind, let's go to the plugin function.
❷ Implement plugin function
First we need to find what node we want to register functions to do custom logic. Because the import need to be inserted into body under Program node, so the outline of function looks like below:
const myplugin = ({ types: t }) => {
  return {
    visitor: {
      Program: (path, state) {
         //
      }
    }
  }
}
Next question would be how to build ImportDeclaration node? If we expand AST visualisation of ImportDeclaration node, we can see that it contains Specifiers array and Literal object.
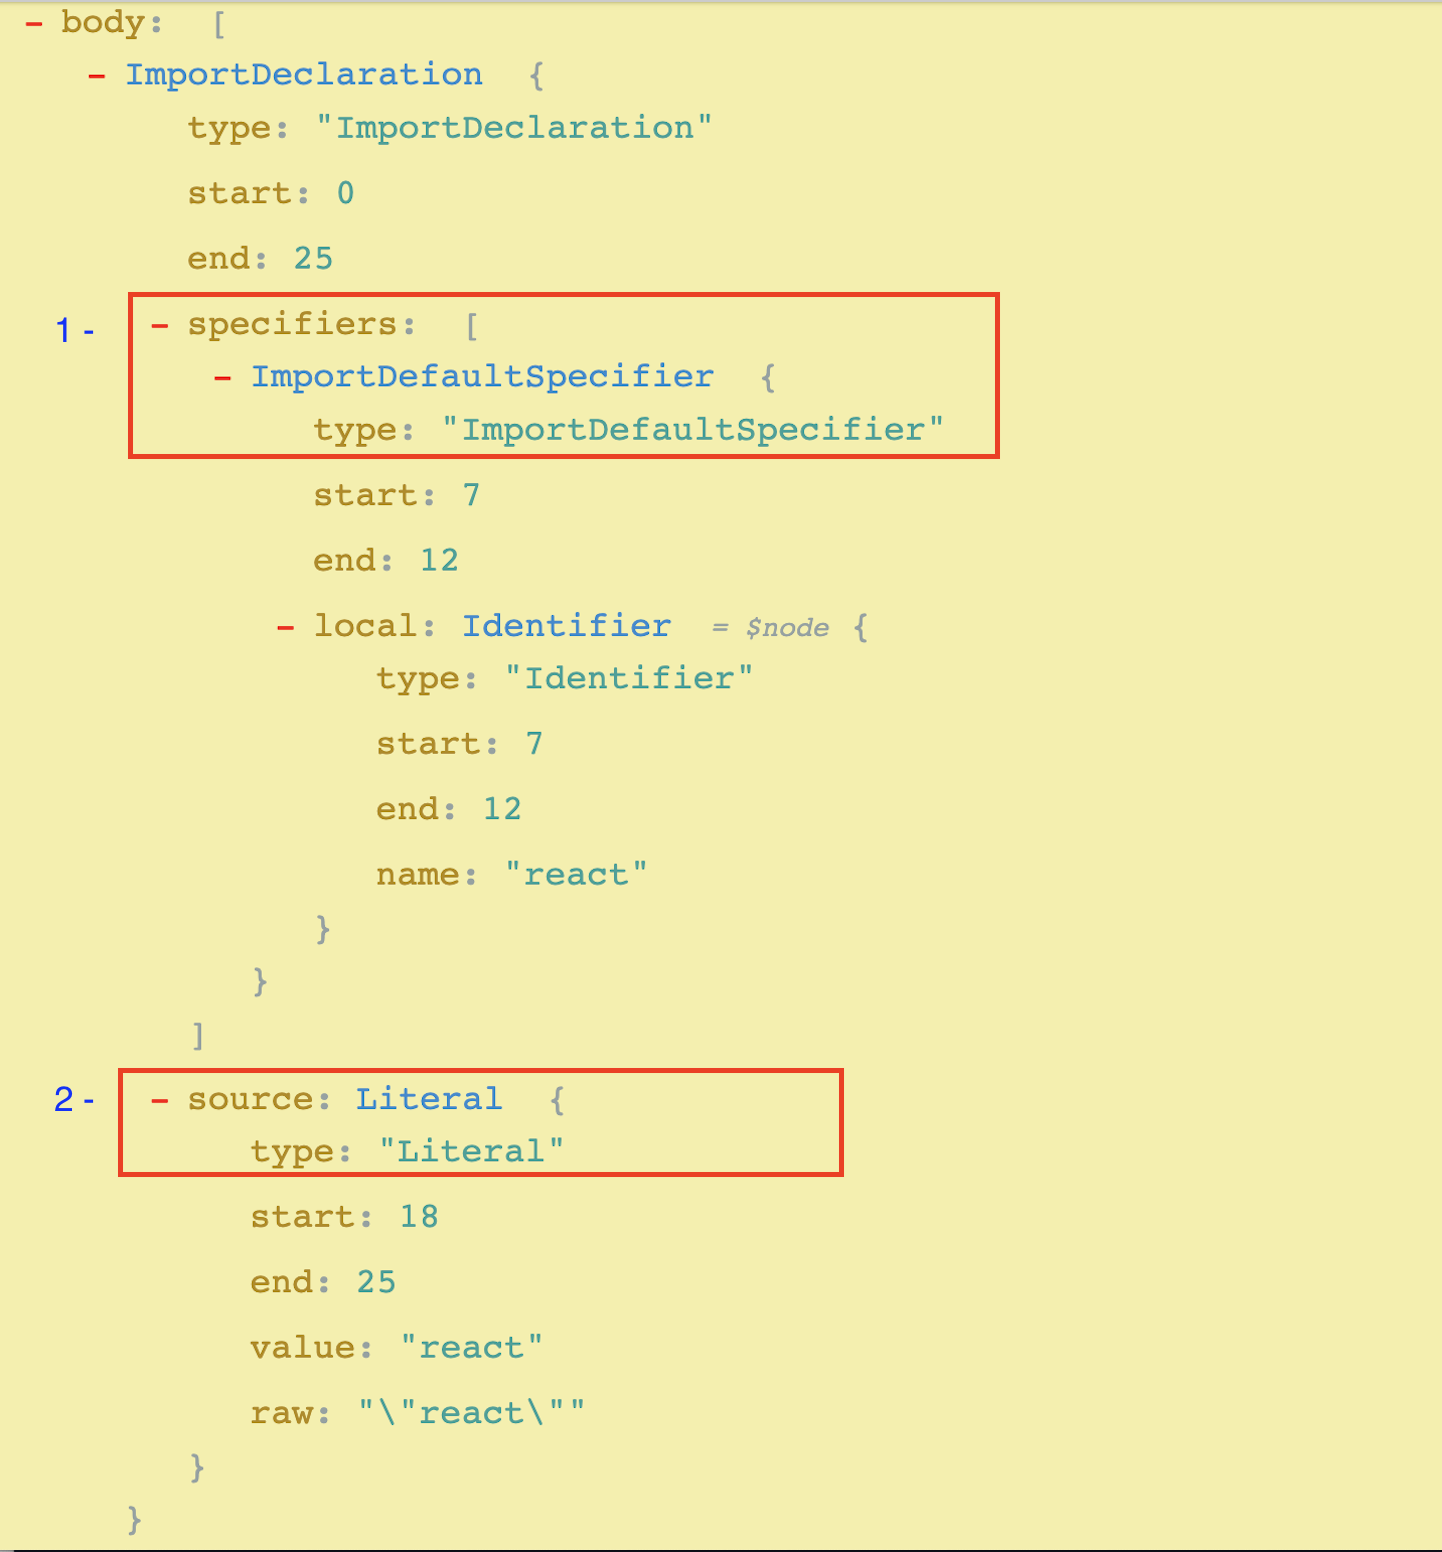
Specifiersarray contains a list of imported names, here it only has oneImportDefaultSpecifierwhich representsreactLiteraljust represents the module path which is string literal'react'
So the work here is to use Babel types to build ImportDeclaration node with proper Specifiers and Literal, and insert to body array.
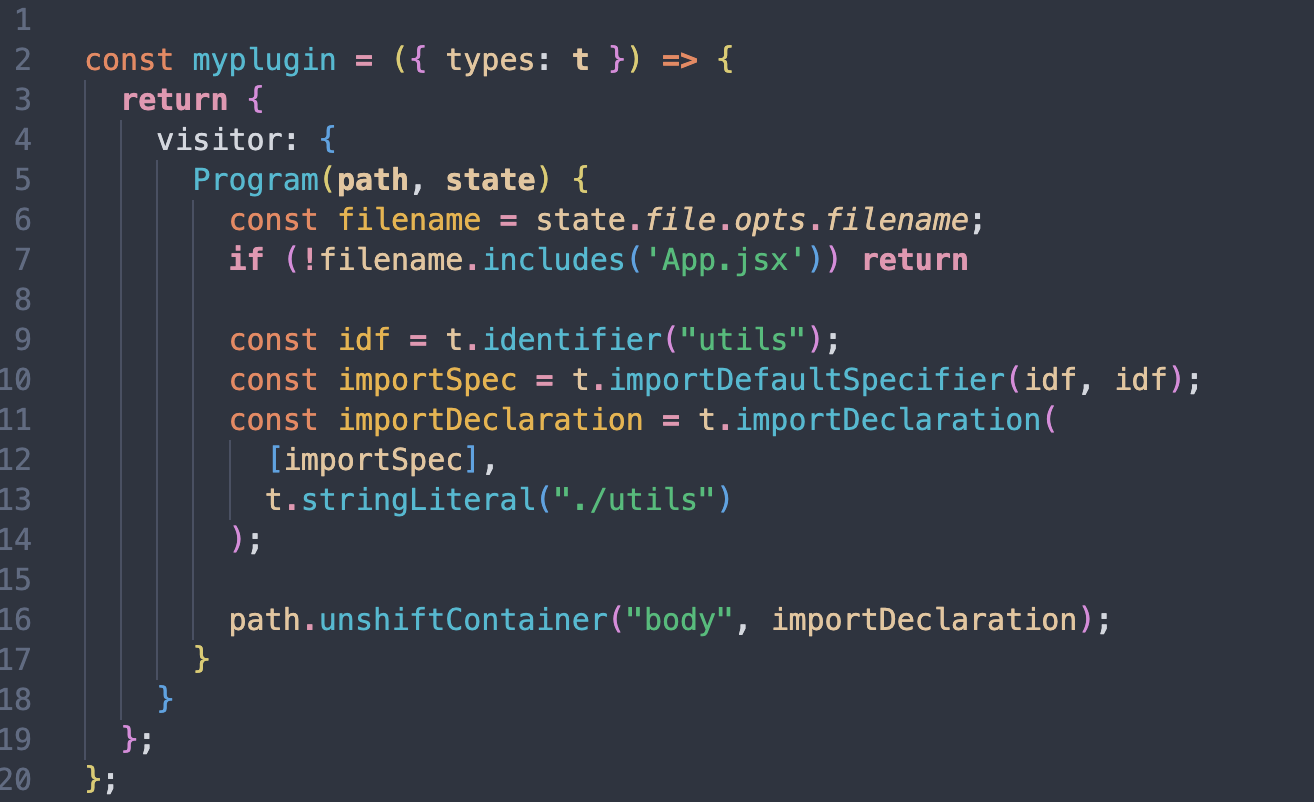
The whole code is actually pretty short:
▪︎ Line 6-7
This is one of use cases when we need state parameter, it stores filename info which is the current file path Babel is visiting. Remember Babel is traversing your entire source code files to compile them one by one. So here we just want to insert in App.jsx component, if it's not this file we simply return.
▪︎ Line 9-14
This section is how the import node is built:
- Build
Identifierrepresenting imported nameutils, - Build
ImportDefaultSpecifierwith thisutilsidentifier - Build the whole
ImportDeclarationby passing created ImportDefaultSpecifier asSpecifiersarray together with stringLiteral representing module path'./utils'
▪︎ Line 16
This single line is where the magic happens: use path to manipulate Program > body to insert this newly created ImportDeclaration node.
So when Babel start generating final code for App.jsx, it will have two import statements:
import react from 'react'
import utils from './utils'
❸ Register plugins in Babel Config
In order for plugins taking effect, we need to let Babel know it. In .babelrc or babel.config.js, we register our plugin in plugins list.
{
  "presets": ["..."],
  "plugins": ["./my-plugin.js"]
}
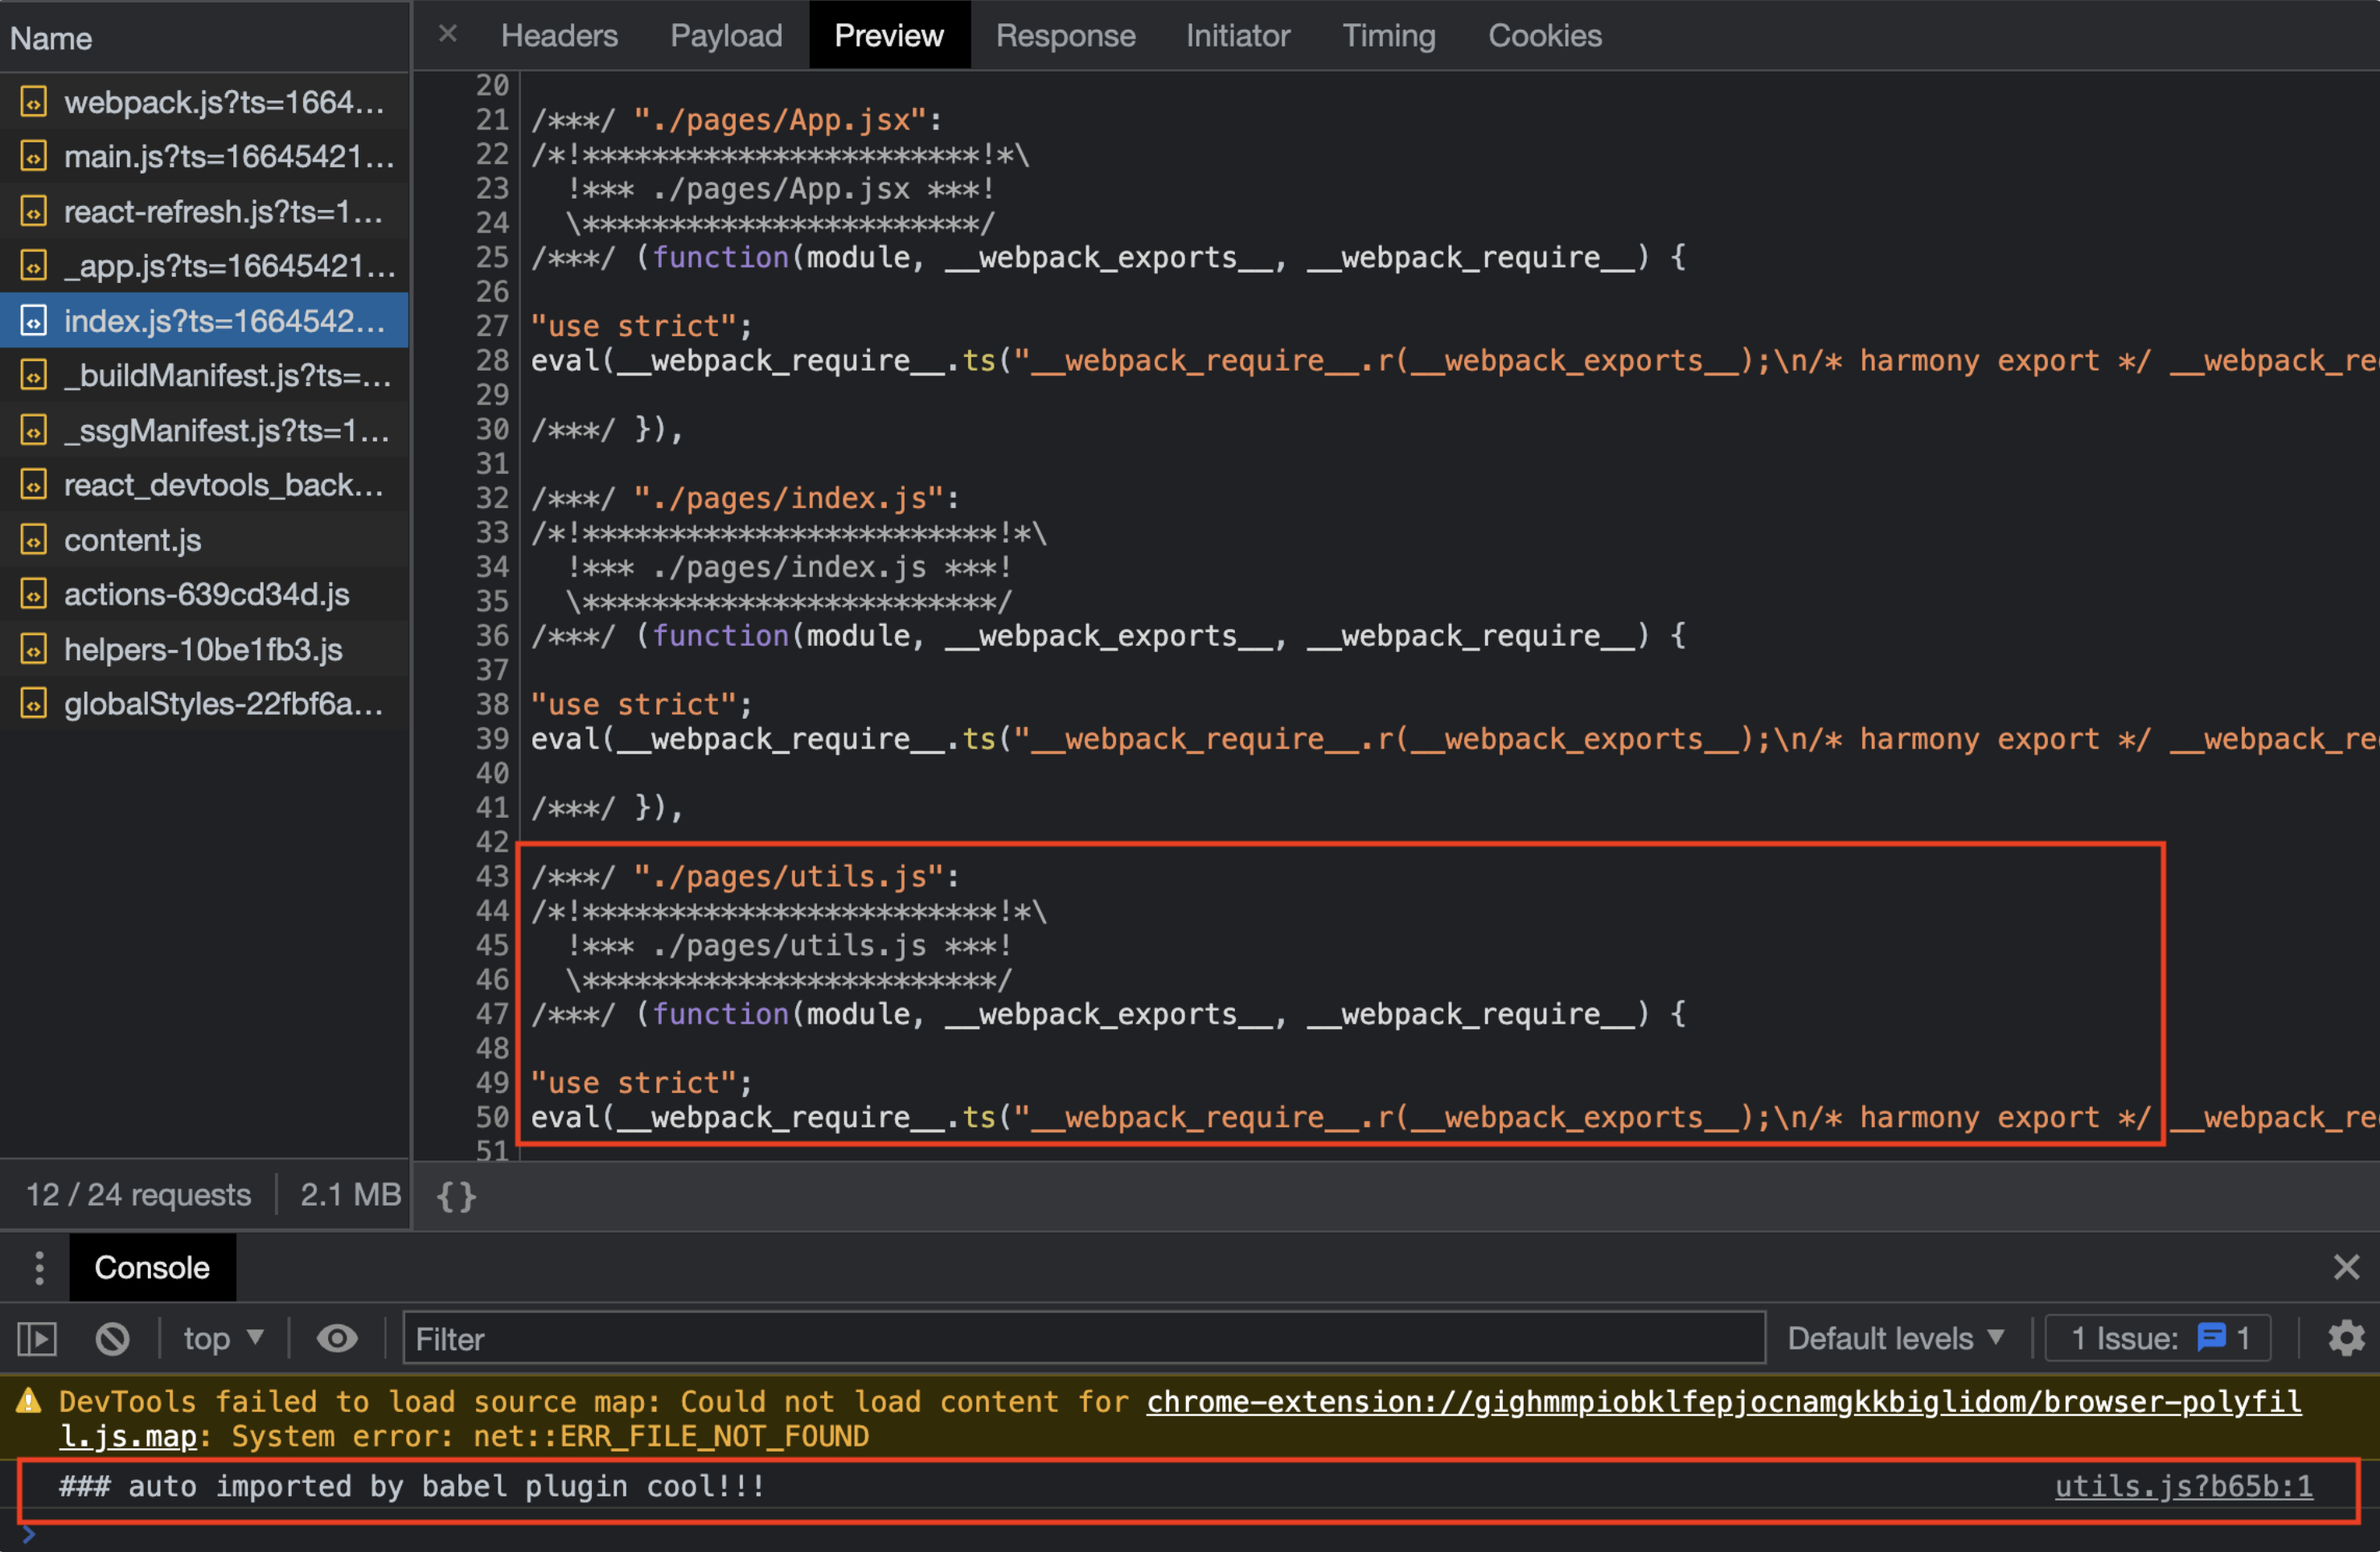
All done! When we start our react app in local, we can see in the bundled code running in the browser, utils module is included, and there is log message in the console. Even in the App.jsx source code, there is only one import for react module.
Looks fun. You may ask is there a more practical use case for custom Babel plugin? Stay tuned for the next post otherwise it will be too long.🤓
References
Subscribe to my newsletter
Read articles from Weiping LarryD directly inside your inbox. Subscribe to the newsletter, and don't miss out.
Written by
