Caesar Cipher in Javascript
 Anas Khan
Table of contents

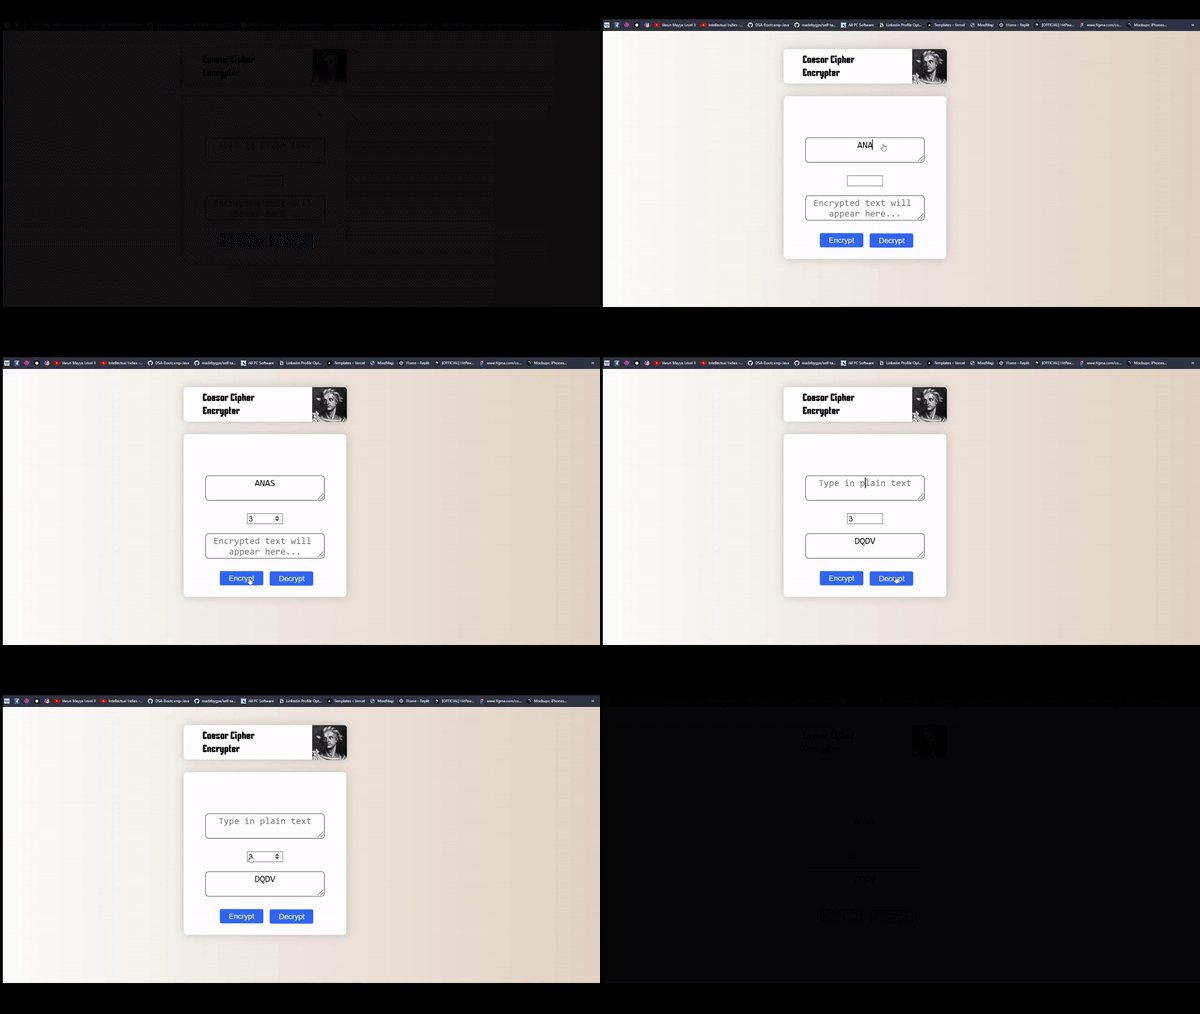
A little demo

Any pre-requirement?
Nothing 😁
You be like
Nah! I am kidding you should know the basics of HTML CSS and Javascript
Let's Get Started
First let's understand the caesar cipher and what it is exactly, below are the resources to learn caesar cipher and cryptography because this blog is not about lectures🤷♂️ Click here
Now you are ready to make your learning and blend it into a web page.
Create one folder in vscode and add an HTML file, CSS file, and Javascript file
CaesarShift.html
Use Ctrl + 1 to generate default HTML code and edit it accordingly
<!DOCTYPE html>
<html lang="en">
<head>
    <meta charset="UTF-8">
    <meta http-equiv="X-UA-Compatible" content="IE=edge">
    <meta name="viewport" content="width=device-width, initial-scale=1.0">
    <title>Caesar Cipher Encrypter</title>
    <link rel="stylesheet" href="Styles.css">
</head>
We have created two containers one for the title and image and a second one for the input area where we encrypt and decrypt our message.
<body>
    <div id='container-1'>
        <h1>Caesar Cipher Encrypter</h1>
        <img id='caesar' src='https://www.seas.upenn.edu/~cis110/current/assets/img/misc/caesar.jpg'>
    </div>

<div id='container-2'>
<label><textarea type="text" id='plainInput-1'
placeholder="Type in plain text"></textarea></label>
        <button id='encrypt-btn'>Encrypt</button>
        <button id='decrypt-btn'>Decrypt</button>
        <input type='number' id='shiftInput' min= '0' max = '25'>
        <br>
        <label>
            <textarea type='text' id='encryptedInput-1' placeholder="Encrypted
text will appear here..."></textarea>
        </label>
   </div>
   <script src="./Script.js"></script>
</body>
We are done with our HTML code let's dive into CSS
Styles.css
In the CSS part we are adding a custom font style just for the heading.
@import url('https://fonts.googleapis.com/css2?family=Kenia&display=swap');

body{
    background: linear-gradient(90deg, #fdfcfb 0%, #e2d1c3 100%);
    position:relative;
    bottom:50px;
}
label{
    font-family:sans-serif;
    color:black;
    transform:scale(1.5);
    position:relative;
}
#container-2{
    position:relative;
    left:580px;
    top:140px;
    background:white;
    border-radius:10px;
    padding:10px 60px;
    width:400px;
    height:500px;
    flex-direction:column;
    box-shadow: 0 0 30px rgba(0,0,0,0.2);
}
 #container-2 button{
    position:relative;
    top:100px;
    right:125px;
}
In this CSS part, we are making changes to containers and how it will look alike
textarea{
background:transparent;
outline:none;
border-radius:5px;
text-align:center;
transform:scale(1.5);
margin-bottom:70px;
position:relative;
top:40px;
cursor:pointer;
}
#encrypt-btn{
 transform:translate(50px,128px) scale(2.4);
}
#decrypt-btn{
    transform:translate(210px,110px) scale(2.4);
}
#encrypt-btn, #decrypt-btn{
    border-radius:2px;
 border:none;
 cursor:pointer;
 background:#3066f6;
 color:white;
 font-family:sans-serif;
 font-size:10px;
 padding:4px 12px;
}
#shiftInput{
    transform:scale(1.8);
    outline:none;
    cursor:pointer;
    border:1px solid grey
}
#container-1{
    background:white;
    border-radius:10px;
    padding:30px 60px;
    width:400px;
    height:50px;
    box-shadow: 0 0 30px rgba(0,0,0,0.2);
    transform:translate(580px,100px);
    font-family: Kenia, cursive;
    cursor:pointer;
}
#container-1,#container-2{
    display:flex;
    justify-content:center;
    align-items:center;
}
#caesar{
  width:111px;
  border-radius:0px 10px 10px 0px;
  position:relative;
  left:62px
}
Now finally let's get started with javascript part
Script.js
In this javascript part, we are assigning variables and connecting to HTML tags with the help of document.getElementById() and making the input in uppercase.
let encryptBtn = document.getElementById('encrypt-btn')
        let eInput= document.getElementById('encryptedInput-1')
        let pInput= document.getElementById('plainInput-1')
        let inputs = [eInput,pInput]
        let decryptBtn = document.getElementById('decrypt-btn')

        inputs.forEach(input => {
            input.oninput = () => {
                input.value = input.value.toUpperCase()
            }
        })
In this part, we are creating encrypt function that will encrypt our input plain text and will present it in encrypted text.
     function encrypt() {
            let pInput= document.getElementById('plainInput-1').value
            let solved = ''
            let shiftInput = parseInt(document.getElementById('shiftInput').value)

            for(var i =0; i<pInput.length; i++){
                let ascii_num = pInput[i].charCodeAt()
                let sum = ascii_num + shiftInput
                sum >= 65 && sum <=90 ? solved += String.fromCharCode(sum) : sum > 90 ?
                solved += String.fromCharCode(65 + (sum % 91)) : solved += pInput[i]
                       }
        eInput.value = solved
        }
In the last part, we are creating a decrypt function that will convert encrypted text into simple plain text format. At the last, we are adding event listeners to encrypt and decrypt buttons.
 function decrypt(){
            let eInput= document.getElementById('encryptedInput-1').value
            let solved = ''
            let shiftInput = parseInt(document.getElementById('shiftInput').value)

            for(let i =0; i<eInput.length; i++){
                let ascii_num = eInput[i].charCodeAt()
                let minus = ascii_num + shiftInput
                minus >= 65 && minus <=90 ? solved += String.fromCharCode(minus) : minus >
                90 ? solved += String.fromCharCode(65 - (minus % 91)) : solved -= eInput[i]
                       }
        pInput.value = solved
                    }
        decryptBtn.addEventListener('click', decrypt)
        encryptBtn.addEventListener('click', encrypt)
This concludes and our website is ready.

Until next time have a great learning ✌️

Subscribe to my newsletter
Read articles from Anas Khan directly inside your inbox. Subscribe to the newsletter, and don't miss out.
Written by

Anas Khan
Anas Khan
I’m versatile in learning & experiencing different fields. I have a keen interest in Web Development and Finance. I like designing & building products that positively impact the lives of users.