Handling authentication in NodeJS using JWT Tokens 🚀
 Jaydeep Dey
Introduction
The process of authenticating a user's identity involves obtaining credentials and utilizing those credentials to verify the user's identity. We all authenticate into several services in our day-to-day life, for example logging into pc, logging in to email etc. It helps us gain personalized access to an application. Authentication can help user to maintain privacy with their data.
Difference between Authentication and Authorization
It might seem confusing at the first sight as to how these terms convey different meanings. People generally use it interchangeably, which is a misconception. While authentication is the process of validating who the user is. On the other hand, Authorization is the process of granting access to a particular resource which is protected, depending on what permission the user has to access them.
Role Based Access Control (RBAC) 👩💻
Role-based access control is a way of defining what sort of permissions a user can get based on the role assigned to them. Roles will be assigned to do some particular action or access certain resources. Here the term "Authorization" fits perfectly as users are authorized to use certain features or access certain resources.
Understanding Client-Server Model for Authentication 💻
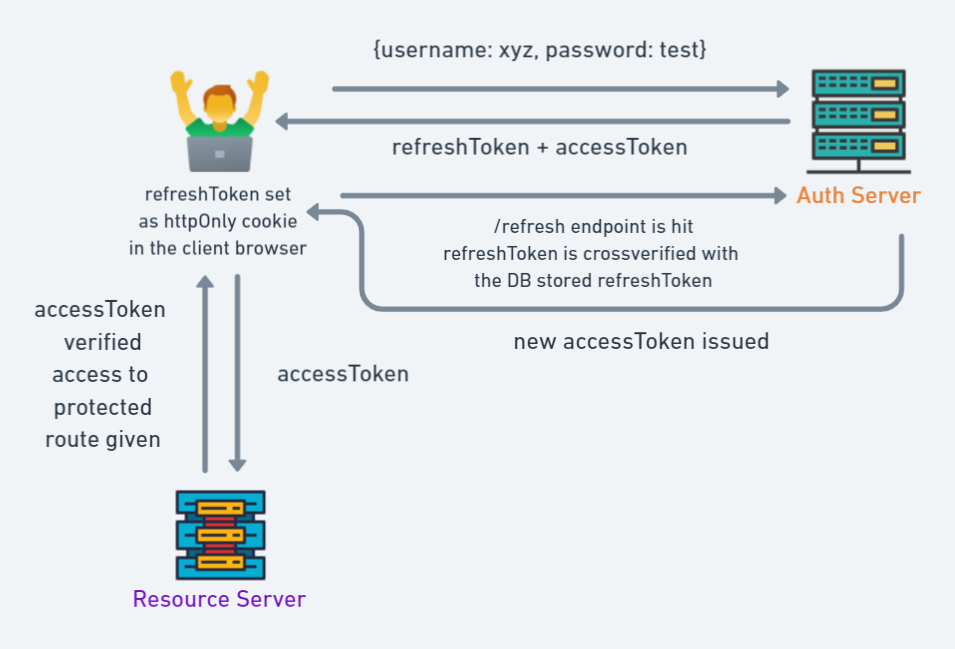
In this scenario, we define two types of JWT Token which get passed between client and server to gain authorization, namely accessToken and refreshToken
accessToken: The server issues access tokens only when it wants the client to access protected routes. Access Tokens are short-lived.Note:
Access Tokens are issued by the server to authorize a client, hence these tokens should not be stored in persistent browser storage such as
localStorageorcookies. The recommended way of storing them is to store them in-memory storage so that it's lost when the application shuts down.The reason for
accessTokenbeing in-memory is to prevent hackers from accessing these tokens. As in-memory storage is not javascript accessible, which means even if a hacker tried to inject malicious Javascript code, theaccessTokencan't be retrieved.
refreshToken: The refresh token is issued when the user authenticates into the application. Refresh Tokens are long-lived.Note:
refreshTokenare stored in the browser in the form ofhttpOnlyCookies, which javascript cannot access and are valid only till the user is authenticated, in other words only when the user is logged inrefreshTokencan generate newaccessTokenwhen/refreshendpoint of REST API is called.A reference of
refreshTokenis stored in the database, so that if the user decides to logout early therefreshTokenstored in the Database can be deleted and the session can be terminatedThe reference of
refreshToken,stored in the database, is cross-verified with therefreshTokenstored inhttpOnlycookie on client-request to REST API to verify the session.refreshTokenshould not be allowed to generate new refreshToken to prevent indefinite access to an unauthorized person, if they somehow manage to getrefreshToken
Implementation on Backend
The code implementation will be done using React on the client side and ExpressJS on the backend side. MongoDB is used as Database.
The required package.json for the backend is mentioned below:
// package.json for backend
"dependencies": {
    "bcrypt": "^5.1.0",
    "body-parser": "^1.20.1",
    "cookie-parser": "^1.4.6",
    "cors": "^2.8.5",
    "dotenv": "^16.0.3",
    "express": "^4.18.1",
    "jsonwebtoken": "^8.5.1",
    "mongoose": "^6.5.4",
    "nodemon": "^2.0.19"
  }
Issuing refreshToken
When the user logs into the application
const login = (req, res, next) => {
    const { email, password } = req.body;
    let errors = [];
    if (!email || !password) {
        errors.push({ msg: 'Please fill in all fields' });
        res.status(400).json({ errors });
    }
    User.findOne({ email })
        .then(user => {
            if (!user) {
                errors.push({ msg: 'Email is not registered' });
                res.status(400).json({ errors });
            } else {
                bcrypt.compare(password, user.password, async (err, isMatch) => {
                    if (err) throw err;
                    if (isMatch) {
// accessToken and refreshToken is being issued
                        const accessToken = jwt.sign(
                            {
                                userInfo: {
                                    name: user.name,
                                    role: user.role
                                },
                            }
                            , process.env.ACCESS_TOKEN_SECRET, { expiresIn: '15m' });
                        const refreshToken = jwt.sign({ name: user.name, role: user.role }, process.env.REFRESH_TOKEN_SECRET, { expiresIn: '1d' });

                        // adding a refreshToken in mongodb
                        await User.findOneAndUpdate({ _id: user._id }, { refreshToken: refreshToken })
                        res.cookie('refreshToken', refreshToken, { maxAge: 1000 * 60 * 60 * 24, sameSite: 'none', httpOnly: true, secure: true });
                        res.status(200).json({ role: user.role, accessToken: accessToken });
                    } else {
                        errors.push({ msg: 'Password is incorrect' });
                        res.status(400).json({ errors });
                    }
                })
            }
        })
}
verifying
refreshTokenwhenaccessTokenexpiresconst User = require('../Models/user') const jwt = require('jsonwebtoken') const handleRefreshToken = async (req, res) => { const cookies = req.cookies; // ensure cookie is set if (!cookies?.refreshToken) res.status(401).json({ msg: 'No cookies' }); const refreshToken = cookies.refreshToken; // cross verify refreshToken with the stored refreshToken in DB const person = await User.findOne({ refreshToken }) if (!person) res.status(401).json({ msg: 'No person' }); // evalutate jwt jwt.verify(refreshToken, process.env.REFRESH_TOKEN_SECRET, (err, user) => { const role = Object.values(user.role) if (err) res.status(403).json({ msg: 'Invalid token' }); // accessToken is issued on successful verification const accessToken = jwt.sign({ userInfo: { name: user.name, role: user.role }, }, process.env.ACCESS_TOKEN_SECRET, { expiresIn: '15m' }); res.status(200).json({ accessToken: accessToken, role: role }); }) }
Here, we are encrypting the user role with accessToken and refreshToken so that RBAC is implemented on the server side
When the user successfully logs-in into the website
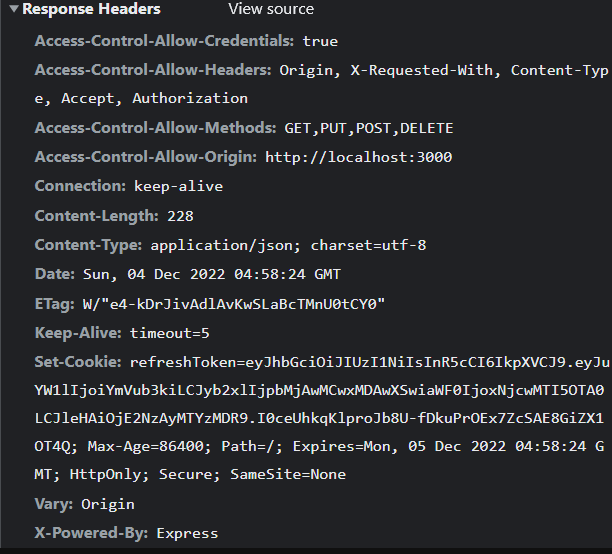
The refreshToken is issued to the client in the response header as a httpOnly cookie. The cookie is set in the browser which will be used subsequently to retrieve new accessToken when it expires.
The accessToken is stored in Browser's in-memory and hence, is not visible. But on logging into the console. We verify that it has been issued. In the production environment, never log it to the console.

The accessToken is passed as a Bearer Token in request Authorization header which then helps the client to access protected routes.
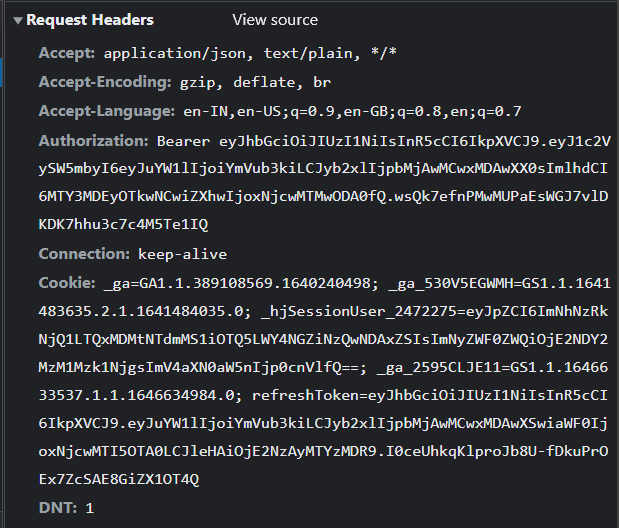
We create a middleware function to verify accessToken
const verify = (req, res, next) => {
    const authHeader = req.headers.authorization || req.headers.Authorization;
    if(!authHeader?.startsWith('Bearer ')) return res.status(401).json({ msg: 'Unauthorized' });
    const token = authHeader.split(' ')[1];
    jwt.verify(token, process.env.ACCESS_TOKEN_SECRET, (err, decoded)=> {
        if(err) return res.status(403).json({ msg: 'Invalid token' });
        console.log(decoded)
        req.role = decoded.userInfo.role
        next()
    })
}
The verification of role is done by another middleware function
const verifyRoles = (...allowedRoles) => {
    return (req, res, next) => {
        if (!req?.role) return res.status(401).json({ msg: 'You are not authenticated' });
        const rolesArray = [...allowedRoles]
        const result = req.role.map(role => rolesArray.includes(role)).find(val => val === true);
        if (!result) return res.status(401).json({ msg: 'You are not authorized to access this route' });
        next();
    }
}
Implementation of a protected route on Frontend 🔒
react-router-dom v6 allowed us to protect routes based on roles assigned to the user. The roles will be fetched from the backend based on accessToken.
The implementation is as follows:
App.jsx
import { Routes, Route } from "react-router-dom"
import Home from "./Pages/Home";
import Loginscreen from "./Pages/Loginscreen";
import Unauthorised from "./Components/Unauthorised";
import UserProvider from "./context/Usercontext";
import Admin from "./Pages/Admin";
import Layout from "./Layout";
import Registerscreen from "./Pages/Registerscreen";
import Missing from "./Missing";
import RequireAuth from "./RequireAuth";
import EditorScreen from "./Pages/EditorScreen";
import Persistlogin from "./Components/Persistlogin";

function App() {

  return (
    <UserProvider>
      <Routes>
          {/* Public Routes (without logged in) */}
          <Route path="/login" element={<Loginscreen />} />
          <Route path="/unauthorised" element={<Unauthorised />} />
          <Route path="/register" element={<Registerscreen />} />


          <Route element={<Persistlogin />}>
            {/* Any User can access with user role */}
            <Route element={<RequireAuth allowedRoles={[2000]} />}>
              <Route path="/" element={<Home />} />
            </Route>


            {/* Protected Routes (Admin) */}
            <Route element={<RequireAuth allowedRoles={[1000]} />}>
              <Route path="/admin" element={<Admin />} />
            </Route>

            {/* Protected Routes(Editor) */}
            <Route element={<RequireAuth allowedRoles={[3000]} />}>
              <Route path="/editor" element={<EditorScreen />} />
            </Route>
          </Route>

          {/* Catch all */}
          <Route path="*" element={<Missing />} />
      </Routes>
    </UserProvider>
  );
}

export default App;
The requireAuth.jsx component is created to manage protected route access
import { useLocation, Navigate, Outlet } from "react-router-dom"
import useAuth from "./hooks/useAuth"

const RequireAuth = ({ allowedRoles }) => {
    // useAuth is a custom hook created to access the global user context store
    const { auth } = useAuth()
    const location = useLocation()

    return (
        <div>
            {auth?.role?.find(role1 => allowedRoles.includes(role1))
                ? <Outlet />
                : auth?.email ?
                    <Navigate to="/unauthorised" state={{ from: location }} replace />
                    : <Navigate to="/login" state={{ from: location }} replace />
            }
        </div>
    )
}
The
<Outlet/>the component is an inbuilt feature ofreact-router-dom v6which helps to renderchildrencomponent which are wrapped around the<Route></Route>component.
One major problem comes when a user tries to refresh the page, the auth state is reset when the window is refreshed. To maintain persist login state we define another component PersistLogin.jsx
import useRefreshToken from "../hooks/useRefreshToken"
import useAuth from "../hooks/useAuth"
import { useState, useEffect } from "react"
import { Outlet } from "react-router-dom"

const Persistlogin = () => {
    const refresh = useRefreshToken()
    const { auth } = useAuth()
    const [loading, setLoading] = useState(true)

    useEffect(() => {
        const verifyRefreshToken = async () => {
            try {
                await refresh()
            } catch (error) {
                console.error(error)
            }
            finally {
                setLoading(false)
            }

        }
        !auth?.accessToken ? verifyRefreshToken() : setLoading(false)
    }, [])

    useEffect(() => {
        console.log(`loading: ${loading}`)
        console.log(`accessToken: ${JSON.stringify(auth?.accessToken)}`)
    }, [loading])

    return (
        <>
            {loading ? <p>Loading...</p> : <Outlet />}
        </>
    )
}

export default Persistlogin
Accessing protected routes
When an admin logs into the application and tries to access the admin page, he is given the access.
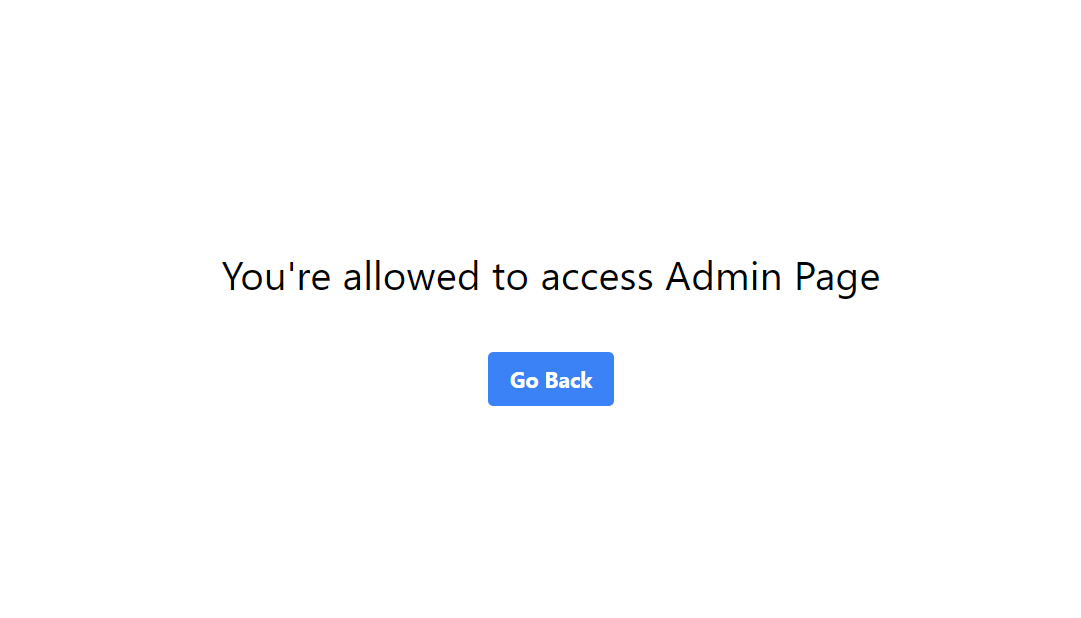
But when the admin navigates to the editor's page, he gets the following error.

As soon as the accessToken expires, the /refresh the endpoint is hit to fetch new accessToken
The network activity is demonstrated:

the /getUser route is protected and when it's being accessed through expired accessToken, we get a 403 Forbidden response. The refreshToken is called subsequently to fetch a new accessToken. This is achieved with the help of Axios Interceptors.
Axios Interceptors
Let's demonstrate the as to how new accessTokens are fetched from the server when it gets expired using Axios interceptor

Axios is a powerful promise-based HTTP Library. One of its coolest features is the Axios interceptors.
Axios interceptors are similar to the middleware function of ExpressJS.
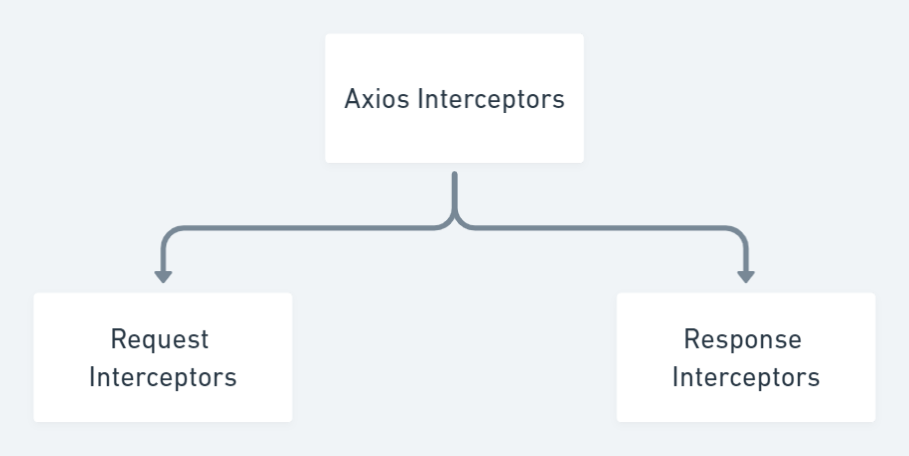
Request interceptors help us define if we want to do any operation before sending a request to the server.
axios.interceptors.request.use(function (config) {
    // Do something before request is sent
    return config;
  }, function (error) {
    // Do something with request error
    return Promise.reject(error);
  });
In our application, we have defined the Request interceptor to pass accessToken as Bearer Token in the Authorization Header.
const requestIntercept = axiosPrivate.interceptors.request.use(
            config => {
                if (!config.headers['Authorization']) {
                    config.headers['Authorization'] = `Bearer ${auth?.accessToken}`
                }
                return config
            },
            error => Promise.reject(error)
        )
Similarly,
Response interceptors are defined as when we want to do any operation after we receive the response from the server.
axios.interceptors.response.use(function (response) {
    // Any status code that lie within the range of 2xx cause this function to trigger
    // Do something with response data
    return response;
  }, function (error) {
    // Any status codes that falls outside the range of 2xx cause this function to trigger
    // Do something with response error
    return Promise.reject(error);
  });
In this application, we have implemented a Response interceptor to resend accessToken as a request header once we detected 403 Forbidden Status, which comes for expired accessToken.
const reponseIntercept = axiosPrivate.interceptors.response.use(
// if successful return response
            (response) => response,
            async (error) => {
// if there is an error, which comes from expired accessToken
                const prevRequest = error?.config;
                if (error?.response?.status === 403 && !prevRequest?.sent) {
// issue new accessToken from refresh endpoint and send it to the request header
                    const newAccessToken = await refresh()
                    return axiosPrivate({
                        ...prevRequest,
                        headers: { ...prevRequest.headers, Authorization: `Bearer ${newAccessToken}` },
                        sent: true
                    });
                }
                return Promise.reject(error);
            }
        )
Logging out a User
When the user tries to logout, the browser stored httpOnly cookie storing refreshToken is deleted. The DB stored refreshToken is also cleared simultaneously.
const logout = (req, res) => {
    const cookies = req.cookies;
    if (!cookies?.refreshToken) res.status(204).json({ msg: 'No cookies' });
    const refreshToken = cookies.refreshToken;
    User.findOneAndUpdate({ refreshToken }, { refreshToken: '' }, (err, doc) => {
        if (err) {
            res.status(500).json({ msg: 'Something went wrong' })
        }
        // maxAge need not be set during clearCookie
        res.clearCookie('refreshToken', { httpOnly: true, sameSite: 'none', secure: true });
        res.status(200).json({ msg: 'Logged out' });
    })
}
Things to keep in mind
Cross-Origin Resource Access
We have our react app running on http://localhost:3000/
and our backend express app running on http://localhost:5000/
It's evident we are trying to access resources from the backend, from a different origin, i.e. our react app.
This will give us a CORS Error, which keeps the site, safe by blocking all sorts of Malicious cross-site scripting activity.
In the Development environment we might encounter this error, so to prevent it, we use CORS Middleware, specifying the origin which gets permission to pass through this policy.
CORS Middleware can be installed by this command
npm i cors or yarn add cors
const allowedOrigin = [
    'http://localhost:3000',
    'http://localhost:5000',
    'http://localhost:3001',
    'http://localhost:5001',
]

const corsOption = {
    origin: (origin, cb)=> {
        if(allowedOrigin.indexOf(origin) !== -1 || !origin){
            cb(null, true)
        }
        else{
            cb(new Error("Not allowed by CORS"))
        }
    },
    optionsSuccessStatus: 200,
}
We pass the corsOption in the CORS Middleware as follows
const cors = require('cors')
app.use(cors(corsOption))
Configuring cookies to allow CORS
In backend:
When sending and receiving cookies, make sure to set secure: true, and sameSite: 'none' to allow cookies to be shared cross-origin
res.cookie('refreshToken', refreshToken, { maxAge: 1000 * 60 * 60 * 24, sameSite: 'none', httpOnly: true, secure: true });
Similarly,
res.clearCookie('refreshToken', { httpOnly: true, sameSite: 'none', secure: true });
NOTE: To test out backend functionalities through Postman or any other similar application, make sure to set
secure: false, as it doesn't allow cookies to be set in the application, which eventually leads to errors.
In Frontend,
While making Axios request, make sure you set withCredentials: true to allow browsers to set cookies before making a request.
await axios.get('/refresh', { withCredentials: true })
Resources Link
Some of the links to useful resources are given, you can refer them for more indepth knowledge on this top. 🚀
React login playlist by Dave Gray:
https://www.youtube.com/playlist?list=PL0Zuz27SZ 6PRCpm9clX0WiBEMB70FWwd
All You Need to Know About Storing JWT in the Frontend: https://dev.to/cotter/localstorage-vs-cookies-all-you-need-to-know-about-storing-jwt-tokens-securely-in-the-front-end-15id
Rest Security CheatSheet:
https://cheatsheetseries.owasp.org/cheatsheets/REST_Security_Cheat_Sheet.html
Thanks a lot for reading my article. ✨
Subscribe to my newsletter
Read articles from Jaydeep Dey directly inside your inbox. Subscribe to the newsletter, and don't miss out.
Written by
