First look at the GitHub CLI
 Favourite Jome
We all know about Github, I presume but do we know about the Github CLI (Command Line Interface)?
The GitHub CLI is a tool I've been using recently, and I doubt many of us developers are aware of it, so we'll be looking at some of its use cases which would help boost your productivity when it comes to using Github.
The GitHub CLI is a tool that takes Github to the command line, allowing us to perform GitHub operations such as making a pull request (PR), creating repositories (repo) etc., that would have been done on the GitHub website directly.
Prerequisite
- Basic knowledge of Git and GitHub
- Basic knowledge of the terminal or the Command Line Interface (CLI)
How to get GitHub CLI up on your machine
There are various means of installing the GitHub CLI on our devices depending on the Operating System (OS) you make use of.
Windows
You can use these package managers or command line installers such as WinGet, and scoop, which of course, must be installed first on your machine. But if you're on Windows 10 upwards, you should have WinGet by default.
winget install --id GitHub.cli
MacOS
brew install gh
For further instructions on how to install the GitHub CLI, please visit their documentation
Configuring GitHub CLI
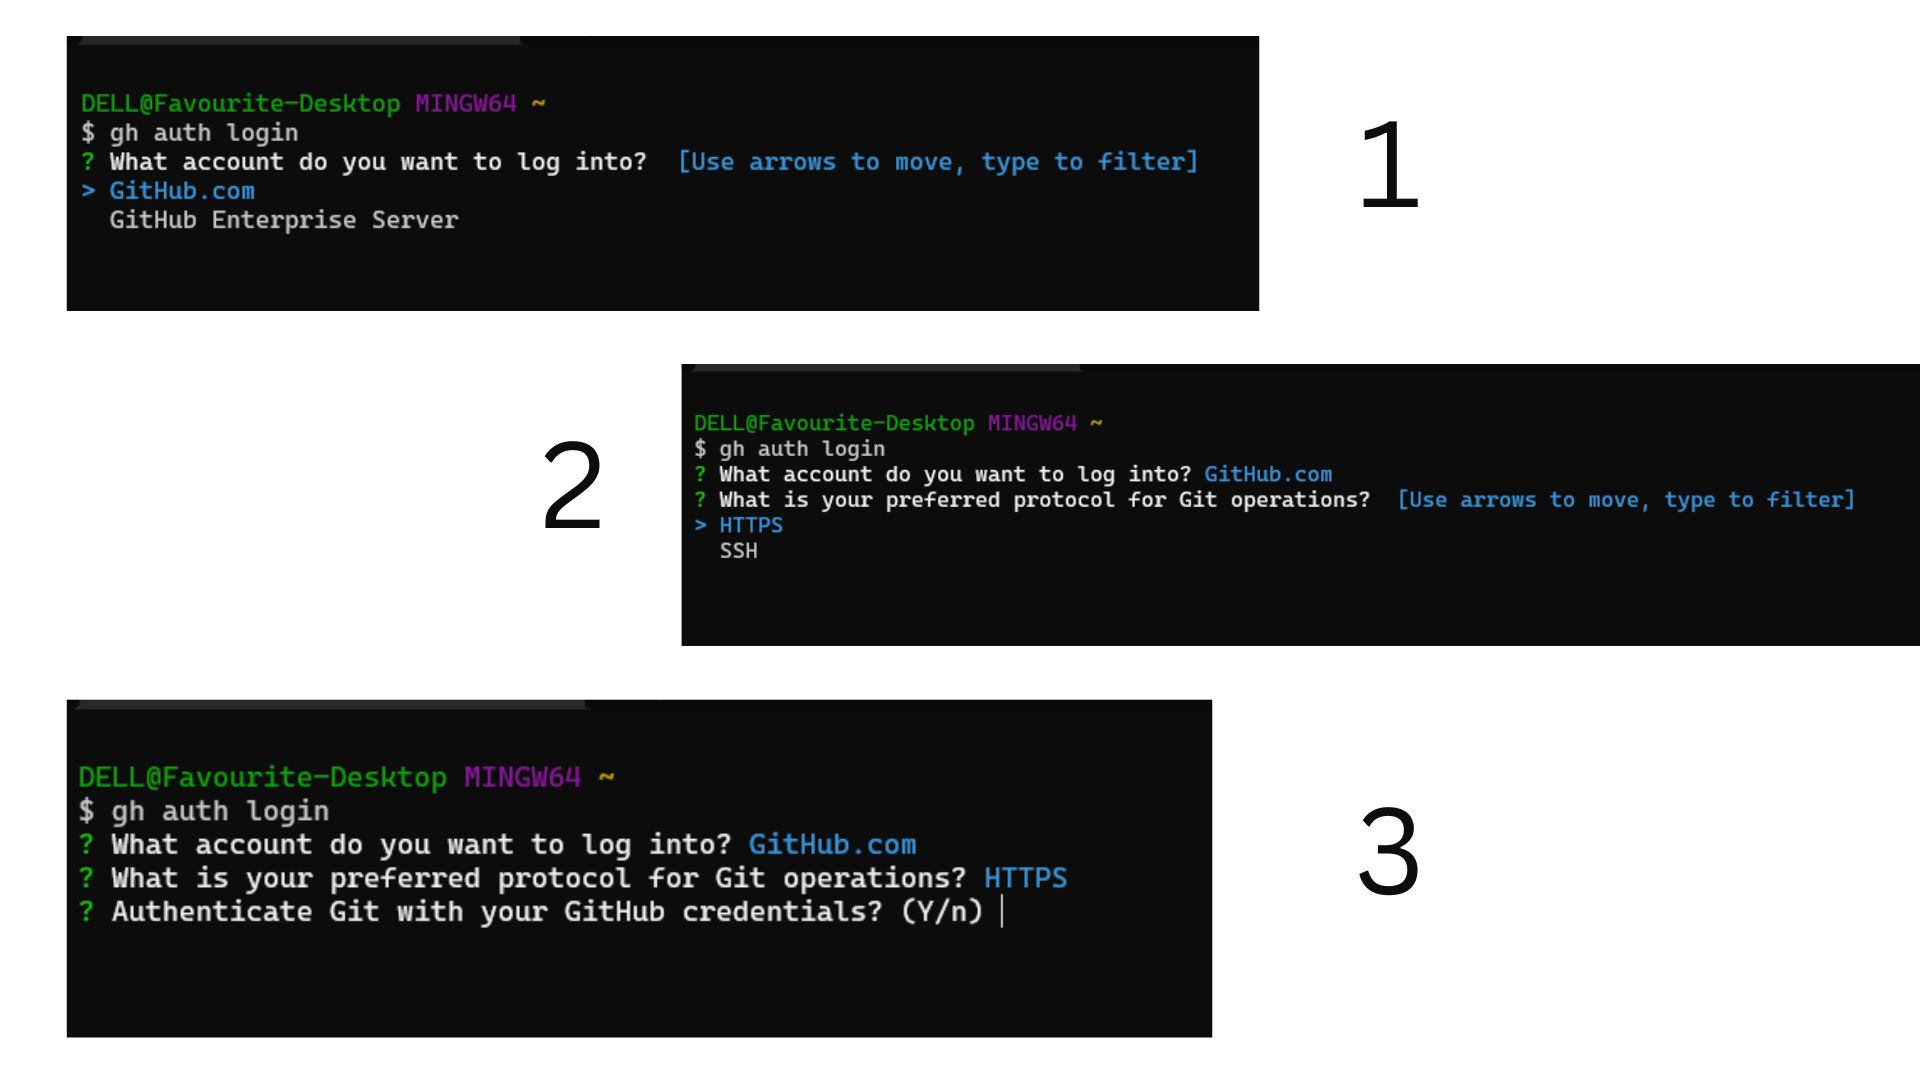
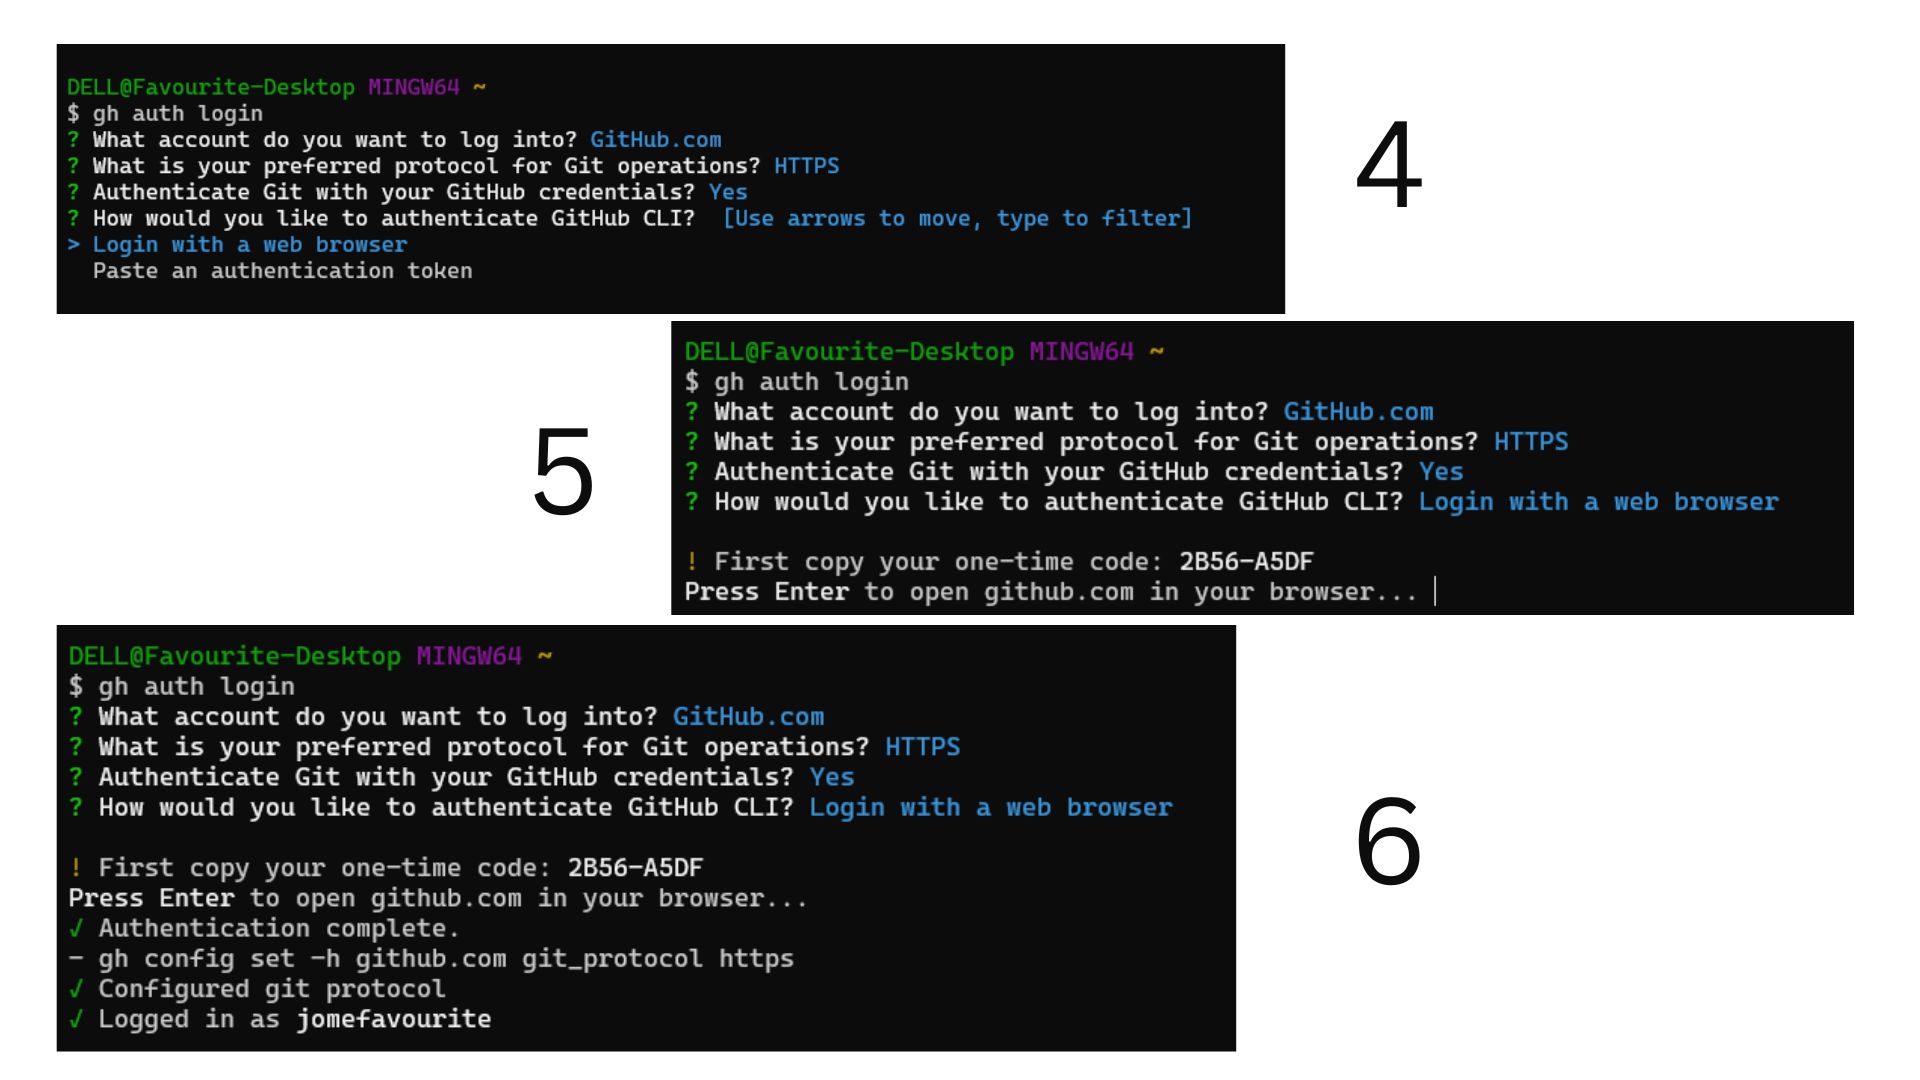
Now that we got the CLI on our various machines, we need to be authenticated with our GitHub accounts to utilise the CLI.
Firstly, run the command on the terminal
gh auth login
When you run the command above, you'll get more prompt; the images below work you through the steps
Syntax of the GitHub CLI
The GitHub CLI commands follow a certain basic syntax or usage, which is:
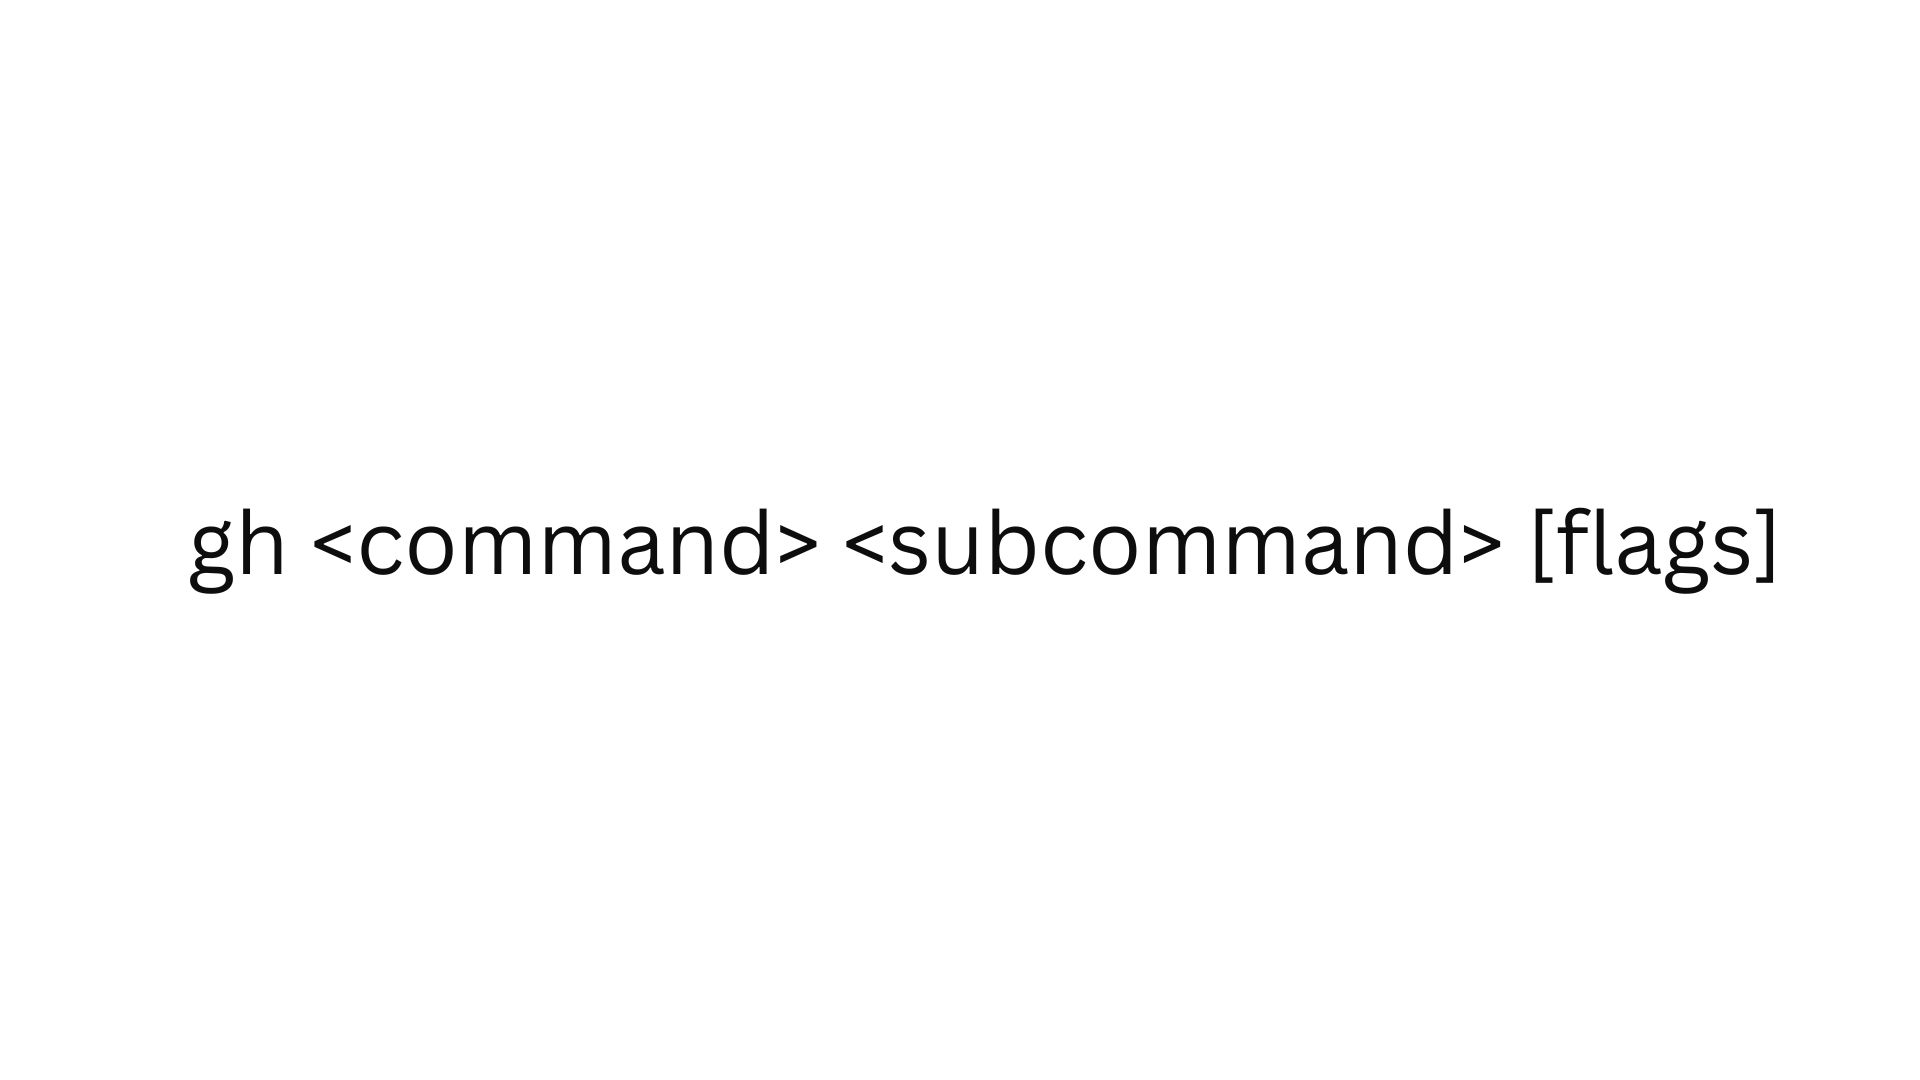
gh: is the initial command, saying I want to use GitHub CLI
command: specifies the action you'll like to take, like login, pr (pull request), browse e.t.c
subcommand: specifies further commands that complete the command essentially. E.g.gh auth login, which we've used.
[flags]: specifies additional options or arguments to the command.
GitHub CLI Basic Commands
There are a lot of commands that serve different GitHub operations, so we aren't going to cover all; we'll look at two commands, which I offend make use of.
gh repo
The gh repo command is used for handling repositories, and it comes with lots of subcommands, such as:
- gh repo create
- gh repo clone
- gh repo delete
- gh repo edit
- gh repo fork
- e.t.c
To view the complete lists of the
gh repocommands, do visit the docs here
Let's go over just one of the subcommands under the gh repo command:
gh repo create [<name>] [flags]
The command above is to create a repository, making it private and public, with flags and lots of other cool stuff concerning a repository beyond this article's scope.
[name]: specifies the name of the repository while
[flags]: specifies particular arguments for the repository being created, for example, making the repo public or private
Running the commands
Before we run the commands, you should know that there are two modes of using this command: the interactive mode and the non-interactive mode.
The interactive mode means you'd go through a list of questions like whether you want to clone the repo after it's been created, whether it should be a private or public repo, and other questions. Note the interactive mode doesn't take arguments, so only the command gh repo create is used.
Let's look at a step-by-step guide using the interactive mode command:
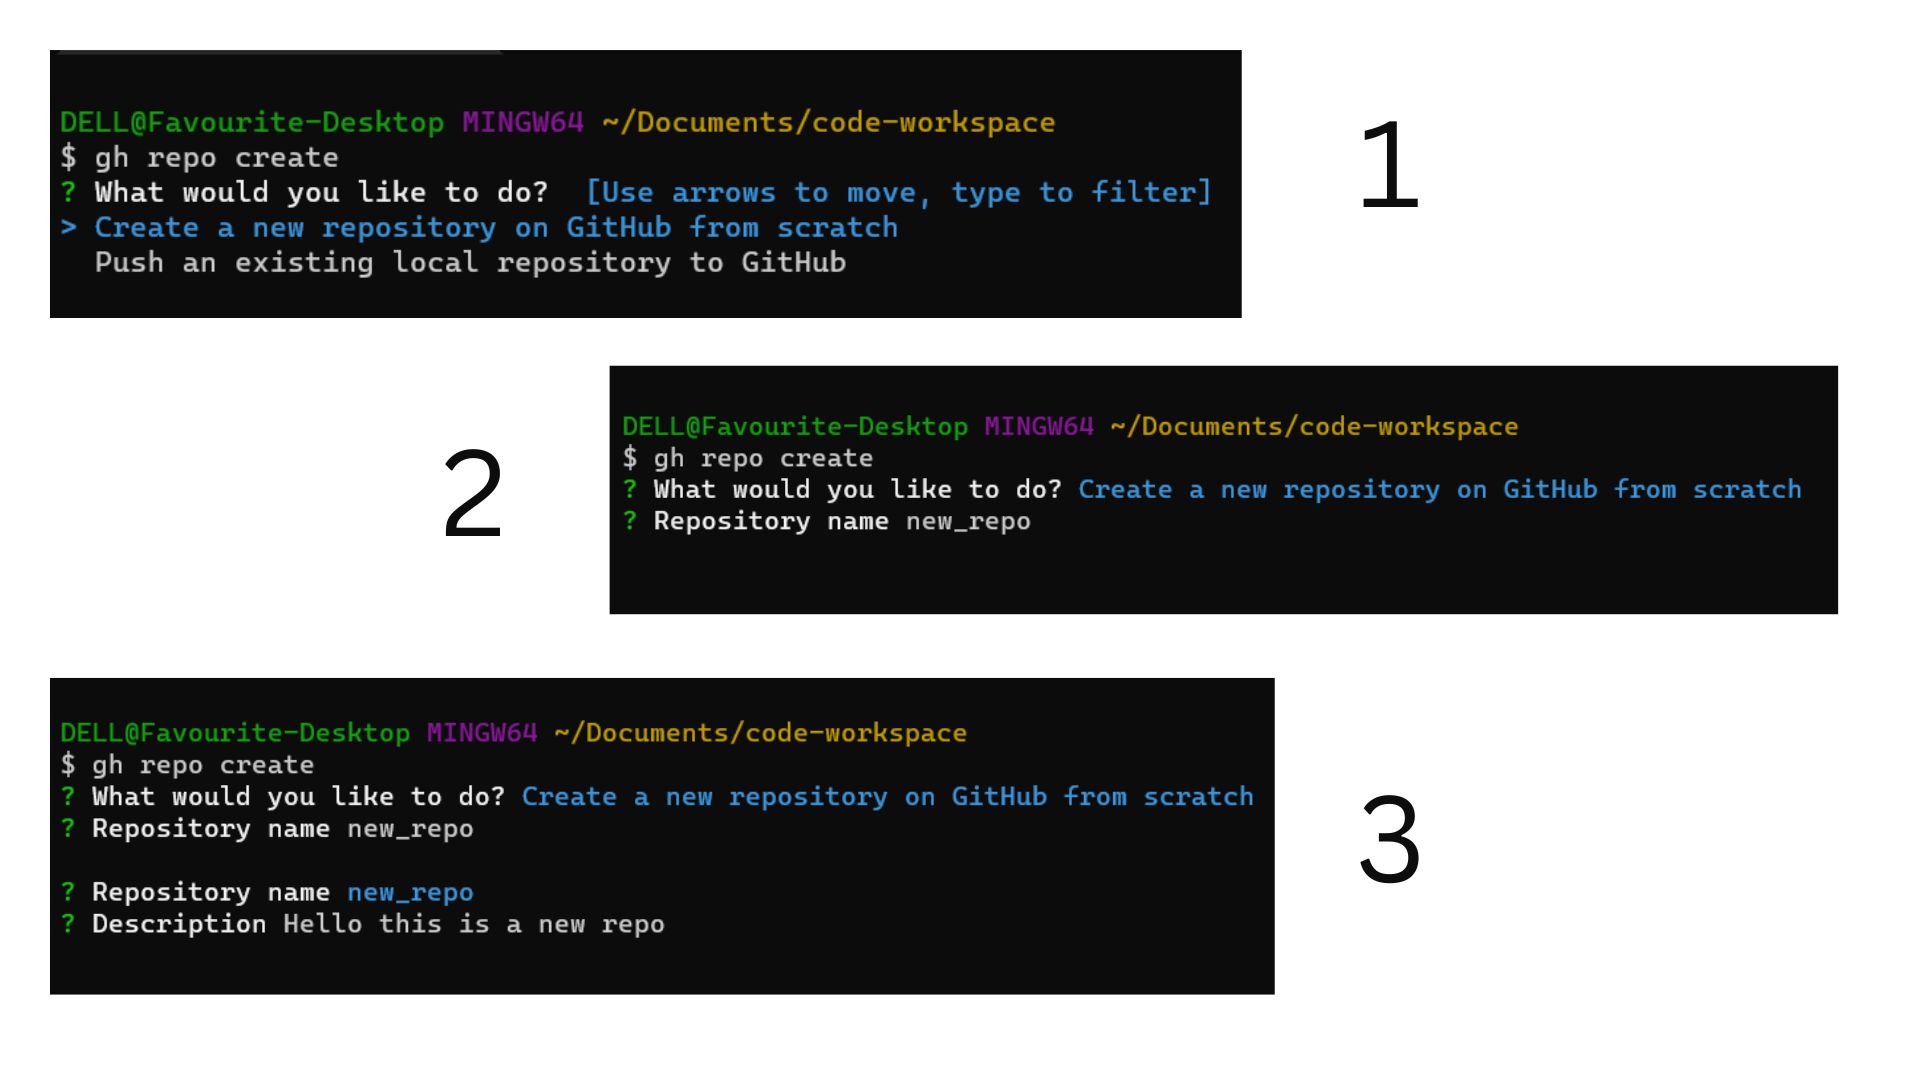
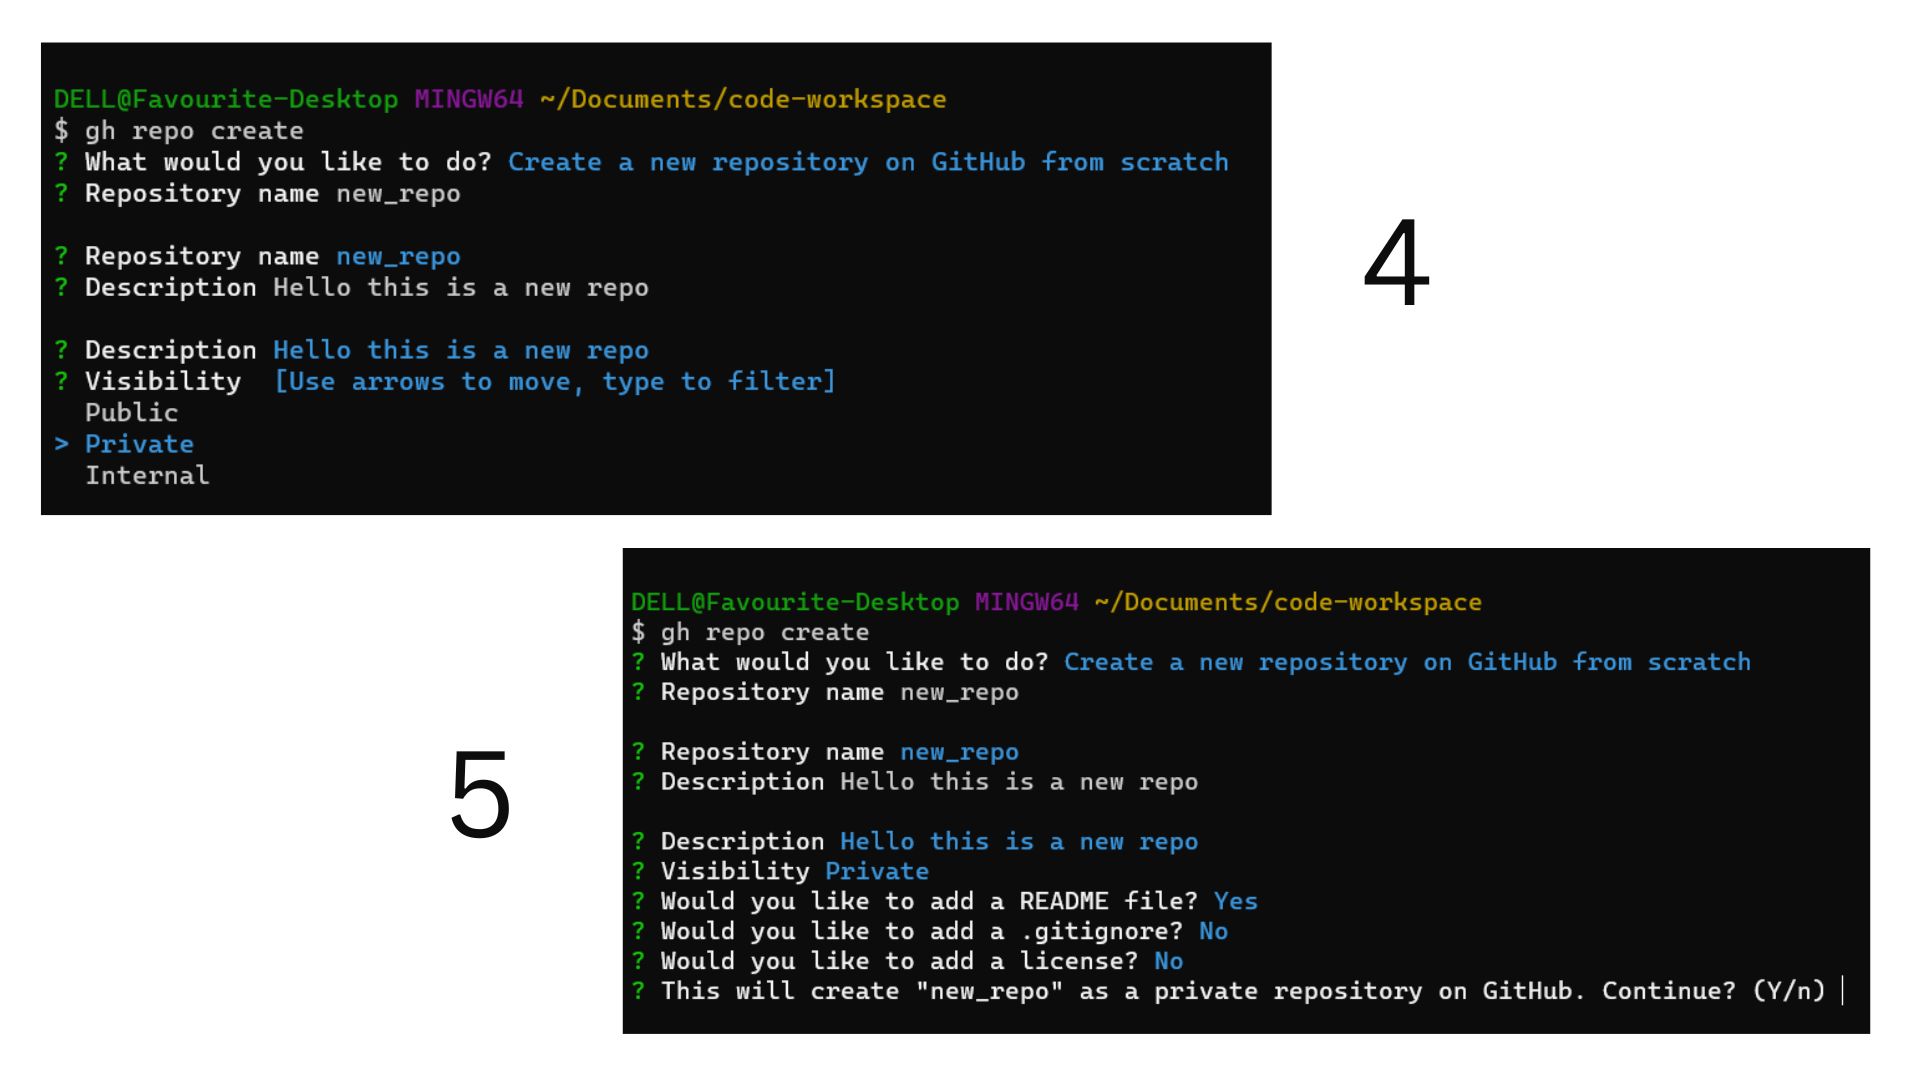
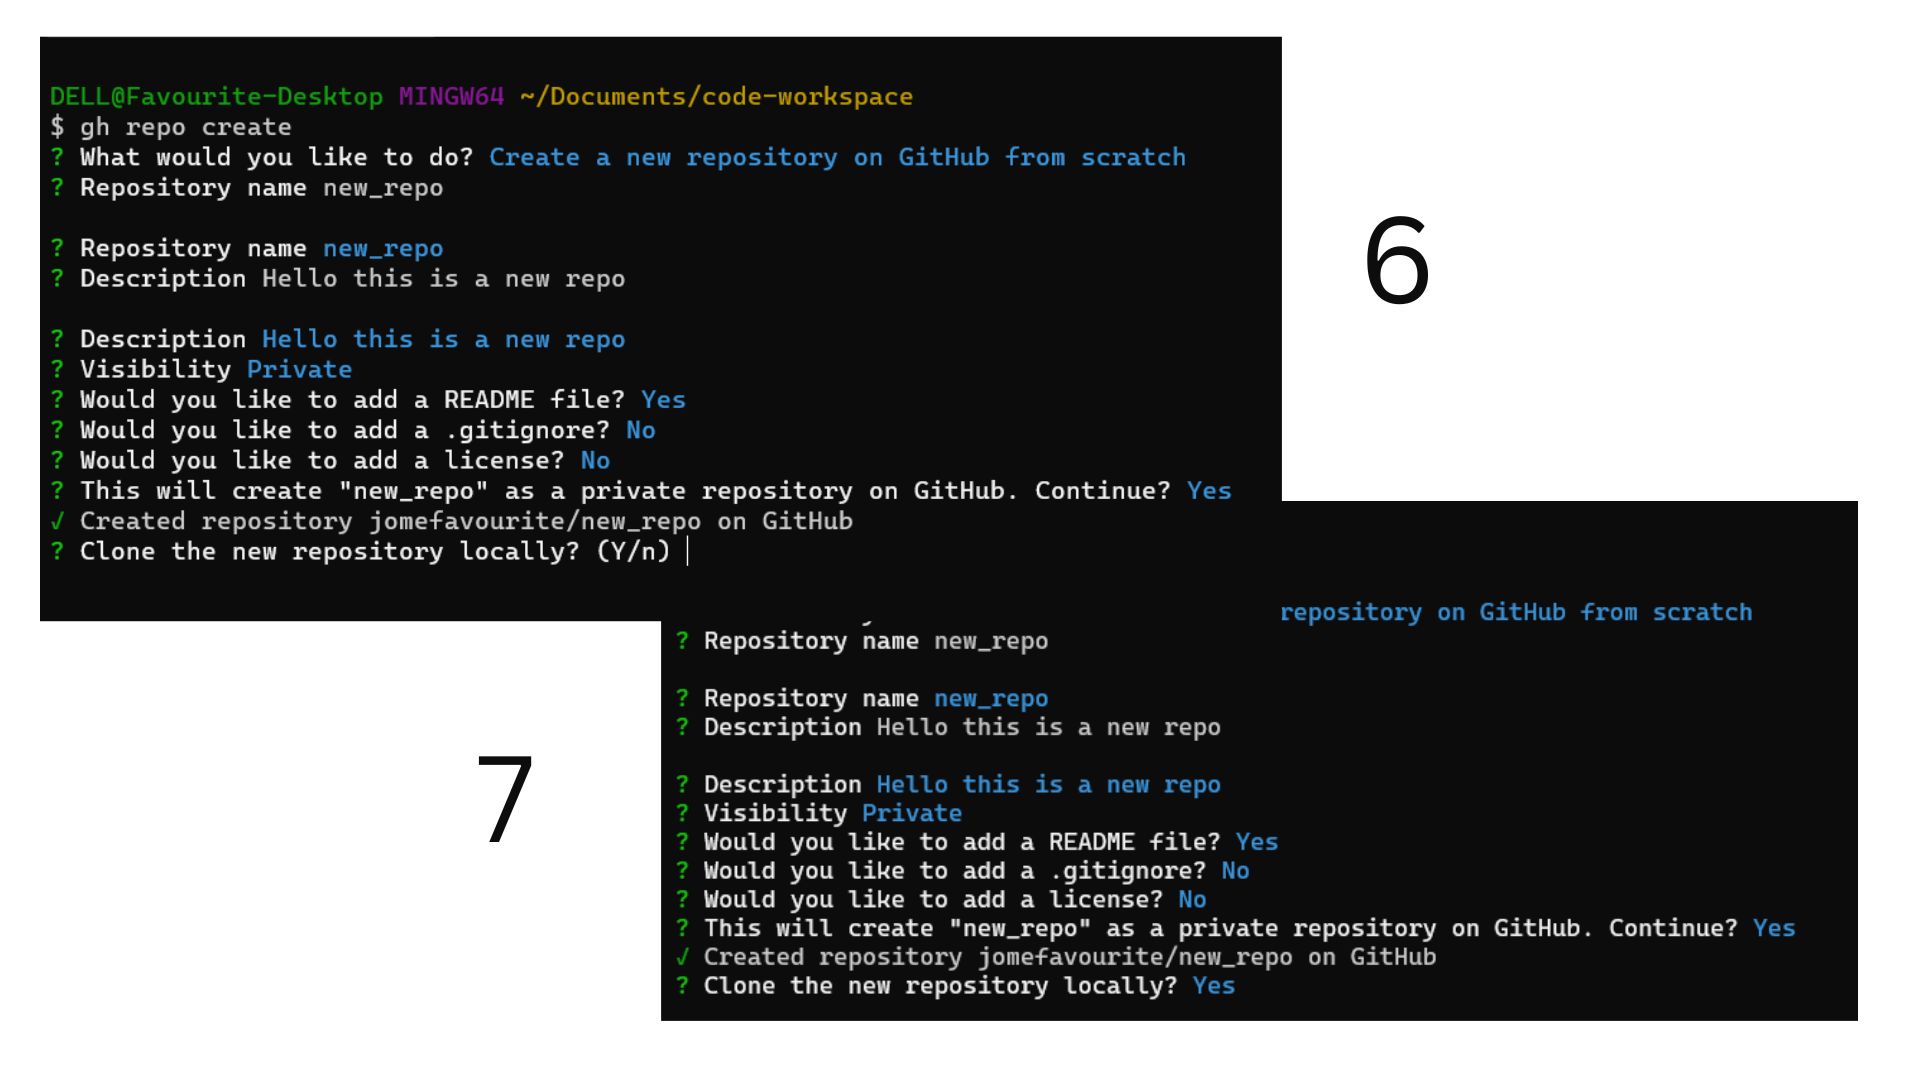
The non-interactive mode is a declarative way of specifying how the repo should be created, where the name and various flags would be specified.
Now, let's create a new repository just like we've done before, but this time in a non-interactive mode whereby there is no step-by-step procedure and no questions.
gh repo create new_repo --add-readme --private -d "Hello this is a new repo" -c
Notice I have 4 flags along with the repository name
--add-readme: specifies you want a Readme file added to the repo, obviously 😅
--private: specifies, hey repo, be a private repo 🔏
-d [string]: specifies description for the repo ✍️
-c: specifies you'll like to clone the repo once it's created ⬇️
Here's the output of the command:

If you'll like to know more about how the other subcommand are to be used, please read up on their docs here
gh pr
The gh pr command is used to work with GitHub pull requests, and it comes with lots of subcommands, such as:
- gh pr create
- gh pr close
- gh pr diff
- gh pr comment
- gh pr reopen
- e.t.c
To view the complete lists of the
gh prcommands, do visit the docs here
Let's go over just one of the subcommands under the gh pr command:
gh pr create [flags]
The command above would be used to create a pull request, and there are two modes of running this command, just like the gh repo create command; we have the interactive mode and the non-interactive mode.
Running the command
Let's create a pull request on the new_repo repository we created earlier. Though in other for us to make the pull request to the repo, we must have created a new branch first because the sole purpose of a pull request is to say hey, I've made some changes would you like to merge my changes to some other branch (target branch).
So once you've identified that you have multiple branches, another thing to look out for is ensuring the working directory on the terminal is the directory you want to make the pull request to. That is, if the command pwd (print working directory) is run, it should output something like this /c/Users/..../new_repo. Basically, the last path should be a git repository, which in this case is new_repo.
Now, let's practicalize all this:
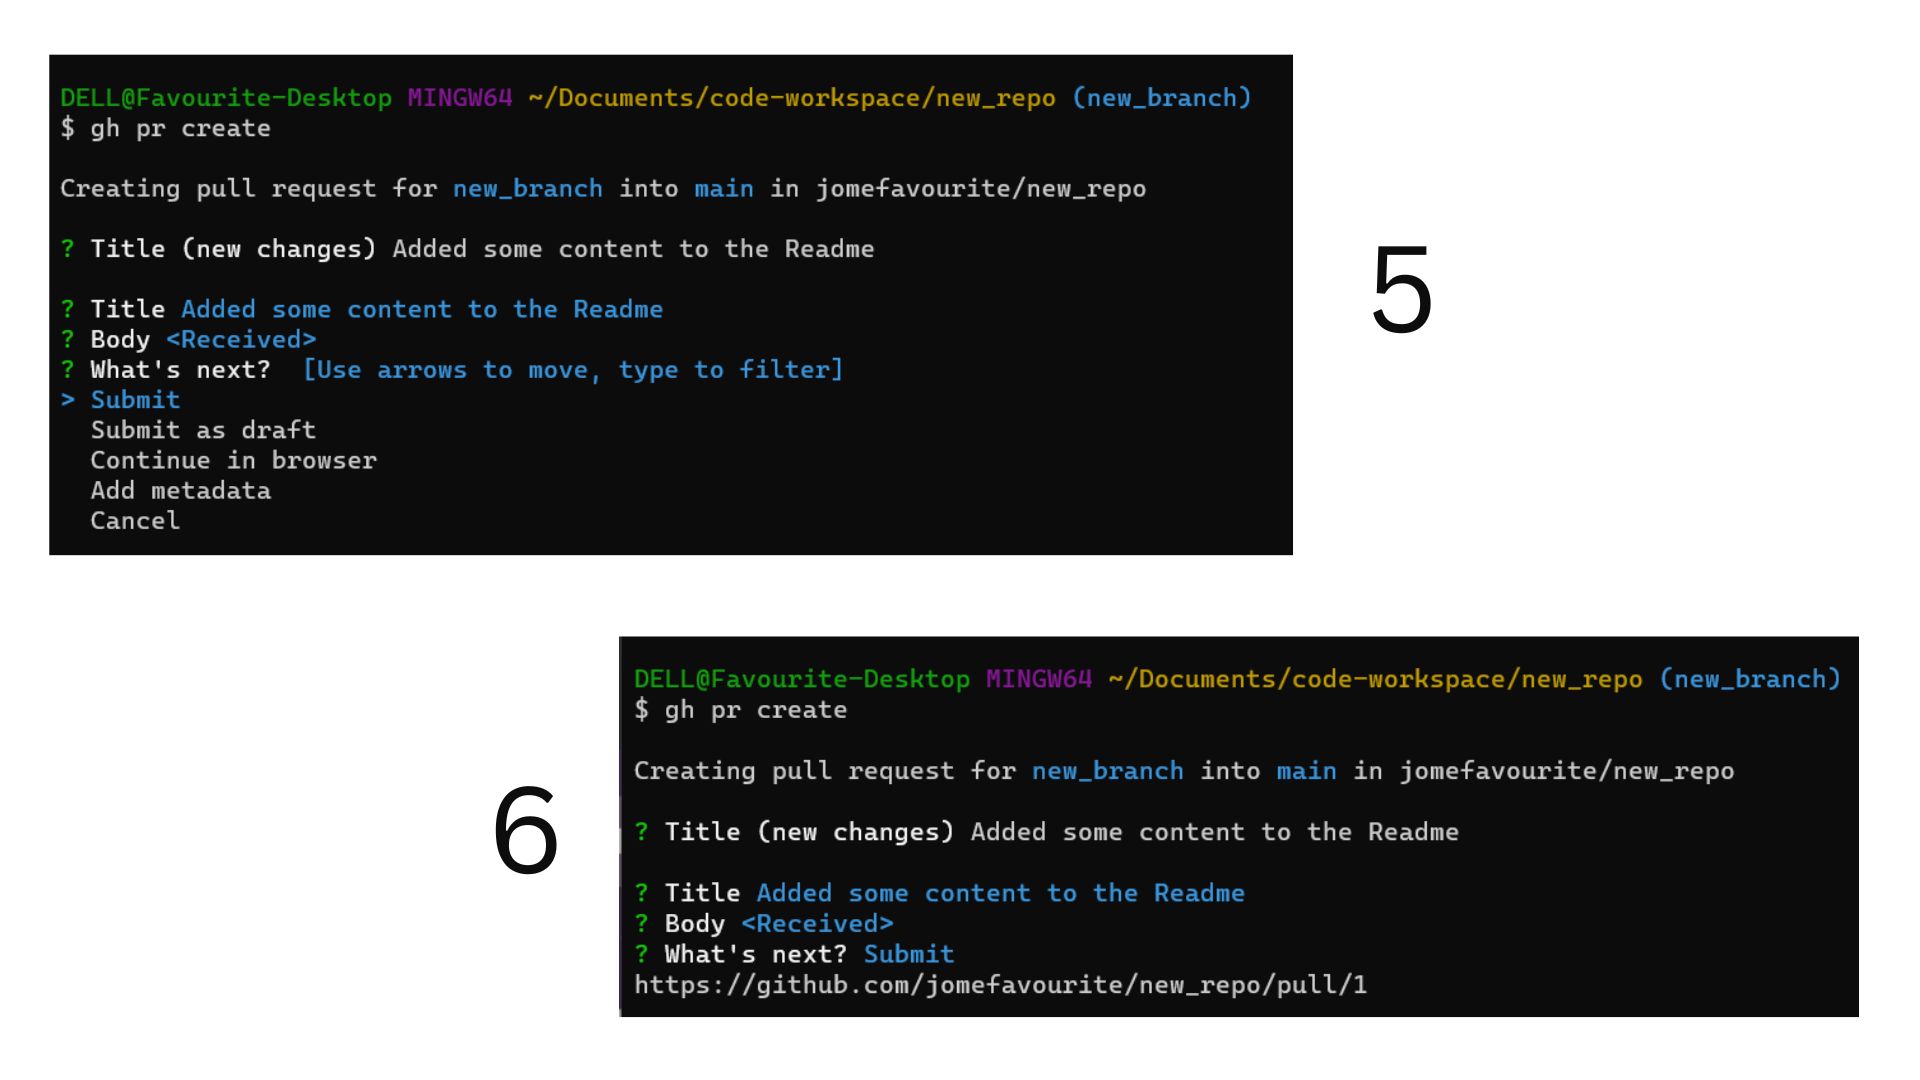
Interactive mode
Recap, so we need to create a new branch first, then make some changes, push those changes and make the pull request to the main branch from the new branch
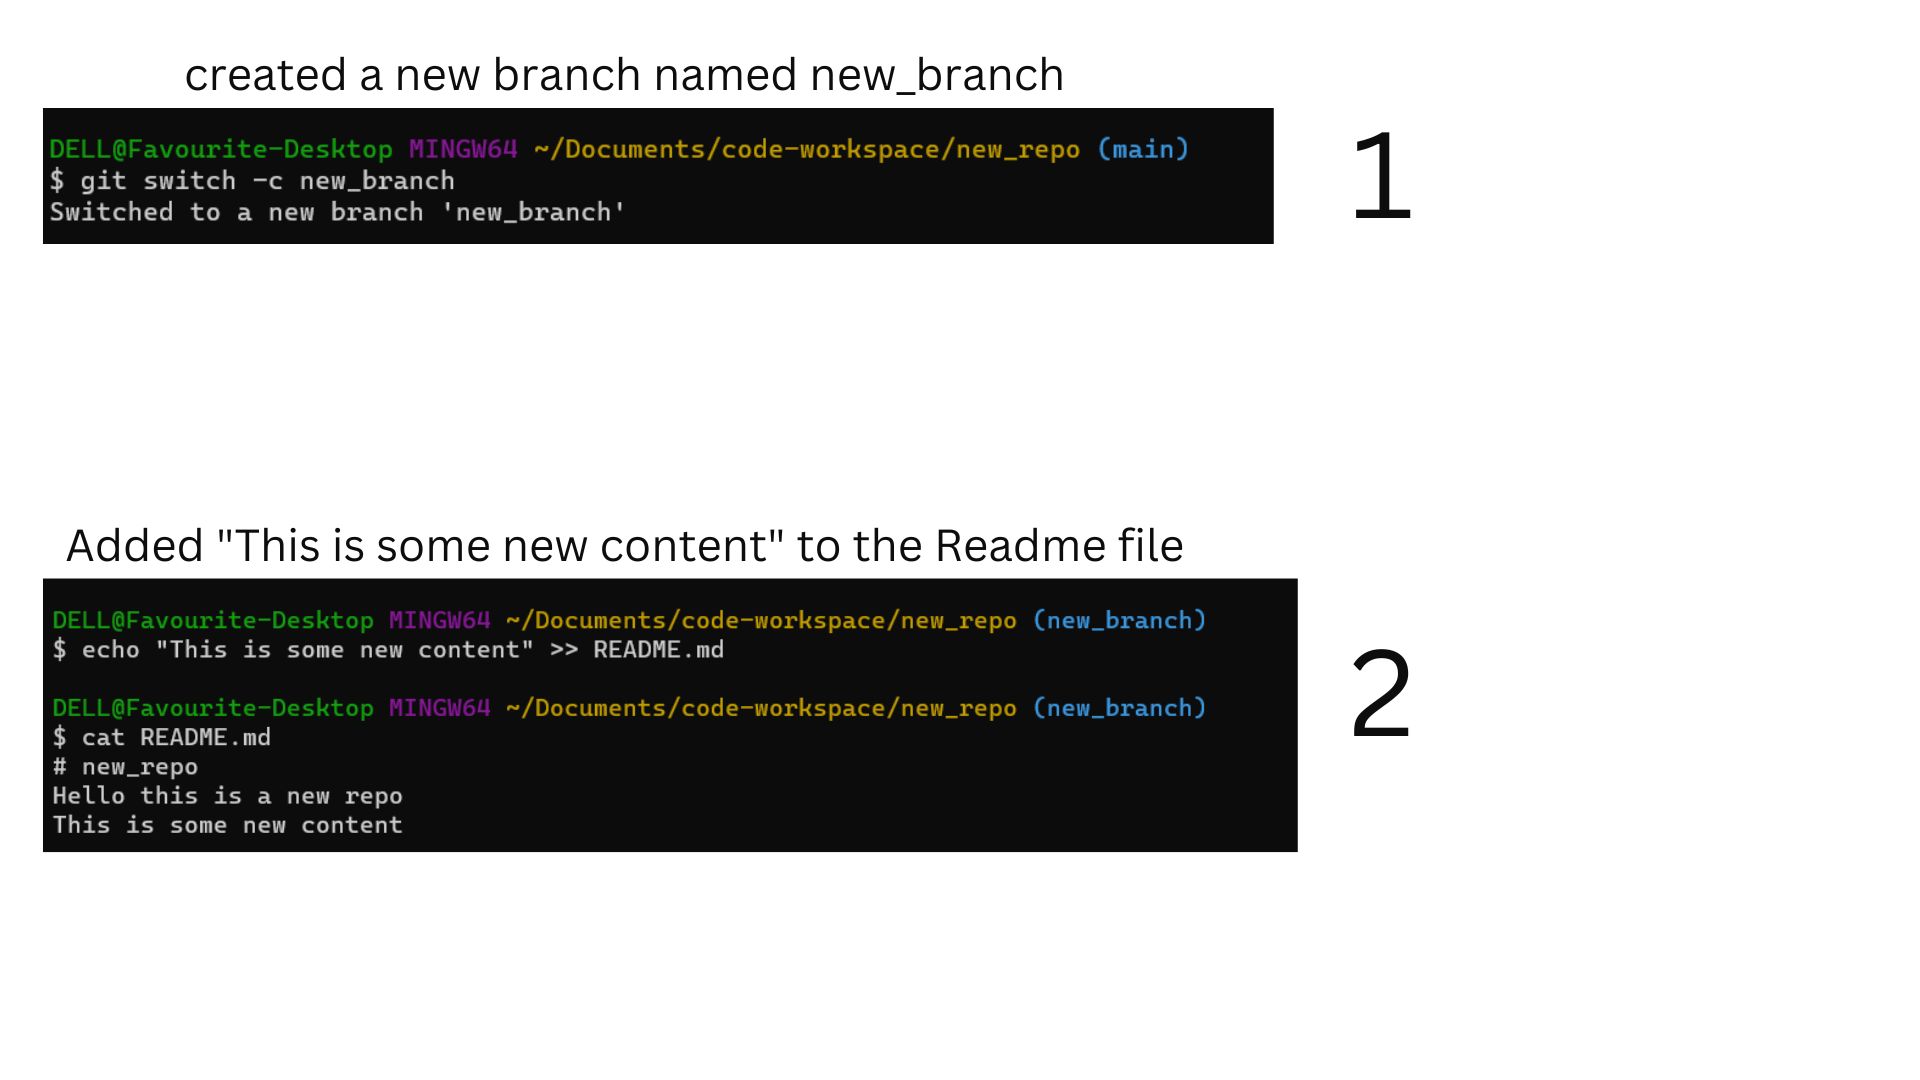
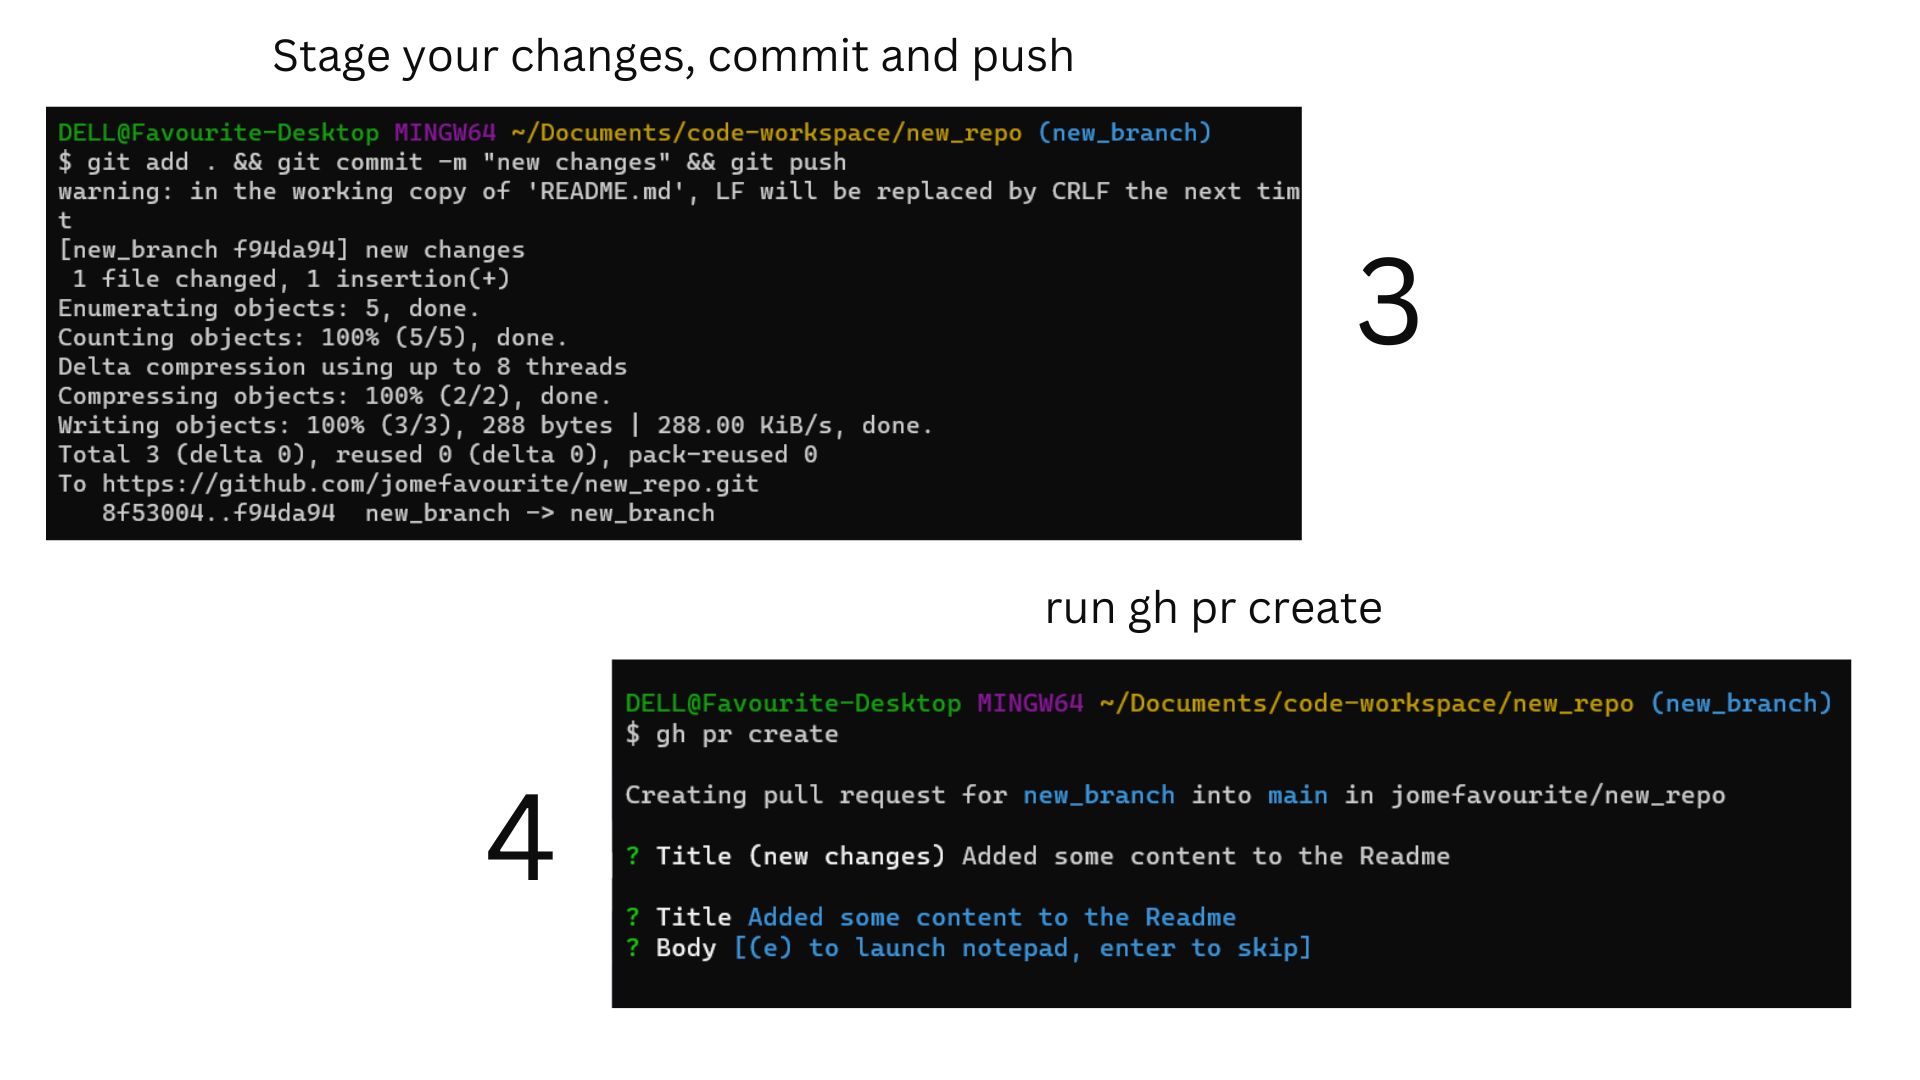
Non-interactive mode
Now for this example, we write the entire command with flags such as --title or --body, which is used in the image below:

Note: if you're going to run the command above, you should have made some changes to your codebase and pushed it before creating the pull request. Also, note there are more flags when using the
gh pr createcommand, to view all, visit the docs here
Conclusion
Now I believe you've got the hang of the GitHub CLI and will be willing to explore the various commands provided if you've got to this point in the article. One helpful flag to always make use of is the --help flag. I believe you could use it along with all the commands, which would guide you on utilising the commands instead of running to the documentation all the time.
Thanks for reading!
Subscribe to my newsletter
Read articles from Favourite Jome directly inside your inbox. Subscribe to the newsletter, and don't miss out.
Written by

Favourite Jome
Favourite Jome
Hi, I'm Favourite, and yes my name is Favourite for all those wondering 😏. I'm a Frontend Developer, passionate about learning about new Web Technologies. Thanks for reading my articles, and I hope you pick one or two things from my writings😁.