How to get started with Git and GitHub
 José Horta
Introduction
Application developers rarely work alone. Large web/cloud/mobile development and data science projects will include many people – front-end developers, back-end developers, database administrators, repository administrators, and others. Every change by every contributor must be tracked and controlled to enable collaboration, accountability and version management. This type of distributed version control is extremely important when managing both small and large software projects. In this article you will learn about some of the popular version control tools, create a GitHub account and use the GitHub web interface to create a repository, add a file to it and commit your changes.
Learning Objectives
Define distributed version control. List several tools used for version control including popular Git platforms. Describe basic git concepts and the purpose of repositories. Create a GitHub account and repository. Add/edit files in your repo, and commit changes using the GitHub web interface.
Prerequisites
While not completely necessary, I believe you will get the most out of this article if you come up with:
- A basic understanding of Html (markup language)
If you want to follow the tutorial in the last part of this article, it is important for you to have:
A Laptop or PC with Windows, Mac or Linux installed
A Internet connection
Git & Github Fundamentals
Distributed Version Control Systems (DVCS) have become critical tools in software development, and key enablers for social and collaborative coding. They are not only being used by Software Engineers and DevOps professionals but also by many other technology practitioners such as Data Scientists and Data Engineers.
However their usage is not limited to coding professions only. They are useful anywhere tracking changes/versions and/or collaboration between multiple users is required. Thousands of course instructors and authors use Git repositories extensively for developing course content such as lab instructions and all kinds of Writers & Teams use Git to Write and track their progress. You will also find usecases in technical documentation, legal document management, and even collaborative development of recipes, books, etc.
While there are many distributed versioning systems, Git is amongst the most popular ones. And GitHub is a highly popular Git-based hosted version control platform, and is seeing incredible growth. There were over 200 million GitHub repositories, whereas at the time of writing this article. These include both public and private repositories for both open source and closed source projects.
The popularity of Git and GitHub make their use an essential skill for coding-related professionals like Software Engineers, Application Developers, Mobile Developers, DevOps & Site Reliability Engineers, Data Scientists, and Data Engineers. When you try to get a software-related job or switch to a different one, employers expect you to provide links to your GitHub profile on your resume.
In the following series of articles you will learn how to develop the essential conceptual and hands-on skills to work with Git and GitHub. We will start with an overview of Git and GitHub, followed by creation of a GitHub account and a project repository, adding files to it, and committing your changes using the web interface.
Next, you will become familiar with Git workflows involving branches and pull requests (PRs) and merges. You will learn to fork and clone public repositories, use pull and push to synchronize your codebase between local and remote repositories, and practice working with Git commands for use in collaborative development workflows. You will also be able to further by completing one or more projects at the end of this series to apply and deepen your newly acquired skills, with some amazing Online tutorials I’ll share with you.
Overview of Version Control, Git, and GitHub
A version control system allows you to keep track of changes to your documents. This makes it easy for you to recover older versions of your document if you make a mistake, and it makes collaboration with others much easier.
How version control works
Here is an example to illustrate how version control works. Let’s say it’s your turn to go shopping for groceries this week.follow along withYou’ve got a shopping list and you want your college roommates to confirm the things you need and add additional items. Without version control, you’ve got a big mess to clean up before you can go shopping. With version control, you know exactly what you need after everyone has contributed their ideas.
What is Git?
Git is free and open-source software distributed under the GNU General Public License. Git is a distributed version control system, which means that users anywhere in the world can have a copy of your project on their own computer. When they’ve made changes, they can sync their version to a remote server to share it with you.
Git isn’t the only version control system out there, but the distributed aspect is one of the main reasons it’s become one of the most common version control systems available.
Version control systems are widely used for things involving code, but you can also version control images, documents, and any number of file types.
You can use Git without a web interface by using your command line interface, but GitHub is one of the most popular web-hosted services for Git repositories. Others include GitLab, BitBucket, and Beanstalk.
There are a few basic terms that you will need to know before you can get started.
The SSH protocol is a method for secure remote login from one computer to another.
A repository contains your project folders that are set up for version control. A data structure for storing documents including application source code.
A fork is a copy of a repository.
A pull request is a way you request that someone reviews and approves your changes before they become final.
A working directory contains the files and subdirectories on your computer that are associated with a Git repository.
Some Git commands that you always use
There are a few basic Git commands that you will always use.
git init - When starting out with a new repository, you only need create it once: either locally, and then push to GitHub, or by cloning an existing repository.
git add - moves changes from the working directory to the staging area.
git status - allows you to see the state of your working directory and the staged snapshot of your changes.
git commit - takes your staged snapshot of changes and commits them to the project.
git reset - undoes changes that you’ve made to the files in your working directory.
git log - enables you to browse previous changes to a project.
git branch - lets you create an isolated environment within your repository to make changes.
git checkout - lets you see and change existing branches.
git merge - lets you put everything back together again.
To learn how to use Git effectively and begin collaborating with web developers, data scientists around the world, you will need to learn at least the essential commands.
Background of Git
Linux development in the early 2000’s was managed under a free-to-use system known as BitKeeper. In 2005, BitKeeper changed to a for-fee system which was problematic for Linux developers for many reasons.
Linus Torvalds led a team to develop a replacement source-version control system. The project ran in a short a timeframe and the key characteristics were defined by a small group.
Key characteristics include:
Strong support for non-linear development.
(Linux patches were then arriving at a rate of 6.7 patches per second)
Distributed development. Each developer can have a local copy of the full development history.
Compatibility with existing systems and protocols. This was necessary to acknowledge the diversity of the Linux community.
Efficient handling of large projects.
Cryptographic authentication of history. This makes certain that distributed systems all have identical code updates.
Pluggable merge strategies. Many pathways of development can lead to complex integration decisions that might require explicit integration strategies.
What is special about the Git Repository model?
Git is designed as a distributed version-control system.
Primarily focused on tracking source code during development.
Contains elements to coordinate among programmers:
Track changes to code or content
Support non-linear workflows.
It serves as a central point for collaboration with a particular focus on agile development methodologies.
In a central version control system, every developer needs to check out code from the central system and commit back into it.
Teams have controlled access scope . As Git is a distributed version control, each developer has a local copy of the full development history, and changes are copied from one such repository to another. Each developer can act as a hub.
When Git is used correctly, there is a main branch that corresponds to the deployable code. Teams can continuously integrate changes that are ready to be released and can simultaneously work on separate branches in between releases.
Git also allows centralized administration of tasks with access-level controls for each team.
Git can co-exist locally such as through the GitHub Desktop client or it can be used directly through a browser connected to the GitHub web interface.
IBM Cloud is based on sound and established open-source tools including Git repositories, often called repos.
GitHub is an online hosting service for Git repositories.
GitHub hosted by a subsidiary of Microsoft.
GitHub offers free, professional and enterprise accounts.
GitHub had over 200 Million repositories in December 2022.
What is GitLab?
GitLab is a complete DevOps platform, delivered as a single application.
GitLab provides access to Git repositories, controlled by source code management.
With GitLab, developers can:
Collaborate, reviewing code, making comments and helping to improve each other’s code.
Work from their own local copy of the code.
Branch and merge code when required.
Streamline testing and delivery with Built-in Continuous Integration (CI) and Continuous Delivery (CD).
Getting started with GitHub
Lab: Estimated time: 30 minutes

In this lab, you will get started with GitHub by creating a GitHub account and project;
You will then edit the project README file using the GitHub web interface and commit changes;
You will create a new file by adding some code to the project using the GitHub web interface and commit changes;
And last you will upload a file from your local environment using the GitHub web interface and commit changes;
After completing this lab, you will be able to:
Describe GitHub
Create a GitHub account
Add a project / repository
Create and edit a file
Upload and commit a file
1. Creating a GitHub account
To create an account in GitHub, complete the following steps:
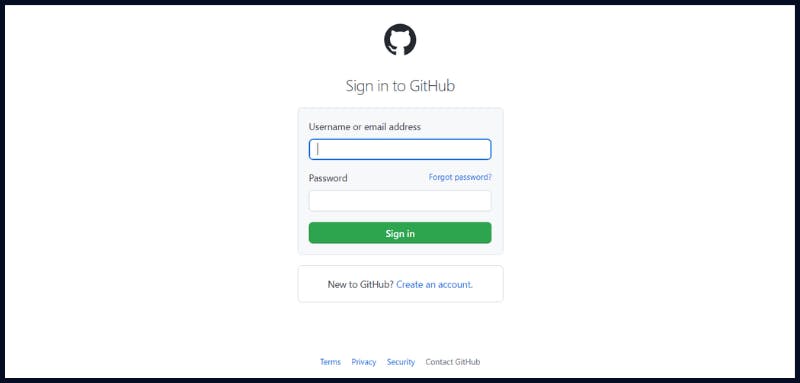
1 - Go to the Join GitHub page and signup and create an account.
Note: If you already have a GitHub account, log in now.
.
2 - Provide the necessary details to create an account as shown below. (You’ll need to enter your email address and select a password, then choose a username and click Sign up for GitHub. When you have finished. Click Create account
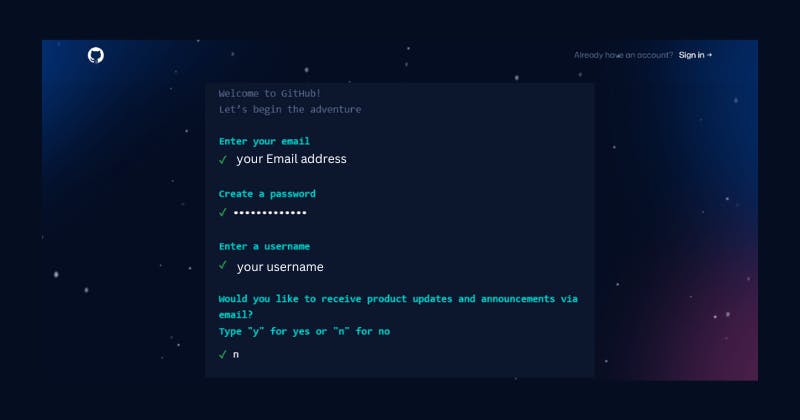
3 - Next, you’ll have a short test to prove that you’re a person. Click Start puzzle
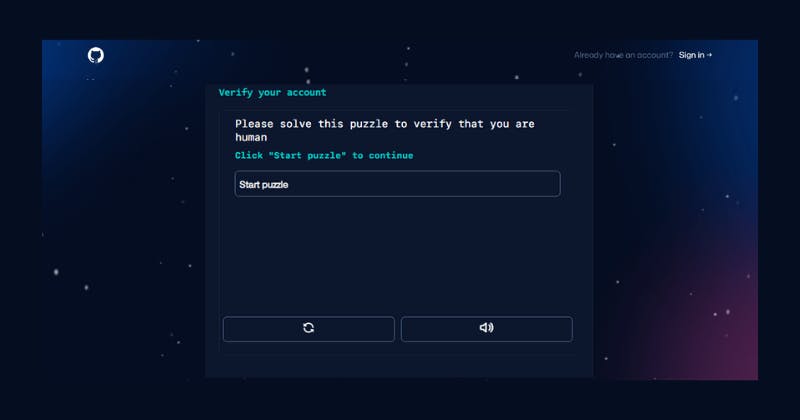
Solve the puzzle presented.
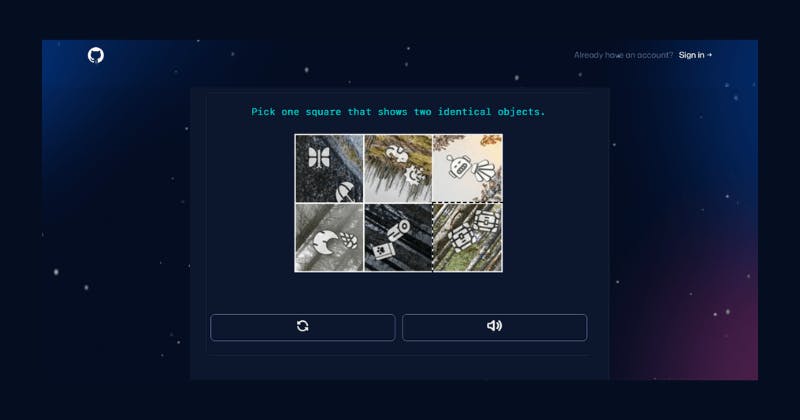
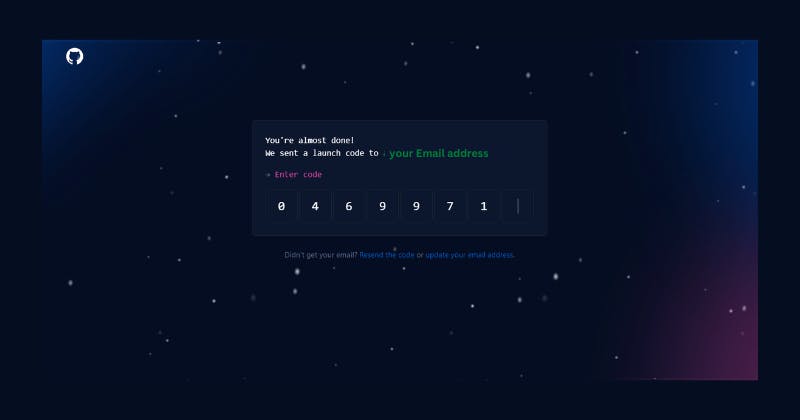
When you're done you will receive a verification email with a launch code from GitHub. Copy/Paste the launch code.
Note: If you do not receive a verification email, click Resend verification email.
Now Enter the code
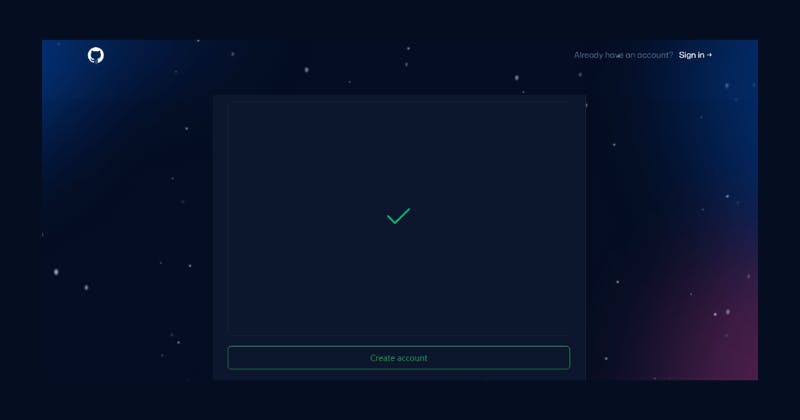
Now you're done! Click the button Create account
4 - Now GitHub asks some questions about your work, programming experience, and interests. You can skip these if you want. Click Continue
How many team members will be working with you?

What specific features are you interested in using?
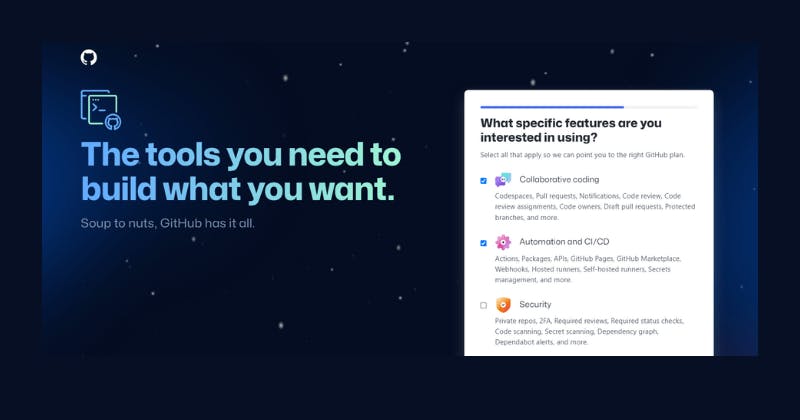
5 - When you’re done, click join a free plan, and then you’ll be taken to a screen where you can select the type of account – most likely a free account personal account is all that you’ll want.

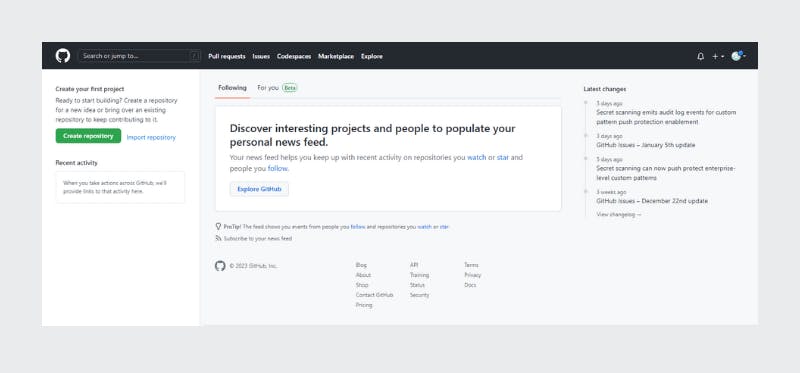
After you Choose to set up a personal, free account, which is the default, setup is finally done!
2. Add a project / repository
To add a new repository, complete the following steps:
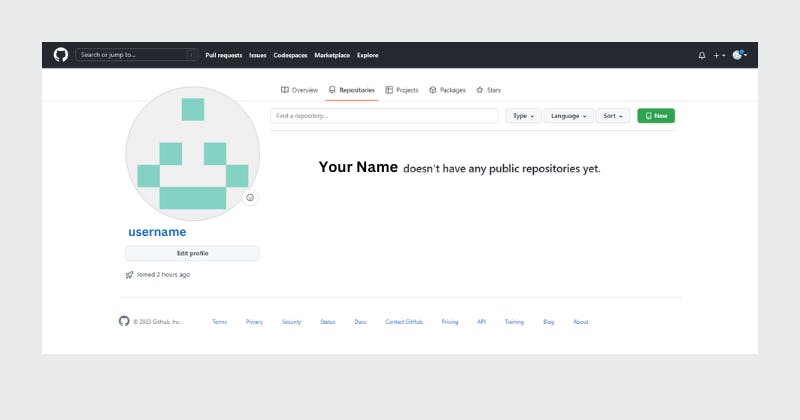
6 - At the top right of the GitHub home page, click on the blue dot or the “+” icon and select Your profile.
Note: It's a good Idea to later on edit your profile page with more details about you.
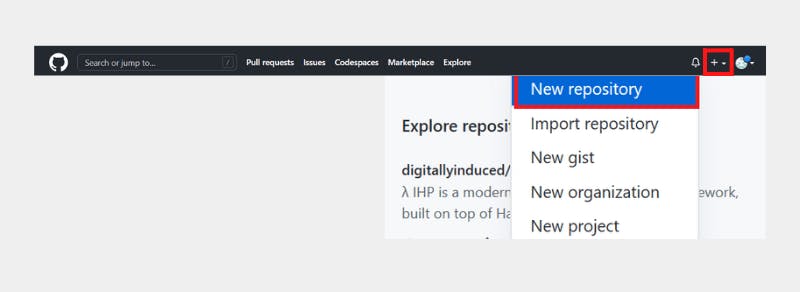
7 - At the top right of the GitHub home page, click on the “+” icon and select New repository.
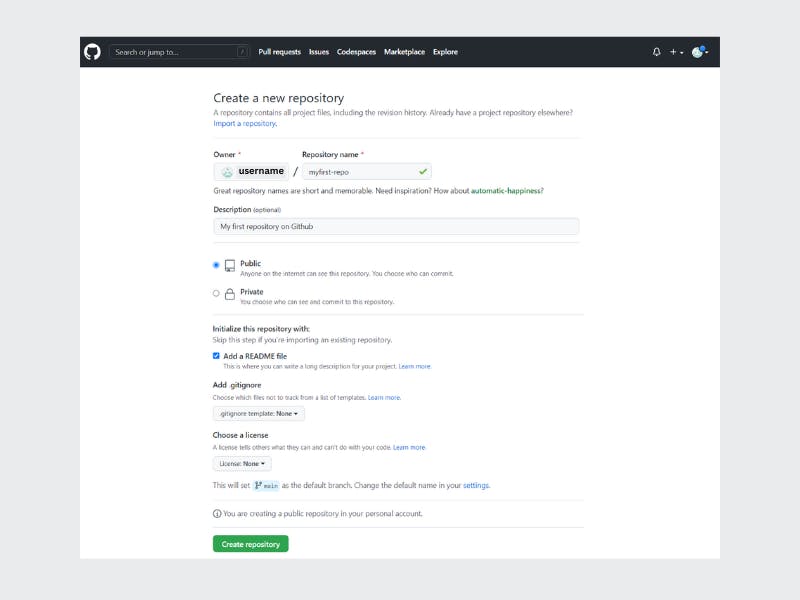
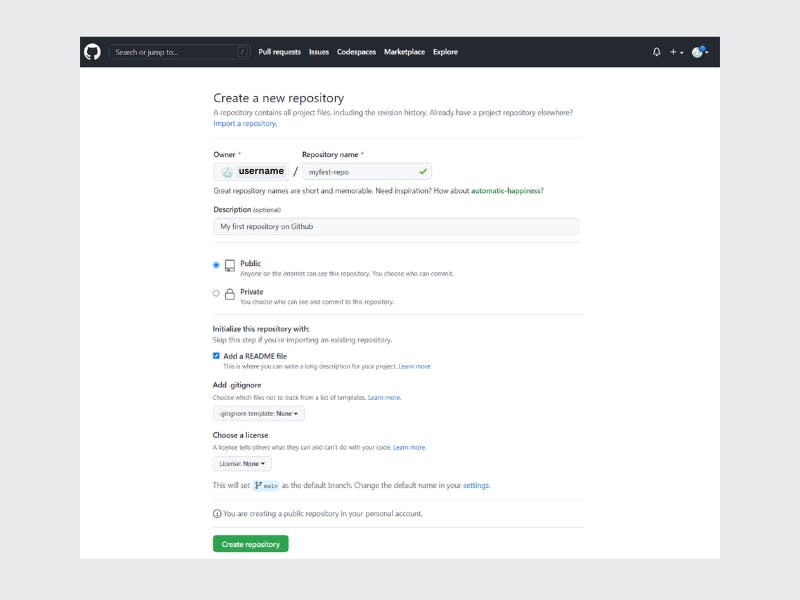
8 - Enter a repository name. Optionally, add a description of your repository; choose the repository visibility - whether you want it to be public or private; and choose the option to Initialize this repository with Readme file. Then click Create Repository.
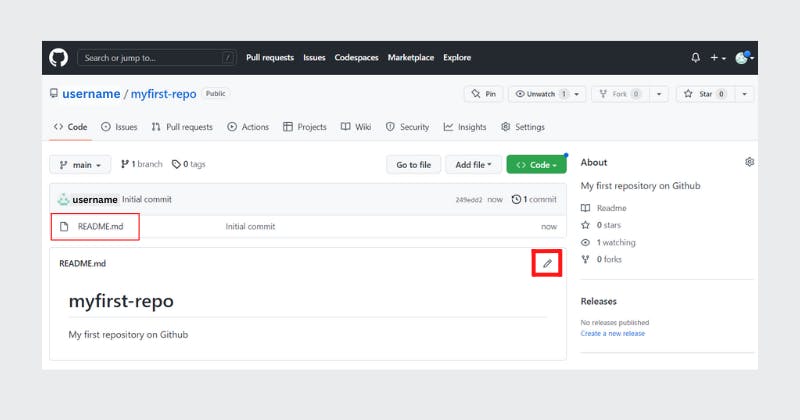
9 - You will now be redirected to the repository you have created. The root folder of your repository is listed by default and it has just one file, the README.md file.
3. Create and edit a file
10 - Now, it’s time to edit the README file. You can do this in your browser. Just click the pencil to open the online editor and you can change the text of the README file.
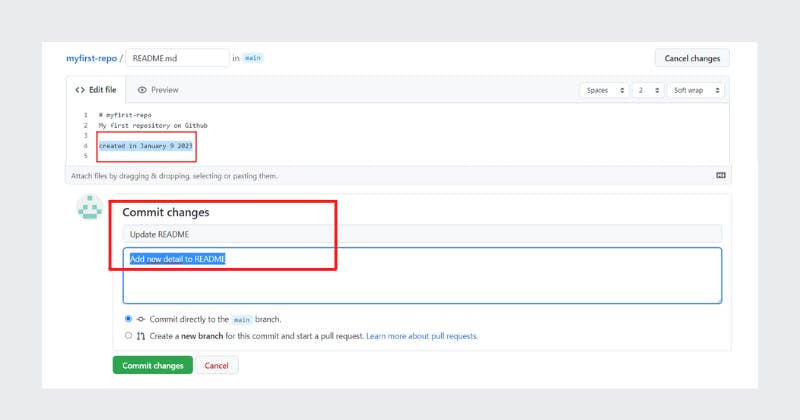
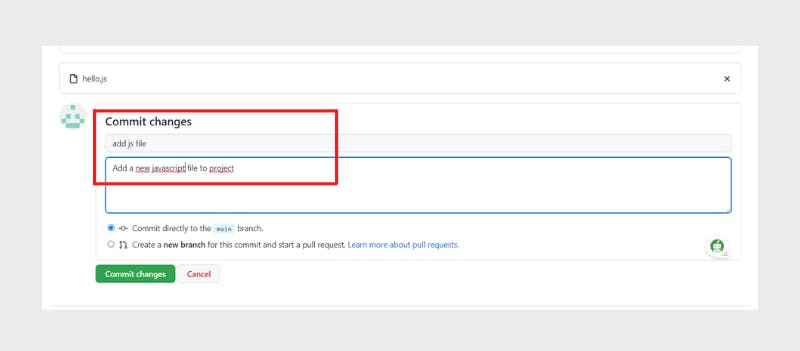
11 - To save your changes to the repository, you must commit them. After you have made your changes, scroll down to the Commit changes section. Add a commit message and optionally add a description, then click Commit changes.
12 - Go back to the home screen by clicking the repository name link.
Note: that the README file is updated and verify your changes.
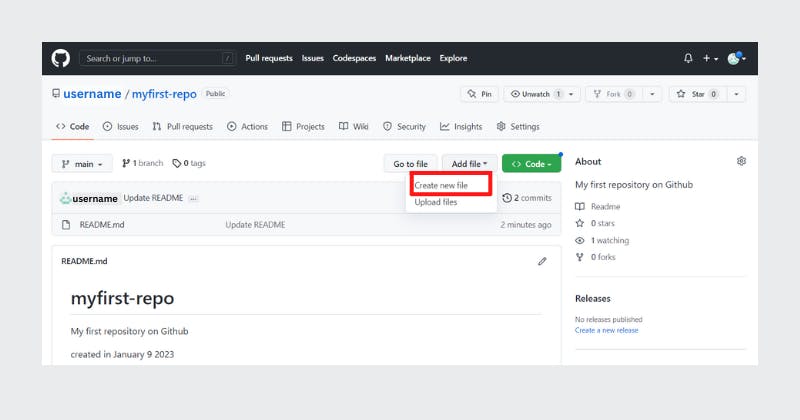
13 - Let’s learn how to create a new file using the built-in web editor provided by GitHub which runs in the browser. Click Add File, then click Create New File to create the new file.
14 - To create a HTML file called firsthtml.html. First, provide the file name. Next, add a comment that describes your code, then add the Block of code. Scroll to the bottom of the file and click Commit changes once finished.
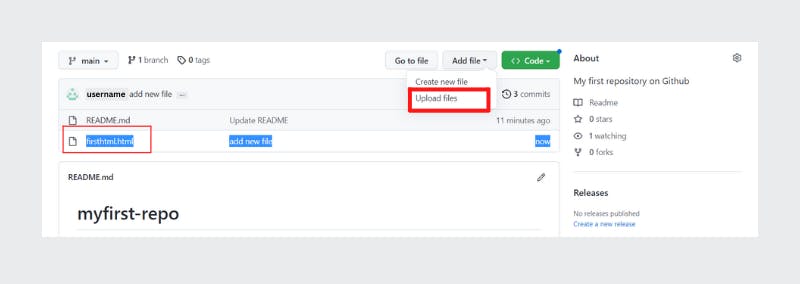
15 - You can see that your file is now added to the repository and the repository listing shows when the file was added or changed.
4. Upload and commit a file
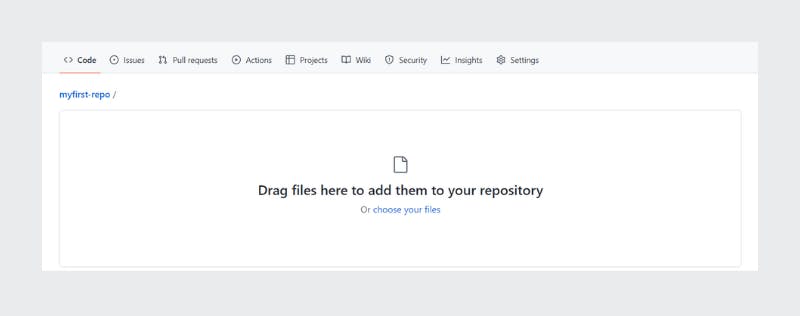
16 - You can also upload a file from your local system into the repository. From the home screen of the repository, click Add File. Choose the Upload files option. Click Choose Your Files and select the files you want to upload from your local system.The file upload process may take a short time, depending on what you are uploading.
17 - Click Commit Changes.
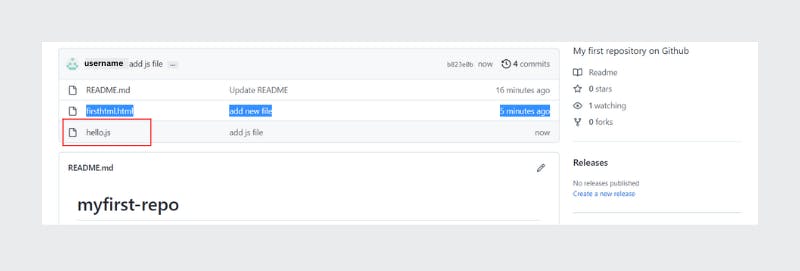
18 - Once the files finish uploading, The repository now reflects the files that were uploaded.
Summary
Congratulations! In this article, you learned:
Git is one of the most popular distributed version control systems. GitHub, GitLab and Bitbucket are examples of hosted version control systems.
Git is designed as a distributed version-control system. A Distributed Version Control System (DVCS) keeps track of changes to code, regardless of where it is stored. This allows multiple users to work on the same codebase or repository, mirroring the codebase on their own computers if needed, while the distributed version control software helps manage synchronization amongst the various codebase mirrors.
GitHub is the online hosting service for Git repositories.
Repositories store documents including application source code and enable contributors to track and maintain version-control and enable you to collaborate with others.
GitHub is primarily focused on tracking source code during development.
GitHub contains elements to coordinate among programmers, track changes, and support non-linear workflows.
You learned how to create and verify a GitHub account.
You learned how to create a repository, edit files, and commit changes using the web interface.
I encourage you to continue to update your repository to become familiar with the processes that you have learned.
Git and GitHub learning resources
There are a lot of helpful Git and GitHub learning resources on the web. This is a short list of my favorites!
GitHub Skills Learn how to use GitHub with interactive courses designed for beginners.
GitHub Live Training, with a hands-on, project-based approach for those who love the command line and those who don't.
Code School: Git Real. Learn basic concepts of Git version control. Explore staging, cloning, branching, and collaborating with Git.
Conclusion
Now you know the basics of Git and GitHub. Feel free to test them out to make sure you understand how they work.
Download this Git commands cheat sheet to have all Git commands in one place for future use.
What's Next?
If you want to follow along with more advanced stuff in the next article, I'll talk about Merging & Branching that are the heart of workflows in Git-based version control systems like GitHub.
You will become familiar with creating and using branches, and merging your changes to the main branch with Pull Requests.
As you start working with GitHub repositories and automating workflows, using the web interface can be limiting and more time-consuming. This is where Git commands come in.
You can use it from your own desktop or a Cloud IDE - wherever you develop your code.
Thanks for the read! Now go practice & build something awesome!
Subscribe to my newsletter
Read articles from José Horta directly inside your inbox. Subscribe to the newsletter, and don't miss out.
Written by

José Horta
José Horta
Full Stack Web Developer based in Portugal. Experienced in designing UI Web Components & developing .Net & React Applications.