Porting U-Boot onto the Beaglebone
 Bill Van Leeuwen
Similar to Part 1 of this blog series, this is a continuation of the write-up for my assignment.
This blog is based on Bootlin's Embedded Linux Course as well as Frank Vasquez and Chris Simmonds Mastering Embedded Linux Programming, so you may have some success reading their materials alongside this blog.
We now have to install the bootloader U-Boot (Das U-Boot is the full name) onto the board.
If you are not familiar, the bootloader is a piece of software that often runs first, or close to first on the hardware (dependent on the board architecture and some other things).
From Frank Vasquez and Chris Simmonds Mastering Embedded Linux Programming:
In an embedded Linux system, the bootloader has two main jobs: to initialize the system
to a basic level and to load the kernel. In fact, the first job is somewhat subsidiary to the
second, in that it is only necessary to get as much of the system working as is needed to
load the kernel.
Connect your serial adapter to the board
We need access to the Beaglebone, and the only way to do this once we load the bootloader is through the serial port.
Your serial adapter's colours may vary. So you may need to look up the spec for your cable. I'm using this Dtech USB to TTL cable I bought for $15 CAD on Amazon. You can likely find one cheaper direct from China if you're willing to wait for shipping.

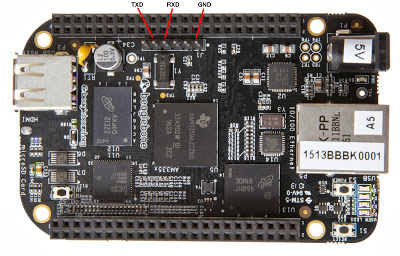
The pins are labelled 1-6 from right to left (in the perspective of this image). Pin 1 is ground, 4 and 5 are the boards Rx, and Tx respectively. Tx is SEND and Rx is RECIEVE, so you need to reverse this order for your cable such that the cables Tx is plugged into the boards Rx, and vice versa.
To communicate with the board, you will need a serial communication program. picocom is a good and minimal choice for our use. In order to get access to the serial port, you need to add yourself to the dialout group.
sudo dnf install picocom
sudo usermod -a -G dialout $USER
You will need to reboot for the dialout change to take affect. You CAN access /dev/ttyUSB0/ as root, or with sudo but you SHOULD NOT run things as root unless you have to, with the risk of ruining your system.
Cross-compiling U-Boot
You should have your cross-compiler set up from Part 1 of this series. If not, you wont be able to continue from here on out.
Check out the U-Boot source code from gitlab (the github version is an identical mirror, and will work just fine if that's your preference).
Bootlin releases the source code as commits in its git repository. Clone the source and check out the latest release with:
git clone https://source.denx.de/u-boot/u-boot.git
cd u-boot
git checkout v2023.01
To understand the compilation steps further than this tutorial for u-boot, see the README.
Since we are cross-compiling:
If you are not using a native environment, it is assumed that you have GNU cross compiling tools available in your path. In this case, you must set the environment variable CROSS_COMPILE in your shell. Note that no changes to the Makefile or any other source files are necessary. For example using the ELDK on a 4xx CPU, please enter:
    $ CROSS_COMPILE=ppc_4xx-
    $ export CROSS_COMPILE
We can shorten this to a simple one-liner with:
export CROSS_COMPILE=arm-linux-
U-Boot is intended to be simple to build. After installing the sources you must configure U-Boot for one specific board type. This is done by typing:
make NAME_defconfigwhere "NAME_defconfig" is the name of one of the existing configu- rations; see configs/*_defconfig for supported names
To configure U-Boot for our board:
make am335x_evm_defconfig .
Now, depending whether you have the wired or wireless beaglebone, run:
make DEVICE_TREE=am335x-boneblack
or
make DEVICE_TREE=am335x-boneblack-wireless
You are now building U-Boot!
From bootlin:
The DEVICE_TREE variable specifies the specific Device Tree that describes our hardware board.
Prepping the SD Card
From bootlin:
The TI romcode will look for an MLO (MMC Load) file in a FAT partition on an SD card. This is precisely what U-Boot compiled for us, together with the U-Boot binary (u-boot.img).
Insert the SD card into your PC. I don't have a port for one, so I'm using a USB adapter. Find the SD card 'device filename':
dmesg
your output will look something like:
[10600.641343] usb 2-3: new SuperSpeed USB device number 4 using xhci_hcd
[10600.661566] usb 2-3: New USB device found, idVendor=8564, idProduct=4000, bcdDevice= 0.38
[10600.661574] usb 2-3: New USB device strings: Mfr=3, Product=4, SerialNumber=5
[10600.661578] usb 2-3: Product: Transcend
[10600.661581] usb 2-3: Manufacturer: TS-RDF5
[10600.661584] usb 2-3: SerialNumber: 000000000037
[10600.668454] usb-storage 2-3:1.0: USB Mass Storage device detected
[10600.669577] scsi host9: usb-storage 2-3:1.0
[10601.697428] scsi 9:0:0:0: Direct-Access     TS-RDF5  SD  Transcend    TS38 PQ: 0 ANSI: 6
[10601.697881] sd 9:0:0:0: Attached scsi generic sg0 type 0
[10602.090927] sd 9:0:0:0: [sda] 124735488 512-byte logical blocks: (63.9 GB/59.5 GiB)
[10602.092385] sd 9:0:0:0: [sda] Write Protect is off
[10602.092391] sd 9:0:0:0: [sda] Mode Sense: 23 00 00 00
[10602.093987] sd 9:0:0:0: [sda] Write cache: disabled, read cache: enabled, doesn't support DPO or FUA
[10602.102665]  sda: sda1
[10602.102917] sd 9:0:0:0: [sda] Attached SCSI removable disk
What we can gain from this output, is that we have a SCSI disk attached. (If you're unfamiliar, SCSI is both an older physical interface, and a communication standard for disks. Though we have attached an SD card, Linux will always see it as a SCSI disk).

This line [10602.102665] sda: sda1 shows that this disk is named sda1, or 'SCSI Disk A 1'. This lives in /dev/sda1.
We need to unmount any partitions of this SD card before modifying its partition table. Check if any are mounted with:
sudo mount | grep sda1
which might output:
/dev/sda1 on /run/media/billsDesktop/16E3-7820 type exfat (rw,nosuid,nodev,relatime,uid=1000,gid=1000,fmask=0022,dmask=0022,iocharset=utf8,errors=remount-ro,uhelper=udisks2)
If this, or any others are mounted, unmount them with
sudo umount /dev/sda1*
Manually erase the partition table on this card with:
sudo dd if=/dev/zero of=/dev/sda1 bs=1M count=16
Note: My post deviates from bootlin's material here. I found their method didn't work for me. This method is from Frank Vasquez and Chris Simmonds Mastering Embedded Linux Programming. The authours have a script to do this as well on the book's github page
Create two partitions on the card with:
sudo sfdisk /dev/${DRIVE} << EOF
,64M,0x0c,*
,1024M,L,
EOF
What we did here was manually add a partition table to the card. One 64MB, FAT32, bootable partition, and another 1GB ext4.
We only need the one for now, but once we mount a root filesystem in a later blog, it will be useful that we've already done it.
Create FAT16 and ext4 filesystems on this partition with:
sudo mkfs.vfat -a -F 16 -n boot /dev/sda1p1
sudo mkfs.ext4 -L rootfs /dev/sda1p2
This should mount to your PC automatically. If not, remove and reinsert the SD card.
What we've done above might also be possible using a GUI tool like GParted
Now we that have a bootable partition on the card, go ahead and copy the compiled U-Boot image onto the card.
The directory for the SD card may be dependent on your workstations distribution, and whether you are using a USB adapter or inserting it directly into the PC. You should also just be able to drag and drop the files in the file explorer.
cp MLO u-boot.img /run/media/$USER/boot/
Testing U-Boot
Make sure your USB to Serial connector is plugged into the board and your PC from earlier.
Start monitoring the serial port with:
picocom -b 115200 /dev/ttyUSB0
#-b is setting the baud rate for the asynchronous serial connection
Insert the SD card into the beaglebone with no power going to it. Hold down the small black button next to the SD card, plug in the power cable, and let go of the button after a few seconds.
Your output should start with something like this:
U-Boot SPL 2023.01 (Jan 21 2023 - 23:09:14 -0500)
Trying to boot from MMC1


U-Boot 2023.01 (Jan 21 2023 - 23:09:14 -0500)

CPU  : AM335X-GP rev 2.1
Model: TI AM335x BeagleBone Black
DRAM:  512 MiB
Core:  160 devices, 18 uclasses, devicetree: separate
WDT:   Started wdt@44e35000 with servicing every 1000ms (60s timeout)
NAND:  0 MiB
MMC:   OMAP SD/MMC: 0, OMAP SD/MMC: 1
Loading Environment from FAT... Unable to read "uboot.env" from mmc0:1...
<ethaddr> not set. Validating first E-fuse MAC
Net:   eth2: ethernet@4a100000, eth3: usb_ether
Hit any key to stop autoboot:  0
switch to partitions #0, OK
mmc0 is current device
Scanning mmc 0:1...
No EFI system partition
BootOrder not defined
EFI boot manager: Cannot load any image
switch to partitions #0, OK
mmc1(part 0) is current device
Scanning mmc 1:1...
BootOrder not defined
EFI boot manager: Cannot load any image
## Error: "bootcmd_nand0" not defined

...
Make sure the date and time are correct for when you compiled U-Boot. Otherwise, the beaglebone is booting the preloaded U-Boot from its internal eMMC. If it's off, you've done something wrong.
The output will be followed by:
=>
Which is the U-Boot command line! SUCCESS! You are officially running your own cross-compiled bootloader.
Playing With U-Boot
We have completed this blog section, but in case you were more curious about U-Boot, enter help to see the commands available to U-Boot :)
Subscribe to my newsletter
Read articles from Bill Van Leeuwen directly inside your inbox. Subscribe to the newsletter, and don't miss out.
Written by
