CSS Selectors : Types and Usage
 Rohit kodape
Introduction
In this article I'm describing CSS selectors and their types with proper examples, using only HTML and CSS. I'm describing how to select any HTML element, and then style it with CSS using CSS selectors of different types. We will also see how can we target HTML elements particularly according to their hierarchy(HTML DOM TREE), no matter how deep the element is situated we can target it using CSS selectors through different Methods. If you're looking for something extra, make sure to follow me on this platform for upcoming informative articles about full-stack web development &, more.
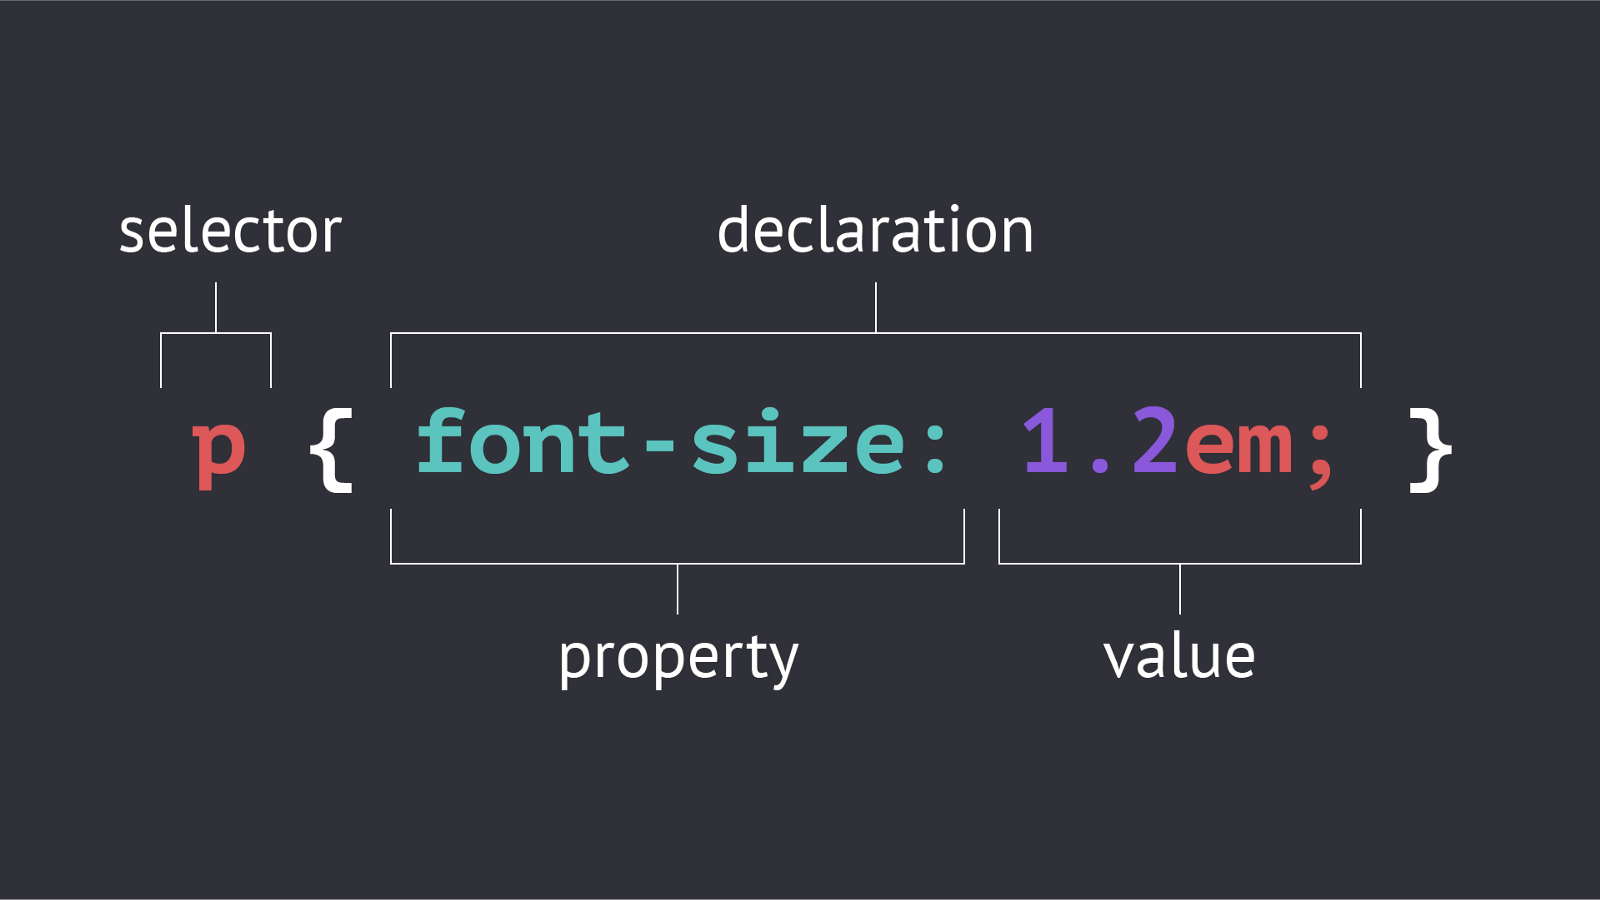
The below image is a simple example of CSS selectors.

Let's discuss exactly what is happening here:- Im assuming that if you are looking forward to learn CSS selectors you must be comfortable with HTML. In the above image, an HTML element(tag) is selected (p) it stands for paragraph and here font size is set to 1.2em, so em is a unit in CSS. Let's take a look and try to understand the syntax in more detail:- The example given in this image is of an individual Selector among the CSS selectors, here the p tag is selected and then {} braces are used and inside that curly braces a property: value pair is defined. In this example, a property named font-size is set equal to some value which is (1.2em) this is an individual selector among the CSS selectors. Let's explore more types
How many types are there in CSS selectors?
Universal selector
Individual selector
Class selector
Id selector
And selector
Combined selector
Inside element selector
Direct child
Sibling~ or + selector
Let's look at each one in detail with examples.
1. Universal Selector -
The universal selector selects all the elements on the pages. it is also used as a wildcard character. It is essentially a type selector that matches any type. Type meaning tags like <div> ,<body>,<button> or any of the other tags on the HTML page. In the below example, every element on the page is styled because of the universal selector * asterisk
<!DOCTYPE html>
<html>
<head>
<style>
* {
   color: #6A1B4D;
   font-size: 10px;
   background-color: cadetblue;
}
</style>
</head>
<body>
<h2>This is heading 2</h2>
<p>This style will be applied on every paragraph.</p>
<p id="paragraph1">it will also effect me!</p>
<p>me too!</p>
</body>
</html>
2. Individual selector -
The Individual selector selects the HTML element from the document only by the element name for ex- <p> or <h2> , let it be any tag it can be selected directly by the tag name itself. Irrespective of the hierarchy the tag will be selected wherever it is situated in the document tree. In the below example :- Every <p> tag will be selected and styled
<!DOCTYPE html>
<html>
  <head>
    <style>
      p {
        text-align: center;
        color: blue;
      }
    </style>
  </head>
  <body>
    <p>This style will be applied on me also.</p>
    <ul>
      <li>
        <p>Me too!!</p>
      </li>
    </ul>
    <p>And me!</p>
  </body>
</html>
3. Class selector -
The class selector selects the element with a specific class attribute. It selects every single element in the document with that class name in particular. you can select multiple elements at a time and style them accordingly without repeating the same code over and over again. One element can belong to many classes, and many elements can belong to one class this is how a class selector can be used. To select elements with the class selector, use the dot character, ., followed by the name of the class. In the below example, .bg-black is the class selector here so <li> with class name, bg-black will be selected and styled.
<!DOCTYPE html>
<html>
  <head>
    <style>
      .bg-black {
        text-align: center;
        color: #CAD5E2;
        background-color:#0D0D0D;
      }
    </style>
  </head>
  <body>
    <p>This style will be applied on me also.</p>
    <ul>
      <li class="bg-black">
        first list item
      </li>
    </ul>
    <p>And me!</p>
  </body>
</html>
4. Id selector -
The id selector is used to select an HTML element based on the id attribute value.
Every element in the HTML page must have a unique id, meaning their id should remain different no redundancy is allowed in the case of the id attribute. You cannot give the same id to other elements. To select an element with a specific ID, use the hash character, #, followed by the name of the ID value. In the below example, #head4 is the id selector here so <h4> element will be selected and styled.
<!DOCTYPE html>
<html>
  <head>

    <style>
      #head4 {
        color: blueviolet;
        background-color: chocolate;
        font-size: 50px;
      }
    </style>
  </head>
  <body>
    <h2>Lets look id selector</h2>
    <h4 id="head4">im heading 4 with id attribute</h4>
    <p>im para</p>
    <a href="#">see more</a>
    <ul>
      <li>item1</li>
      <li>item2</li>
      <li>item3</li>
    </ul>
  </body>
</html>
5. And selector -
This selector selects an HTML element which satisfies multiple conditions and these conditions are evaluated to be true. In simple words, it means an HTML element contains more than one class. for ex. <li class="bg-color font-bg">Hello world<li> to target this type of element which contains two classes then and the selector is of good use. This is also known as chained selectors.
<!DOCTYPE html>
<html>
  <head>
    <style>
      p.bg-red.font-lg {
        color: blueviolet;
        background-color: #6A1B4D;
        font-size: larger;
      }
    </style>
  </head>
  <body>
    <h2>Lets look id selector</h2>
    <h4 id="head4">im heading 4 with id attribute</h4>
    <p>im para</p>
    <a href="#">see more</a>
    <p class="bg-red font-lg">this is a paragraph will be selected with chaining</p>
  </body>
</html>
6. Combined selector -
The name of the selector indicates a combination of something that has to do with this selector type and it is true. One can style multiple HTML elements at the same time by targeting through the combined selector. Each element have to be separated with , in the combined selector syntax.In the following example <p>,<li>,<span> elements are styled in one line of code.
<!DOCTYPE html>
<html>
 <head>

  <style>
    p,li,span{
      background-color:#6a7b77;
      color: darkgreen;
    }
  </style>
</head>
<body>
  <h2>Hello combined selector</h2>
  <p>i will be styled</p>
  <ul>
    <li>i will be styled too!!</li>
  </ul>
  <span>me too!</span>
</body>
</html>
7. Inside an element -
inside an element, the selector matches all elements that are descendants of a specified element. The elements specified in the inside selector are separated by whitespaces. The following example selects the <li> then <span> the element inside of an <div> element.
<!DOCTYPE html>
<html>
<head>
 <style>
    div li span{
      background-color:#6a7b77;
      color: black;
    }
  </style>
</head>
<body>
     <div>
       <ul>
        <li><span>hey im span</span></li>
       </ul>
     </div>
</body>
</html>
8. Direct child -
A direct child is a child element that comes immediately below the parent in terms of hierarchy, so selecting the elements which are a direct child of a specified element is done by a direct child selector. To use a direct child selector, specify the parent element and then > symbol followed by direct children.
<!DOCTYPE html>
<html>
  <head>
    <style>
      div > p {
        background-color: #6a7b77;
        color: darkgreen;
      }
    </style>
  </head>
  <body>
    <div>
      <p>
        Lorem ipsum, dolor sit amet consectetur ,
        im styled
      </p>
      <ul>
        <li>im list item</li>
      </ul>
    </div>
  </body>
</html>
9.Sibling ~ or + selector -
The sibling selector allows you to select an element that is a sibling of another element. The sibling selector is represented by the + symbol and is used to select an element that is immediately preceded by the specified element.In the following example <p> tag is the direct child of <div> the element which is selected and styled. In the example above,.container p + p selects the second p the element that is immediately preceded by another p element, and sets its colour to red. The first p the element will not be affected by this selector.
<!DOCTYPE html>
<html>
  <head>
    <style>
      .container p + p {
        color: red;
      }
    </style>
  </head>
  <body>
    <div class="container">
      <p>This is a paragraph.</p>
      <p>This is another paragraph.</p>
    </div>
  </body>
</html>
"In conclusion, CSS selectors play a crucial role in styling web pages and making them visually appealing. By understanding the different types of selectors, such as class, ID, and attribute selectors, web developers can create complex and dynamic styles for their pages. With the ability to target specific elements on a page, CSS selectors provide a powerful tool for controlling the look and feel of web pages. By mastering the art of CSS selectors, web developers can create beautiful and functional websites that provide an optimal user experience."Thanks for reading !!!
Subscribe to my newsletter
Read articles from Rohit kodape directly inside your inbox. Subscribe to the newsletter, and don't miss out.
Written by
Rohit kodape
Rohit kodape
An aspiring web developer !!