Building a Root Filesystem For the Beaglebone Black
 Bill Van Leeuwen
This is Part 3 of this blog series, this is a continuation of the write-up for my assignment.
This blog is based on Bootlin's Embedded Linux Course as well as Frank Vasquez and Chris Simmonds Mastering Embedded Linux Programming, so you may have some success reading their materials alongside this blog.
In this section, we will finish our setup of a barebones Linux system for the Beaglebone Black. The Root Filesystem is the last essential piece of the Linux system. Ours will contain a familiar directory structure, as well as many of the basic programs you might be used to from a desktop Linux distribution.
Creating a Root Filesystem From Scratch
The first step in this process is to create a staging directory in which to place the filesystem hierarchy for our future Beaglebones rootfs.
mkdir bin dev etc home lib proc sbin sys tmp usr var && mkdir usr/bin usr/lib usr/sbin var/log
Take a look at this structure with tree -d, which should now look like:
.
├── bin
├── dev
├── etc
├── home
├── lib
├── proc
├── sbin
├── sys
├── tmp
├── usr
│   ├── bin
│   ├── lib
│   └── sbin
└── var
    └── log
Programs Needed for the rootfs
According to Mastering Embedded Linux Programming - "Even for a basic root filesystem, you need approximately 50 utilities..." It goes on to mention that tracking down this source code for ourselves might be a true pain. (BusyBox)[https://busybox.net/] solves that problem for us. You can read more about BusyBox somewhere else, but all that is necessary to know here, is it provides us with the essential Linux utilities that we need, in a minimal package size.
Clone the git repo, and switch to a stable release with:
git clone git://busybox.net/busybox.git
cd busybox
git checkout 1_35_0
Build the default configuration of BusyBox
make distclean
make defconfig
Export the toolchain and architecture like we did in (Part 3)[https://blog.billvanleeuwen.ca/compiling-and-porting-the-linux-kernel-to-the-beaglebone-black] of this blog series to avoid typing it in each make command:
export ARCH=arm
export CROSS_COMPILE=arm-training-linux-uclibcgnueabihf-
We want to install BusyBox in our staging directory. Enter the menu config with
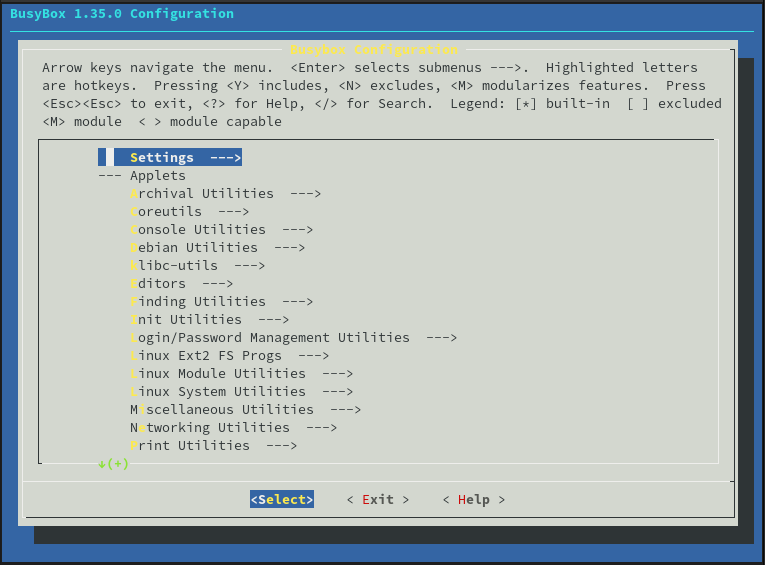
make menuconfig

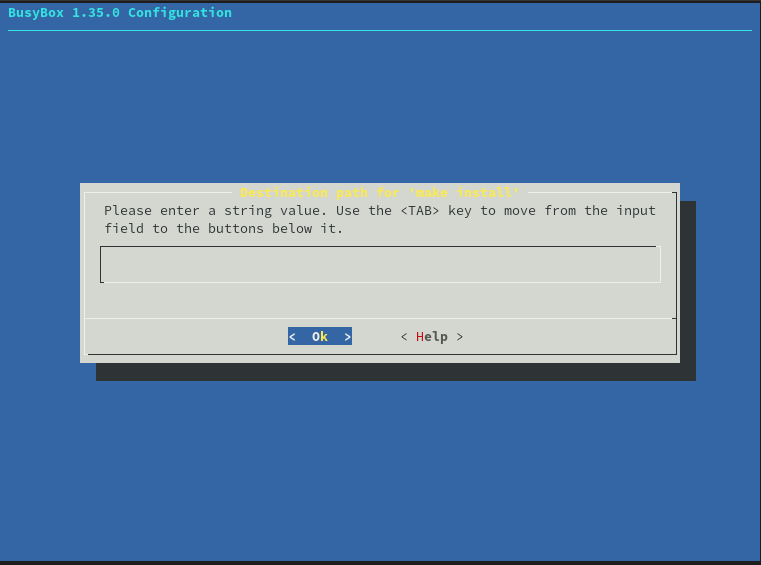
Once in the menu, set the install path in Settings -> Destination path for 'make install'. This should be the path for your rootfs directory we just created.

We also want busybox to statically compile. This will reduce complexity for us.
Note on Static Compilation
You might not want to do this in most cases, as any further programs you install must also be statically compiled.
For the uninitiated Static Compilation is the process of compiling all of the needed libraries together with the program itself, rather than using them externally. This saves complexity, as you don't need to worry about including extra object files in your rootfs, but the compromise is size. Many of these programs rely on the same libraries. You can imagine it would save on space if we didn't have to include these in each compiled program, and instead have a single object file for these to all dynamically link against. For our purposes (essentially building a toy Linux system nobody is ever going to use in production) this is fine.
Now run make install to build Busybox.
On following the instructions from bootlin and Mastering Embedded Linux, this step returned me an error:
networking/ping.c:158:11: fatal error: netinet/icmp6.h: No such file or directory
  158 | # include <netinet/icmp6.h>
I likely made a mistake in configuring my toolchain.
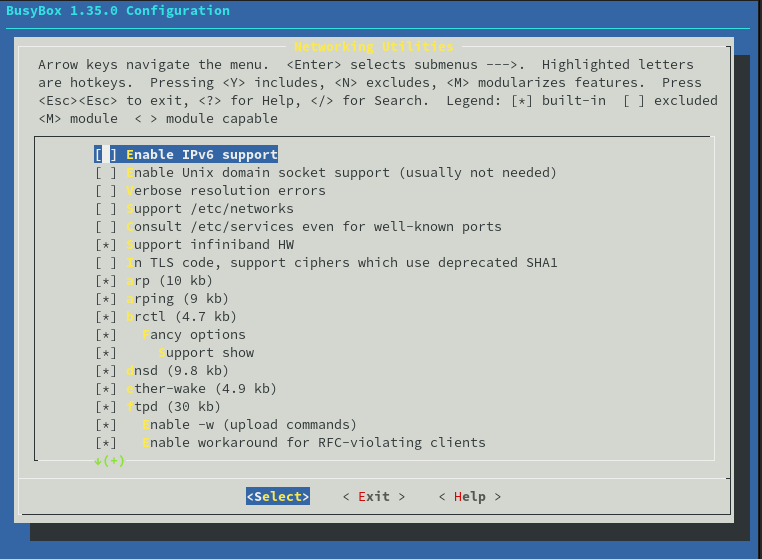
We dont need ipv6 for our limited scope project, so if this happens to you, it can be solved by disabling ipv6 support in the BusyBox menu config under Networking Utilities -> Enable IPv6 Support

Try ```tree`` in your staging directory to see what buysbox installed
.
├── bin
│   ├── arch -> busybox
│   ├── ash -> busybox
│   ├── base32 -> busybox
│   ├── base64 -> busybox
│   ├── busybox
│   ├── cat -> busybox
│   ├── chattr -> busybox
│   ├── chgrp -> busybox
│   ├── chmod -> busybox
│   ├── chown -> busybox
│   ├── conspy -> busybox
│   ├── cp -> busybox

...

├── dev
├── etc
├── home
├── lib
├── linuxrc -> bin/busybox
├── proc
├── sbin
│   ├── acpid -> ../bin/busybox
│   ├── adjtimex -> ../bin/busybox
│   ├── arp -> ../bin/busybox
│   ├── blkid -> ../bin/busybox
│   ├── blockdev -> ../bin/busybox
│   ├── bootchartd -> ../bin/busybox
│   ├── depmod -> ../bin/busybox
│   ├── devmem -> ../bin/busybox
│   ├── fbsplash -> ../bin/busybox
│   ├── fdisk -> ../bin/busybox
│   ├── findfs -> ../bin/busybox

...

└── var
    └── log

16 directories, 397 files
Wow, look at all those programs! Imagine compiling and loading all of these yourself. Sheesh.
Testing our system
You should have two partitions on your SD card that we created in (part 2)[https://blog.billvanleeuwen.ca/porting-u-boot-onto-the-beaglebone] of this series.
Insert your SD card into the PC, and copy all of the files and folders from your staging directory to the rootfs partition on your SD card.
Eject the card, and slot it into your Beaglebone.
Like before, hold the USR button as you power up the Beaglebone, and spam the spacebar in the picocom terminal.
You should see the u-boot command line: =>
You should still have the bootcmd environment variable defined. We need to set another so that we can mount our rootfs and avoid the kernel panic from earlier.
setenv bootargs console=ttyO0,115200 root=/dev/mmcblk0p2 rootfstype=ext4 rootwait init=/bin/sh +m
This tells the system that we have our root filesystem on the second partition of our SD card.
Go ahead and reboot the system with boot.
You should now avoid the kernel panic, and see something like this in your console:
[    2.266649] VFS: Mounted root (ext4 filesystem) readonly on device 179:2.
[    2.274829] devtmpfs: mounted
[    2.279609] Freeing unused kernel image (initmem) memory: 1024K
[    2.288104] Run /sbin/init as init process
[    2.304033] mmc1: new high speed MMC card at address 0001
[    2.311922] mmcblk1: mmc1:0001 M62704 3.56 GiB
[    2.319848]  mmcblk1: p1
[    2.323613] mmcblk1boot0: mmc1:0001 M62704 2.00 MiB
[    2.335241] mmcblk1boot1: mmc1:0001 M62704 2.00 MiB
[    2.350386] mmcblk1rpmb: mmc1:0001 M62704 512 KiB, chardev (250:0)
[    4.887550] random: crng init done
can't run '/etc/init.d/rcS': No such file or directory

Please press Enter to activate this console.
Great! Hit enter, and you now have a rather minimal Linux system running!
/ # ls
bin      etc      lib      proc     sys      usr
dev      home     linuxrc  sbin     tmp      var
/ # cd bin/
/bin # ls
arch           dumpkmap       kill           netstat        setserial
ash            echo           link           nice           sh
base32         ed             linux32        pidof          sleep
base64         egrep          linux64        ping           stat
busybox        false          ln             pipe_progress  stty
cat            fatattr        login          printenv       su
chattr         fdflush        ls             ps             sync
chgrp          fgrep          lsattr         pwd            tar
chmod          fsync          lzop           reformime      touch
chown          getopt         makemime       resume         true
conspy         grep           mkdir          rev            umount
cp             gunzip         mknod          rm             uname
cpio           gzip           mktemp         rmdir          usleep
cttyhack       hostname       more           rpm            vi
date           hush           mount          run-parts      watch
dd             ionice         mountpoint     scriptreplay   zcat
df             iostat         mpstat         sed
dmesg          ipcalc         mt             setarch
dnsdomainname  kbd_mode       mv             setpriv
/bin #
There is however an error from the kernel:
can't run '/etc/init.d/rcS': No such file or directory
/etc/init.d/rcS is supposed to be an init script called by busybox's init system. This needs to be defined by us, which we will do in the next step.
The Init system
Back in our staging directory, create two files.
cd etc
mkdir init.d
touch init.d/rcS
touch inittab
Copy the sample inittab file from (bootlins example)[https://elixir.bootlin.com/busybox/1.35.0/source/examples/inittab] into your inittab file
Because we aren't doing anything serious with our system. init.d/rCs can be left empty. Normally you could define any extra init scripts or commands in this file.
Copy these files over to your rootfs directory. Start up your Beaglebone by the method before and viola! The error should be gone!
Conclusion
You've now successfully ported a minimal Linux system onto the Beaglebone!
You could take this one step further and flash it onto the onboard eMMC, but for the sake of this blog series, I won't go into that here.
Subscribe to my newsletter
Read articles from Bill Van Leeuwen directly inside your inbox. Subscribe to the newsletter, and don't miss out.
Written by
