Getting Started with Spatial SQL: Connect QGIS To PostGIS Database
 Leonard Fidelis
QGIS offers a seamless connection with your PostGIS database. The desktop application has an interactive User Interface where users can write and visualize the results of written SQL queries. This eliminates the back-and-forth import/export when analyzing datasets separately.
This guide provides simple steps on how to create a PostgreSQL database and how to connect a database to QGIS. I’ll also show you how to create schemas, save queries and load them directly to your QGIS workspace using the QGIS Database Management tool.
Use the video below for download and install instructions for PostgreSQL and its spatial extension.
How To Create a PostgreSQL Database and Spatial Extension on PgAdmin
PgAdmin will be used to create a PostGIS database in this tutorial. Feel free to use any preferred alternative.
Using the PgAdmin desktop app, we can create a spatial database. First, enter the set master password > Click the server drop-down to establish connection > Object > Create > Database.
On the open dialogue, enter database name > owner > comment > save.
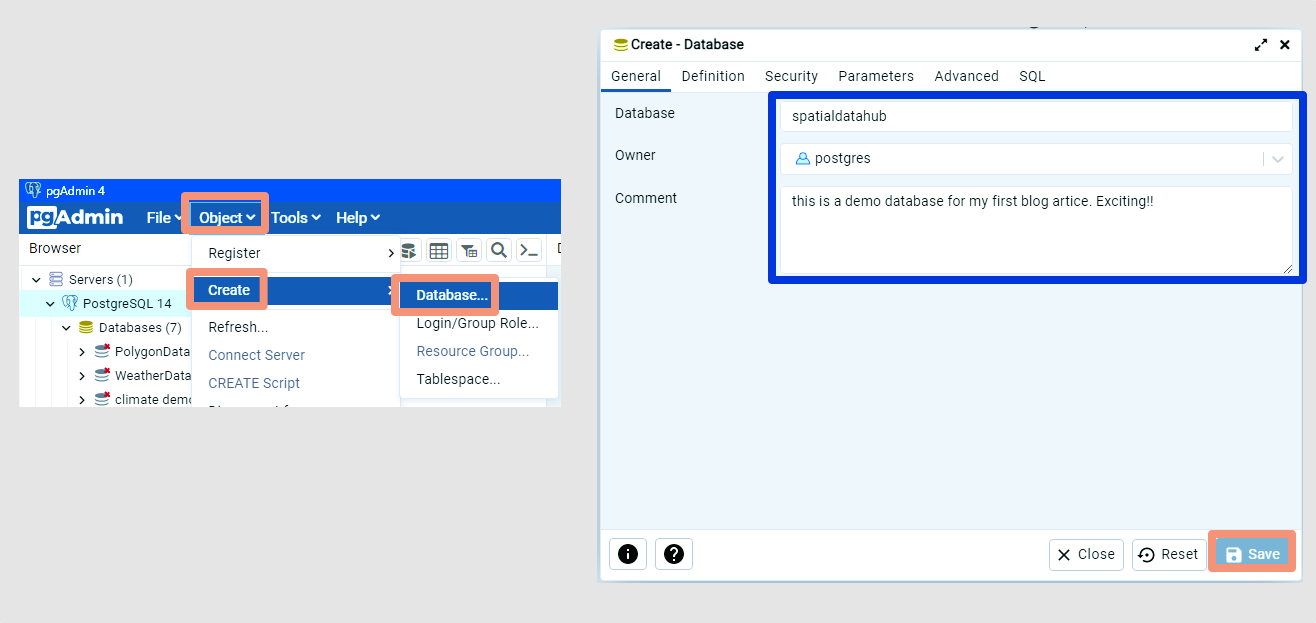
If you prefer to do this using the command line, the code below will suffice.
CREATE DATABASE spatialdatahub
    WITH
    OWNER = postgres
    ENCODING = 'UTF8'
    CONNECTION LIMIT = -1;

 COMMENT ON DATABASE spatialdatahub
    IS 'this is a demo database for my first blog article. Exciting!!';
To attach a spatial extension to your database, expand the database drop-down > extension (Right-click) create > extension > name = postgis > save
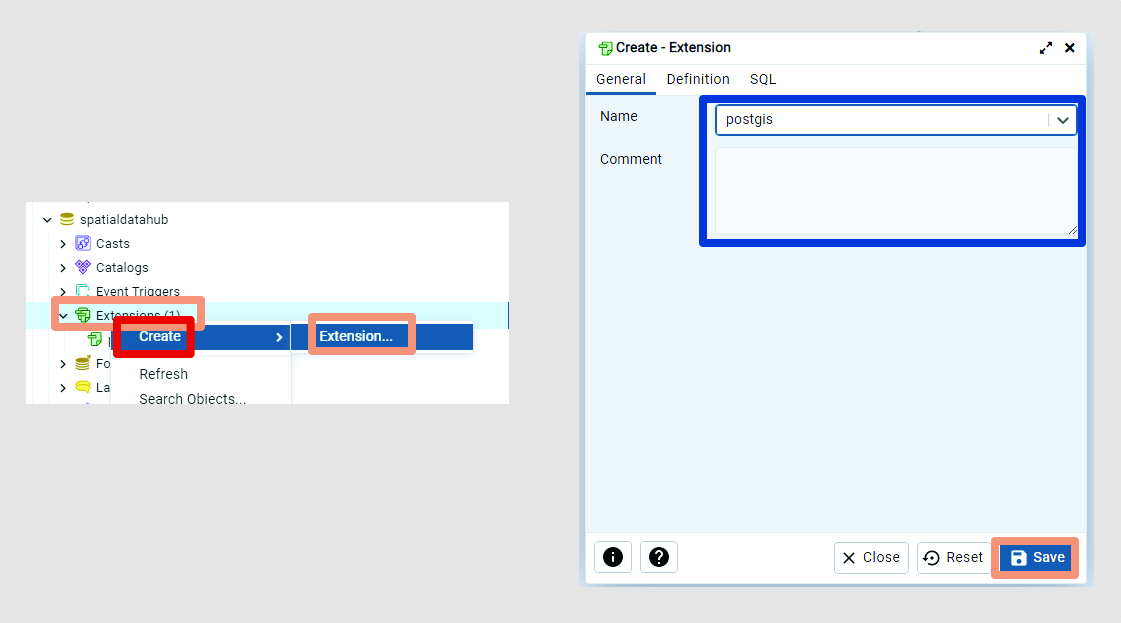
CREATE EXTENSION postgis;
Connect PostGIS Database with QGIS Data Source Manager
To connect your existing database, create a new connection using the data source manager > PostgreSQL > new
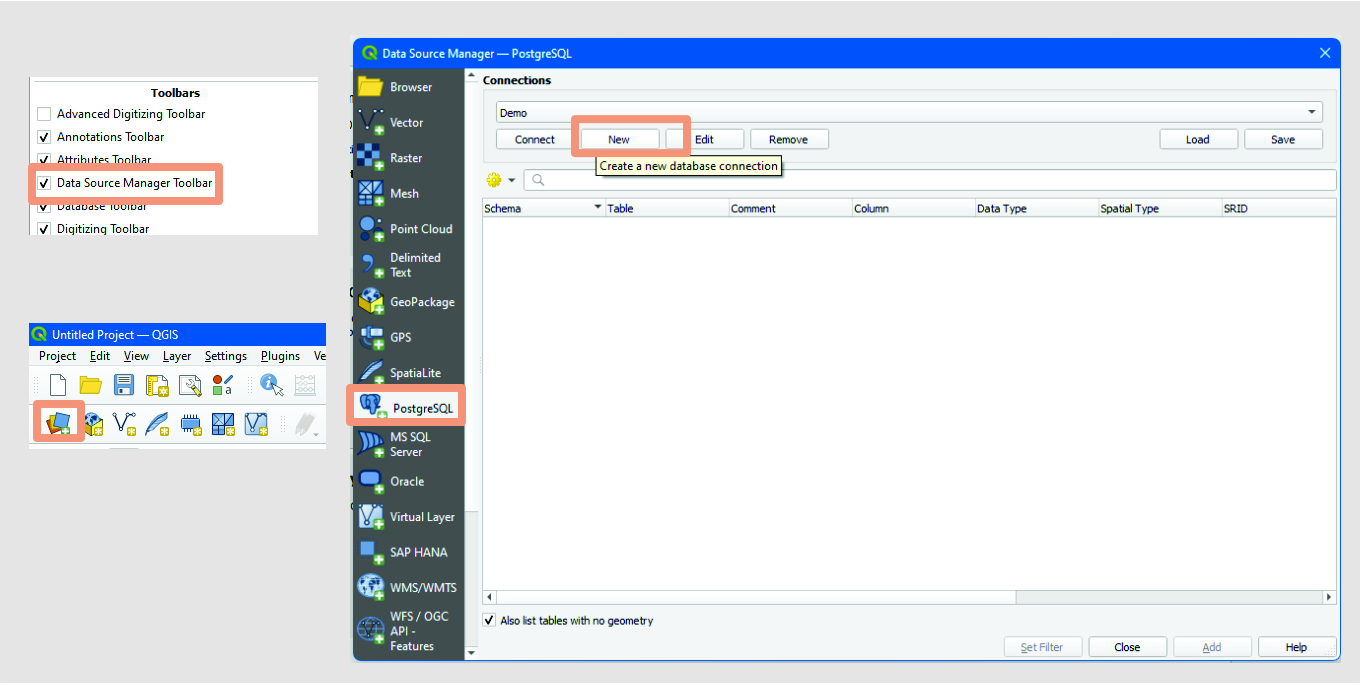
Set up connection parameters:
Host == localhost
Port == 5432
Database == name of the database as created
Add an authentication configuration using the + icon, and enter a chosen name, username, and password.
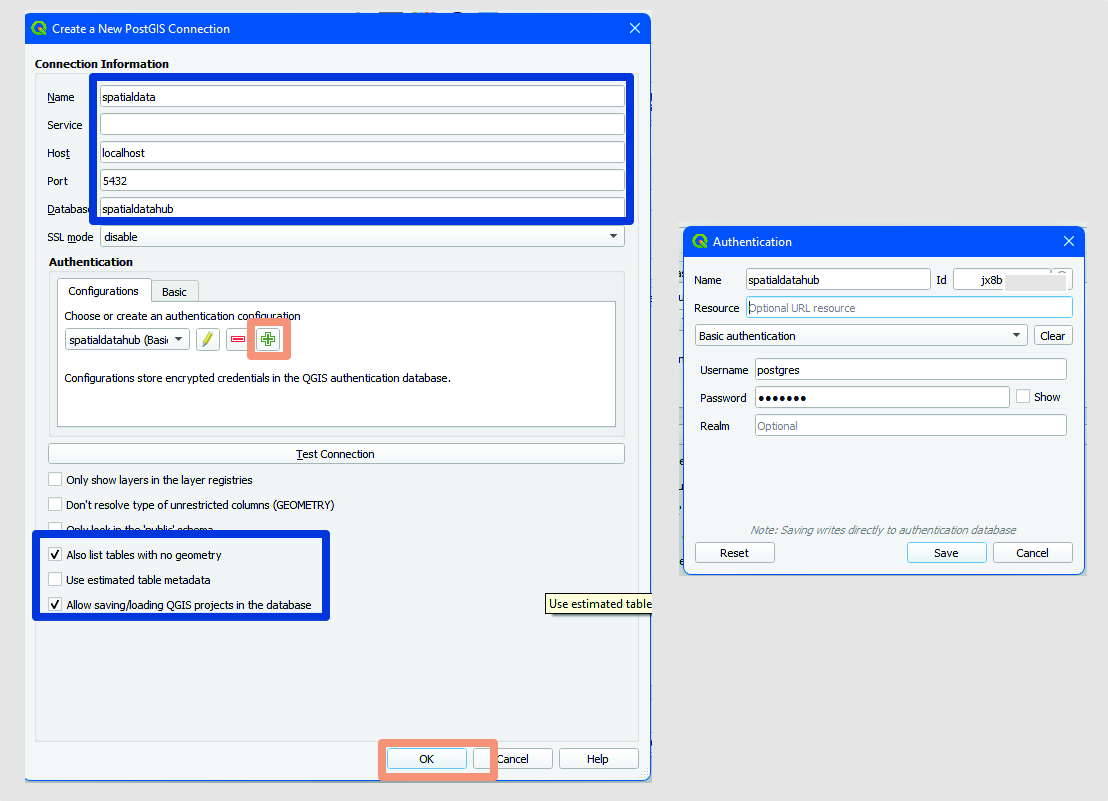
When making this connection for the first time, you must set a master authentication password.
Set additional preferences using the checkboxes below. Here, I’ll enable working with tables having no geometry and loading QGIS projects in the database.
When complete > OK.
To edit a connection, access all connections using the Data Source Manager > PostgreSQL > Edit.
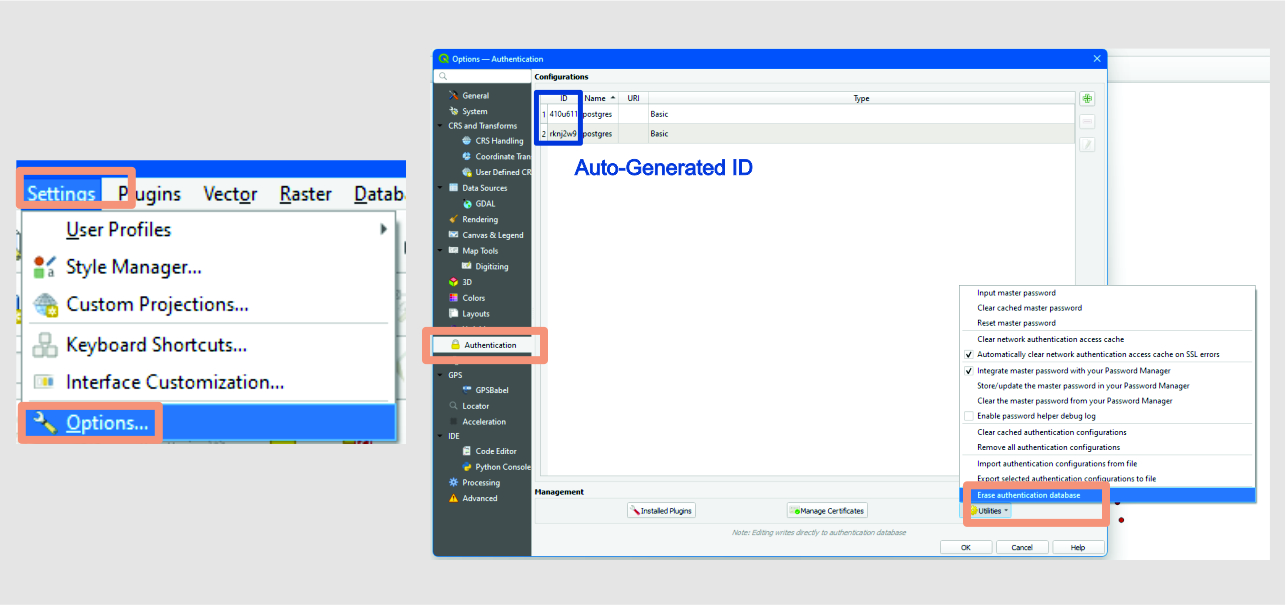
The authentication ID for each connection can be gotten by using the edit button on the authentication. This ID can be shared between users in an enterprise environment.
If lost and required, you can reset your master password from the authentication settings.
Settings > Options > authentication > utilities > erase authentication database
Exploring the Database Manager Tool
The DB manager allows users to access databases from different providers like GeoPackage, Oracle Spatial, SpatiaLite, Virtual Layers, and PostGIS. Using the PostGIS provider, you can create and manipulate schemas, write queries, import datasets from the QGIS workspace, etc. Here’s a walkthrough to get you started.
Create Schemas
A default schema named “public” is created for every database, however, you can create schemas within the database for different reasons.
On the DB Manager toolbar (Click the drop-down to access the database before creating a schema)> Schema > create schema > enter new schema name > OK.

Note 1: When naming your schemas, select an easily identifiable name as this will be called several times during your analysis. An ideal name will consist of lower-case letters and avoid spaces between texts.
Import Datasets to DB Manager
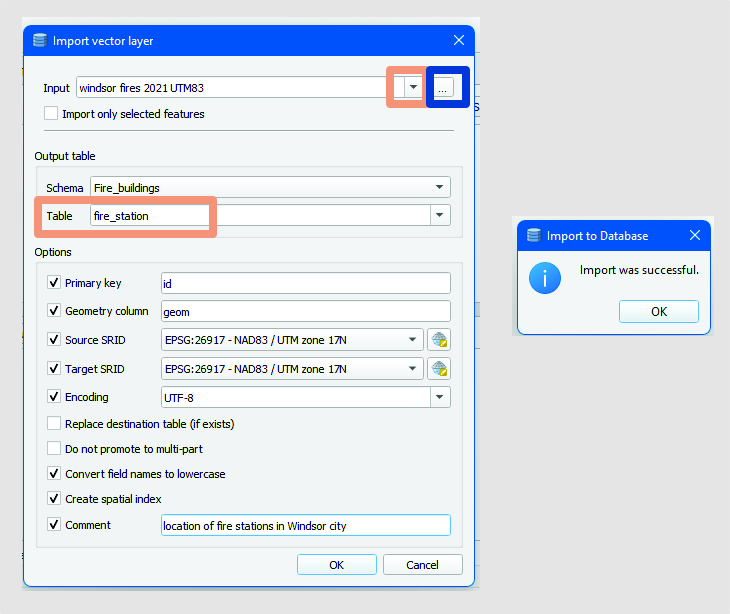
To import datasets from the QGIS workspace or directly from the file directory, use the Import Layer/File on the toolbar and enter the required details.
As shown in the next image the input drop-down (yellow) lets you select layers from QGIS while the button beside (blue) selects files from their stored directory.
The output table name can be used to set preferred names using the naming convention stated in Note 1.
Writing your First SQL Query in DB Manager
To write a query, click on the SQL Window on the toolbar. Queries can be written in the top section of the window. Use the ‘Execute’ button (Ctr + R) to run the query. The ‘Clear’ button erases the window while the product of your analysis can be seen using the ‘Create a view’ option.
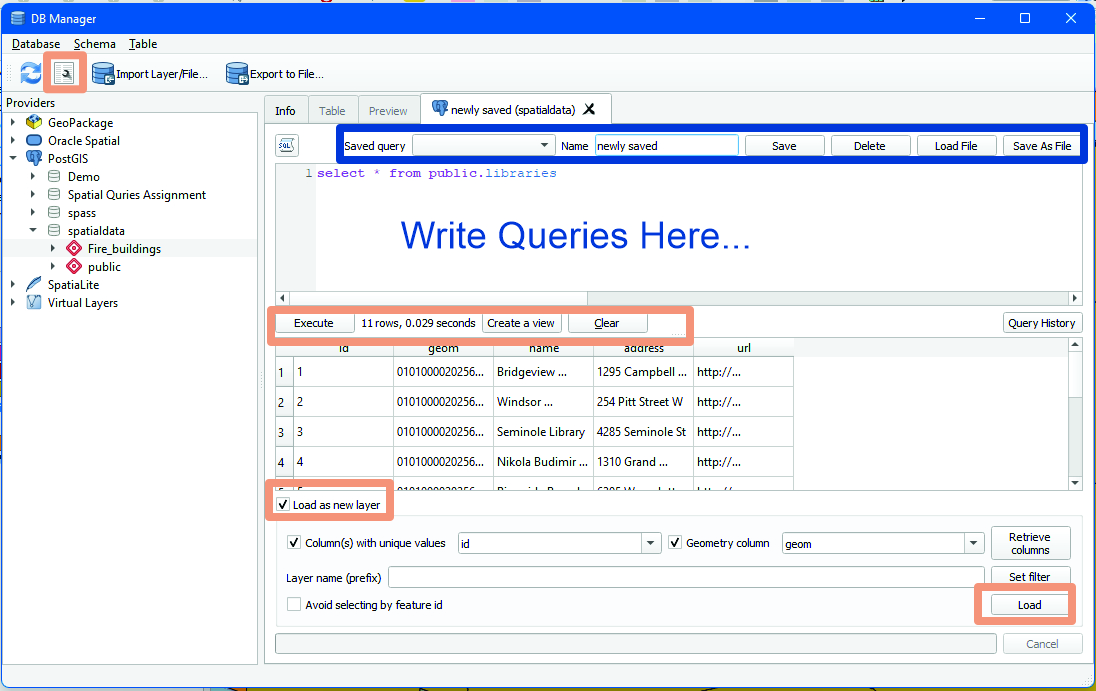
You can choose to save queries and easily access them later using the Saved query drop-down.
Save and Export Projects
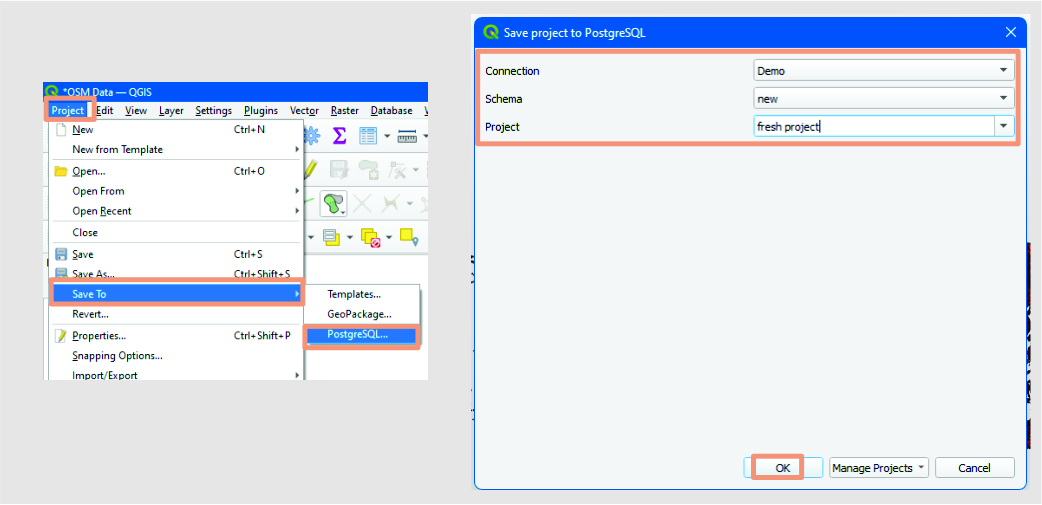
To access query results on the connected database, save projects after analysis. To save a project;
On the QGIS window,
Project > save to > PostgreSQL, enter project details > OK.
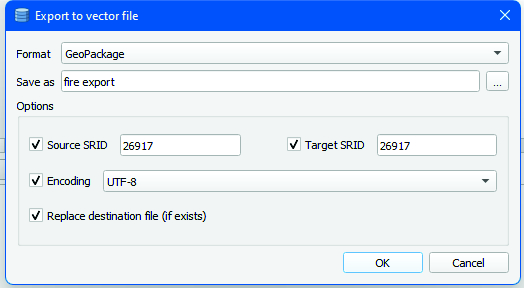
To export a query result, select the ‘Export to file’ option on the DB Manager toolbar> select preferred file format > and file settings > OK.
If you encounter errors during your setup, leave a comment in the section below or a private message via any of the social media handles.
Subscribe to my newsletter
Read articles from Leonard Fidelis directly inside your inbox. Subscribe to the newsletter, and don't miss out.
Written by

Leonard Fidelis
Leonard Fidelis
Hi, I'm Leo. A Geomatician and Data Analyst who loves unfolding the metrics of daily human activities. I recently started a YouTube channel where I share explainer videos on GIS analytical processes. And here I am, starting out a blog for the same purpose. I'm currently working on adding a host of python libraries to my stack, and I'd be sure to update you as I do. When I'm not writing codes or crunching numbers to inform Geospatial decisions, you'd find me writing texts on how exactly you can do that. Yes, a Technical Writer. Here's my Stack: SQL {PostgreSQL, MySQL} Python {NumPy, Pandas, Matplotlib, Seaborn} GIS Applications [QGIS, ArcGIS, Google Earth Pro, AutoCAD]