Optimizing Your React Native App with Flipper
 Tiffany Chong
Table of contents

Introduction
Ever wondered how to speed up your React Native apps and measure their performance? Let me walk you through measuring the performance of your app through component render times, and also some techniques to speed up your application.
Step 1: Know Performance Metrics
To begin optimization, we must first know some performance metrics:
JS/UI Frame Rate - The number of frames that are displayed each second. This can be measured using React Perf monitor. Ideally, you must achieve 60 frames per second for a more smooth life-like UI animation. Dropping below could signal a performance issue.
Component render times - The amount of time it takes for React components to render. This can be viewed using flame graphs using apps like Flipper or RN Native Debugger.
Flipper

In this tutorial, we will use Flipper for the following reasons:
It comes enabled out of the box in React Native version 0.62 and higher.
It is compatible with RN Reanimated 2, unlike RN Native Debugger
Step 2: Installing Flipper
Install the Flipper app through their official website.
Note: If you are using RN version 0.62 and above, Flipper integration is automatically enabled. Otherwise, you can upgrade to have Flipper integration enabled.
Open Flipper, then open your mobile application in the simulator.
Note: Flipper might say "No application selected". You can ignore that.
Click React Native > React DevTools on the left-hand side.
In your app, go to a page right before the page whose loading time you want to record.
Click on the blue circle, called "Start profiling"
In your app, click on the page you want to record.
After everything finishes rendering, click on the same circle to "Stop profiling".
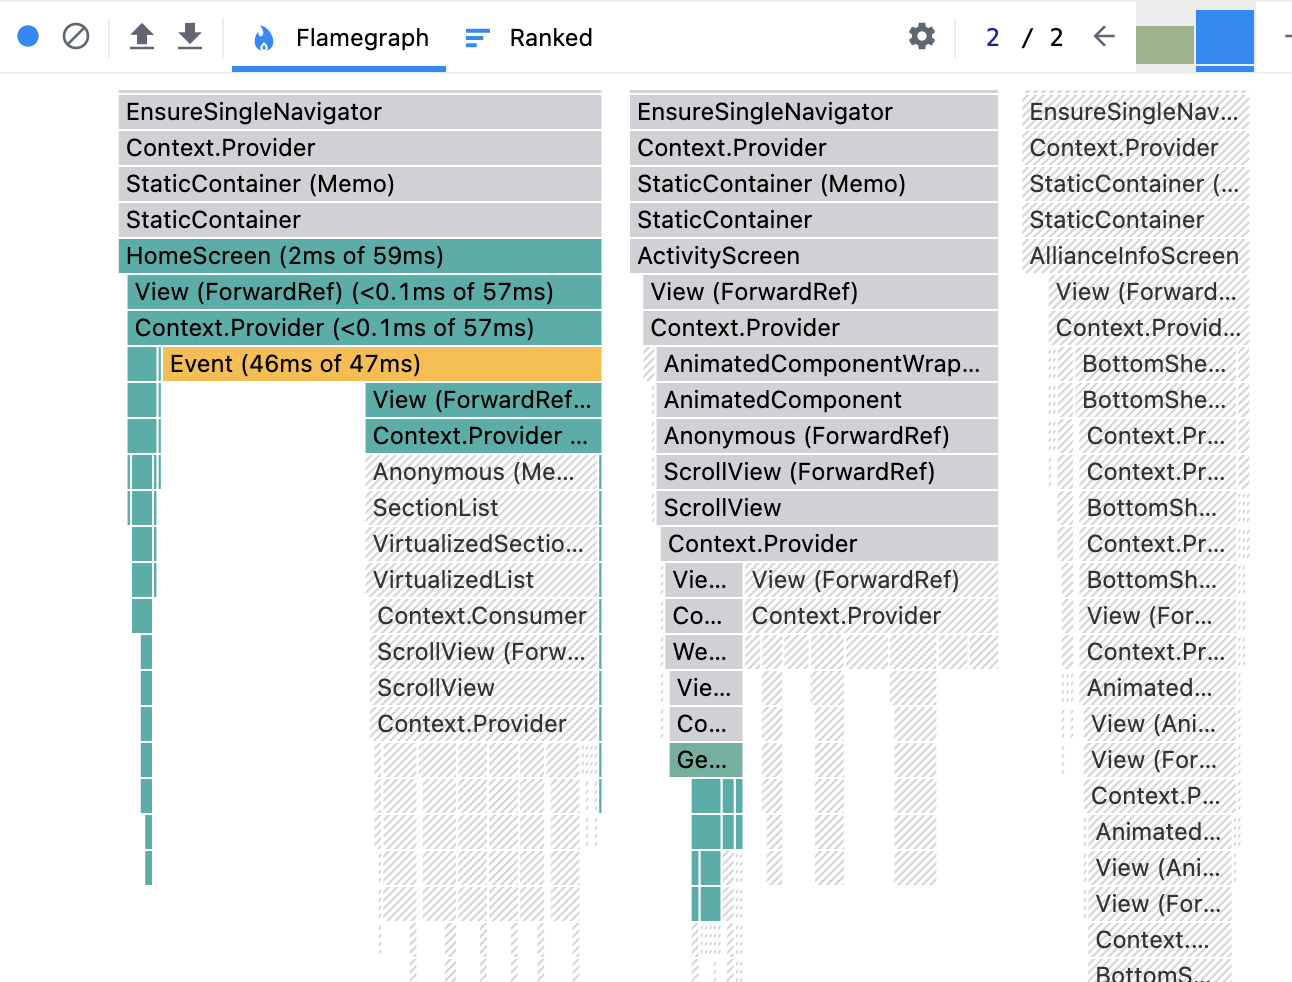
You should see a flame graph such as the one in the next section.
Step 3: Interpreting Flamegraphs
Interpreting Commits (i.e. Rerenders)
Here, you can see that there are 2 commits (i.e. the screen rerendered twice). You can scroll through the commits to see which components were drawn during each rerender.

In every commit, you should notice, a different part of the component tree is highlighted, i.e. rendered.
Interpreting the Component Tree

What does it mean when it says "HomeScreen (2ms of 59s)"?
That means, it took 2ms to render the HomeScreen, and another 57s to render the descendants of the HomeScreen. Thus, in total, HomeScreen, together with its descendants, took 59s to run.
You will notice that the only child of HomeScreen, View (Forward Ref), took 0<0.1ms of 57s, meaning it took less than 0.1ms to render the View, and close to 57s to render the children of the View. Indeed, the children/grandchildren of HomeScreen, aka View, took 57s in total to run.
Note: Meaning of "Did not render" - The parent component did not render perhaps because they are not on screen, or perhaps they have already been rendered, or they were already rendered in previous commits (scroll on top-right). Child components may not have rendered because they have been memoized, or perhaps they will render in later commits, or perhaps some conditional statements caused them to not render.
Meaning of Colors
As you might have already noticed, the yellower the color is, the longer it takes for the component to load. These are the components that you need to look out for.
Step 4: Find Reason Behind Rerenders
One of the ways to reduce overall rendering time is to reduce the total number of re-renders by a component.
You can view how many times a component has been rerendered by either scrolling through the commits, or counting the number of times this component is highlighted.
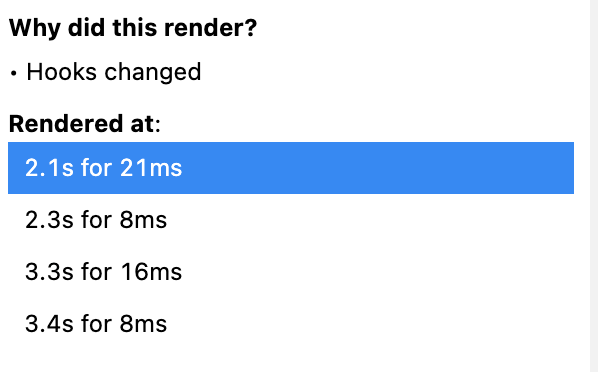
Or to make things easier, you can click on the component to see a summary on the right-hand side of the screen, telling you all the times this component has rendered.

Note: To enable the "Why did this render", you can go to Settings Icon > Profiler > and tick "Record why each component rendered while profiling."

Find the reason behind rerenders
Flipper does not give very specific messages for why a component re-renders. At most, it tells you that "parent has re-rendered" or "hooks changed". So how do you know which hook has changed?
Here are some tips to look for the culprit hook/variable:
Control + F to search for "use" or "state" or "useState" or "setState" to check which variables/hooks could potentially cause re-render.
console.log variables to monitor whether variables change with each render
Check if re-renders are lessened when culprit variable/hooks are set as constant or commented out.
Step 5: Reduce rerenders
1. Reduce setState calls
Avoid calling setState when you don't need them. For example, use an "if" clause to determine when to setState. If your results from fetch are empty, or the previous state is the same as new state, then don't call setState because every setState causes a rerender.
Another example to reduce setState calls is setting isLoading variables in the component to false, then true, then false again, you can directly set isLoading variables to true at the start, and set it to false once some data have been fetched.
2. Memoize pure components
Pure components are components whose outputs only depend upon the input parameters, in the case of React, these are the props.
Note: This means that the component output does not depend upon state; it also does not depend upon Math.random() or new Date(); it also should not produce any side effects, such as changing the state of something outside of the component.
In theory, these components only have to re-render when one of the props have changed. Thus, if the parent component has been rendered, but props for this component haven't changed, you can skip the rendering of this component. To do this, you can wrap the component around a React.memo hook like so
export default React.memo(MyComponentName)
to prevent it from rerendering.
3. Use useMemo
Don't confuse it with React.memo, which is used to tell components when to re-render.
You can use useMemo hook on bulky objects, like React styles objects. You can use them if you want to produce the same object to use as props for a child component. You can even use useMemo to memorize an entire JSX element.
// Before
<Pressable><YesOrNoButton yes={state.yes}></Pressable>

// After
<Pressable
 children={React.useMemo(() => {
 return <YesOrNoButton yes={state.yes}/>;
  }, [state.yes])}
/>
In the above example, if state.yes does not change, then the children props will be the same, so the entire <Pressable/> component will not need to rerender.
4. useCallback
Make sure to use useCallback hook to prevent recreating a callback function that you will pass to a child component.
5. Separating Components
Sometimes, one huge component could contain multiple useQuery hooks, causing it to re-render multiple times. This means that whenever any of the data is loaded/has changed, the entire large component is re-rendered. If you are able to break the component down into several subcomponents, each with their own useQuery hook, that will speed up rendering because React no longer needs to render the entire parent component when any one of the data has changed.
6. Query Batching
If, on the other hand, you are unable to separate the components using different useQuery, you can oppositely, combine these useQuery instead using query batching.
If you have many queries, you can query such that the component only rerenders once when all the data has been fetched.
7. Don't use useIsFocused hook unless you have reason to do so.
Use useFocusEffect instead of useIsFocused. When using useIsFocused, the function component is called once again when it is out of focus. If you only want to call the function when it is in focus, then you should be using useFocusEffect hook instead.
You can refer to this guide to check out how to use useFocusEffect.
8.useAuthState should not cause re-render
If you are using authentication state from firebase, this hook should not change on every render.
If you are calling const [user] = useAuthState(firebase.auth()), make sure to import firebase from "@react-native-firebase/app" instead of import { firebase } from "@react-native-firebase/storage";
This prevents auth state from changing during every render.
Conclusion
Now, you've learned how you can reduce re-renders of components, and reduce the rendering time of components through common patterns. Hopefully, you can see and report tangible results and see significant results using the Flipper app.
Subscribe to my newsletter
Read articles from Tiffany Chong directly inside your inbox. Subscribe to the newsletter, and don't miss out.
Written by

Tiffany Chong
Tiffany Chong
Software Developer and Graphic Designer