Installing GUI on Amazon EC2 instance running Amazon Linux 2
 Adarsh Acharya
Amazon Linux 2 is a popular operating system choice for Amazon Elastic Compute Cloud (EC2) instances. Amazon Linux 2 is designed to provide a secure, stable, and high-performance environment for running workloads on EC2 instances. In this tutorial, we will learn how to install a Graphical User Interface (GUI) on an EC2 instance running Amazon Linux 2.
Before we start, you need to connect to your Amazon EC2 instance using SSH as the ec2-user. The instance must be in a public subnet and accessible through a public IP address or an Elastic IP address. Alternatively, you can establish a connection using AWS VPN or AWS Direct Connect that allows you to access your instance through a private IP. These instructions do not apply to environments using a bastion host. For security reasons, traffic to the VNC server is tunneled using SSH. It's a best practice to avoid opening VNC ports in your security groups.
Ensure that your instance is up-to-date by running the following command:
sudo yum update
sudo reboot
Failure to update and reboot can lead to unpredictable results when following these steps.
Install the MATE desktop environment
The MATE desktop environment is a lightweight GUI that is easy to use and provides a simple, intuitive interface. To install the MATE desktop environment, follow these steps:
Install the MATE packages:
sudo amazon-linux-extras install mate-desktop1.x
- Define MATE as your default desktop for all users:
sudo bash -c 'echo PREFERRED=/usr/bin/mate-session > /etc/sysconfig/desktop'
Install TigerVNC
TigerVNC is a high-performance, platform-neutral implementation of the VNC (Virtual Network Computing) protocol. To install TigerVNC, follow these steps:
Install TigerVNC Server
sudo yum install tigervnc-server- Configure a VNC-specific password containing from six to eight characters for this user. When asked if you want to enter a view-only password, press "n":
vncpasswd
- Restrict VNC network access to the localhost, so that VNC can be accessed only by using a secure SSH tunnel.
Create the tigervnc configuration directory:
sudo mkdir /etc/tigervnc
Create a mandatory configuration file containing the localhost option:
sudo bash -c 'echo localhost > /etc/tigervnc/vncserver-config-mandatory'
- Start the VNC Server on display number 1, and cause it to always start at boot time.
Create a new systemd unit:
sudo cp /lib/systemd/system/vncserver@.service /etc/systemd/system/vncserver@.service
Use the sed command to replace all occurrences of USER in the new unit with ec2-user:
sudo sed -i 's/<USER>/ec2-user/' /etc/systemd/system/vncserver@.service
Reload the systemd manager configuration:
sudo systemctl daemon-reload
Turn on the service:
sudo systemctl enable vncserver@:1
Start the service:
sudo systemctl start vncserver@:1
Connect to the GUI using VNC
- Install the TigerVNC software on your local computer, if it's not already installed. TigerVNC is available for Windows, Linux, and macOS.
On your local computer, use SSH to connect to your instance while creating a tunnel to forward all traffic on local port 5901/TCP (VNC) to the instance's VNC server:
Linux and macOS
When connecting to your instance using SSH, add the -L parameter to activate port forwarding. Replace PEM_FILE with your private key, and INSTANCE_IP with your instance's public or private IP, as appropriate.
ssh -L 5901:localhost:5901 -i PEM_FILE ec2-user@INSTANCE_IPWindows
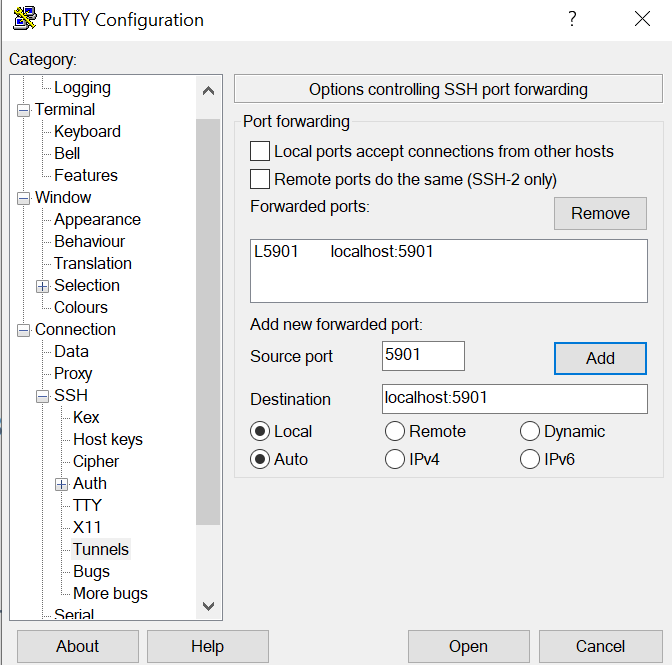
When opening the connection with PuTTY, configure port forwarding, and then open the connection:
From the Connection menu, select SSH, and then select Tunnels.
Enter 5901 in the Source Port field.
Enter localhost:5901 in the Destination field.
Select Add.

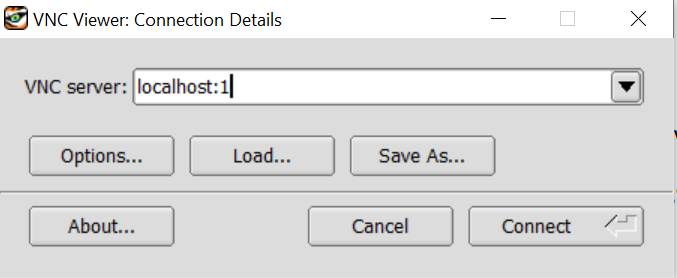
Open the TigerVNC Viewer on your local computer. When asked for the VNC server hostname, enter localhost:1 and then connect to it.

Enter the VNC password that you set up in step 2 of the Install TigerVNC section. If an alert appears stating that the connection isn't secure, disregard it. You're accessing the VNC server using an encrypted SSH tunnel.
Your MATE desktop environment appears.
Source: https://aws.amazon.com/premiumsupport/knowledge-center/ec2-linux-2-install-gui/
Subscribe to my newsletter
Read articles from Adarsh Acharya directly inside your inbox. Subscribe to the newsletter, and don't miss out.
Written by
