Web Scraping Using Node.js and Cheerio for Dummies .
 Ukpeh Michael
Introduction
I woke up feeling the need to get large chunks of data to populate my database for a movie REST API I was building. I started copying and pasting the data manually and I guess it was a nice experience doing that besides I had all the time in the world. Then a friend recommended I scrape the data of such web pages into a JSON format and I was like what is scraping? I hopped on my browser and googled what scraping was.
Now let's see what I found.
Web scraping has been a popular way of getting valuable data from websites without calling an API endpoint. It is extracting unstructured data from the rendered HTML elements on the page and stores it in a database or a file format(CSV, spreadsheets, JSON) that can be used for the analysis of the extracted data.
Web scraping can be done by a variety of tools from online Saas to APIs and you can also build yours locally on your local machine(if you want to turn it into a cloud application feel free).
But what are web scrapers made of?
Web scrapers are made of tools that parse HTML data and an underlying algorithm that is responsible for selecting the required data.
In this article, we will take a deep dive into web scraping using Node.js and Cheerio, a library for manipulating and parsing HTML and XML elements to scrape a popular movie site, IMDb for the first 50 featured movies of the year 2023 into data that can be analyzed in a JSON file.
Prerequisites
To follow along, we will need the following:
Knowledge of Javascript(ES6, async, await)
Knowledge of CSS query selectors, and HTML.
Node.js and npm are installed on your computer alongside basic knowledge of both.
Knowledge of Axios since we will use it as our HTTP client to fetch data from the URL we want to scrape.
Now let's start building(it's just a web scraper though :| )
Setting up our project
Now let's head to our home directory or any place you find comfortable to build this project, make our project directory and get into it
mkdir web-scraper-cheerio
cd web-scraper-cheerio
by entering the command above in our terminal.
Now we have our project directory, we can then initialize our Node.js application setting up our package.json and setting up our dependencies.
npm init -y
npm i axios cheerio
We create our app.js in the same directory, this is where our project's logic is stored and executed.
touch app.js
code .
Lastly, we set up our start script for our Node.js application in our package.json to help us start our application instead of running node start app.js anytime we want to run our application.
{
    "name": "web-scraper-cheerio",
    "version": "1.0.0",
    "description": "A web scraper built with cheerio",
    "main": "index.js",
    "scripts": {
        "test": "echo \"Error: no test specified\" && exit 1",
        "start": "node start app.js"
    },
    "keywords": [],
    "author": "",
    "license": "ISC",
    "dependencies": {
        "axios": "^1.3.4",
        "cheerio": "^1.0.0-rc.12"
    }
}
Now let's start cooking.
A Brief Introduction To Cheerio
Cheerio is a lightweight Javascript library used to parse and manipulate HTML and XML documents. So basically, we are going to use it to parse data fetched via a GET request using our HTTP client, Axios.
So Cheerio implements a JQuery-like syntax meaning if you have some knowledge of Jquery, you will find it easier to follow along.
First off, let's try to load data from a website using Axios.
//app.js
const axios = require("axios");

const imdbUrl = "https://www.imdb.com/search/title/?year=2023&title_type=feature&";

const loadData = async (url) => {
   const response =  await axios.get(url);
   console.log(response.data);
}
loadData(imdbUrl);
//Run npm start to execute this in your terminal
Executing the above code will return unstructured HTML which we can't use to create structured data that can be consumed. Axios sends an HTTP GET request to where the site is hosted and fetches the rendered HTML.
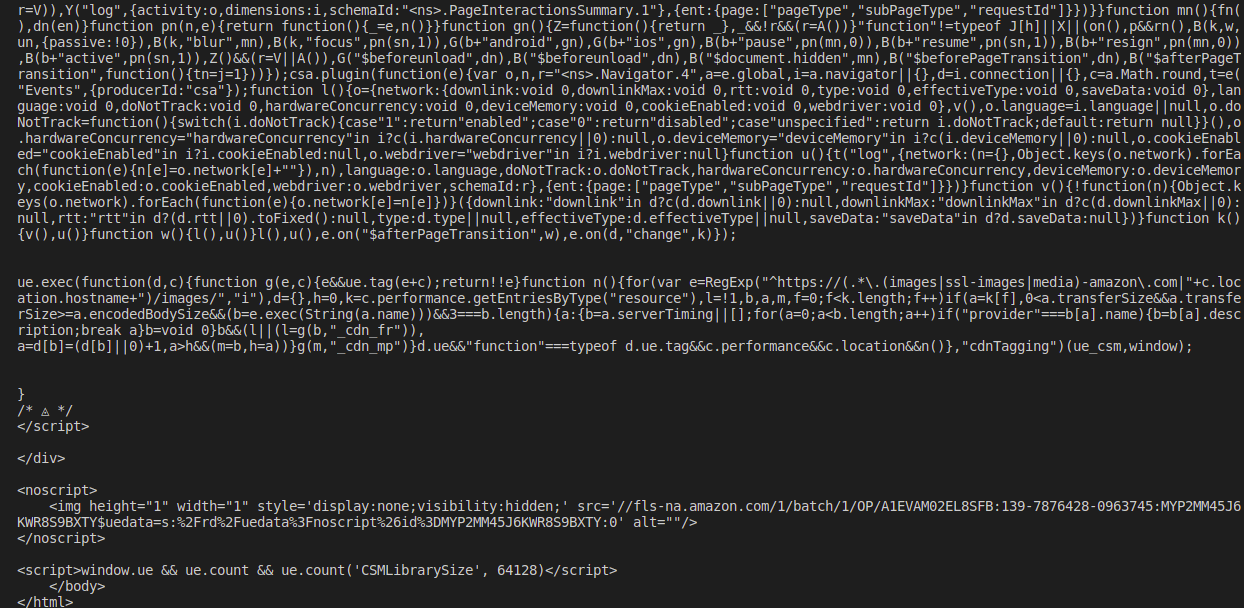
Now that's where Cheerio comes in as a parser to fetch our desired data and transform it into a suitable form for our use by parsing it into a DOM we can manipulate. Let's edit our app.js file to add our Cheerio import and start using it.
//app.js
const axios = require("axios");
//Import Cheerio
const cheerio =  require("cheerio");

const imdbUrl = "https://www.imdb.com/search/title/?year=2023&title_type=feature&";

// Edit function name as we start to use Cheerio
const scrapeData = async (url) => {
// Fetch data
   const response =  await axios.get(url);
   console.log(response.data);
// Load fetched data into Cheerio instance
   const $ =  cheerio.load(response.data);
}
scrapeData(imdbUrl);
The $ is a DOM created by Cheerio which can be manipulated by us and used to access various elements based on their CSS selectors. For example, I want to print out the URL of all links in the body of a webpage.
// data is data gotten from an imaginary GET request
const $ = cheerio.load(data);
const body = $('body');
body.find('a').each((id, element) => {
   const link  =  element.attr('href');
   console.log(link);
})
In the above block of code, we use $ to access the body as a DOM element. In the body, we have multiple a tags which contain the URLs stored in the attribute href. Usingeach method, we can loop through multiple a tags found and log out the corresponding URL for each a tag.
Now Back to Our Project
With our newfound knowledge of Cheerio, we can try to get the titles of the movies featured, the image source URL and the description of the movie from IMDb's Featured Movies Webpage.
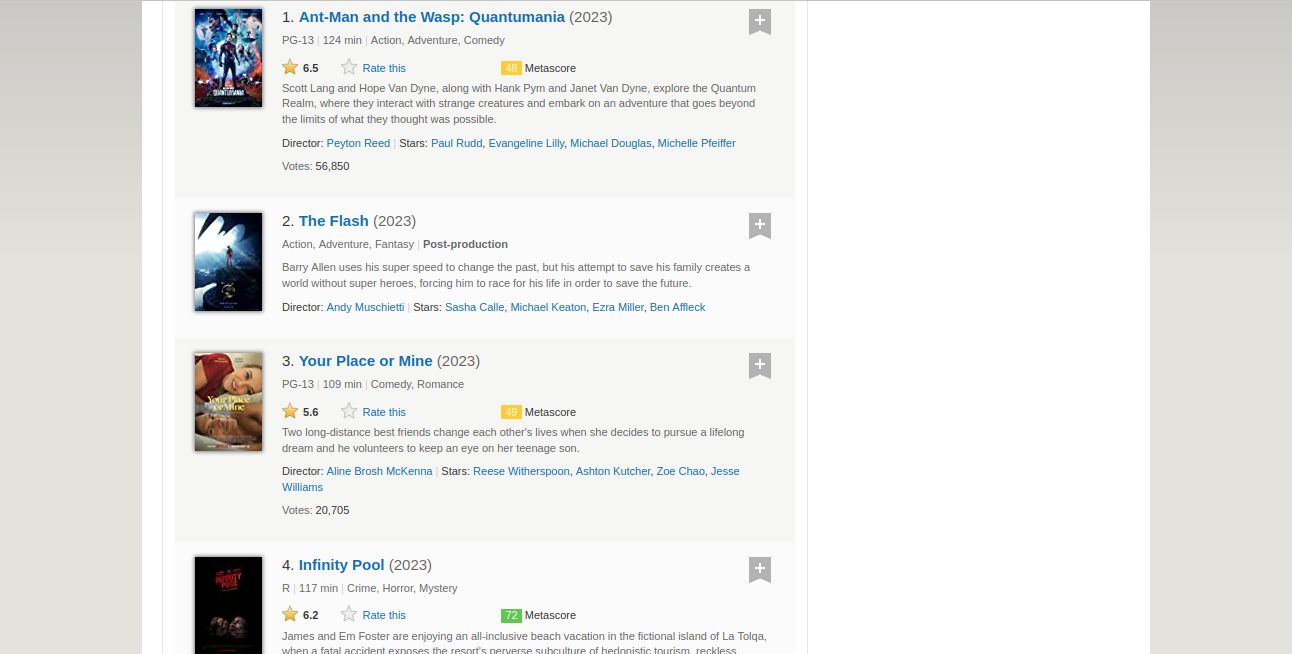
Looking at this page, we notice a similar semantic structure for each movie, as information relating to each movie can be grouped into a div. Let's inspect the webpage to see the common parent select and find out the actual selectors for each DOM element we need to extract data from.
For the common parent selector
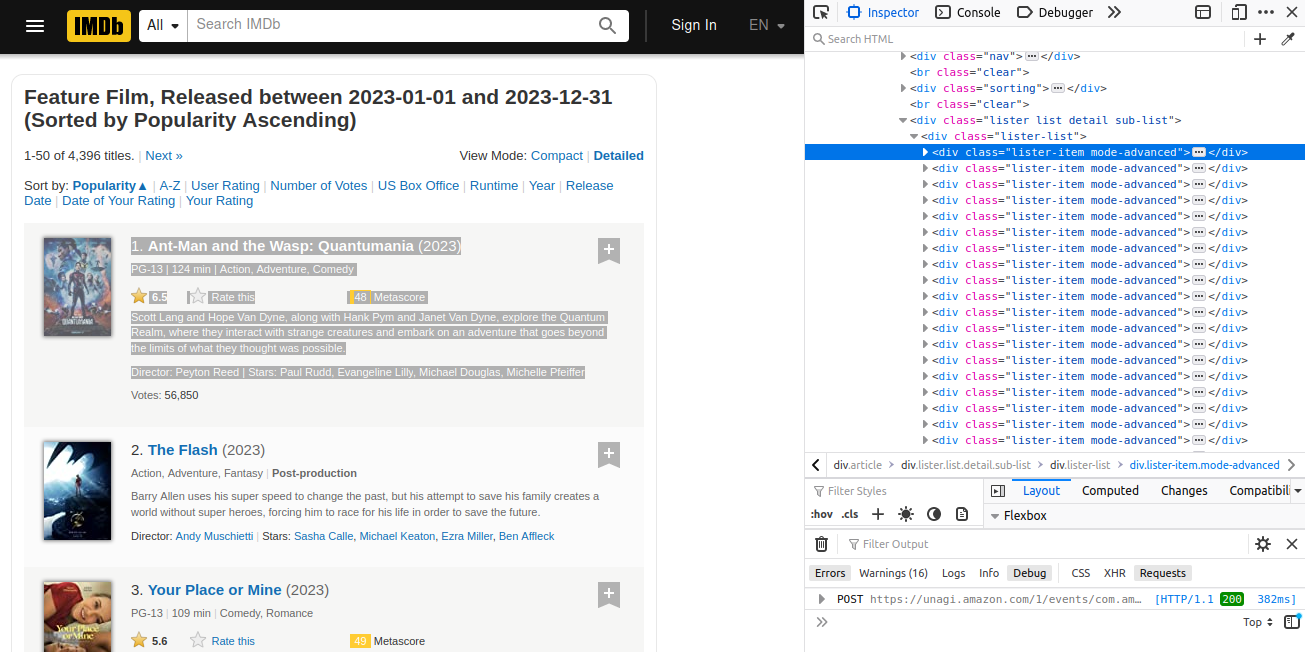
We notice the common parent element is the div with selector .lister-item and multiple divs are bearing the class so we loop through it.
Note: We will modify our scrapeData function to contain a try-catch statement for basic error handling.
//app.js
// ..
const scrapeData = async (url) => {
   try {
    const {data} =  await axios.get(url);
    const $ =  cheerio.load(data);
    const listItem = $('.lister-item')
    listItem.each((id, element)=> {
        console.log(element)
    })
   } catch(error) {
    console.log(error)
   }
}
scrapeData(imdbUrl);
// Output: We get DOM Objects loggged out in the terminal. You
// can try it out.
We can manipulate these objects to get our movie titles, descriptions and image URLs.
Movie Titles
For the movie titles, we inspect using our browser dev tools to find the corresponding selector for it, extract it and print out the information we extracted.
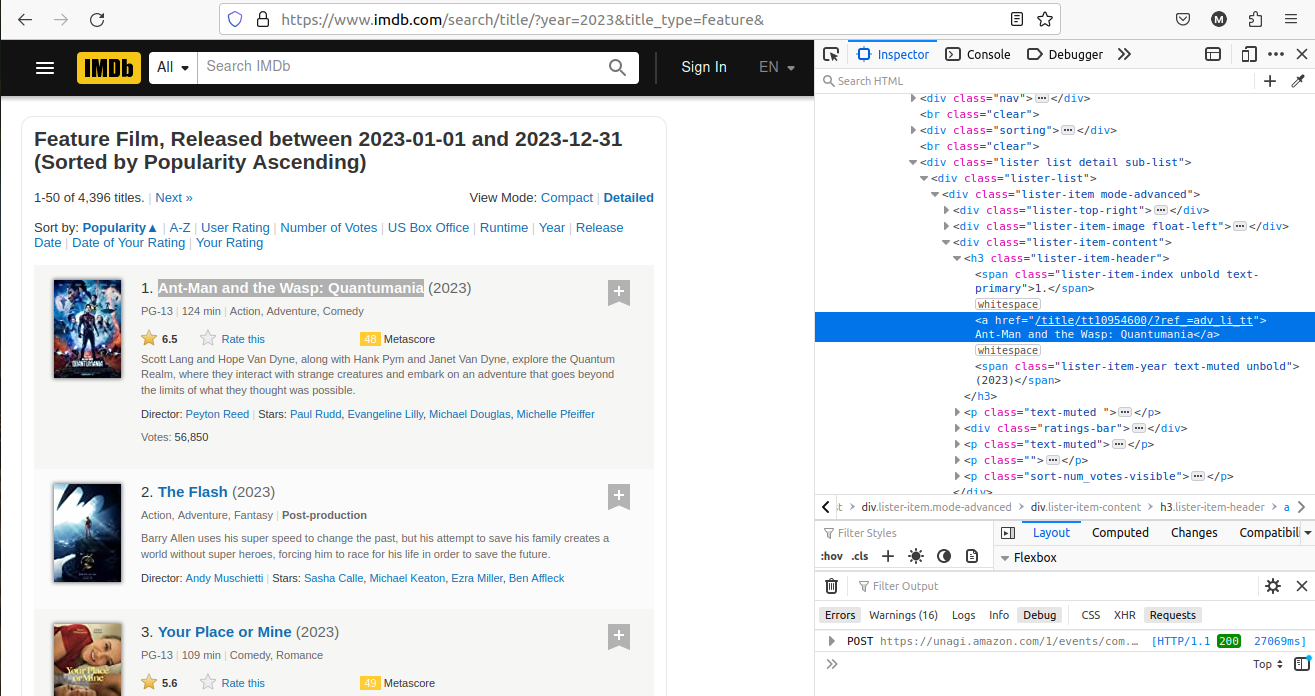
The movie title can be found in an a tag nested in an h3 in the .listed-item-content div so let us modify our scrapeData function.
// ..
//Create an array to store each movie's information
const moviesList = [];

const scrapeData = async (url) => {
   try {
    const {data} =  await axios.get(url);
    const $ =  cheerio.load(data);
    const listItem = $('.lister-item');
     //Loop
    listItem.each((id, element) => {
      const movieTitle = $(element).find('.lister-item-content')
      .find("h3").find("a").text();
      // Add movie title to movieList array
      moviesList.push({
        title: movieTitle
      })
    })
    // Print out movie titles
    console.log(moviesList);
   } catch(error) {
    console.log(error)
   }
}
Now let's break down movieTitle, it is a string extracted from an a tag that was gotten using the .find() method found in an h3 found in the.lister-item-content div. Therefore, we use .find() to find elements matching the given selector and we use .text() to extract the inner text or content as a string.
Note: If the element occurs more than once, it returns an array of elements.
We get our output after running npm start
[
  { title: 'Ant-Man and the Wasp: Quantumania' },
  { title: 'The Flash' },
  { title: 'Your Place or Mine' },
  { title: 'Infinity Pool' },
  { title: 'Fast X' },
  { title: 'Winnie the Pooh: Blood and Honey' },
  { title: "Magic Mike's Last Dance" },
  { title: 'Knock at the Cabin' },

  // Had to slice it due to it's length.
]
Cool right! Now let's use the same methods and logic to include our movie description.
Movie Descriptions
Let's swiftly apply the same logic to get our movie descriptions starting from inspecting it to knowing the suitable selector to use.
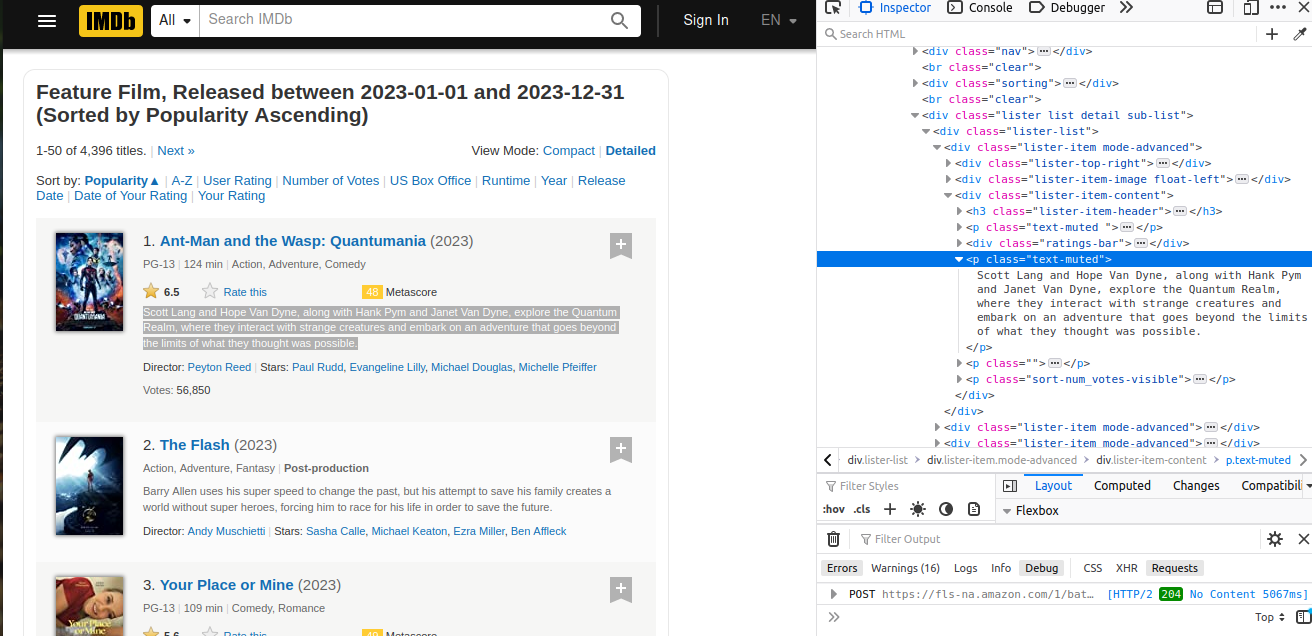
It's located in the .lister-item-content div and it is the 2nd element of the selector, p.text-muted so we apply the pseudo-class :nth-of-type(2) where 2 indicates that it is the 2nd occurring element.
Let's modify our code to enable us to fetch the description.
// app.js
// In scrapeData()
    listItem.each((id, element) => {
      const movieTitle= $(element)
         .find('.lister-item-content')
         .find("h3").find("a").text()
      const description = $(element)
         .find('.lister-item-content')
         .find('p.text-muted:nth-of-type(2)')
         .text().replace(/\n/, "")
      movieList.push({
         title: movieTitle,
         description
        })
    })
//  ....Rest of the function
// Update your code and run npm start to see output
You should get a similar output.
[
  {
    title: 'Ant-Man and the Wasp: Quantumania',
    description: 'Scott Lang and Hope Van Dyne, along with Hank Pym and Janet Van Dyne, explore the Quantum Realm, where they interact with strange creatures and embark on an adventure that goes beyond the limits of what they thought was possible.'
  },
  {
    title: 'The Flash',
    description: 'Barry Allen uses his super speed to change the past, but his attempt to save his family creates a world without super heroes, forcing him to race for his life in order to save the future.'
  },
  {
    title: 'Your Place or Mine',
    description: "Two long-distance best friends change each other's lives when she decides to pursue a lifelong dream and he volunteers to keep an eye on her teenage son."
  },

// .. the rest
]
Notice we used .replace(/\n/, "") , it removes every newline character and replaces it with an empty string for readability.
Let's fetch the image URLs.
Movie Image URLs
For image URLs, we try to extract the src attribute as a string from the images. Each image is enclosed in .lister-item-image div in an a tag. Since we just need the image's src attribute value and there are no similar elements with such a selector, we can directly look for the img tag in .lister-item-image.
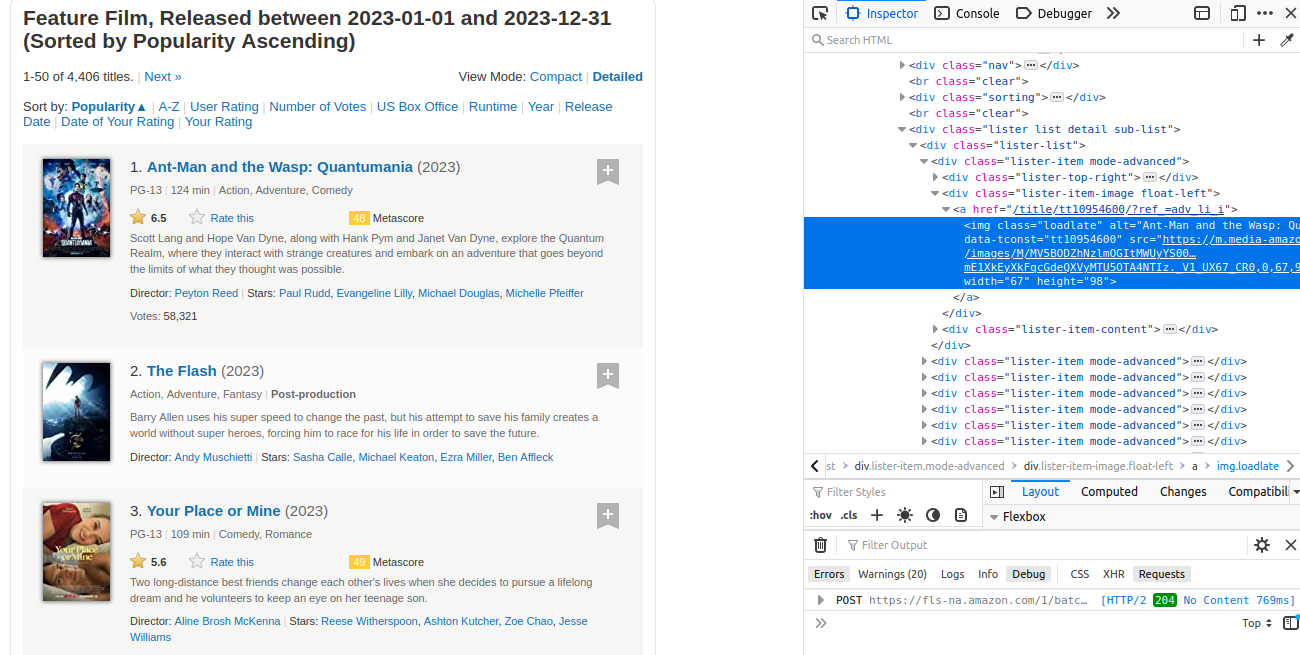
We will edit our code to take this into account.
// app.js
// In scrapeData()
    listItem.each((id, element) => {
      const movieTitle= $(element)
         .find('.lister-item-content')
         .find("h3").find("a").text();

      const description = $(element)
         .find('.lister-item-content')
         .find('p.text-muted:nth-of-type(2)')
         .text().replace(/\n/, "");
      const imageUrl = $(element)
        .find(".lister-item-image")
        .find("img").attr('src');

      movieList.push({
         title: movieTitle,
         description,
         imageUrl
        })
    })
//  ....Rest of the function
// Update your code and run npm start to see output
The .attr() is used to extract the value of an attribute of an HTML element. Now let's see the corresponding output.
[
  {
    title: 'Ant-Man and the Wasp: Quantumania',
    description: 'Scott Lang and Hope Van Dyne, along with Hank Pym and Janet Van Dyne, explore the Quantum Realm, where they interact with strange creatures and embark on an adventure that goes beyond the limits of what they thought was possible.',
    imageUrl: 'https://m.media-amazon.com/images/S/sash/4FyxwxECzL-U1J8.png'
  },
  {
    title: 'The Flash',
    description: 'Barry Allen uses his super speed to change the past, but his attempt to save his family creates a world without super heroes, forcing him to race for his life in order to save the future.',
    imageUrl: 'https://m.media-amazon.com/images/S/sash/4FyxwxECzL-U1J8.png'
  },
  {
    title: 'Your Place or Mine',
    description: "Two long-distance best friends change each other's lives when she decides to pursue a lifelong dream and he volunteers to keep an eye on her teenage son.",
    imageUrl: 'https://m.media-amazon.com/images/S/sash/4FyxwxECzL-U1J8.png'
  },
 // .. the rest
]
Now we are done getting the data, let's think about persisting data/information we just scraped. We can't just scrape data without storing it in a structured form or else our purpose for scraping is defeated.
Persisting Data in a JSON file
We need to store whatever we scraped in permanent storage, not temporary storage such as an array. Using the fs module, provided by Node.js, we will write the incoming data to a JSON file.
We will modify our code using the fs module to write to a newly created JSON file after storing our data in the array, movieList
Back to our code
// app.js
// Final code
const axios = require("axios");
const cheerio =  require("cheerio");
const fs =  require("fs")

const imdbUrl = "https://www.imdb.com/search/title/?year=2023&title_type=feature&";

const movieList = [];
const scrapeData = async (url) => {
   try{
    const {data} =  await axios.get(url);
    const $ =  cheerio.load(data);
    const listItem = $('.lister-item');
    listItem.each((id, element) => {
        const movieTitle= $(element)
          .find('.lister-item-content')
          .find("h3").find("a").text();

        const description = $(element)
          .find('.lister-item-content')
          .find('p.text-muted:nth-of-type(2)')
          .text().replace(/\n/, "");

        const imageUrl = $(element)
           .find(".lister-item-image")
          .find("img").attr('src');

        movieList.push({
            title: movieTitle,
            description,
            imageUrl
        });
    })
// Persist data to JSON file.
    fs.writeFile(
       'movies.json',
        JSON.stringify(movieList),
        (err) => {
        if (err) {
            throw Error("Error writing to file")
        }
        console.log("Data scraped and saved ....")

    })
   } catch(error){
    console.log(error)
   }
}
scrapeData(imdbUrl);
The output shown below:
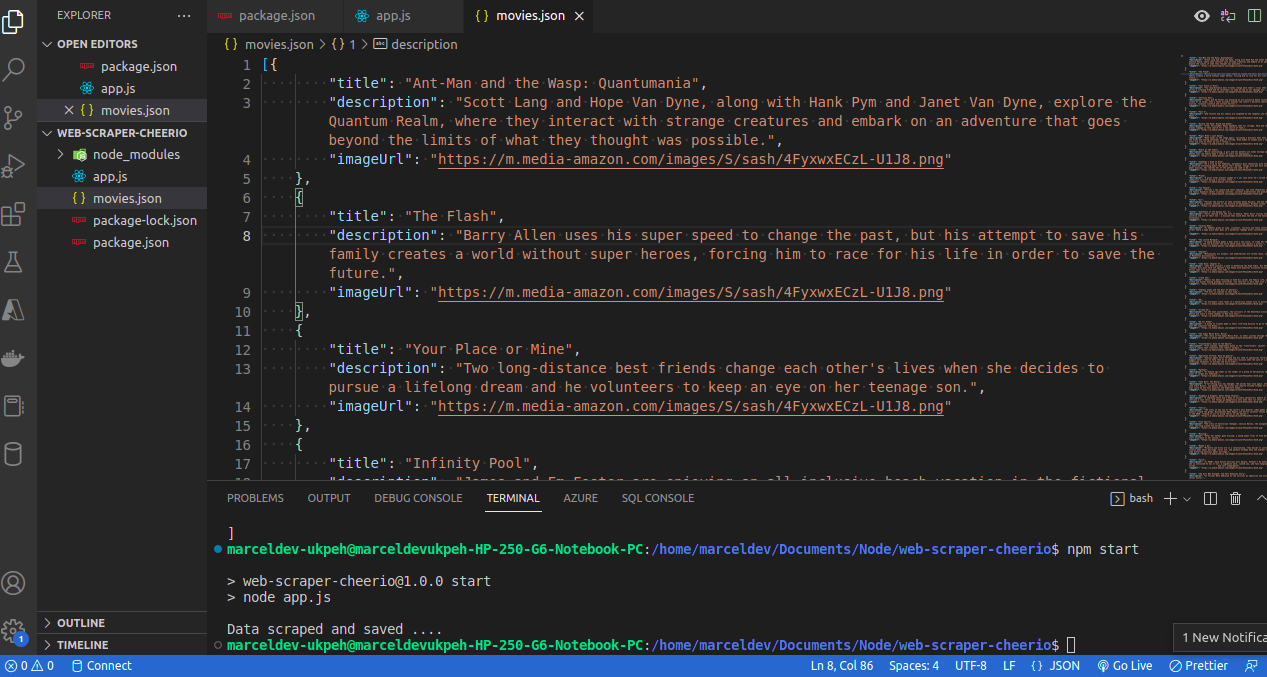
We can now store our data in a structured form as a JSON file using the fs module's writeFile method that took our data in JSON format(using JSON.stringify()) and wrote it to movies.json.
We can now use our movies.json file as we please for data analysis or to store it in a database.
Conclusion
So far, we have gone from getting unparsed data using Axios to structured data in a JSON file using our custom-built web scraper built with Node.js and Cheerio. Web scraping is a useful tool in a developer's toolkit to fetch data from websites of choice.
Despite all these perks, there are still limitations as not all sites can be scraped with Cheerio properly due to the dynamic rendering of elements using Javascript or in the case of Single Page Applications( built with a frontend framework). the solution to this limitation is using a headless browser library such as puppeteer which is a Node.js library that can access Chromium browser functionalities.
You can delve deeper by taking a look at Cheerio's documentation and also try to implement this web scraper using puppeteer.
Good luck!
Subscribe to my newsletter
Read articles from Ukpeh Michael directly inside your inbox. Subscribe to the newsletter, and don't miss out.
Written by

Ukpeh Michael
Ukpeh Michael
I am a developer passionate about building scalable systems