How To Containerize Your Website
 Akeem Oyebanji
GOALS:
To pack your website into a Docker image
Push your Docker image to Docker Hub
Prerequisites are
Must have Docker installed
A website code you want to host pushed to GitHub
Must have an Ubuntu 20.04 virtual machine running on any cloud provider.
Must have a docker hub account
CLONING YOUR PROJECT GITHUB REPO
first, we need to clone the GitHub repo that holds our website into a directory named my-website.
cd ~

git clone https://github.com/ProfAkymbo/myportfolio.git my-website
you need to put in your GitHub repo URL.
now after cloning this, we need to enter into the directory we cloned into.
cd my-website
CREATING THE DOCKERFILE
we need to package our website into an image.
and to do that we need to install docker.
INSTALLING DOCKER
let's go through these steps by running the following commads.
First, update your existing list of packages:
sudo apt update
Next, install a few prerequisite packages which let apt use packages over HTTPS:
sudo apt install apt-transport-https ca-certificates curl software-properties-common
Then add the GPG key for the official Docker repository to your system:
curl -fsSL https://download.docker.com/linux/ubuntu/gpg | sudo apt-key add -
Add the Docker repository to APT sources:
sudo add-apt-repository "deb [arch=amd64] https://download.docker.com/linux/ubuntu focal stable"
This will also update our package database with the Docker packages from the newly added repo.
apt-cache policy docker-ce
Finally
sudo apt install docker-ce
let's check that docker is running:
sudo systemctl status docker
you should get an output like this:

now that you have done that you will need to create a file called Dockerfile. use the command below:
nano ~/my-website/Dockerfile
when the file opens, copy the codes below into it
FROM nginx:alpine

COPY . /usr/share/nginx/html

WORKDIR /usr/share/nginx/html
so basically we are creating this image based on nginx.

Explanation of the above code is that the COPY module helps us copy all the files that we cloned from our GitHub account to the path /usr/share/nginx/html.
which is the default path where nginx hosts its webpage.
and lastly, we are changing the working directory to that path.
now we can save this file with CTRL O and exit with CTRL X
CREATING THE IMAGE
we have created our Docker file and we have docker installed.
now we can create our image.
to do that you can use the command below:
docker build -t profakymbo/myportfolio:1.0 .
the beginning of the tag should be your docker hub username.
the name of the application can come next.
the dot (.) at the end tells docker that it should build a file from our current directory.
now check that your image was created with this command:
docker image ls
output

REPOSITORY        TAG       IMAGE ID       CREATED         SIZE
profakymbo/myportfolio  1.0       1c62512f3a87   7 minutes ago   42.7MB
you should see a result like the above output.
PUSHING OUR IMAGE TO DOCKER HUB
now before we push this image we need to make sure that when we run the image it works perfectly well before using the image to build a container by using the command below:
docker run -d -p 80:80 profakymbo/myportfolio:1.0
In the command above we run the image in a detached mode. Also, we are opening port 80 on the container and port 80 on our virtual machine.
we can now check our running container with the command below:
docker ps
outputs

CONTAINER ID   IMAGE                 COMMAND                  CREATED          STATUS          PORTS                               NAMES
ffb268bb3980   profakymbo/myportfolio:1.0   "/docker-entrypoint.…"   39 seconds ago   Up 38 seconds   0.0.0.0:80->80/tcp, :::80->80/tcp   eloquent_allen
you should have an output like the one above to show that our container is running on port 80. To check on our browser to be sure that our image is working, take the public IP address of your virtual machine and paste it into your browser.
you can get it from your terminal with this command:
hostname -I | awk '{print $1}'


and that's it!
now we need to push our image to the docker hub. To do that we need to first log in to our docker account from our terminal with this command:
docker login
and when you do this you will see a prompt that asks you for your username and for your password
NOTE: as you type the password it’s not going to show on the screen.
now we can push our image with the command below:
docker push profakymbo/myportfolio:1.0
note that it is a must that your docker hub username comes first. if not,
there will be an error saying you do not have access to the library, which is the official docker library.
but with your username in front, docker knows that you want to push this particular image to a repository owned by you.
when you are done pushing you should see an output like this:
The push refers to repository [docker.io/profakymbo/myportfolio]
5f70bf18a086: Pushed
fde565bb57fb: Pushed
042cd3f87f43: Layer already exists
f1bee861c2ba: Layer already exists
c4d67a5827ca: Layer already exists
152a948bab3b: Layer already exists
5e59460a18a3: Layer already exists
d8a5a02a8c2d: Layer already exists
7cd52847ad77: Layer already exists
1.0: digest: sha256:bb39e39ecc443be84fb9e6518f36873bac01b313680ffa4f847313377b9dec32 size: 2198

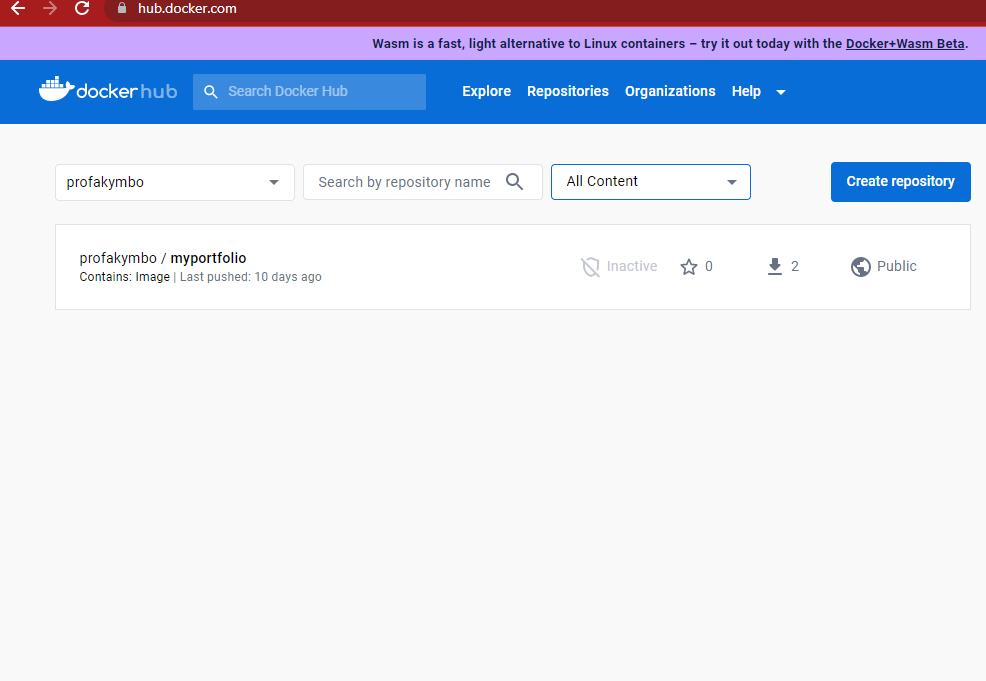
and as you can see in my docker hub account. the image is created.
Subscribe to my newsletter
Read articles from Akeem Oyebanji directly inside your inbox. Subscribe to the newsletter, and don't miss out.
Written by

Akeem Oyebanji
Akeem Oyebanji
Cloud || Data || DevOps Engineer, and a passionate Technical Writer who loves sharing knowledge, making it easy for others to understand.