Connect Spring Webflux with AstraDB- Cassandra database. CRUD operations.
 uday kumar
Table of contents
Introduction
Spring WebFlux is a reactive web framework that is built on top of the Reactive Streams API. It is designed to help developers build scalable and responsive web applications using reactive programming principles.
AstraDB is a distributed NoSQL database service on the cloud that is built on top of the Apache Cassandra open-source database. It provides a fully managed and scalable database service that can be used to build cloud-native applications.
In this blog, we will explore the connection between Spring WebFlux and AstraDB.
The complete code related to this blog is available on my GitHub page.
https://github.com/utronics/webflux-astradb
We'll need
Java > 8.
AstraDB Multi-cloud DBaaS Built on Apache Cassandra.
Setting up the database
- Login into your AstraDB Account and create the database:
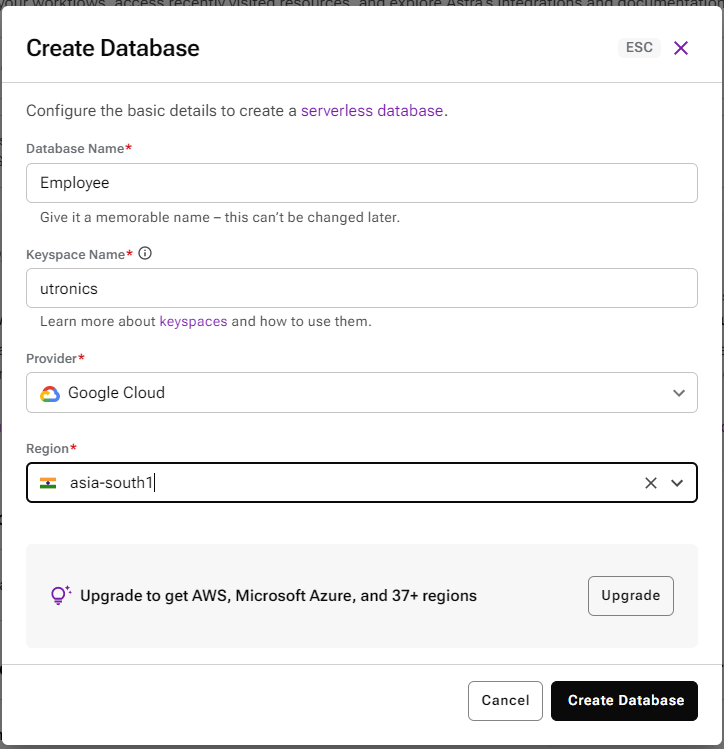
- Goto CQL console section after creating the database and create a table.
CREATE TABLE keyspace_name.employee(
  id int PRIMARY KEY,
  name text,
  dept text,
  salary bigint
);
- From connect tab download the Secure Connect Bundle 🎁.

- Open settings and under Token Management generate and download the token, we will be needing the Secure Connect Bundle and the tokens later for connection.

Our database is all set.
Dependencies required
Add the following dependencies while generating the project using Spring Initializer.
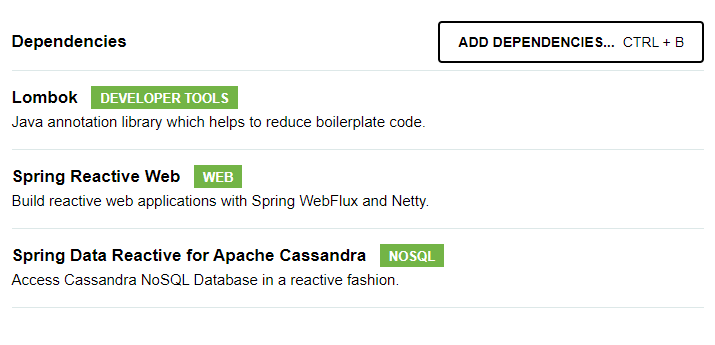
Additionally, add the following dependencies in your pom.xml if want swagger UI for your REST endpoints.
        <dependency>
            <groupId>org.springdoc</groupId>
            <artifactId>springdoc-openapi-webflux-core</artifactId>
            <version>1.6.14</version>
        </dependency>
        <dependency>
            <groupId>org.springdoc</groupId>
            <artifactId>springdoc-openapi-webflux-ui</artifactId>
            <version>1.6.14</version>
        </dependency>
create the model class
@Data
public class Employee {

    @Id
    @PrimaryKeyColumn(name = "id", ordinal = 0, type = PrimaryKeyType.PARTITIONED)
    @CassandraType(type = CassandraType.Name.INT)
    private int id;
    @Column("name")
    @CassandraType(type = CassandraType.Name.TEXT)
    private String name;
    @Column("dept")
    @CassandraType(type = CassandraType.Name.TEXT)
    private String dept;
    @Column("salary")
    @CassandraType(type = CassandraType.Name.BIGINT)
    private long salary;
}
Code Explanation
@PrimaryKeyColumn annotation is used to specify that the id field is the first partition key of the Cassandra table. The ordinal attribute is used to specify the position of the field in the primary key. In this case, the id field is the only partition key, so its ordinal is 0create repository interface
public interface EmployeeRepository extends ReactiveCassandraRepository<Employee, Integer> {


}
ReactiveCassandraRepository provided by Spring Data Cassandra. This interface provides a set of predefined methods for interacting with the Cassandra database, including CRUD (create, read, update, delete) operations.
Connect the application with the database
Paste the following in application.yml file.
 spring:
  data:
    cassandra:
      keyspace-name:
      username: #Client ID - get from Token
      password: #Client Secret - get from Token
      schema-action: create-if-not-exists
      request:
        timeout: 10s
      connection:
        connect-timeout: 10s
        init-query-timeout: 10s
datastax.astra:
  secure-connect-bundle: #Path of the connect bundle zip file.
astra.db:
  id: #Datacenter ID
  region: #region
  keyspace: #keyspace-name
  application.token: #Token
copy the Secure Connect Bundle 🎁 to the resources folder.
replace "#Path of the connect bundle zip file". with connect bundle filename
username, password and application.token from the downloaded token.
In the overview tab of your database in Astradb get the region and data center id.
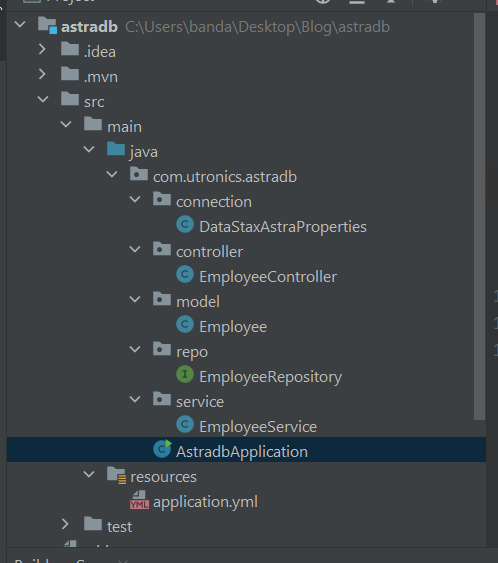
Here is my project structure:
Connection Configuration Class
@ConfigurationProperties(prefix = "datastax.astra")
public class DataStaxAstraProperties {
    private File secureConnectBundle;


    public File getSecureConnectBundle() {
        return secureConnectBundle;
    }

    public void setSecureConnectBundle(File secureConnectBundle) {
        this.secureConnectBundle = secureConnectBundle;
    }

}
DataStaxAstraProperties Class is used to specify configuration properties for connecting to an Astra database. The @ConfigurationProperties annotation is used to bind the properties defined in the application.properties or application.yml file to this class.
In this case, the prefix datastax.astra is specified, which means that all properties starting with datastax.astra in the configuration file will be mapped to properties in this class. For example, if the datastax.astra.secure-connect-bundle property is defined in the configuration file, it will be mapped to the secureConnectBundle field in this class.
The secureConnectBundle field is of type File and represents the location of the secure connect bundle file that is used to connect to an Astra database. The getSecureConnectBundle() and setSecureConnectBundle(File) methods are accessor methods for this field.
Main Class
@SpringBootApplication
@OpenAPIDefinition(info = @Info(
      title = "AstraDB Application",
      version = "1.0",
      description = "Cassandra Demo"
))
@EnableConfigurationProperties(DataStaxAstraProperties.class)
public class AstradbApplication {

   public static void main(String[] args) {
      SpringApplication.run(AstradbApplication.class, args);
   }

   @Bean
   public CqlSessionBuilderCustomizer sessionBuilderCustomizer(DataStaxAstraProperties astraProperties) {
      Path bundle = astraProperties.getSecureConnectBundle().toPath();
      return builder -> builder.withCloudSecureConnectBundle(bundle);
   }
}
The @OpenAPIDefinition annotation is used to specify metadata for the OpenAPI Swagger documentation.
The @EnableConfigurationProperties annotation is used to enable the use of configuration properties in the application. In this case, it enables the use of the DataStaxAstraProperties class for configuring the connection to an Astra database.
The bean CqlSessionBuilderCustomizerwhich takes a single argument of type DataStaxAstraProperties. This argument is used to access the secureConnectBundle property from the DataStaxAstraProperties class, which helps in connecting to our cloud instance of Cassandra database.
Service layer
@Service
public class EmployeeService {
    @Autowired
   private EmployeeRepository employeeRepository;

    public Flux<Employee> getAllEmployees(){
       return employeeRepository.findAll().onErrorResume(e -> Flux.just(new Employee()));
   }
    public Mono<Employee> getEmployeeById(int id){
       return employeeRepository.findById(id);
   }

   public Mono<Employee> insertEmployee(Employee employee){
       return employeeRepository.insert(employee);
   }

   public Mono<Employee> updateEmployee(Employee employee){
       return employeeRepository.save(employee);
   }

   public Mono<Void> deleteEmployee(Integer id){
       return employeeRepository.deleteById(id);
   }
}
Controller
@RestController
public class EmployeeController {

    @Autowired
    private EmployeeService employeeService;
    @GetMapping("/getAllEmployees")
    public Flux<Employee> getAll(){
        return employeeService.getAllEmployees();
    }
    @GetMapping("/getEmployeeById/{id}")
    public Mono<Employee> getById(@PathVariable Integer id){
        return employeeService.getEmployeeById(id);
    }
    @PostMapping("/insertEmployee")
    public Mono<Employee> insertEmployee(@RequestBody Employee employee){
        return employeeService.insertEmployee(employee);
    }
    @PutMapping("/updateEmployee")
    public  Mono<Employee> updateEmployee(@RequestBody Employee employee){
        return employeeService.updateEmployee(employee);
    }
    @DeleteMapping("/deleteEmployee/{id}")
    public Mono<Void> deleteEmployee(@PathVariable Integer id){
        return employeeService.deleteEmployee(id);
    }
}
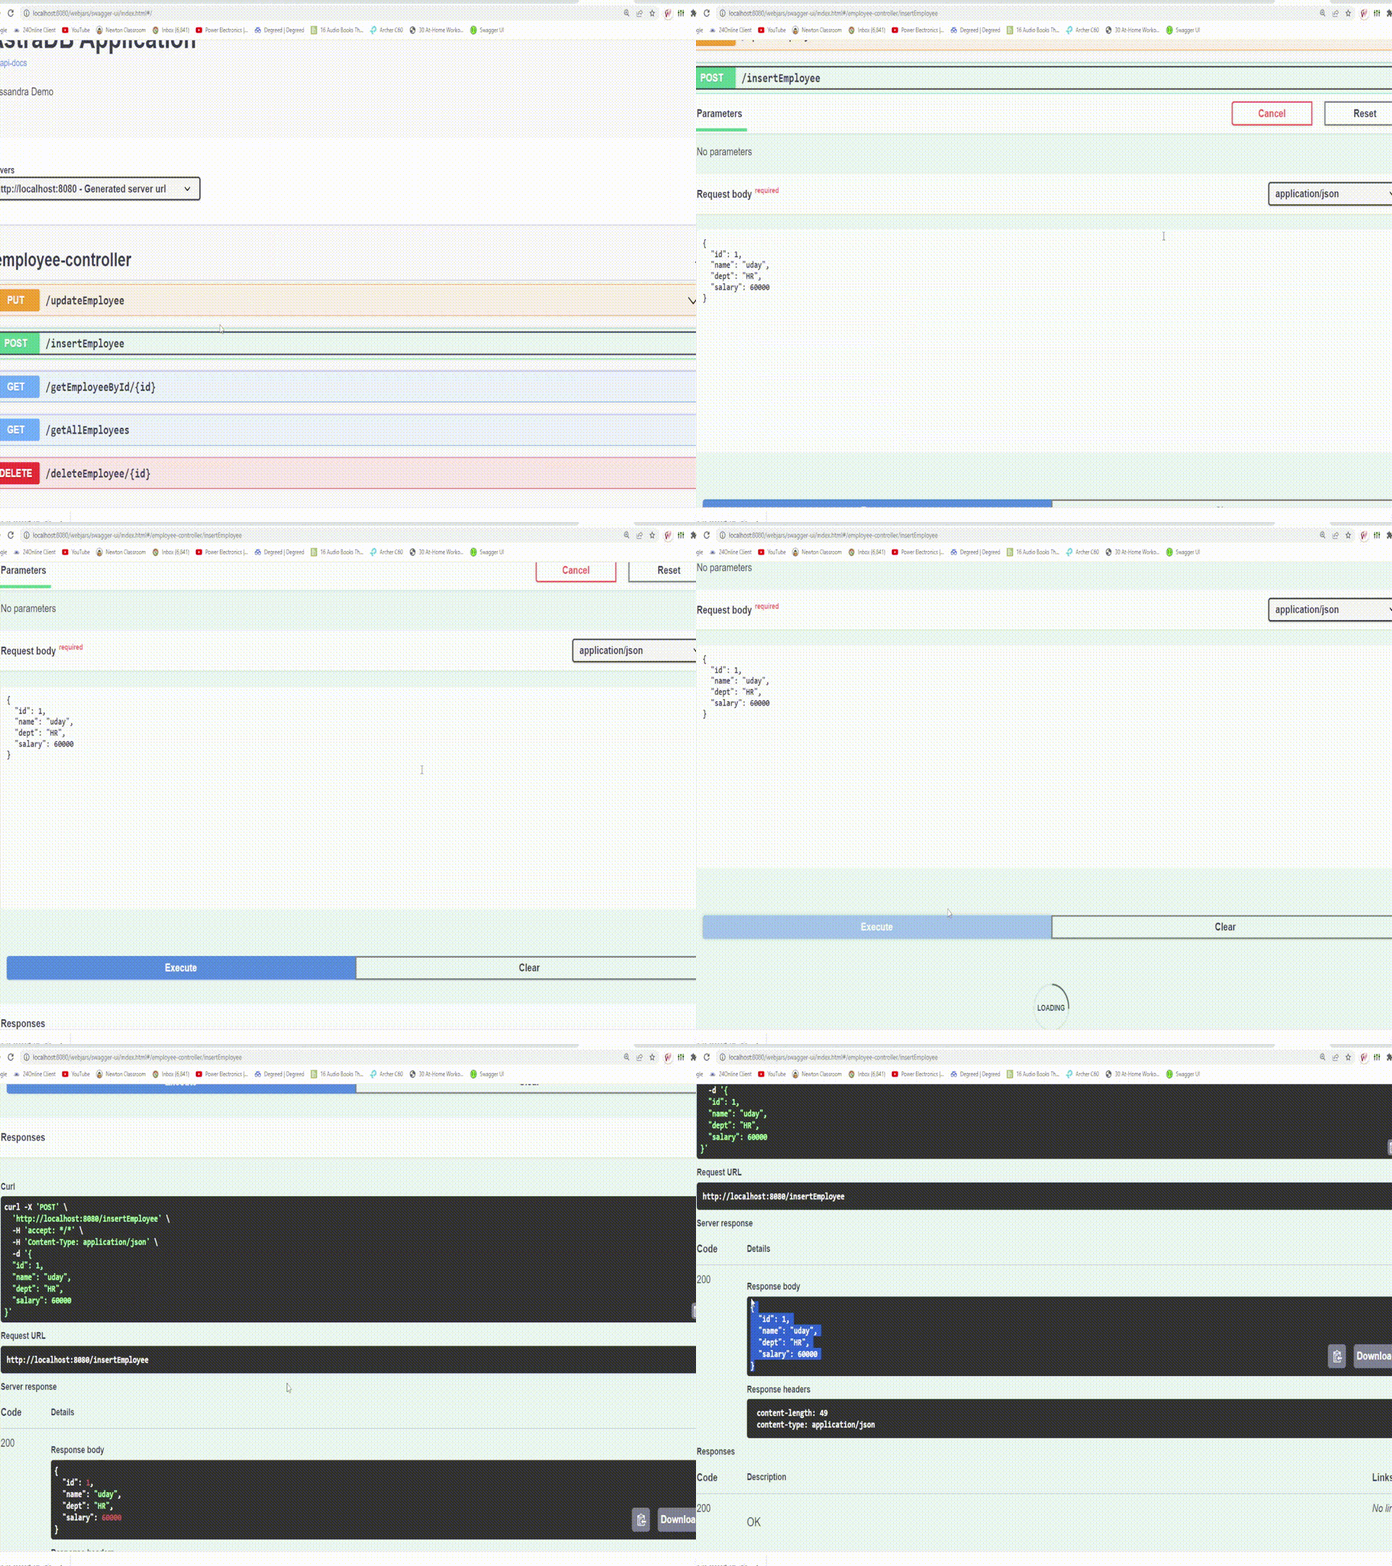
Url of swagger UI :
http://localhost:8080/webjars/swagger-ui/index.html#/
Conclusion
That is it for this article. I hope you found this article useful, if you need any help please let me know in the comment section.
Subscribe to my newsletter
Read articles from uday kumar directly inside your inbox. Subscribe to the newsletter, and don't miss out.
Written by

uday kumar
uday kumar
I'm a Full Stack Developer and Technical Content Writer with expertise in building robust web applications.