A powerful React and TailwindCSS to-do list app [part 1]
 Franklin Mayoyo
The most comprehensive step-by-step guide to building a to-do list app. I will walk through the process of creating a simple yet powerful to-do list app using React and Tailwind CSS. We'll also learn how to persist data locally using the LocalStorage API.
Interact with the complete app at todo.
I explained every step. I dare you to point me to a better tutorial than this one, even a video! I'll be waiting.
The reason why I have spent more than 50 hours writing this article is because of the struggle I had when I was following tutorials. The tutor tells you to do ABC but doesn't explain what happens behind the scenes.
So I took the challenge. You can tell me how I performed in the comment section.
This is guide is designed in an easy-to-follow manner with instructions and code samples.
I have also included a section called side notes✍📝 where I add additional information to help you understand some React, Tailwind CSS, and JavaScript concepts.
To save you some time, here are some of the things we'll do during this session.
Learn how to use
React.jsat the advanced level.Learn to use React hooks
useEffectanduseState.Use
localStorage APIto persist our data.How to use es6+
arrow functions, spread operator, and object destructuring.Learn to handle Form inputs.
Learn
Tailwind CSSdesign basics.Learn how to do
conditional renderinganddefault data setup.How to reduce the number of
Tailwind CSS classesand keep our code clean with utilities.How to implement
Add Task, and delete task(s).How to use
create viteCLI to set up our projectHow to import and use SVG icons from
Heroicons.How to use
gitandgithub.How to deploy our app to the internet.
Use
uuidto generate unique IDs (bonus 😂)
By the end of this tutorial, we'll have a fully functional to-do list app that stores our tasks locally, allowing us to pick up where we left off even if we close the browser.
I designed the guide in a way that you can skip some parts. In the parenthesis, you'll see (you can skip this part) or side note✍📝 for information that you can skip.
Let's get started and build a to-do list app that's both practical and impressive!
1. The Set up guide (you can skip this part)
I assume you know how to use an editor and browser. Make sure to use any code editor or browser of your choice.
For clarity am using vs code terminal to run commands. The main reason is that I like using some Linux-specific commands that don't work on windows cmd or powershell. For example, touch which has a weird <type null> alternative in windows cmd. (Though I'll use none.😂)
If you want to set git bash as your default shell, open settings using the shortcut ctrl + , (combine control and a comma).
You can also use the manual approach without necessarily making, git bash, your default.
Open the setting UI (top right) and add the code below
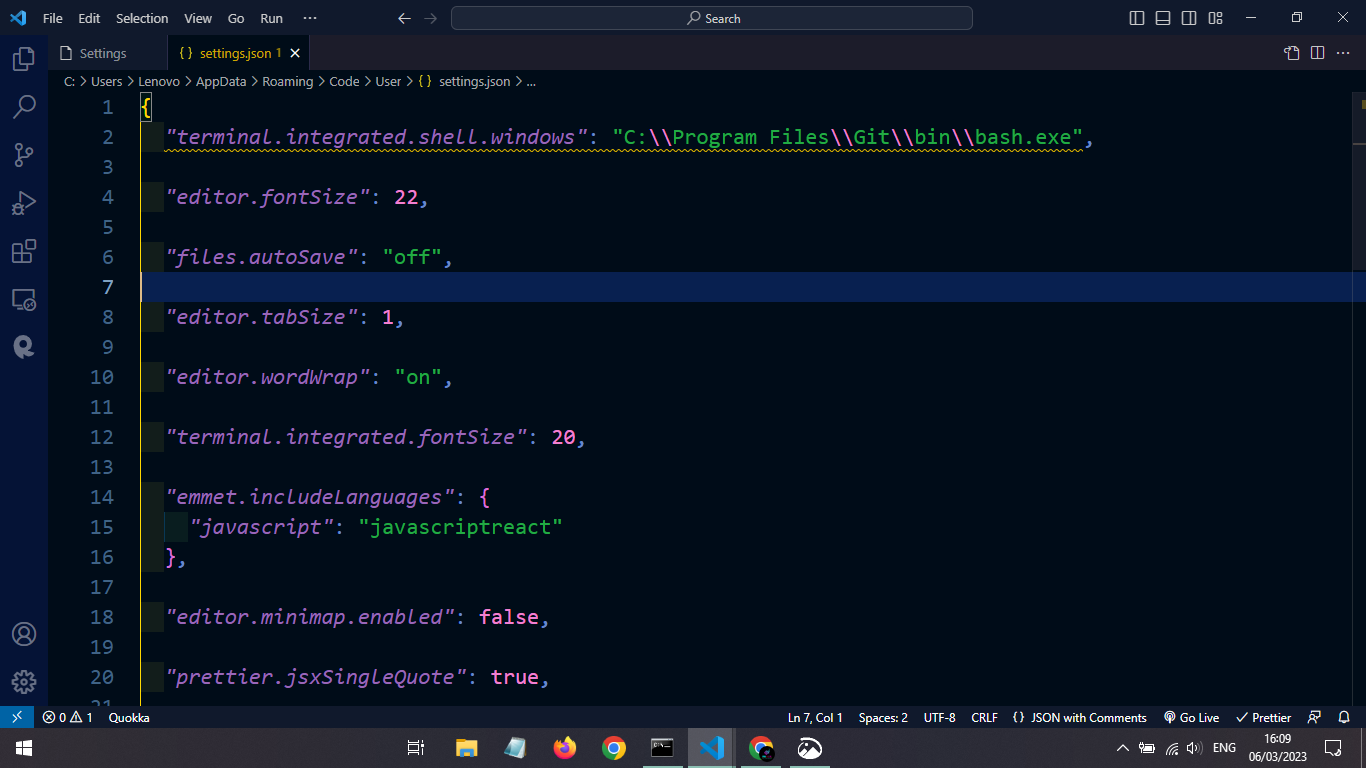
"terminal.integrated.shell.windows": "C:\\Program Files\\Git\\bin\\bash.exe"
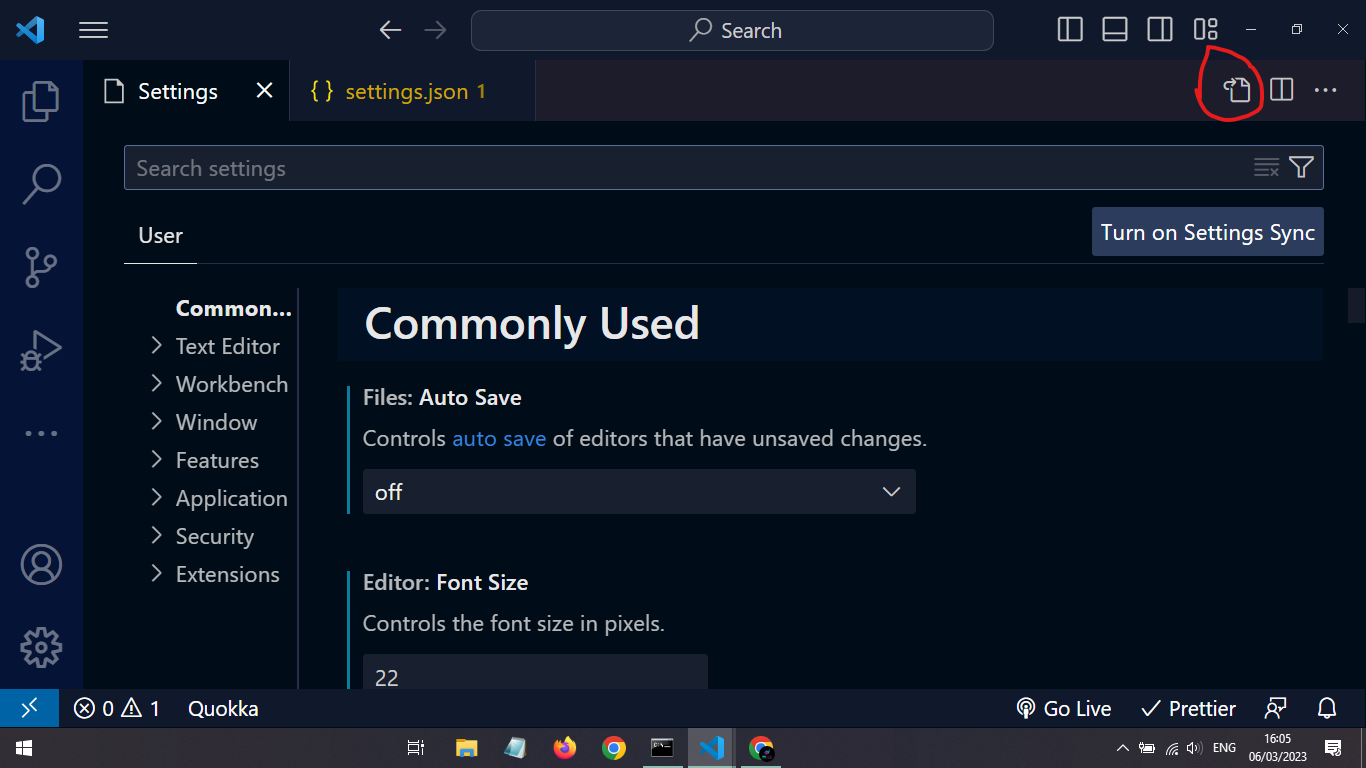
Like this 👇👇
Now open the terminal, create a folder, and give it a name.
Or you can create the folder manually.
// step 1: I create folder in desktop and go to the folder
mkdir todo-app && cd todo-app
// open the folder in vs code
code .
In the Terminal use npm create vite to set up a project.
npm create vite
I'll use the same folder name as my project name so let's go with ./ like this.

Choose React 👇
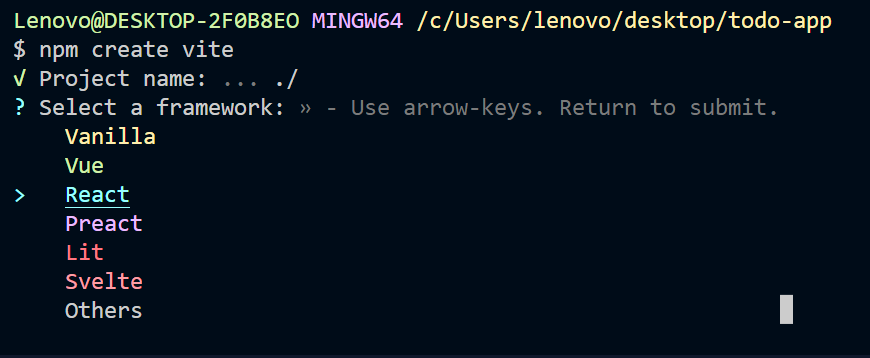
Use JavaScript 👇

Run npm install to download/install the relevant packages (react and react-dom)
npm install
Let's install Tailwindcss as a dev dependency.
npm install -D tailwindcss postcss autoprefixer
Let us initialize tailwindcss.
npx tailwindcss init -p
A new file tailwind.config.cjs was created. Open it.
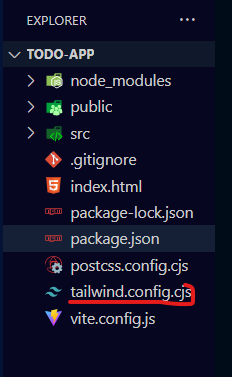
Replace content with:
  content: [
    "./index.html",
    "./src/**/*.{js,ts,jsx,tsx}",
  ],
Your code should look like this.
/** @type {import('tailwindcss').Config} */
module.exports = {
  content: ['./index.html', './src/**/*.{js,ts,jsx,tsx}'],
  theme: {
    extend: {},
  },
  plugins: [],
}
Next, go to the src folder and delete the file App.css.
Now open index.css, and delete the code inside. Then add this 👇
@tailwind base;
@tailwind components;
@tailwind utilities;
We are done with the setup part👏.
2. Working on the actual App starts...⚒
Open App.jsx delete the boilerplate code and create a simple App component.
Let's add some styling using Tailwind CSS classes.
Background color red will do for testing purposes 😂. Let's change the text color and font size as well.
const App = () => {
  return (
    <div>
      <h1 className='bg-red-700 text-white text-xl'>Priview working</h1>
    </div>
  )
}
export default App
Now open Terminal and run the development server.
npm run dev
Navigate to your browser using the link provided by vite in the Terminal. http://localhost:5173/or simply click the letter 'o' on your keyboard to open.
If you are using a Chrome browser like me you should see.
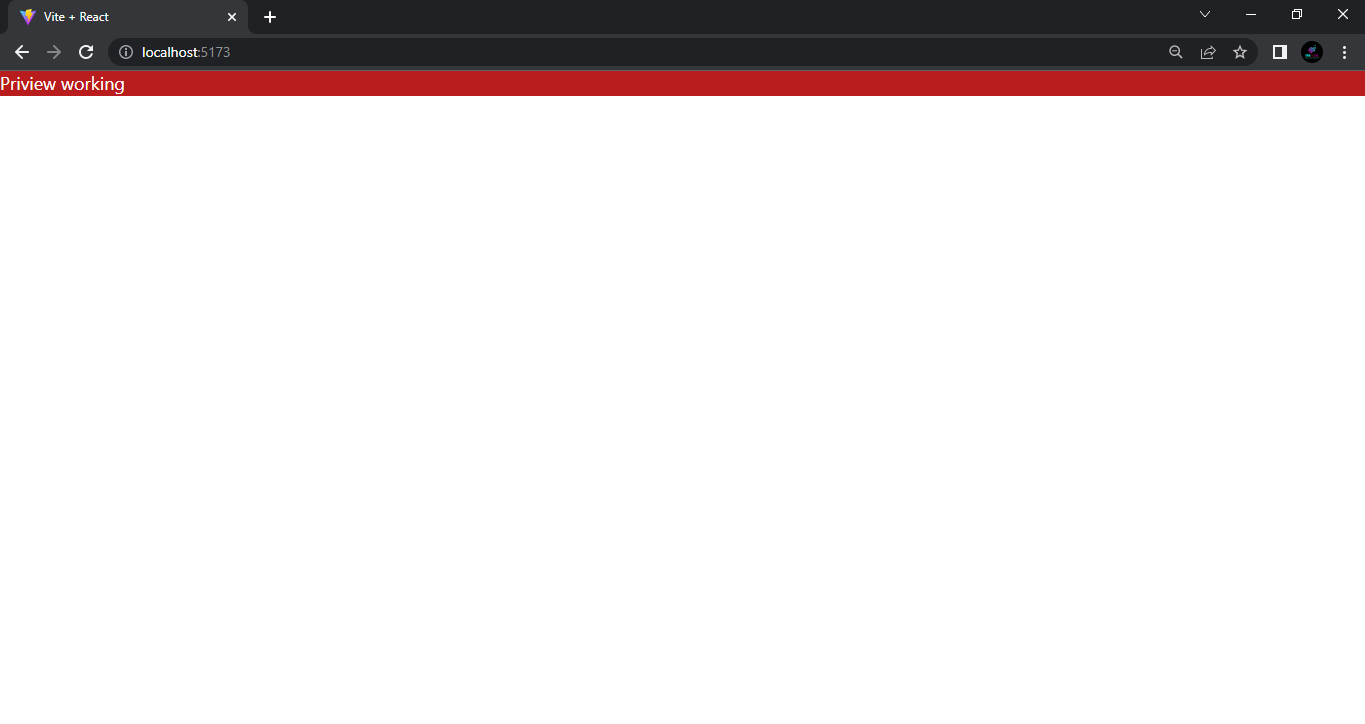
Other browsers will work fine as well. I don't know about IE though 😂.
Now let us edit the App.jsx content to return more meaningful JSX.
First, we need form button elements.
Your code should look like👇
const App = () => {
  return (
    <main>
      <div>
        <form>
          <label htmlFor='taskInput'>Task:</label>
          <input type='text' id='taskInput' placeholder='Go to meeting'/>
          <button>Add Task</button>
        </form>
      </div>
    </main>
  )
}
export default App
In the browser, you should see.

Let's do some styling for our component by adding a few Tailwind CSS classes (we'll discuss them later).
Your code should look similar to 👇
const App = () => {
  return (
    <main className='flex justify-center items-center min-h-screen'>
      <div className='bg-black p-7 rounded-2xl  flex justify-around items-center flex-col'>
        <form>
          <label
            htmlFor='taskInput'
            className='text-2xl text-white px-3 font-semibold'
          >
            Task:
          </label>
          <input type='text' id='taskInput' placeholder='Go to meeting' />
          <button className='text-lg bg-sky-900 rounded-lg px-3 py-1 ml-3 text-white font-medium'>
            Add Task
          </button>
        </form>
      </div>
    </main>
  )
}
export default App
The browser should display.
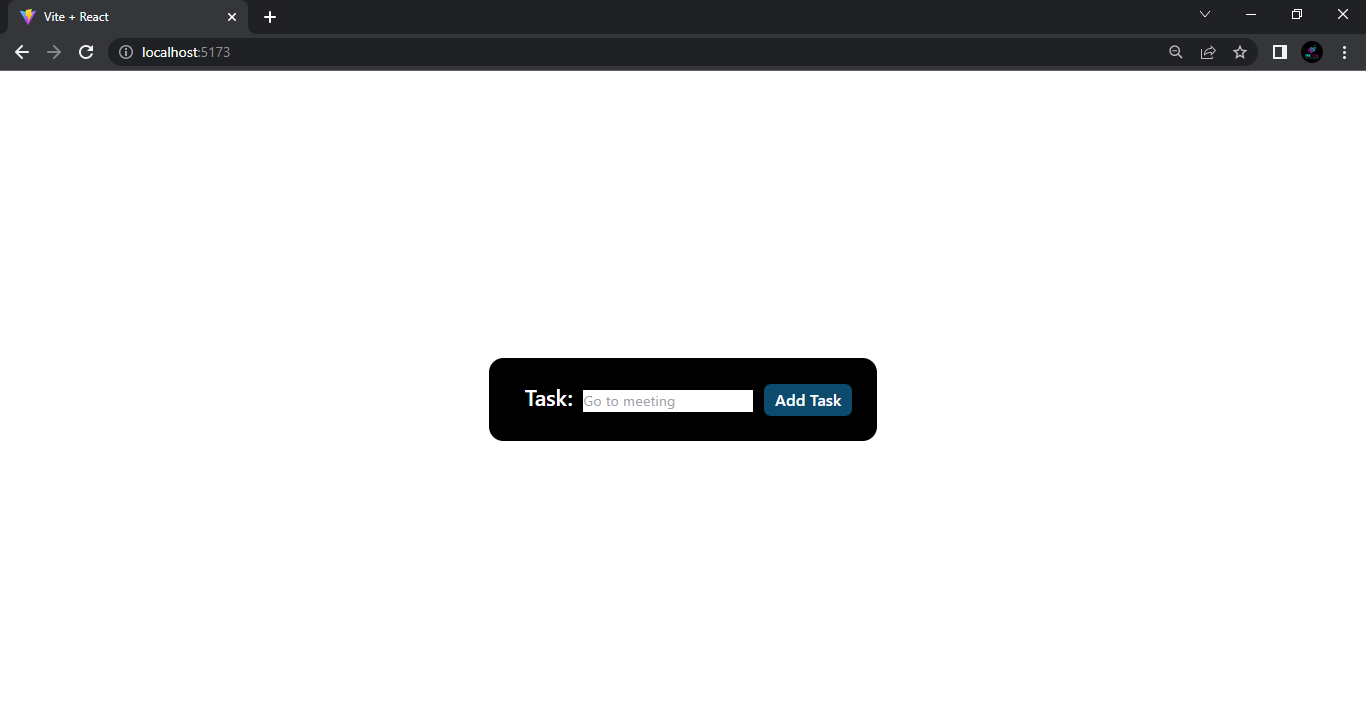
But wait! doesn't our app look ugly with these many classes?
What if we had a way of modifying and cleaning it? And do all our styling in the rightful file index.css.
You can also use an extension like inline fold to hide the classes. I won't use it here because I want to keep my styles in index.css.
Tailwind CSS utility layer
Tailwind CSS provides a solution for reducing the number of classes using the utility layer.
Here, we create a single utility class and set all our styling classes in the utility class.
Then we reference the styles with just the one utility class we created.
Let's open index.css and create a utility class called .parent-container and add all the classeNames from the main element to the new class .parent-container.
Here is what the index.css looks like before we create the utility class.
@tailwind base;
@tailwind components;
@tailwind utilities;
We will use the @layer directive to define a new layer in which custom utilities can be defined. In this case, the layer is called utilities.
Define a new utility class called .parent-container in the utilities layer of Tailwind CSS.
.parent-container is a class selector that we will add to our main element in the App.jsx component to apply the styles defined (just like we add classes in CSS).
Now using @apply a Tailwind directive let's apply our styling classes.
In this case, the flex justify-center items-center min-h-screen classes will be applied to any element with the .parent-container class.
The code in index.css should look like this👇
@tailwind base;
@tailwind components;
@tailwind utilities;

@layer utilities {
  .parent-container {
    @apply flex justify-center items-center min-h-screen;
  }
}
In the App.jsx, instead of the many classes in our main element, let's use the utility class parent-container that holds our styles.
Like this 👇
const App = () => {
  return (

//add parent-container to main
    <main className='parent-container'>
      <div className='bg-black p-7 rounded-2xl  flex justify-around items-center flex-col'>
        <form>
          <label
            htmlFor='taskInput'
            className='text-2xl text-white px-3 font-semibold'
          >
            Task:
          </label>
          <input type='text' id='taskInput' placeholder='Go to meeting' />
          <button className='text-lg bg-sky-900 rounded-lg px-3 py-1 ml-3 text-white font-medium'>
            Add Task
          </button>
        </form>
      </div>
    </main>
  )
}
export default App
Do you see how the component is becoming lighter? Now we're unstoppable! 🚀
Let's create some more utility classes for the other elements as well.
Here is what my App.js and index.css look like this after editing.
index.css👇
@tailwind base;
@tailwind components;
@tailwind utilities;

@layer utilities {
  .parent-container {
    @apply flex justify-center items-center min-h-screen;
  }
  .content {
    @apply bg-black p-7 rounded-2xl  flex justify-around items-center flex-col;
  }
  .input-label {
    @apply text-2xl text-white px-3 font-semibold;
  }
  .add-btn {
    @apply text-lg bg-sky-900 rounded-lg px-3 py-1 ml-3 text-white font-medium;
  }
}
App.jsx👇
const App = () => {
  return (
    <main className='parent-container'>
      <div className='content'>
        <form>
          <label htmlFor='taskInput' className='input-label'>
            Task:
          </label>
          <input type='text' id='taskInput' placeholder='Go to meeting' />
          <button className='add-btn'>Add Task</button>
        </form>
      </div>
    </main>
  )
}
export default App
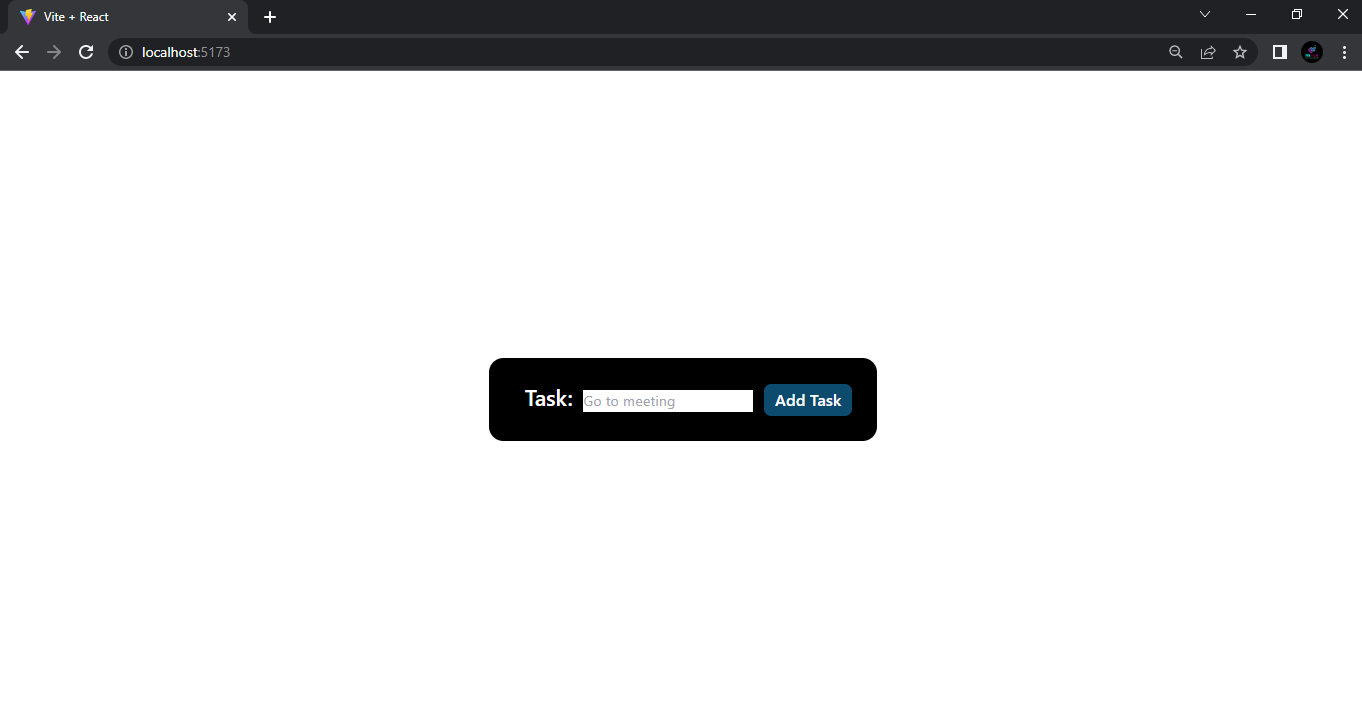
Now see how clean our component is!
The app should display just fine in the browser without any errors.
Side Note✍📝 (Read only)
If you are curious about what the Tailwind classes we used do, here is the same code written in pure CSS.
/* flex justify-center items-center min-h-screen */
.parent-container {
  display: flex;
  justify-content: center;
  align-items: center;
  min-height: 100vh;
}

/* bg-black p-7 rounded-2xl flex justify-around items-center flex-col */
.container {
  background-color: black;
  padding: 1.75rem;
  border-radius: 1rem;
  display: flex;
  justify-content: space-around;
  align-items: center;
  flex-direction: column;
}

/* text-2xl text-white px-3 font-semibold */
.title {
  font-size: 1.5rem;
  color: white;
  padding: 0.75rem;
  font-weight: 600;
}

/* text-lg bg-sky-900 rounded-lg px-3 py-1 ml-3 text-white font-medium */
.button {
  font-size: 1.125rem;
  background-color: #2d3748;
  border-radius: 0.5rem;
  padding: 0.375rem 0.75rem;
  margin-left: 0.75rem;
  color: white;
  font-weight: 500;
}
You can use the Tailwind CSS docs to learn more. It is really easy to use.
Just search for the style you want.
Or use pure CSS if you don't like tailwindcss.
...end of side note.🔚
Handling form submission
side note ✍📝
First, by default, when you add a button inside a form, the button is treated as a submit button unless you explicitly specify its type to something else like button using the type attribute. If the type is not specified or is set to submit, clicking the button will submit the form and trigger the onSubmit event (if the onSubmit event is in the form).
Second, in the browser, do you notice that if you click the button, there is a quick reload of the app?
By default, if you click the button, the browser will automatically submit the form unless you prevent this behavior.
Since we are developing the website locally on http://localhost:5173/, submitting the form without specifying a destination URL will result in the form data being submitted to the same URL as the page containing the form. In this case, the URL would be http://localhost:5173/.
...end of side note🔚
In our button let us add type='submit' just for screen readers(since we'll have only one button within the form anyway😂)
const App = () => {
  return (
    <main className='parent-container'>
      <div className='content'>
        <form>
          <label htmlFor='taskInput' className='input-label'>
            Task:
          </label>
          <input type='text' id='taskInput' placeholder='Go to meeting'/>
          {/* add type to the button bellow */}
          <button className='add-btn' type='submit'>
            Add Task
          </button>
        </form>
      </div>
    </main>
  )
}
export default App
To prevent the default form submission behavior, we will need to create the handler function for the form. We can call it handleSubmit().
To prevent the default behavior of form submission in JavaScript, we pass an event parameter to the handler function handleSubmit().
This parameter can be named anything, but it's common to use event or e.
We can then call the preventDefault() method on the event parameter to prevent the default behavior from occurring when the form is submitted.
Then pass the event handler function handleSubmit() to the onSubmit event in the form.👇
const App = () => {
//Our form event handler function
  const handleSubmit = (e) => {
    e.preventDefault()
  }
  return (
    <main className='parent-container'>
      <div className='content'>
    //Pass the function to the form onSubmit
        <form onSubmit={handleSubmit}>
          <label htmlFor='taskInput' className='input-label'>
            Task:
          </label>
          <input type='text' id='taskInput' placeholder='Go to meeting'/>
          {/* add type to the button bellow */}
          <button className='add-btn' type='submit'>
            Add Task
          </button>
        </form>
      </div>
    </main>
  )
}
export default App
We've now prevented default form submission.
You deserve applause for making it this far.👏
Getting and storing form input data.
Our app has been set up, and now we need to retrieve the tasks and store them in a variable for future use.
Our first hook
side note ✍📝
React is a JavaScript library that helps us create user interfaces (UIs) with predictable and efficient state management.
However, it's important to note that React doesn't automatically manage the state of our app.
To manage state changes, we need to use React's state management tools, such as the useState hook.
The useState hook is a powerful function that allows functional components to have state variables.
When we call the useState hook, we pass in the initial state as the first argument and a function to update the state value as the second argument.
Explicitly managing the state of our components using React's state management tools ensures that our components are updated only when necessary, resulting in high-performance and responsive user interfaces.
This means that when data changes, React knows about it and can re-render the necessary components efficiently.
... end of side note🔚
Let's import useState from react and use it to monitor changes in our app.
Now declare the state const [tasks, setTasks] = useState([])
We use the useState() hook to manage the state of our tasks.(add and delete task(s) in our app).
At the start, we set the current state tasks to an empty array [].
Later, we'll use setTasks() function to update our tasks.
For each task, we will create an object with a unique id, and a title. The title will hold the task string.
Then add the object to the array [].
//import useState
import { useState } from 'react'

const App = () => {
//set the state
  const [tasks, setTasks] = useState([])
  const handleSubmit = (e) => {
//prevent form submission
    e.preventDefault()
  }
  return (
    <main className='parent-container'>
      <div className='content'>
        <form onSubmit={handleSubmit}>
          <label htmlFor='taskInput' className='input-label'>
            Task:
          </label>
          <input type='text' id='taskInput' placeholder='Go to meeting'/>
          {/* add type to the button bellow */}
          <button className='add-btn' type='submit'>
            Add Task
          </button>
        </form>
      </div>
    </main>
  )
}
export default App
Very important!
Pay more attention to this part.
We want to add some functionality to our handleSubmit() function.
But first, let's see how we can go about it.
  const handleSubmit = (e) => {
    e.preventDefault()
  }
Let's log the event to the browser console.
  const handleSubmit = (e) => {
    e.preventDefault()
    console.log(e)
  }
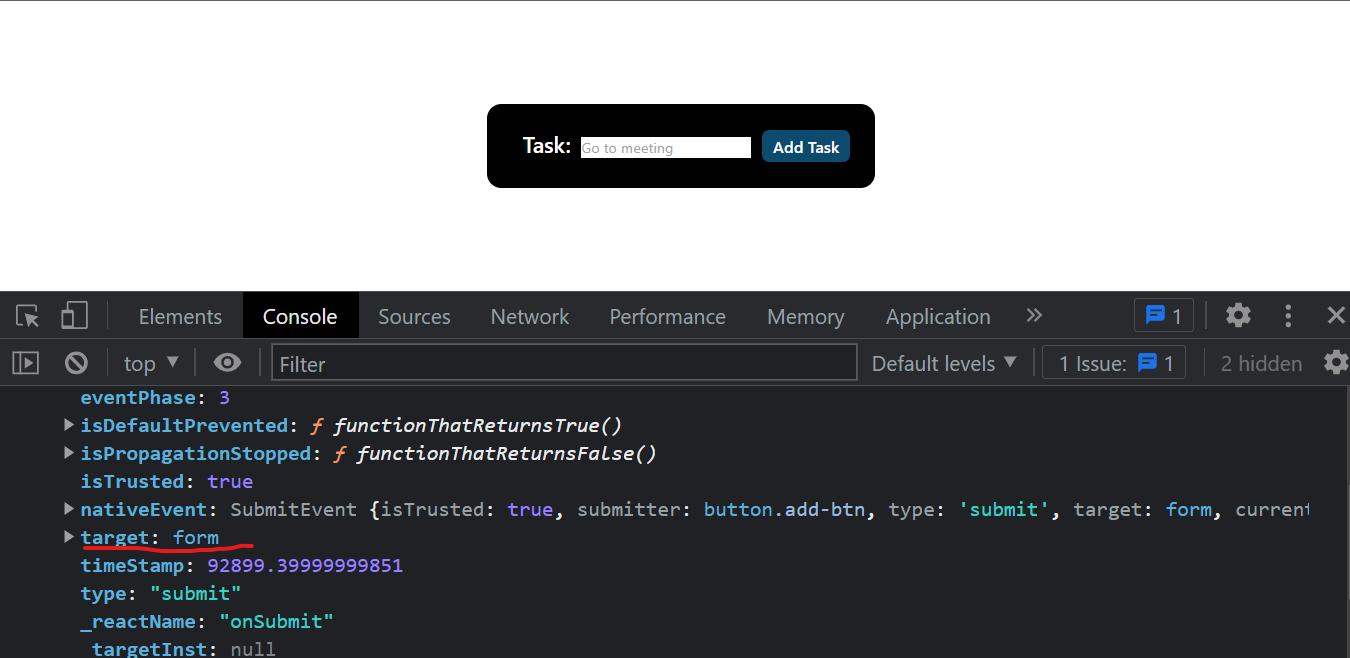
As you can see, we get a bunch of useful nodes and events we can use to interreact with the DOM tree.
side note📝✍
In our app, both target and currentTarget will work.
But first ...
target: refers to the element that triggered the event.
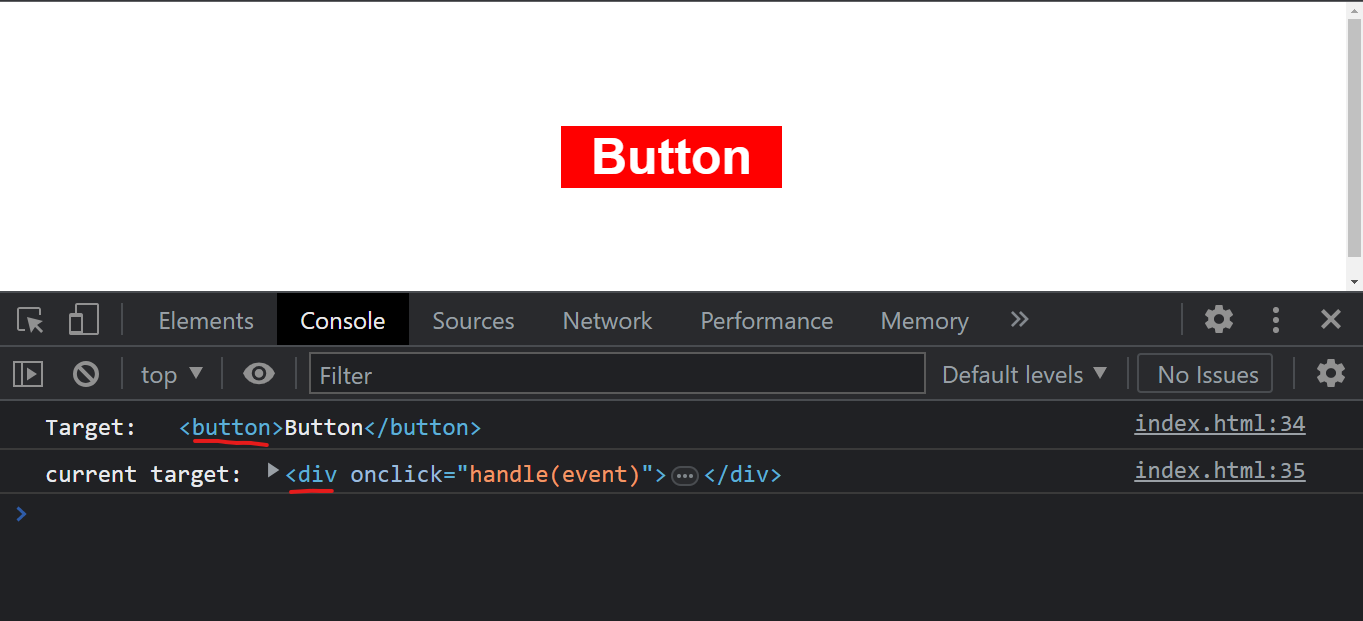
For example, if you have a button inside a div and you add an event listener to the div. If you click on the button the target property will refer to the button element even though the event is attached to the div.
currentTarget: refers to the element that the event listener is attached to. This is the element that you added the event listener to.
For a similar setup, where we have a button inside a div and you add an event listener to the div. If you click on the button the currentTarget property will refer to the div element.
Here is an example code.
    <!-- html -->
<div onclick="handle(event)">
      <button>Button</button>
    </div>
    <!-- javascript -->

<script>
      const handle = (e) => {
        console.log('Target:', e.target)
        console.log('current target:', e.currentTarget)
      }
</script>
Note the difference in this browser console log.
You get the idea.
Let me clarify again why both target and currentTarget will work in our scenario.
It is all based on the way our app is structured.
In our code, both target and currentTarget properties return the form element because the event onSubmit={handleSubmit} is attached to the form element itself.
When the handleSubmit function is called, it receives an event object representing the form submission event.
The target property of this event refers to the element that triggered the event, which in this case is the form element.
Of course, we clicked the button. But the button type is set to 'submit' which in turn triggers onSubmit attached to the form.
In that case, it is the form that triggers the onSubmit event. (Think of the button as a reference element).
The currentTarget property, on the other hand, refers to the element that the event listener onSubmit={handleSubmit} is attached to, which is also the form element.
Okay.👍
...end of side note.🔚
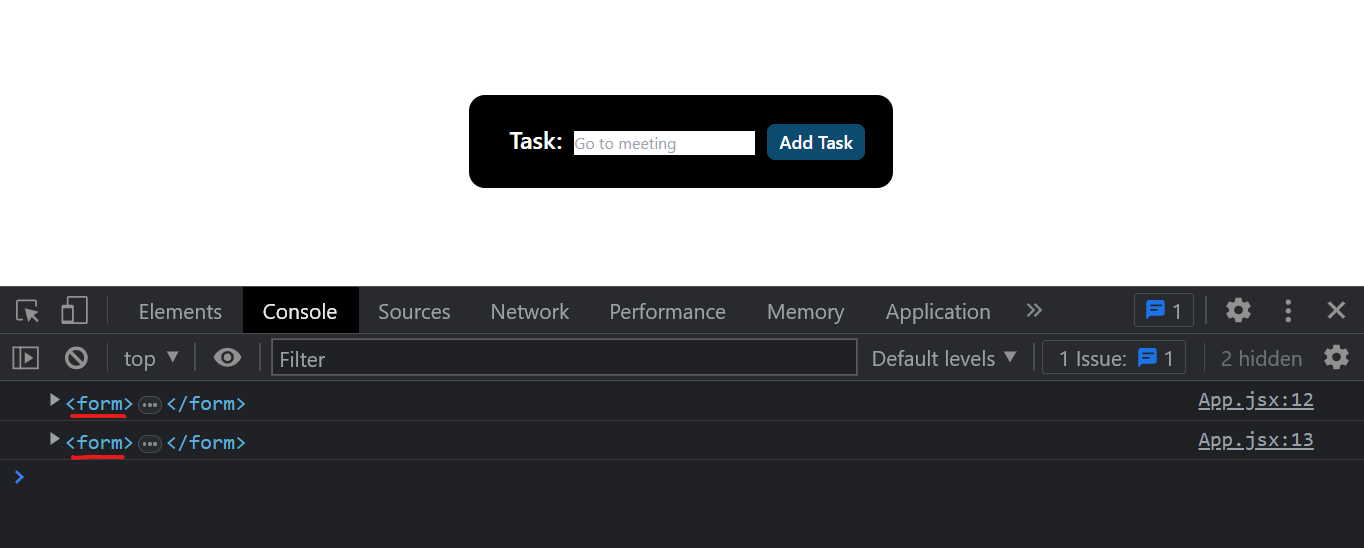
Log both e.target and e.currentTarget to confirm.
  const handleSubmit = (e) => {
    e.preventDefault()
    //console.log(e)
    console.log(e.target)
    console.log(e.currentTarget)
  }
The logs are the same.
We can now choose one.
Note: The method we used will work but In React it is recommended to use methods such as document.getElementById to get input values. Or use the useRef hook.
Let's use target.
  const handleSubmit = (e) => {
    e.preventDefault()
    console.log(e.target)
  }
The mind grenade!
e.target gives us back a form.
We are only interested in the input element.
How can we target the input element?
Remember the structure of the form like this
<form>
   <label></label>
   <input />
   <button></button>
</form>
Well, that is where the id becomes useful.
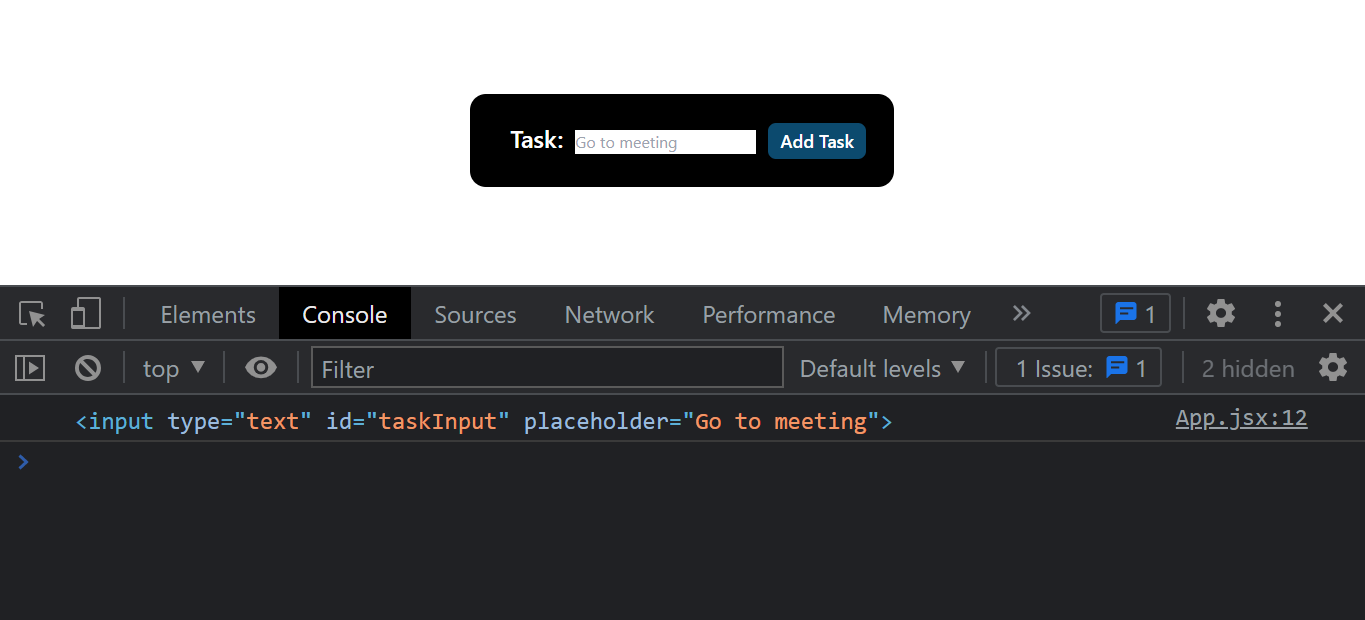
Let's use the taskInput id that is on the input element to access the input element.
  const handleSubmit = (e) => {
    e.preventDefault()
    console.log(e.target.taskInput)
  }
Here is the log with the input.
side note 📝✍
Now a million-dollar question. Why do we use a dot to get the id?
There might be confusion because of how we access id in CSS and how we access values in JavaScript objects.
Remember this is a DOM element. e.target points to the element that triggered the event.
Hence we can get an element id with a dot like we used a dot to get target which is just the element form that triggered the form submission.
If we had a class in the input and wanted to use it instead, then we could do this.
const handleSubmit = (e) => {
  e.preventDefault()
  console.log(e.target.querySelector('.taskInput'))
}
...end of the side note.🔚
Now that we have the input, we can access its value/data using value.
  const handleSubmit = (e) => {
    e.preventDefault()
    console.log(e.target.taskInput.value)
  }
If you type something in the input and click add Task button or enter on your keyboard, you should see the input value logged to the console.
Let's store the value in a variable
  const handleSubmit = (e) => {
    e.preventDefault()
    const inputValue = e.target.taskInput.value
    console.log(inputValue)
  }
Set The state
After we click on add task button (or enter on the keyboard), we want to add our task object to the tasks array.
In short, we want to be able to update the state of our tasks.
The task should be an object with title and id.
For React to monitor our state correctly we need a unique id.
This is where we will use a package by the name uuid "Universally Unique Identifier".
You can use any other package or create your id generation functionality.
Now open the Terminal.
Click on the + to open another instance of the Terminal.
Or kill the current Terminal using ctrl + c
Don't forget to restart the server with npm run dev once you're done with the installation we're going to do.
In the Terminal, run npm i uuid
npm i uuid
Let's import v4 from uuid.
import { v4 as uniqueId } from 'uuid'
side note ✍📝
Something weird?
Okay with es6 and beyond, you can import a package and rename it using the as keyword.
The syntax { v4 as uniqueId} is known as object destructuring with renaming or aliasing.
We import v4 but then we give it a new name uniqueId.
You can do so with any package or even hook.
Example 1:
import { useState as myState } from 'react';
//Then in your app use myState instead of useState like
// const [name, setName] = myState('Frank')
Example 2:
import React as MyReact from 'react';

function MyComponent() {
  return (
    <MyReact.Fragment>
        <MyReact.div>
            <MyReact.h1>Hello, World!</MyReact.h1>
        </MyReact.div>
    </MyReact.Fragment>
  );
}
Please don't import React like that though 😂. This is why. (the code below will work)
import React as MyReact from 'react';

function MyComponent() {
  return (
    <>
        <div>
            <h1>Hello, World!</h1>
        </div>
    </>
  );
}
But you might run into a naming conflict with other modules or global variables because you imported React as MyReact.
To be safe from naming conflicts, you will need to use the importName.element like <MyReact.h1></MyReact.h1> , <MyReact.section></MyReact.section> etc. That is overkill.😂
...end of side note🔚
Let's create our object with a title and an id.
For the unique id, just invoke uniqueId().
Let's also log the tasks.
Up to this point, your code should look like this.👇👇
import { useState } from 'react'
import { v4 as uniqueId } from 'uuid'

const App = () => {
  const [tasks, setTasks] = useState([])
  // log tasks
  console.log(tasks)

  const handleSubmit = (e) => {
    e.preventDefault()
    const inputValue = e.target.taskInput.value
    const taskObject = {
      id: uniqueId(),
      title: inputValue,
    }
    setTasks(taskObject)
  }
  return (
    <main className='parent-container'>
      <div className='content'>
        <form onSubmit={handleSubmit}>
          <label htmlFor='taskInput' className='input-label'>
            Task:
          </label>
          <input type='text' id='taskInput' placeholder='Go to meeting' />
          {/* add type to the button bellow */}
          <button className='add-btn' type='submit'>
            Add Task
          </button>
        </form>
      </div>
    </main>
  )
}
export default App
Now let us add a task and open the browser console.
You should see the task rendered.
The reason why you might see two console logs is that when you use React.StrictMode, React intentionally invokes some lifecycle methods twice in development mode.
Don't worry the React.StrictMode is a development-only feature in React that helps detect potential problems in your code.
Should you want to avoid seeing the console logs twice, you can move the console.log(tasks) statement inside a useEffect hook with an empty dependency array, which will ensure that it only runs once when the component mounts.
Alternatively, you can remove React.StrictMode in your main.jsx file, which will prevent the component from rendering twice in development mode. (However, there is no need)
🔚
... Let's move on.
We have a problem!
Do you note that a user can add an empty task?
We can stop that by doing a check whether the user added a value in the input field before creating the object to add to the tasks.
That's where we'll use a truthy falsy concept.
In JavaScript, a value is considered falsy if it is treated as false when evaluated in a boolean context, and truthy if it is treated as true.
Here are falsy values false, 0, -0, NaN, null, undefined, an empty string ''. Other than these falsy values, Everything else is truthy
Here we are checking if the inputValue is true (if it exists).
Like this👇
  const handleSubmit = (e) => {
    e.preventDefault()
    const inputValue = e.target.taskInput.value
    if (inputValue) {
      const taskObject = {
        id: uniqueId(),
        title: inputValue,
      }
      setTasks(taskObject)
    }
  }
However, the user is a developer and decides to play with our app by submitting a whitespace ' '.😂
Remember an empty string '' is not the same as a string with whitespace ' '.
//note: this code not part of the app
const falsyEmptyString = '';
const truthyEmptyString = ' ';
So if the user submits a whitespace it is considered truthy.
We can stop that using trim() method to remove whitespaces.
Add trim() at the end of const inputValue = e.target.taskInput.value like this.👇
 const handleSubmit = (e) => {
    e.preventDefault()
    const inputValue = e.target.taskInput.value.trim()
    if (inputValue) {
      const taskObject = {
        id: uniqueId(),
        title: inputValue,
      }
      setTasks(taskObject)
    }
  }
We are making some progress!
Now let's use alert() to tell the user to add a task if she tries to add an empty field.
const handleSubmit = (e) => {
    e.preventDefault()
    const inputValue = e.target.taskInput.value.trim()
    if (inputValue) {
      const taskObject = {
        id: uniqueId(),
        title: inputValue,
      }
      setTasks(taskObject)
    } else {
      alert('Can not add an empty task')
    }
  }
We have another issue. Even after the user adds a task, the value in the input field persists.
We want to clear the value in the input field once the task has been added to our tasks.
We can do so by setting the value to an empty string '' after updating the state setTasks() .
  const handleSubmit = (e) => {
    e.preventDefault()
    const inputValue = e.target.taskInput.value.trim()
    if (inputValue) {
      const taskObject = {
        id: uniqueId(),
        title: inputValue,
      }
      setTasks(taskObject)
      e.target.taskInput.value = ''
    } else {
      alert('Can not add an empty task')
    }
  }
create list
Now let us create an unordered list ul with a few li items below our button but still within the form.
Then add some classeNames for the styles.
import { useState } from 'react'
import { v4 as uniqueId } from 'uuid'

const App = () => {
  const [tasks, setTasks] = useState([])
  // log tasks
  console.log(tasks)

  const handleSubmit = (e) => {
    e.preventDefault()
    const inputValue = e.target.taskInput.value.trim()
    if (inputValue) {
      const taskObject = {
        id: uniqueId(),
        title: inputValue,
      }
      setTasks(taskObject)
      e.target.taskInput.value = ''
    } else {
      alert('Can not add an empty task')
    }
  }

  return (
    <main className='parent-container'>
      <div className='content'>
        <form onSubmit={handleSubmit}>
          <label htmlFor='taskInput' className='input-label'>
            Task:
          </label>
          <input type='text' id='taskInput' placeholder='Go to meeting' />
          {/* add type to the button bellow */}
          <button className='add-btn' type='submit'>
            Add Task
          </button>
          <ul className='py-5 list-none'>
            <li className='flex justify-between text-white bg-sky-900 py-1               px-3 rounded-md text-lg my-2'>
              List one
            </li>
            <li className='flex justify-between text-white bg-sky-900 py-1 px-3 rounded-md text-lg my-2'>
              List two
            </li>
          </ul>
        </form>
      </div>
    </main>
  )
}
export default App
In the browser, you should see.

Replace the class names in ul with className = 'ul-container' . In li replace the class name with className = 'task-container' .
App.jsx 👇
import { useState } from 'react'
import { v4 as uniqueId } from 'uuid'

const App = () => {
  const [tasks, setTasks] = useState([])
  // log tasks
  console.log(tasks)

  const handleSubmit = (e) => {
    e.preventDefault()
    const inputValue = e.target.taskInput.value.trim()
    if (inputValue) {
      const taskObject = {
        id: uniqueId(),
        title: inputValue,
      }
      setTasks(taskObject)
      e.target.taskInput.value = ''
    } else {
      alert('Can not add an empty task')
    }
  }

  return (
    <main className='parent-container'>
      <div className='content'>
        <form onSubmit={handleSubmit}>
          <label htmlFor='taskInput' className='input-label'>
            Task:
          </label>
          <input type='text' id='taskInput' placeholder='Go to meeting' />
          <button className='add-btn' type='submit'>
            Add Task
          </button>
          <ul className='ul-container'>
            <li className='task-container'>List one</li>
            <li className='task-container'>List two</li>
          </ul>
        </form>
      </div>
    </main>
  )
}
export default App
In the index.css, let us create the two utility classes, ul-container and task-container and add the styling classes to both utility classes.
@tailwind base;
@tailwind components;
@tailwind utilities;

@layer utilities {
  .parent-container {
    @apply flex justify-center items-center min-h-screen;
  }
  .content {
    @apply bg-black p-7 rounded-2xl  flex justify-around items-center flex-col;
  }
  .input-label {
    @apply text-2xl text-white px-3 font-semibold;
  }
  .add-btn {
    @apply text-lg bg-sky-900 rounded-lg px-3 py-1 ml-3 text-white font-medium;
  }
  .ul-container {
    @apply py-5 list-none;
  }
  .task-container {
    @apply flex justify-between text-white bg-sky-900 py-1 px-3 rounded-md text-lg my-2;
  }
}
Let's create some global colors in the utilities layer (optional).
Let us try to see how we can set some colors and fonts that we can reuse with our classes. (without editing tailwind.config.cjs )
Take 'bg-sky-900' and set it in a class.
We need it in either hex or rgb or hsl or hwb.
I found its rgb to be "rgb(12, 74, 110)".
Let's set a class for the color bg-pri, then add background color of rgb(12, 72, 110).
@tailwind base;
@tailwind components;
@tailwind utilities;

@layer utilities {
  /* colors */
.bg-pri{
  background-color: rgb(12, 74, 110);
}
  /* css for elements */
  .parent-container {
    @apply flex justify-center items-center min-h-screen;
  }
  .content {
    @apply bg-black p-7 rounded-2xl  flex justify-around items-center flex-col;
  }
  .input-label {
    @apply text-2xl text-white px-3 font-semibold;
  }
  .add-btn {
    @apply text-lg bg-sky-900 rounded-lg px-3 py-1 ml-3 text-white font-medium;
  }
  .ul-container {
    @apply py-5 list-none;
  }
  .task-container {
    @apply flex justify-between text-white bg-sky-900 py-1 px-3 rounded-md text-lg my-2;
  }
}
Now we can replace all bg-sky-900 classes in our styles with bg-pri.
@tailwind base;
@tailwind components;
@tailwind utilities;

@layer utilities {
  /* colors */
  .bg-pri {
    background-color: rgb(12, 74, 110);
  }
  /* css for elements */
  .parent-container {
    @apply flex justify-center items-center min-h-screen;
  }
  .content {
    @apply bg-black p-7 rounded-2xl  flex justify-around items-center flex-col;
  }
  .input-label {
    @apply text-2xl text-white px-3 font-semibold;
  }
  .add-btn {
    @apply text-lg bg-pri rounded-lg px-3 py-1 ml-3 text-white font-medium;
  }
  .ul-container {
    @apply py-5 list-none;
  }
  .task-container {
    @apply flex justify-between text-white bg-pri py-1 px-3 rounded-md text-lg my-2;
  }
}
Let's do so for the text-white as well.
I set a class called pri-color and add color to it.
Then replace all text-white classes with pri-color.👇
@tailwind base;
@tailwind components;
@tailwind utilities;

@layer utilities {
  /* colors */
  .pri-color {
    color: #ffffff;
  }
  .bg-pri {
    background-color: rgb(12, 74, 110);
  }
  /* css for elements */
  .parent-container {
    @apply flex justify-center items-center min-h-screen;
  }
  .content {
    @apply bg-black p-7 rounded-2xl  flex justify-around items-center flex-col;
  }
  .input-label {
    @apply text-2xl pri-color px-3 font-semibold;
  }
  .add-btn {
    @apply text-lg bg-pri rounded-lg px-3 py-1 ml-3 pri-color font-medium;
  }
  .ul-container {
    @apply py-5 list-none;
  }
  .task-container {
    @apply flex justify-between pri-color bg-pri py-1 px-3 rounded-md text-lg my-2;
  }
}
Of course, this was overkill since it didn't reduce our code. 🔚
Let's continue...
In App.jsx let us delete one li item and leave the other.
import { useState } from 'react'
import { v4 as uniqueId } from 'uuid'

const App = () => {
  const [tasks, setTasks] = useState([])
  // log tasks
  console.log(tasks)

  const handleSubmit = (e) => {
    e.preventDefault()
    const inputValue = e.target.taskInput.value.trim()
    if (inputValue) {
      const taskObject = {
        id: uniqueId(),
        title: inputValue,
      }
      setTasks(taskObject)
      e.target.taskInput.value = ''
    } else {
      alert('Can not add an empty task')
    }
  }

  return (
    <main className='parent-container'>
      <div className='content'>
        <form onSubmit={handleSubmit}>
          <label htmlFor='taskInput' className='input-label'>
            Task:
          </label>
          <input type='text' id='taskInput' placeholder='Go to meeting' />
          {/* add type to the button bellow */}
          <button className='add-btn' type='submit'>
            Add Task
          </button>
          <ul className='ul-container'>
            <li className='task-container'>List one</li>
          </ul>
        </form>
      </div>
    </main>
  )
}
export default App
Making the list dynamic (important part!).
We want to go over our tasks and set them as li items.
We also want to make sure that the li is dynamic. In that, if you add a task, the task is automatically displayed as a li item.
Let's use map() method to iterate over the tasks array and create a li item for each task.
side note ✍📝
The map() iterates over the tasks array and returns a new array.
The main difference between forEach() and map() .
The forEach() method is similar to map() but won't work here because it iterates over the array but it does not return a new array.
...end of side note.🔚
In the ul element, use the curly braces {} to go to the 'JavaScript land'.
Within the {} we iterate over our tasks with map() method.
We pass in a callback function then in the callback we use task as a parameter like (task).
Now, task represents each task object in the tasks 'array'. (which is not an array. We'll see why)
For each task in the new tasks array, we want to create an element. In this case, let's just create an li element with hardcoded text content of list item.
Here is the code for the ul element.
          <ul className='ul-container'>
            {tasks.map((task)=>{
              return <li>List item</li>
            })}
          </ul>
The first gotcha.
Now our code doesn't work anymore.
We get an error.
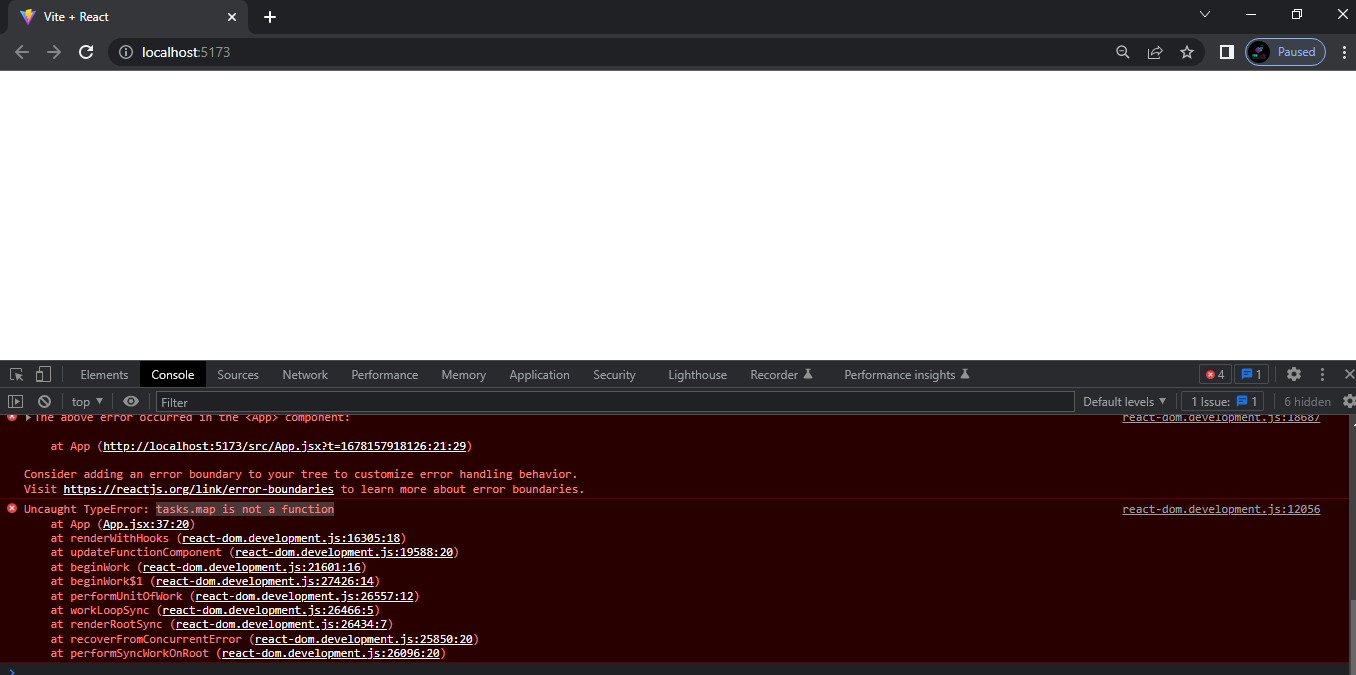
I purposely made the error way back when we were updating the tasks state using setTasks() function.
Our code in handleSubmit function looks like this.
  const handleSubmit = (e) => {
    e.preventDefault()
    const inputValue = e.target.taskInput.value.trim()
    if (inputValue) {
      const taskObject = {
        id: uniqueId(),
        title: inputValue,
      }
      setTasks(taskObject)
      e.target.taskInput.value = ''
    } else {
      alert('Can not add an empty task')
    }
  }
Now pay attention! (very important)👀.
This is what happens:
With React hook useState(), the state can be updated with any data type.
You can set the state to a string and later 'update' it to an object.
In that case, we say that you mutated the state directly instead of updating it.
The codes below are not part of the app, it is for demonstration purposes only (I'll tell you when to continue editing the actual app code).
//Let's do some mutation.
const [language, setLanguage] = useState('JavaScript')
const handle = () => {
    const person = {
     name: 'Frank',
     job: 'Engineer',
     age: 102}
      setLanguage(person)
   }
In the above code, we mutated the state of language from a string to an object using setLanguage(person) .
We can do the same using other data types as well. string, number, bigint, boolean, undefined, null, symbol, object, and function.
🔚
Now back to our app.
Initially, we set the state of our tasks to an empty array.

However, in the handleSubmit function, we update the state with an object.
Remember we passed an object by the name taskObject{} to the tasks using setTasks(taskObject) .
Let's say the taskObject{} the properties id : 1 title: 'Go to the mall'.
const taskObject = {
        id: 1,
        title: 'Go to the mall' ,
      }
Using setTasks(taskObject) function, we update the tasks.
setTasks(taskObject)
Behind the scenes, we mutated the state from an array to an object.
This is what we did👇
const [tasks, setTasks] = useState({ id: 1,title: 'Go to the mall'})
Note that our new tasks state is no longer an array.

The fix.🔧
We can wrap the object with [] brackets.
Note: You can map over an object using Object.keys().map()
Like, setTasks([taskObject]) .
**Time to start editing our app code again.**🚀
Don't forget to add our utility className task-container to the li item for styling.
Our new code. With setTasks([taskObject]) function.👇
import { useState } from 'react'
import { v4 as uniqueId } from 'uuid'

const App = () => {
  const [tasks, setTasks] = useState([])
  // log tasks
  console.log(tasks)

  const handleSubmit = (e) => {
    e.preventDefault()
    const inputValue = e.target.taskInput.value.trim()
    if (inputValue) {
      const taskObject = {
        id: uniqueId(),
        title: inputValue,
      }
      setTasks([taskObject])
      e.target.taskInput.value = ''
    } else {
      alert('Can not add an empty task')
    }
  }

  return (
    <main className='parent-container'>
      <div className='content'>
        <form onSubmit={handleSubmit}>
          <label htmlFor='taskInput' className='input-label'>
            Task:
          </label>
          <input type='text' id='taskInput' placeholder='Go to meeting' />
          {/* add type to the button bellow */}
          <button className='add-btn' type='submit'>
            Add Task
          </button>
          <ul className='ul-container'>
            {tasks.map((task) => {
              return <li className='task-container'>List one</li>
            })}
          </ul>
        </form>
      </div>
    </main>
  )
}
export default App
In the browser, you should see.

Dynamic list.
Instead of our hard-coded text content List one, let us dynamically get the title from each task in tasks and add the title as our li text content.
In our map() method, let us get the title with task.title from each task and display it in li as the text content.
<ul className='ul-container'>
    {tasks.map((task) => {
       return <li className='task-container'>{task.title}</li>
     })}
</ul>
side note✍📝
Imagine if you had ten properties or more in your object, wouldn't be annoying to do task.title task.time task.complete task.id task.urgent ...
We could instead destructure all the properties of the object.
Each destructured property will act as a variable and a corresponding value is assigned to it.
Example (not part of our app code).
const task = {
  id: 1,
  title: "Go to a meeting",
  time: '10am',
  complete: false,
  urgent: true
  // other properties ...
};

const { id, title, time, complete, urgent} = task;
// this is similar to
const id = task.id
const title = task.title
const time = task.time
const complete = task.complete
const urgent = task.urgent
...end of side note🔚
For our app, it is fine to access each key with a dot notation, since we only have two keys, title and id.
But I like structuring, and that is what am going for.
Let us destructure the properties of the object, task.
Now in the li text content, instead of using task.title we just use the title that we destructured from the task.
<ul className='ul-container'>
    {tasks.map((task) => {
      const { id, title } = task
      return <li className='task-container'>{title}</li>
    })}
</ul>
Everything works just fine but we have two problems.
There is an error in our console saying
Each child in a list should have a unique "key" prop.We can only add one task to the app (Try adding another task to see).
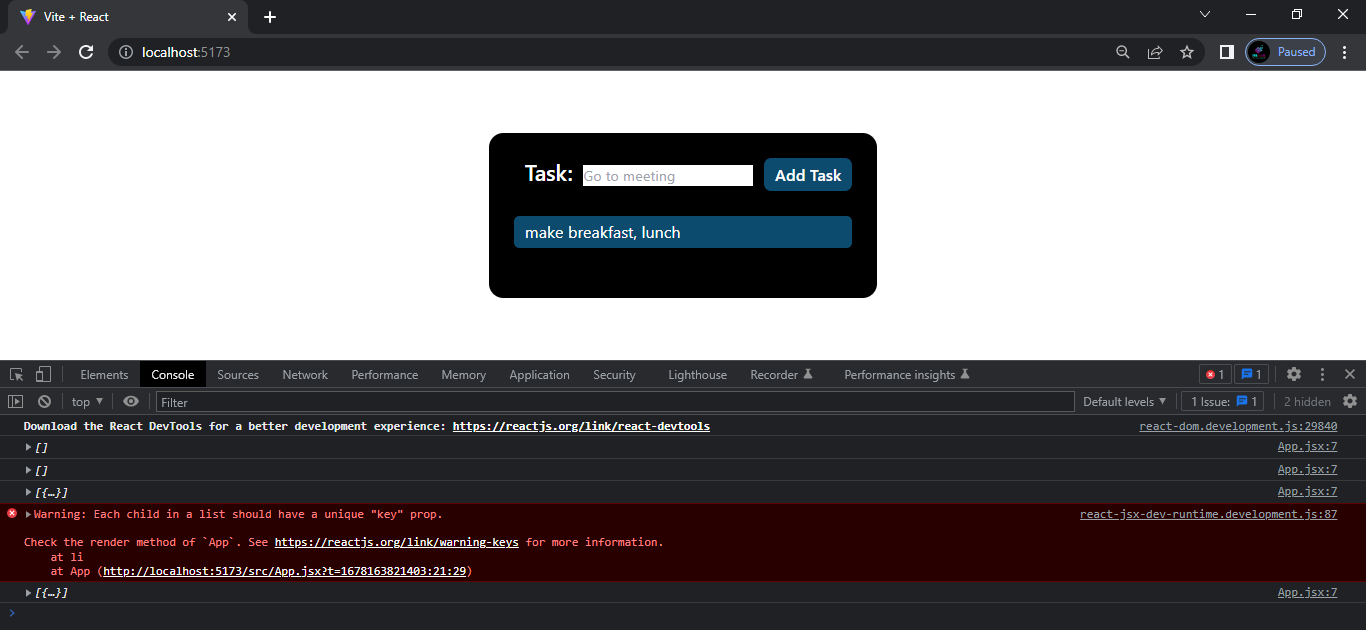
Solving the Each child in a list should have a unique "key" prop error.
React requires each child in a list to have a unique "key" prop because it helps React keep track of our components and state.
With the key, React can identify which items get changed, added, or removed from the list in the future.
To add a key to a list item, you should add it to the top-level JSX element that represents the item.
In our app, after we map() through the tasks, for each task we return a li element. We should add a key prop to the li element.
In the key prop we need to pass in a unique value, which we already have in the form of an id.
<ul className='ul-container'>
    {tasks.map((task) => {
      const { id, title } = task
      return <li className='task-container' key={id}>{title}</li>
    })}
</ul>
side note✍📝
A top-level JSX element is the element that directly contains all of the other elements in the component's output.
If we were returning a li that is nested in a div, our top-level JSX element could be the div.
We should add the key prop to the top-level JSX element div
Example.
<ul className='ul-container'>
    {tasks.map((task) => {
      const { id, title } = task
      return (
        <div key={id} >
            <li className='task-container'>{title}</li>
        </div>)
    })}
</ul>
If we had a section element as the top-level JSX element then we would do 👇
<ul className='ul-container'>
    {tasks.map((task) => {
      const { id, title } = task
      return (
        <section key={id}>
            <div>
                <li className='task-container'>{title}</li>
            </div>
        </section>)
    })}
</ul>
...end of side note.🔚
We fixed the key prop error. 👏
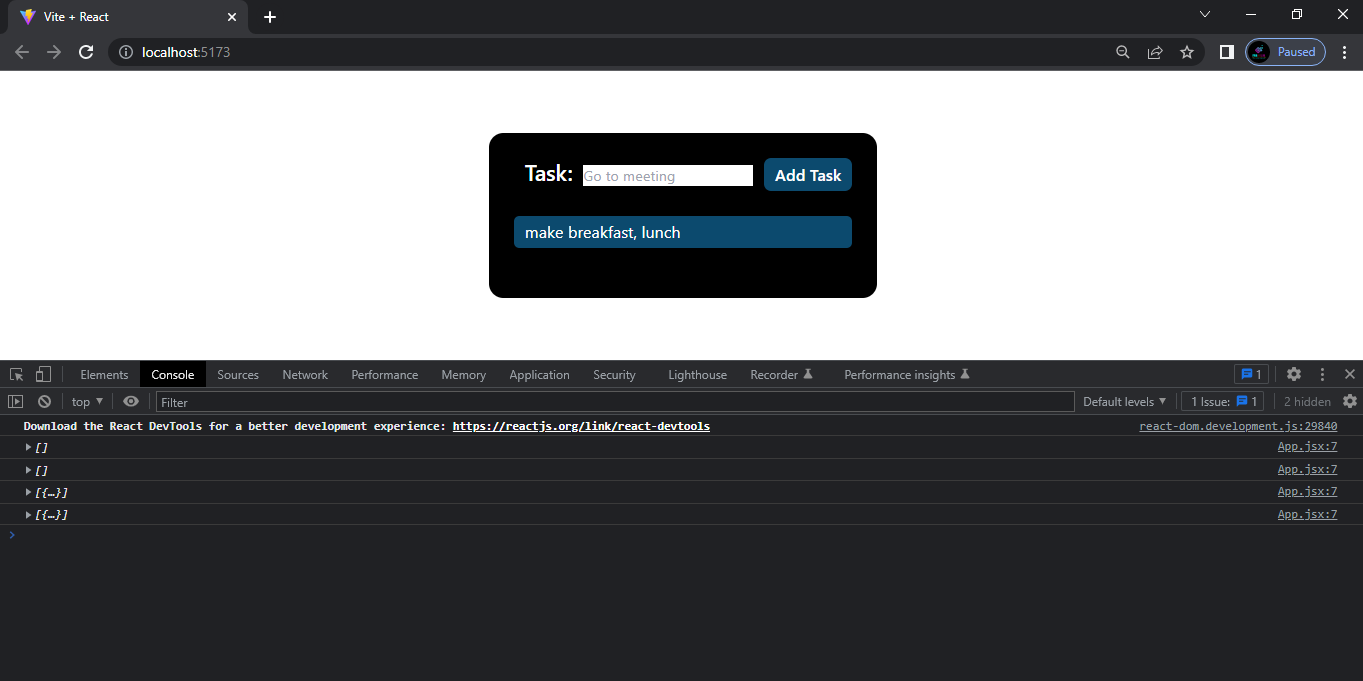
How can we add more than one task?
To know the reason why our code only adds one task, let's go back to our handleSubmit function.
  const handleSubmit = (e) => {
    e.preventDefault()
    const inputValue = e.target.taskInput.value.trim()
    if (inputValue) {
      const taskObject = {
        id: uniqueId(),
        title: inputValue,
      }
      setTasks([taskObject])
      e.target.taskInput.value = ''
    } else {
      alert('Can not add an empty task')
    }
  }
With setTasks([taskObject]) function, we are updating the state of tasks with a new array [taskObject] that has only the current task object on every form submission.
Here is what happens, If the user adds a task, our app creates a taskObject{} for the task.
Instead of adding the new task to the array as a new object, we replace/modify the previous taskObject{} in our tasks state with the new object with the setTasks([taskObject]) function.
Now our array of tasks only contains the current task.
How can we fix this?
The spread operator.
The spread operator (...) is a JavaScript syntax that allows an iterable (like an array or a string) to be expanded into individual elements.
The spread operator can be used to Concatenate arrays, Copy an array, Add new elements to an array, and Remove elements from an array.
In our app, we will use the spread operator (...) to Add a new object to the tasks array.
When the user clicks the add button, the handleSubmit() function is called. Within the handleSubmit function, the setTasks() function is called with an argument of [taskObject]. This updates the state variable, tasks, with the new task object that was just created. i.e. setTasks([taskObject])
Now we want to get a copy of the tasks that are already in the tasks array.
Even if the array is empty, we will still get back the empty array copy.
Like this,
[...tasks]
side note ✍📝
Let us see how the spread ... works.
//we create a user object with soem properties.
const user = {
  id: 123,
  name: 'John Doe',
  email: 'johndoe@example.com',
  age: 35,
  isAdmin: true
};
//we copy the user object and add come other propertie(s)
const updatedUser = {
  ...user, // copy the user object
//add some properties
  occupation: 'Software Engineer',
  age: 36
};
// log the new object
console.log(updatedUser);
Output
// The updatedUser object output
{
  id: 123,
  name: 'John Doe',
  email: 'johndoe@example.com',
  age: 36,
  isAdmin: true,
  occupation: 'Software Engineer'
}
Similarly, we can create arrays of objects by copying an existing array to a new array and then add some new objects to the new array.
const myArray = [
  { id: 1, name: 'John' },
  { id: 2, name: 'Jane' },
  { id: 3, name: 'Bob' },
];

const updatedArray = [
  ...myArray,
  { id: 4, name: 'Mary' },
  { id: 5, name: 'Tom' },
];

console.log(updatedArray);
Output
[
  { id: 1, name: 'John' },
  { id: 2, name: 'Jane' },
  { id: 3, name: 'Bob' },
  { id: 4, name: 'Mary' },
  { id: 5, name: 'Tom' }
]
...end of side note.🔚
We copied the tasks to a new array with [...tasks].
Now we want to add our current task object taskObject to the tasks.
Like this [...tasks, myObject].
We just created a new array by first copying the objects from tasks then we added our new object tasksObject to create a new array.
We want to update our state with the new array.
Like this setTasks([...tasks, myObject]) .
Now, whenever a user adds a task, we first get a copy of tasks from tasks then we add the current task to the copy.
A new array is created and used to update the state of our tasks.
Now we can add as many tasks as we wish to the tasks array!
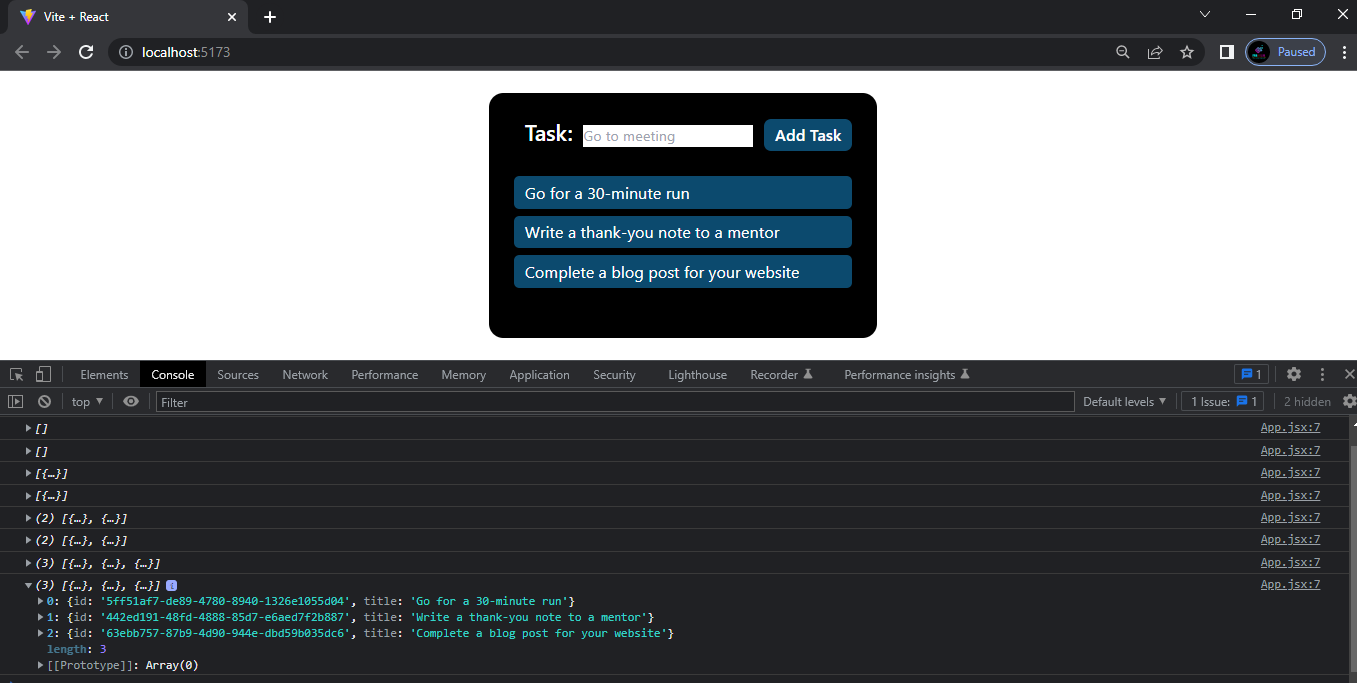
Our app is okay but we want to do some checks and see if there are tasks in tasks array.
We want the user to know when there are no tasks to display with a text saying No tasks added yet
How can we achieve that? well ...
Conditional Rendering.
There are several techniques for conditional rendering in React, including the ternary operator, the logical operators (&& and | |),nullish coalescing operator (??), switch statements, if/else statement, Enum-based approach, among other methods.
We want to display the li of tasks if the user has added a task(s) or else display a paragraph with the text 'No tasks added yet'
We can use truthy falsy concept to check as we did in the handleSubmit function where we checked whether there was a value in the input field before we updated the state.
We'll use a different approach though. We will check whether we have anything in the tasks array using the length property.
Also, since we used an if(){}else{} in handleSubmit this time let us use the ternary operator to do conditional rendering.
Let us check whether we have any tasks to render from tasks array using tasks.length > 0
If we have something in the tasks (the length is more than 0), that is when we should map() over the tasks array and return our li elements otherwise we should render a paragraph saying No tasks added yet.
Example.
          <ul className='py-5 list-none'>
            {tasks.length > 0 ? /* we map over the array*/: (
              <p className='empty-tasks'>No tasks added yet</p>
            )}
          </ul>
side note ✍📝
Let's also update the key prop in our li element from key={id} to key={String(id)}. Of course uniqueId will generate a string but in your development, should you ever use id of number 9 or 'number string' '9', you need to tell React that the id will always be a String or a Number.
That way, React will predictably know if the id is valid just in case there is an automatic id type coercion that you might not catch.
...end side note🔚
In the p element add className='empty-tasks' we'll use it for styling
<ul className='ul-container'>
      {tasks.length > 0 ? (
         tasks.map((task) => {
            const { id, title } = task
                return (
                  <li key={String(id)} className='task-container'>
                    {title}
                  </li>
              )
           })
          ) : (
                  <p className='empty-tasks'>No tasks added yet</p>
          )}
</ul>
Now go to index.css and create empty-tasks utility class and apply styling classes to it.
Your index.css should look like this.👇
@tailwind base;
@tailwind components;
@tailwind utilities;

@layer utilities {
  /* colors */
  .pri-color {
    color: #ffffff;
  }
  .bg-pri {
    background-color: rgb(12, 74, 110);
  }
  /* css for elements */
  .parent-container {
    @apply flex justify-center items-center min-h-screen;
  }
  .content {
    @apply bg-black p-7 rounded-2xl  flex justify-around items-center flex-col;
  }
  .input-label {
    @apply text-2xl pri-color px-3 font-semibold;
  }
  .add-btn {
    @apply text-lg bg-pri rounded-lg px-3 py-1 ml-3 pri-color font-medium;
  }
  .ul-container {
    @apply py-5 list-none;
  }
  .task-container {
    @apply flex justify-between pri-color bg-pri py-1 px-3 rounded-md text-lg my-2;
  }
  .empty-tasks {
    @apply pri-color p-1 text-lg;
  }
}
In the browser, the app should display the paragraph if no task has been added.

What next?
The user is not happy because she can't delete her task(s) 😒. Let's help her.
Continue to part-2 where we will add the delete task(s) functionality.
Subscribe to my newsletter
Read articles from Franklin Mayoyo directly inside your inbox. Subscribe to the newsletter, and don't miss out.
Written by

Franklin Mayoyo
Franklin Mayoyo
Sharing knowledge on SaaS entrepreneurship and development.