A Complete Guide to CSS Object Model (CSSOM)
 Alex Anie
If you are a front-end developer or a CSS enthusiast and you love writing code in CSS, words like Flexbox, Grid, Positioning, Box model, Selectors, Media Queries, Animations, Transforms and Transitions, and translate property, to mention a few, are not going to be strange to you, this is because these topics are talked about more and actively in every CSS community, forum and because you have personally used them.
However, the CSS Object Model, also known as CSSOM, is another significant CSS feature that is less well-known but even more crucial because it affects how the CSS we write daily renders on the browser.
In this blog on CSS Object Model, we will be taking a closer look at what is CSS Object Model, how does CSS Object Model implement with browsers, and why it’s essential for a front-end developer.
What is CSS Object Model (CSSOM)?
CSSOM, also called CSS Object Model, is the set of web APIs that allows the manipulation of CSS from JavaScript with built-in instance properties and methods. Unlike the Document Object Model (DOM), which considers the page’s HTML document, the CSS Object Model works alongside the DOM and deals with the rendering of the stylesheet document.
The stylesheet is linked and parsed to the browser through the HTML, where the CSS Object Model is combined with the DOM to form a render tree. This render tree contains the required nodes to render the page.
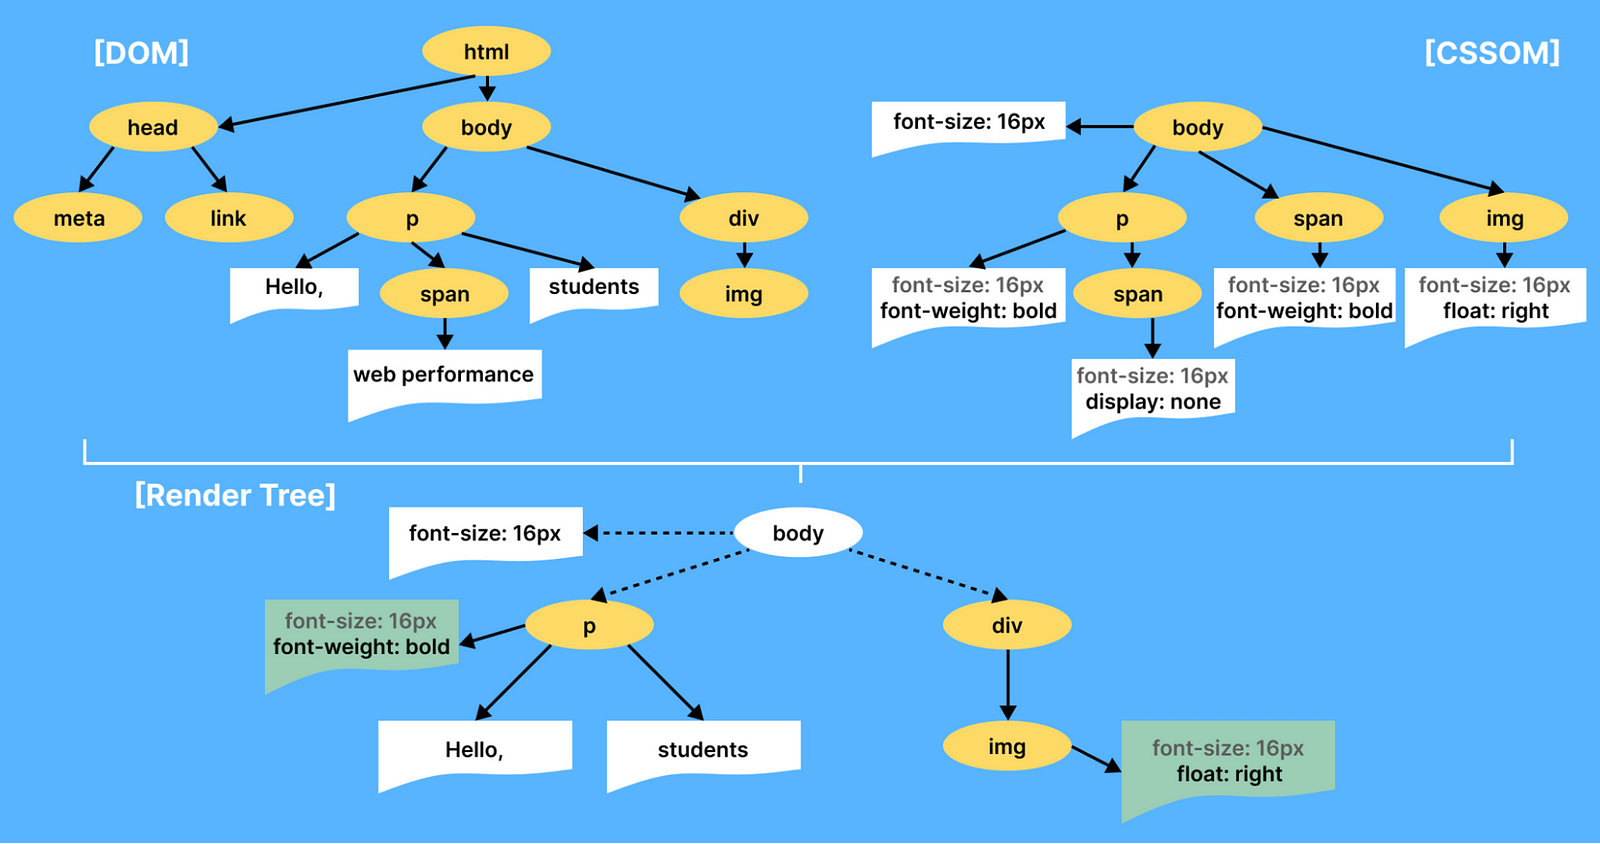
The rendering process of the CSS Object Model and the DOM is done within the browser and is called the critical rendering path. It is the process or series of steps the browser goes through to convert the HTML, CSS, and JavaScript into pixels that display on the screen. This path comprises CSS Object Model, DOM, layout, and rendering tree, as shown in the figure below.
Here are the steps in the critical rendering path:
Development of DOM, CSS Object Model, and execution of JavaScript.
The browser loads the HTML file.
Request the JavaScript and CSS files via the
< script >and< link >tags, respectively.JavaScript, through the DOM, makes the necessary changes and updates the document.
Layout computes the exact position and size of each object.
CSS is then parsed as the CSS Object Model build and changes the style in the DOM.
Paint translates into actual pixels and displays them on the screen.

The browser engine translates this process and creates the render tree. As soon as the layout and how each element is to be positioned have been determined, pixels are painted out by the browser to the screen.
It’s also important to consider that whether or not we add style rules to the webpage, the browser, by default, assigns in-built styles to the document loaded on the browser; this is called user-agent or user-agent-stylesheet.
However, frontend developers or web designers create their external style sheet called author style-sheet; this CSS style is linked to the HTML file. This is the most common style sheet as developers write them to correct and update the user-agent-stylesheet.
Get started with this complete Selenium automation testing tutorial. Learn what Selenium is, its architecture, advantages and more for automated cross browser testing.
Styling DOM Elements with CSS Object Model
In this section, we will look at a few JavaScrit properties and methods that can be used to style the DOM with CSS Object Model directly from JavaScript.
- User-Agent-Stylesheet/Author Stylesheet
Before we dive deep into properties and methods for manipulating the DOM with CSS Object Model, let’s see how the user-agent-stylesheet and author stylesheet interact with the document loaded on the browser.
HTML:
<body>
    <div>
        This is a CSS style Example
    </div>
</body>
From the above HTML code example, we created a < div > tag with text content. Now let’s add some styling to it.
CSS:
 div {
        width: 200px;
        height: 200px;
        background-color: purple;
        color: white;
    }
We have created a < div > tag with properties, i.e., width and height of 200px, background color purple, and color for the text is kept white.
Output:
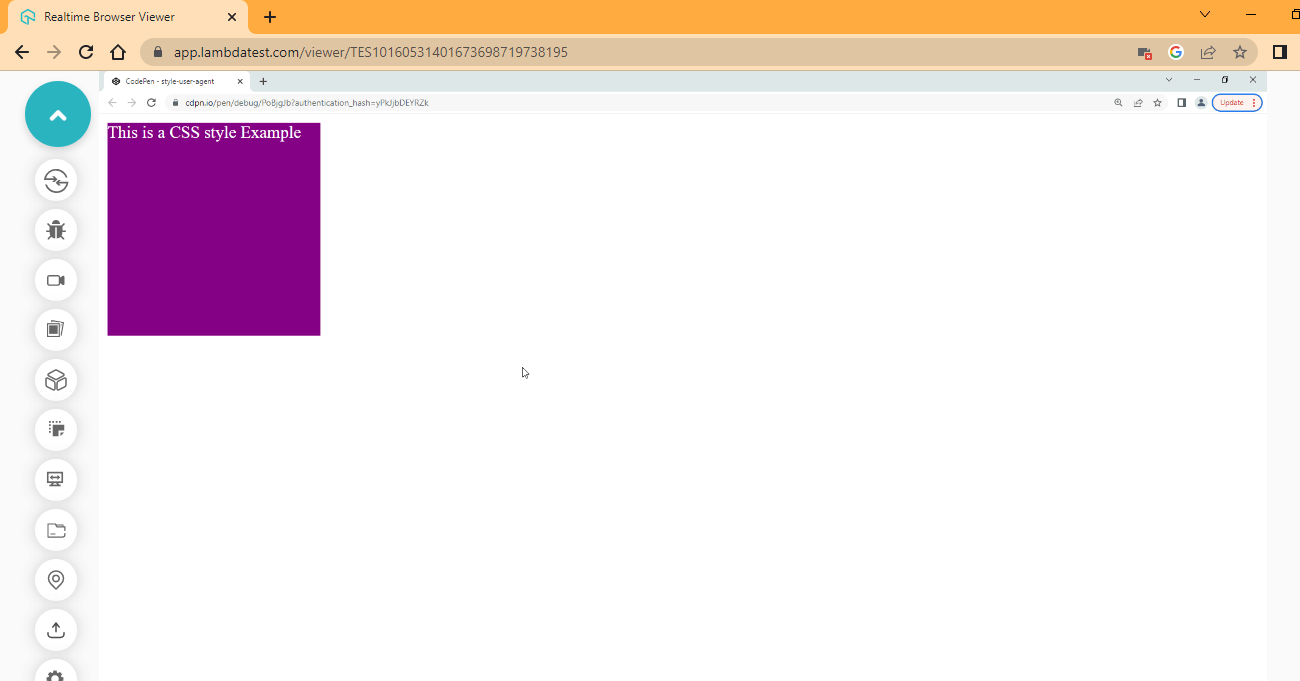
From the browser output, we have a < div > tag displayed as a square, with a background color of purple (color code: #A020F0). Before we apply CSS styles, let’s see how the user-agent affects the element we created and how we can overwrite each property with the author style-rule.
DevTools:
The output image is taken from LambdaTest’s platform while performing real-time testing. LambdaTest is a cloud-based cross browser testing platform that allows you to test your web and mobile applications over more than 3000+ browsers and device configurations. It also supports parallel testing to perform multiple tests in the same environment.
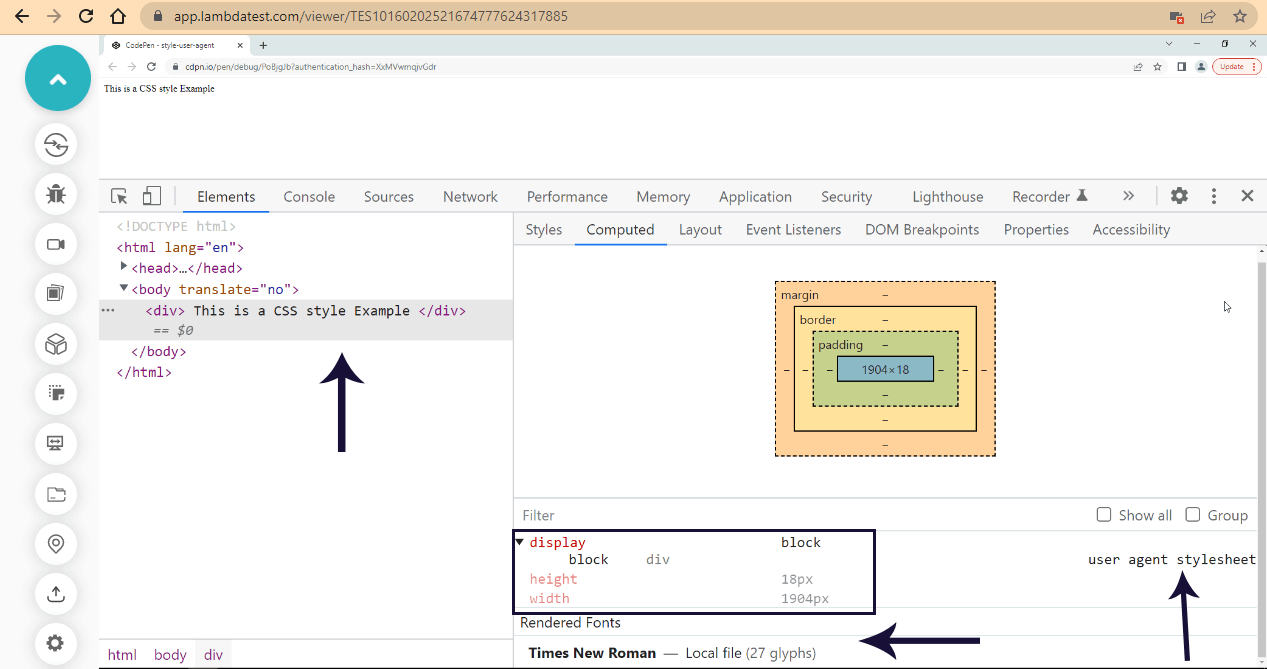
For a better understanding of how this works, here are the steps you need to follow:
Launch your DevTools.
Select the element and select computed.
Click the div on the console.
As indicated by the arrow on the right, see the user agent style-sheet.
Also, from the yellow box, the user-agent sets the
< div >to display block.font-family of Times New Roman and font size of 16px
As mentioned earlier, the user-agent is responsible for setting default values to elements properties when loaded on the browser if the author style rule is not declared for that specific property.
Now let’s see how we can overwrite the user agent-stylesheet using the author stylesheet we created in our CSS.
CSS:
 div {
        width: 200px;
        height: 200px;
        background-color: purple;
        color: white;
        font-family:monospace;
        font-size: 32px;
    }
From the CSS code sample above, we targeted the font-family and font-size property, and we set them to monospace and 32px respectively.
Browser Output:
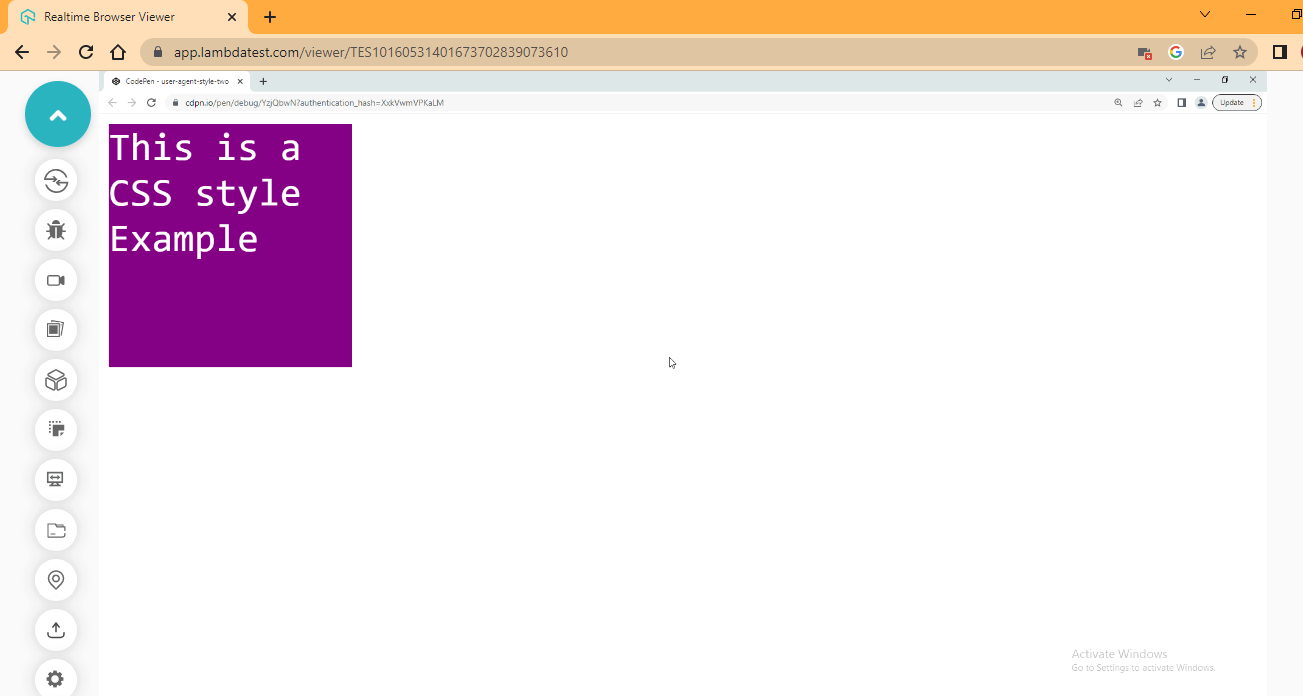
From the browser output, the font-size is now much bigger than the one we had before, and the font-family is now monospace. Let’s see how this has affected the user-agent-stylesheet with the DevTools.
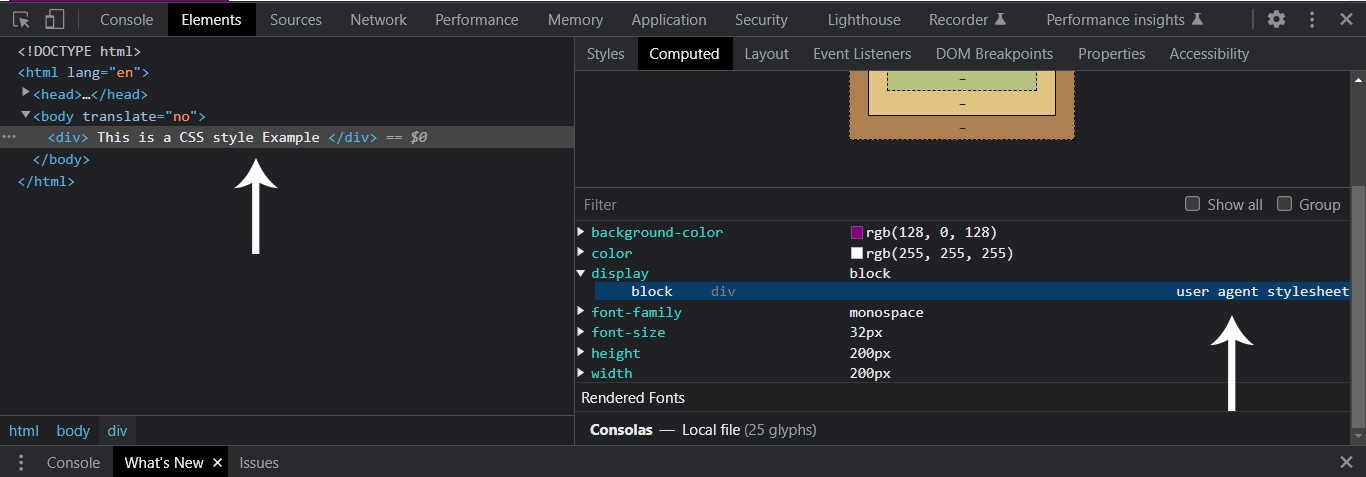
Now we just had one user-agent stylesheet rule, which is display block. The font-size of 16px and the font-family of Times New Roman had been overwritten.
- Inline style property
Now that we have seen how the user-agent and author-stylesheet work, let’s see how to manipulate the DOM with CSS Object Model with the style property.
The HTMLElement.style property specifies the inline style of an Element. This is a read-only property that returns CSSSyleDeclaration.
JavaScript:
// Assigning the div element to a div variable
  const div = document.querySelector('div');

// Using the style property to manipulate the div element
  div.style.backgroundColor = 'orange';
  div.style.border = '5px solid red';
  div.style.borderRadius = '5px';
  div.style.paddingTop = '10px';
  div.style.paddingLeft = '10px';
From the code example above, we assign a < div > tag to a div variable we created, and we apply a backgroundColor of orange ( #FFA500), a border of 5px solid, and a color of red, paddingTop and paddingLeft 10px across respectively.
When working with the style properties, it’s important to note that the CSS Reference property, a list of CSS properties accessible by the style property, is all in camelCase. For example, the background-color is written as backgroundColor with the (-) hyphen omitted.
This is because the (-) hyphen is an Arithmetic Operator for subtraction, so putting the hyphen (-) in between the background and color will throw an error. However, shorthand property does not require a hyphen (-), a perfect example of this border property we defined earlier.
Browser Output:
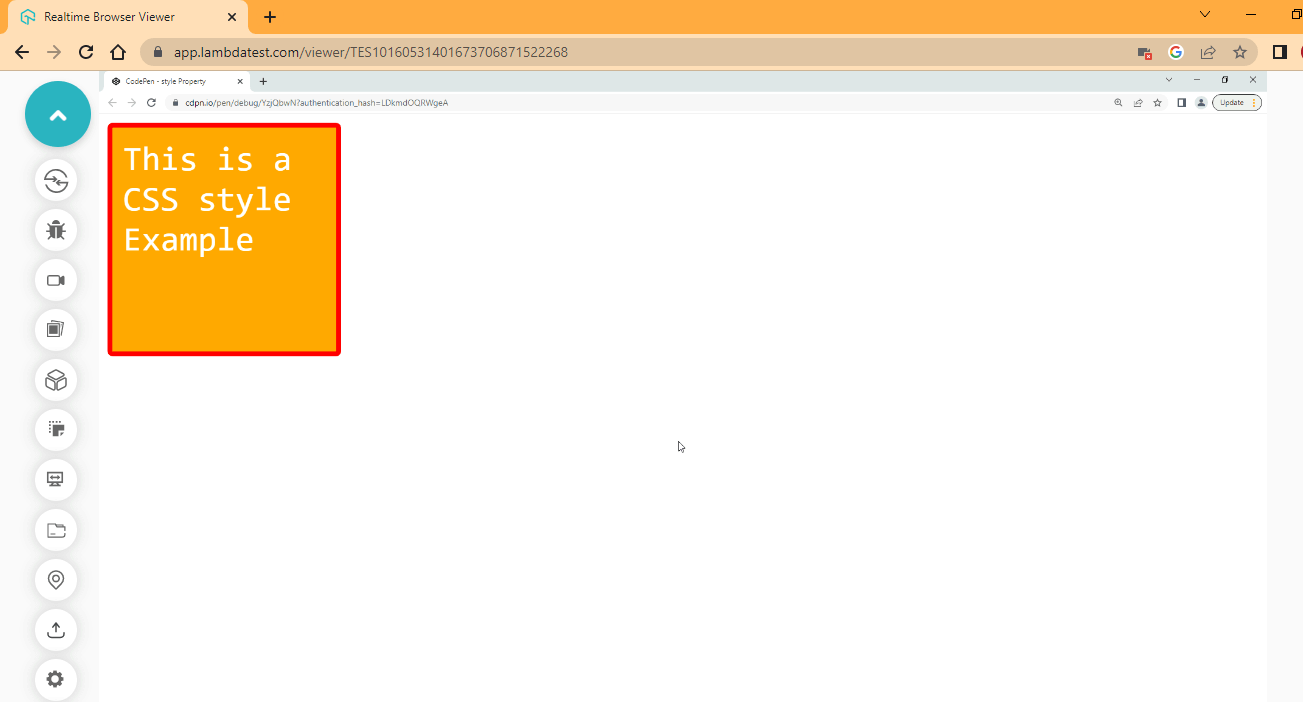
We have successfully changed the element styles using the style property, the style property, as mentioned earlier, returns the inline style. Any style we set using the style property appears aligned with the element. Let’s check our DevTools to see how this works.
DevTools:
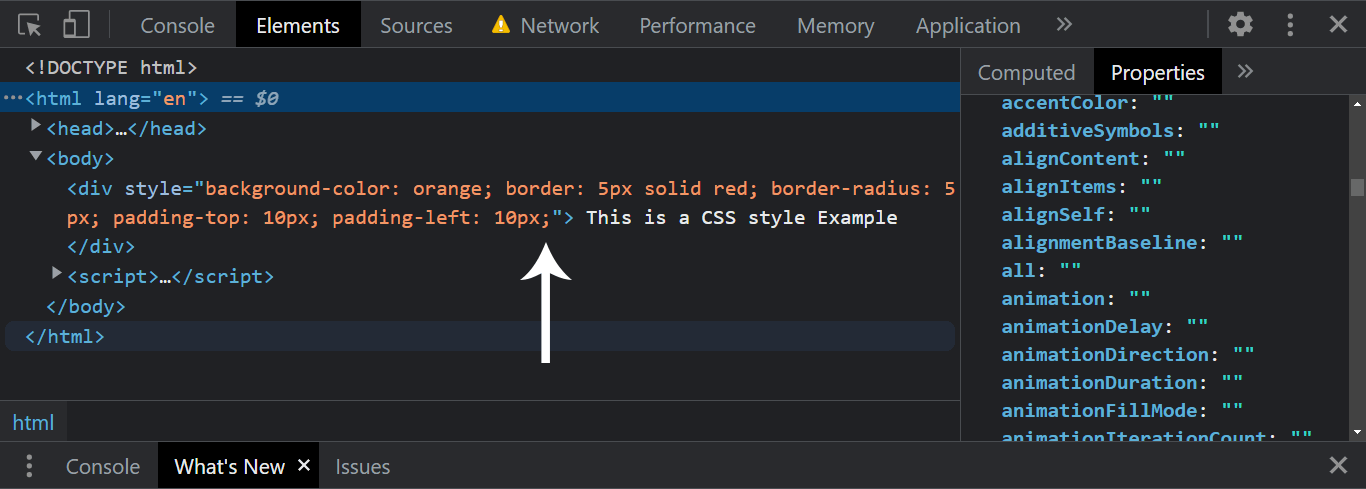
As seen from the DevTools output, each property is parsed inside the element as a value to the style property. While the style property can be beneficial, it can also cluster your HTML and JavaScript.
- getComputedStyle
The window.getComputedStyle() returns the values of an object of all the CSS properties of an element; this can either be the element values or pseudo-element values.
- Get Element Value with GetComputedStyles
Here, we will see how to return an element value with the GetComputedStyle method.
Syntax:
window.getComputedStyle(element)
Try the code below.
HTML:
<div>
   The example here is about window.getComputedStyle(element)
</div>
CSS:
div {
        width: 500px;
        height: 200px;
        background-color: purple;
        color: white;
        font-family:monospace;
        font-size: 20px;
        padding: 20px;
}
From the CSS code example above, we targeted the div tag and set the width to 500px, height to 200px, background-color to purple, color to white, font-family to monospace, font-size to 20px and padding to 20px across.
Now let’s see how we can access and return this value using JavaScript’s getComputedStyle() method.
JavaScript:
const div = document.querySelector('div');

const getProValue = window.getComputedStyle(div);

div.innerHTML = `We are using the getComputedStyle method to return the font-family which is: ${getProValue.fontFamily} and the font-size which is: ${getProValue.fontSize}`;
From the JavaScript code example above, we used the getComputedStyle() method to return the value of the font-family and font-size of the specified element.
Browser Output:
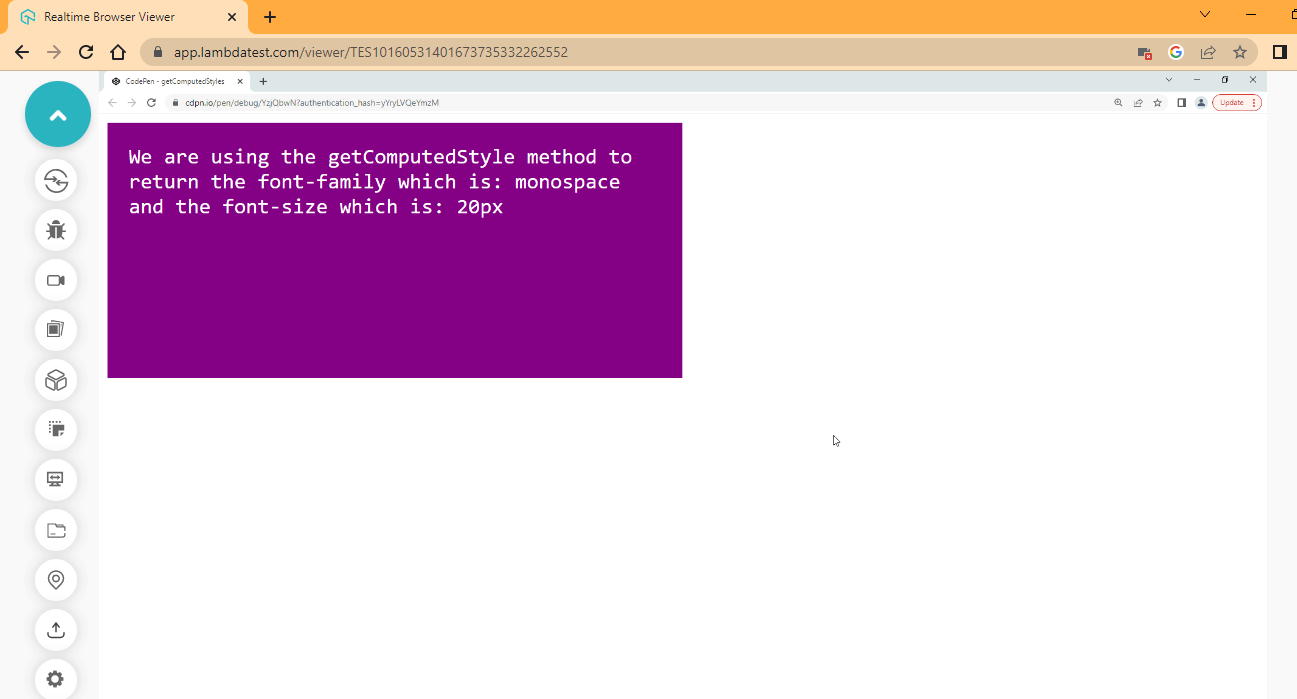
As seen from the browser output, we have the font-family value monospace and the font-size value 20px printed out.
Unlike the style property we explained earlier, the getComputedStyle() method does not set a value to an element. It returns a value set to that element and other associated properties, even if the value still needs to be specified.
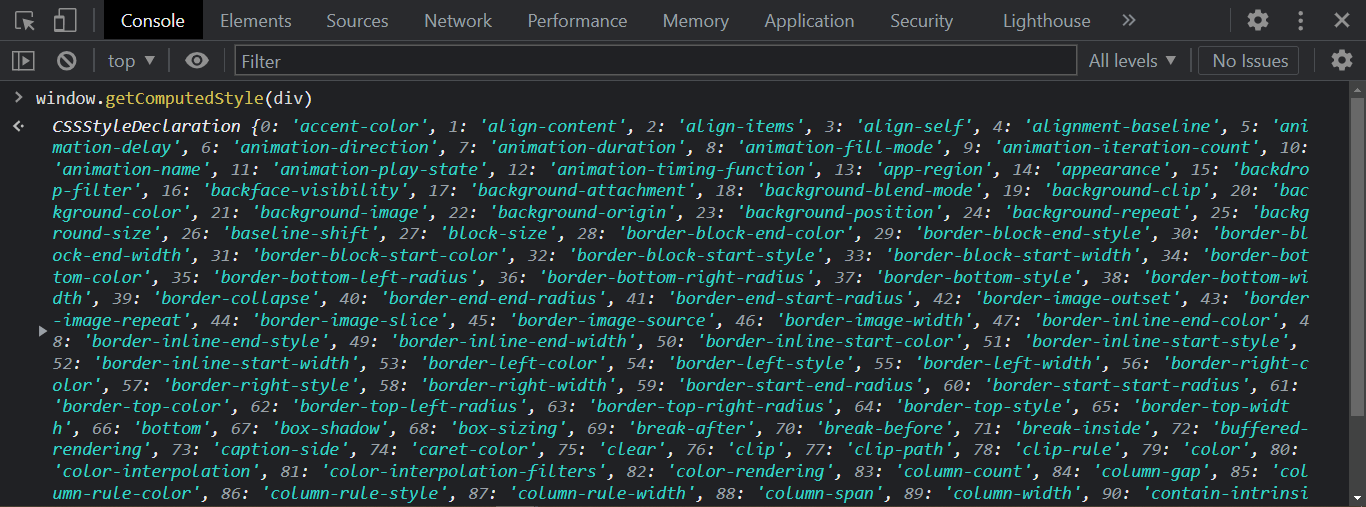
Let’s take another approach and return all the values associated with the < div > element using the getComputedStyle() method.
Type the following command and hit enter on the browser console.
window.getComputedStyle(div)
DevTools:
Through this usability testing tutorial, you will learn how usability testing is a great way to discover unexpected bugs, find what is unnecessary or unused before going any further, and have unbiased opinions from an outsider
The property is returned as a CSSSyleDeclaration object.
- Get Pseudo-Element with GetComputedStyles
In this section, we will see how to return a Pseudo-Element with the GetComputedStyle() method.
To do this, we have to assign the pseudo-element ::before or ::after as an argument to the GetComputedStyle() method to a specified element.
Syntax:
window.getComputedStyle(element, pseudo-element)
Try the code below.
HTML:
<p>Return background Pseudo-element</p>
CSS:
p::after {
    content: "";
    background: purple;

    display: block;
     width: 400px;
     height: 100px;
  }
From the CSS code example above, we created a Pseudo-Element after the paragraph’s content. We set the content to an empty string because we don’t want any content in the Pseudo-Element; the background is set to purple.
Then we set the display to block to bring the Pseudo-Element to a new line, a width of 400px and a height of 100px, respectively.
JavaScript:
const para = document.querySelector("p");
const printBG = getComputedStyle(para, "::after").background;

console.log("print the RGB value of background: ", printBG);
We targeted the background color of the Pseudo Element of the paragraph tag, and we are getting the background value set on the Pseudo-Element.
Now let’s see how this looks on the browser.
Browser Output:
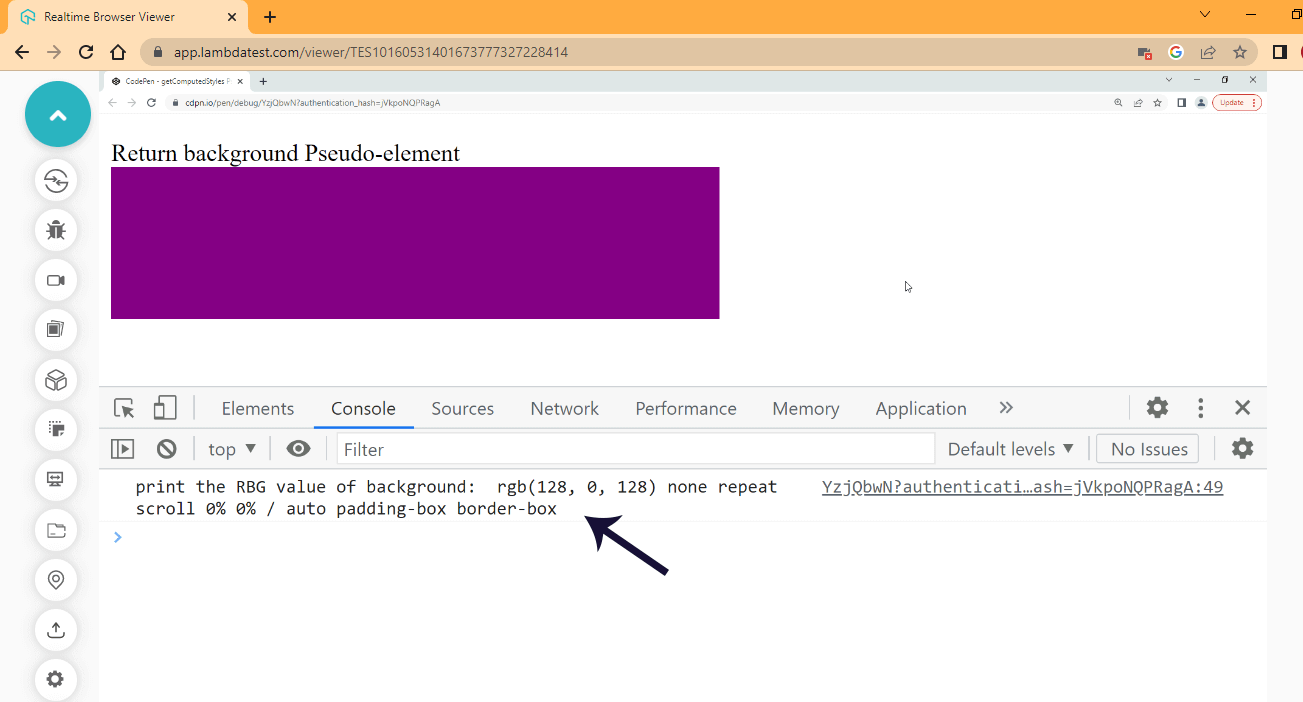
From the console output, the RGB value of purple is printed out.
Check out the top 18 advanced CSS tricks and techniques you should know in 2023 to help you master modern web design and development skills.
CSSStyleDeclaration Interface
In this section, we will see how we can use the CSSStyleDeclaration Interface, its properties, and the methods used in the CSS Object Model.
- getPropertyValue()
The getPropertyValue() method interface is used to return a string value of CSSStyleDeclaration of a given value of an element. The getPropertyValue() takes a property name string as an argument and returns the property value.
Syntax:
getPropertyValue(property)
Try the code below.
HTML:
 <main>
        <p>Return background Pseudo-element</p>
 </main>
CSS:
p{
    background: purple;
    color: white;

    width: 400px;
    height: 100px;

    font-family: monospace;
    font-size: 20px;
    padding: 10px;
}
From the code example above, we targeted the < p > tag and applied a background of purple, the color of white, a width of 400px, the height of 100px, font-family of monospace, font-size of 20px and padding of 10px.
Now let’s see how we can use JavaScript to return the width and height value of the paragraph element.
Try the code below,
JavaScript:
// Assigning the p element to a variable
const par = document.querySelector('p');

// Here we return the CSS properties by getting the
// computed styles.
const getProValue = window.getComputedStyle(par);

// Here we are returning the value of width and height to the innerHTML
par.innerHTML = `The the width of the paragraph is: ${getProValue.getPropertyValue('width')} and the height is: ${getProValue.getPropertyValue('height')}`;
From the JavaScript example, our code has three phases:
The first phase is when we assign the
< p >tag to a variable parThe second phase is when we get the properties of
< p >tag and assign it to the getProValue variable.The third phase is when we parse the variable value to the inner HTML and return the width and height properties assigned to the elements using the getPropertyValue() method.
Now let’s see how this runs on the browser.
Browser Output:
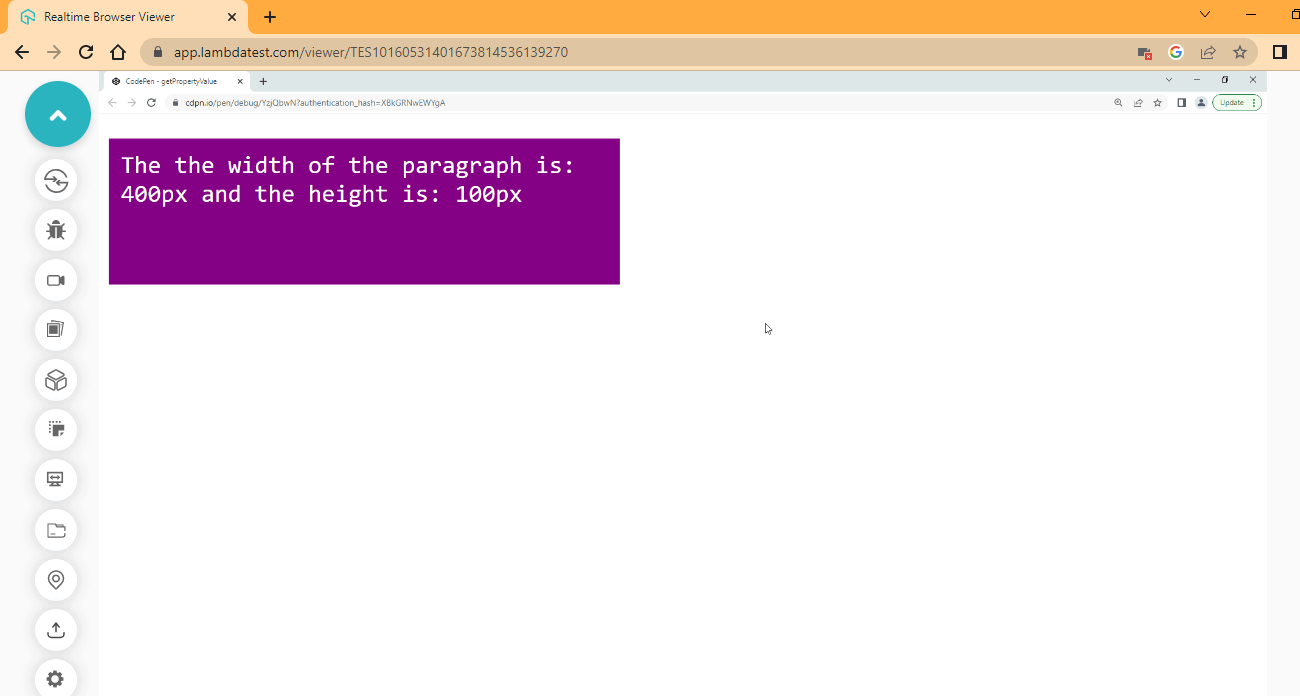
The width and height are printed from the browser output on the screen.
In this System testing tutorial, learn why System testing is important and all the intricacies of the System testing process.
- getPropertyPriority()
The getPropertyPriority() method interface of the CSSStyleDeclaration object is used to check the priority of a specified property of a given element.
If the critical keyword is present, it returns important; if not, it returns an empty string.
Syntax:
getPropertyPriority('background')
Try the code example below,
HTML:
<main class="first-case">
        <p class="present p" style="background: purple !important;">This element has "important" property</p>
        <p class="not-present p">This element does NOT has "important" property</p>
    </main>
From the HTML code example above, we created a < main > tag with a class of first-case and inside this tag, we nested two < p > tags, with a class of p for both tags and present and not-present for each respectively.
The present, as seen, is explicitly defined with a style property and a value of background purple and then the important keyword.
The not-present, on the other hand, is left without a style property.
CSS:
.first-case{
    display: flex;
}

.p{
    background: purple;
    color: white;

    width: 400px;
    height: 100px;

    font-family: monospace;
    font-size: 20px;
    padding: 10px;
    margin-right: 20px;
}

.not-present {
    background: orange;
}
From the CSS code example above, we targeted the parent tag, < main > with a class of first-case and we set it to display: flex, making the children element < p > to sit side by side because they are now flex items.
Then we use the p class, which both < p > tags have in common, and we set it to a background of purple, the color of white, a width of 400px, and a height of 100px.
Also, the font-family is set to monospace, and the font-size is set to 20px to make it bold for readability purposes. At the same time, the padding and margin-right take 10px and 20px, respectively.
Now let’s see how we can access this using JavaScript below,
JavaScript:
// Section ONE
    const par1 = document.querySelector('.present');
    const par2 = document.querySelector('.not-present');

    // Section TWO
    const proOne = par1.style.getPropertyPriority('background');
    const proTwo = par2.style.getPropertyPriority('background');

    // Section THREE
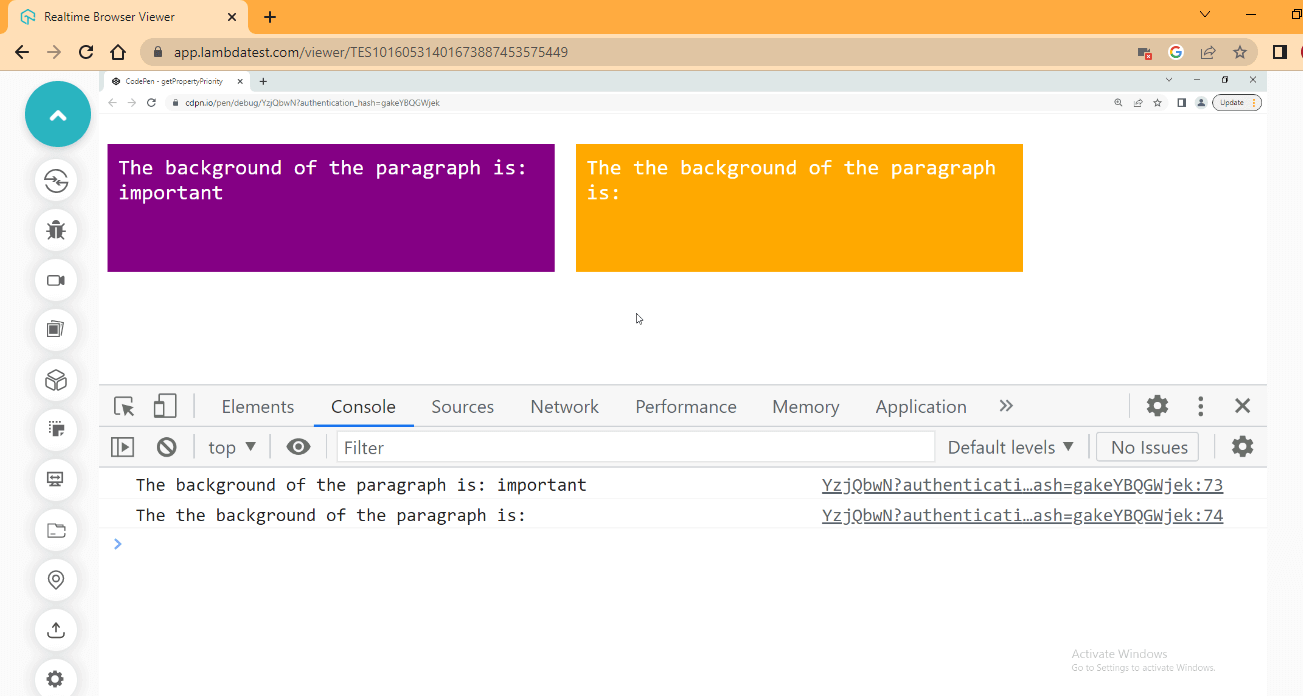
    const returnOne =  par1.innerHTML = `The background of the paragraph is: ${proOne}`;
    const returnTwo =  par2.innerHTML = `The the background of the paragraph is: ${proTwo}`;

    console.log(returnOne)
    console.log(returnTwo)
Our JavaScript code above is divided into three sections:
First, we apply the two
< p >to two different variables par1 and par2.Then, use the style property to return the background property, and the getPropertyPriority() method is used to check if the property being returned is specified with the important keyword.
Lastly, we use the innerHTML to print out the value to the screen.
Also, we return the value to the console for the case of clarity.
Browser Output:
A complete Manual testing tutorial covering all aspects of Manual testing, including strategies and best practices.
As seen from the browser preview and console, the important keyword is printed in the first tag while an empty string is returned.
- setProperty()
The setProperty() method interface of the CSSStyleDeclaration object is used to set a new value to the style property of a given element. The setProperty method takes in two or three arguments. The last argument (i.e., priority) is optional.
Syntax:
setProperty(propertyName, value)
setProperty(propertyName, value, priority)
Property name can be added in a single or double quote and then its value.
Second syntax is an important keyword in that double or single quote.
HTML:
<main class="first-case">
        <p class="p one">This element does NOT have "important" property</p>
        <p class="p two">This element has "important" property</p>
 </main>
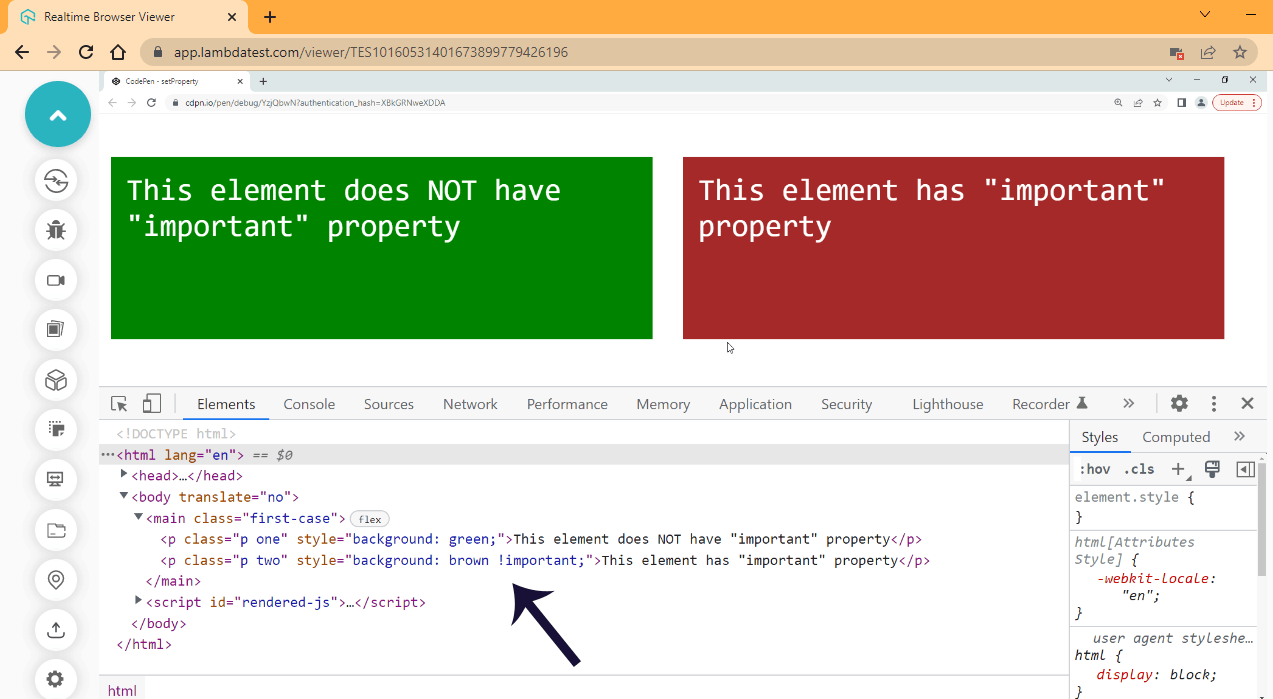
Just like the previous code example, the HTML code above has two < p >, what we are going to do is set the style property with a background-color of green and brown to both tags and apply the important keyword to the lask < p > tag.
CSS:
.first-case{
    display: flex;
}

.p{
    color: white;

    width: 400px;
    height: 100px;

    font-family: monospace;
    font-size: 20px;
    padding: 10px;
    margin-right: 20px;
}
From the CSS code above, the parent element < main > tag with a class of first-case is set to display: flex, while the two < p > paragraph tags take a width and height of 400px and 100px respectively. Color of white, font-family of monospace, font-size of 20px, padding of 10px, and margin-right of 20px.
Now try the JavaScript code below,
JavaScript:
// Section ONE
    const par1 = document.querySelector('.one');
    const par2 = document.querySelector('.two');

    // Section TWO
    const proOne = par1.style.setProperty('background', 'green');
    const proTwo = par2.style.setProperty('background', 'brown', 'important');
This section has two parts of the JavaScript code above that explain what we are trying to do. We apply a background of green to the first tag and a background of brown to the section with the important value.
Browser Output:
A comprehensive User Acceptance Testing (UAT) tutorial that covers what User Acceptance Testing is, its importance, benefits, and how to perform it with real-time examples.
While observing the browser output, launch your DevTools and check the element tag; observe how the style tag is now inserted into both elements as indicated by the arrow and compare it with the HTML code we wrote.
- removeProperty()
The removeProperty() method interface of the CSSStyleDeclaration object is used to remove a style property from a given element. The removeProperty method takes in the CSS style property to be removed as an argument.
Syntax:
removeProperty(property)
Try the code below.
HTML:
<p class="p one" style="background: purple;">This element does NOT have a background color</p>
Here, we make use of the same HTML element from the previous example.
Now let’s type out the CSS code.
CSS:
.p{
    color: black;

    width: 400px;
    height: 100px;

    font-family: monospace;
    font-size: 20px;
    padding: 10px;
    margin-right: 20px;

    border: 5px solid black;
}
In this section, we also make use of the same code from the previous section with some little modification. We changed the color from white to black, then added a border of 5px solid with the color black.
JavaScript:
// Section ONE
    const par1 = document.querySelector('.one');

 // Section TWO
 const proOne = par1.style.removeProperty('background');
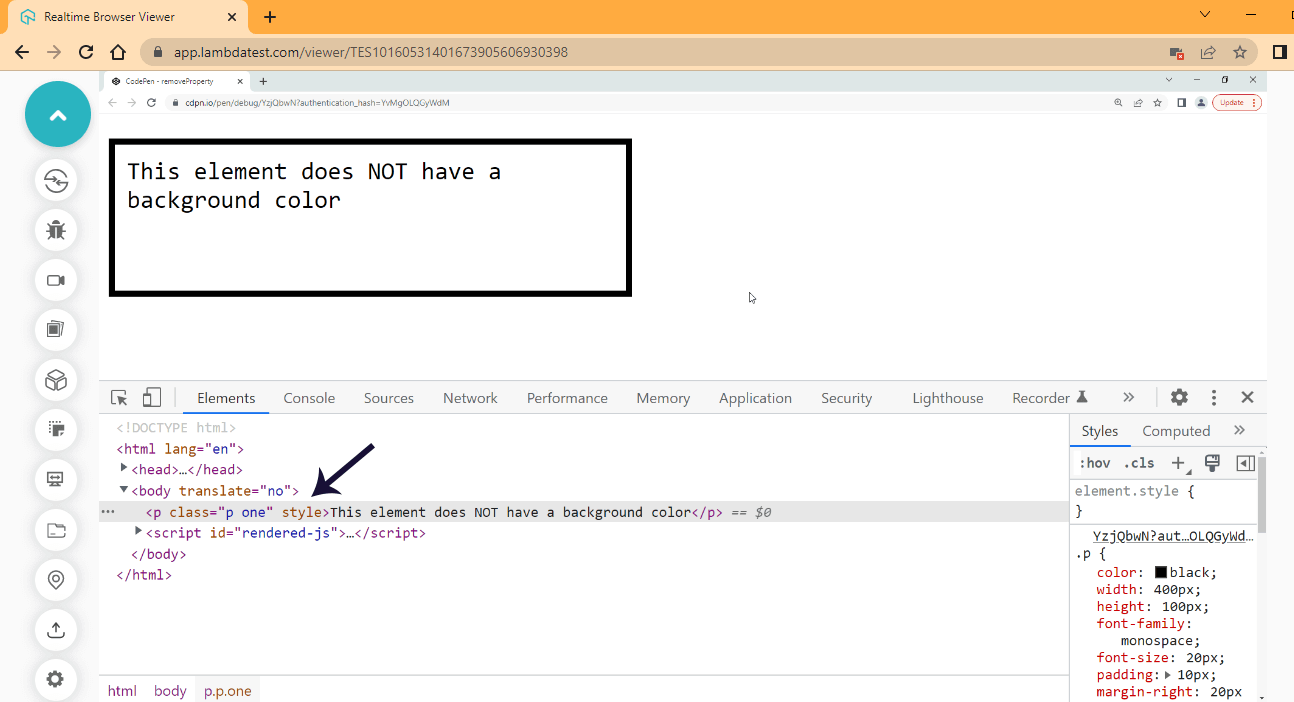
We used the removeProperty() method to remove the background poverty from the < p > element. From the browser output, you will see that the box does not have a background color.
It’s important to note that when using multi-line words like background-color, use a hyphen and place it inside a single or double quote.
See the browser output below.
Browser Output:
In this Ad hoc testing tutorial, let’s deep dive into what Ad hoc testing is, its advantages, disadvantages, types, characteristics, and their best practices.
The browser output shows that the style attribute is still present, but the background property and value are completely removed.
- item()
The item() method interface of the CSSStyleDeclaration object returns a style property from a given element. The item() method uses a positive integer as an argument and returns the property at the index.
If the item() method will return a space if you do the following;
Pass in a negative integer, for example, -1
If the integer passed is greater than the length of the properties of the specified element,
And if the item() is left empty without no value passed, it returns as Uncaught TypeError.
Syntax:
item(index)
Working with the item() method can be very confusing if you are trying it for the first time, so to make it easy, we are going to use two example methods to explain how the item() method works.
In the first example, we will use Longhand properties with the style attribute, while in the second example, we will use the Longhand and Shorthand properties.
Using item() to access longhand properties
In this section, we will use the longhand property within the style attribute and then use the item() method to return the given property at a specified index.
Try the code below.
HTML:
<p class="p one" style="color: white;
                        background-color: purple;
                        font-family: monospace;
                        width: 400px;
        ">
       This element has four items but its index at 0
       </p>
From the HTML code above, we have four properties assigned to the style attribute which are:
color
background-color
font-family and
width
We are going to be returning this property with the item() method.
CSS:
.p{
    width: 400px;
    height: 100px;

    font-size: 20px;
    padding: 10px;
    margin-right: 20px;
    border: 5px solid black;
}
We added the following CSS styles to the < p > tag, which is a width and height of 400px and 100px, font-size of 20px, a padding of 20px and border of 5px solid and color of black.
Many web developers forget font typography and spacing in CSS styling. Typography and font spacing in CSS is important for creating a visually appealing and easy-to-read website. To know in detail, please check our blog on CSS Font Spacing will cover everything you need to know about typography and font spacing in CSS and the different ways of achieving that.
JavaScript:
// Section ONE
    const par1 = document.querySelector('.one');

    // Section TWO
    const proOne = par1.style.item(0);
    const proTwo = par1.style.item(5);
    const proThree = par1.style.item(3);

    // Section THREE
    console.log(proOne);
    console.log(proTwo);
    console.log(proThree);
The JavaScript code is ground into three sections.
One, we assigned the
< p >to a variable.Two, we passed in three item() to three different variables.
Three, we printed out each value to the console.
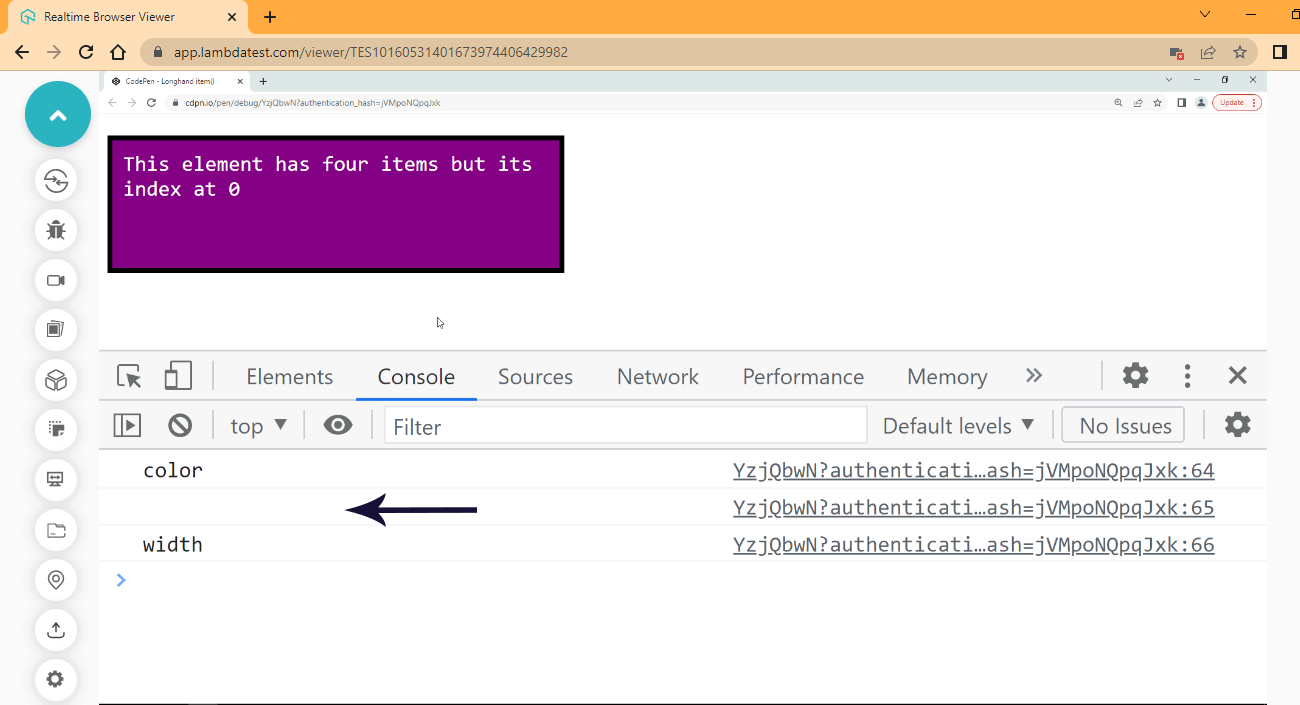
See the browser output below.
Browser Output:
Do you use a Mac and want to run the test in Internet Explorer? This article explores how to test Internet Explorer on Mac.
From the browser output, the color and width returned properties have a huge space in between. This is the return value of the second variable we logged to the console.
The second variable takes in an argument of 5 integers, which is longer than the maximum length value of the specified element.
To get the length of all properties in the element, type the following on the console.
Console:
par1.style.length
This should return the length value.
DevTool:
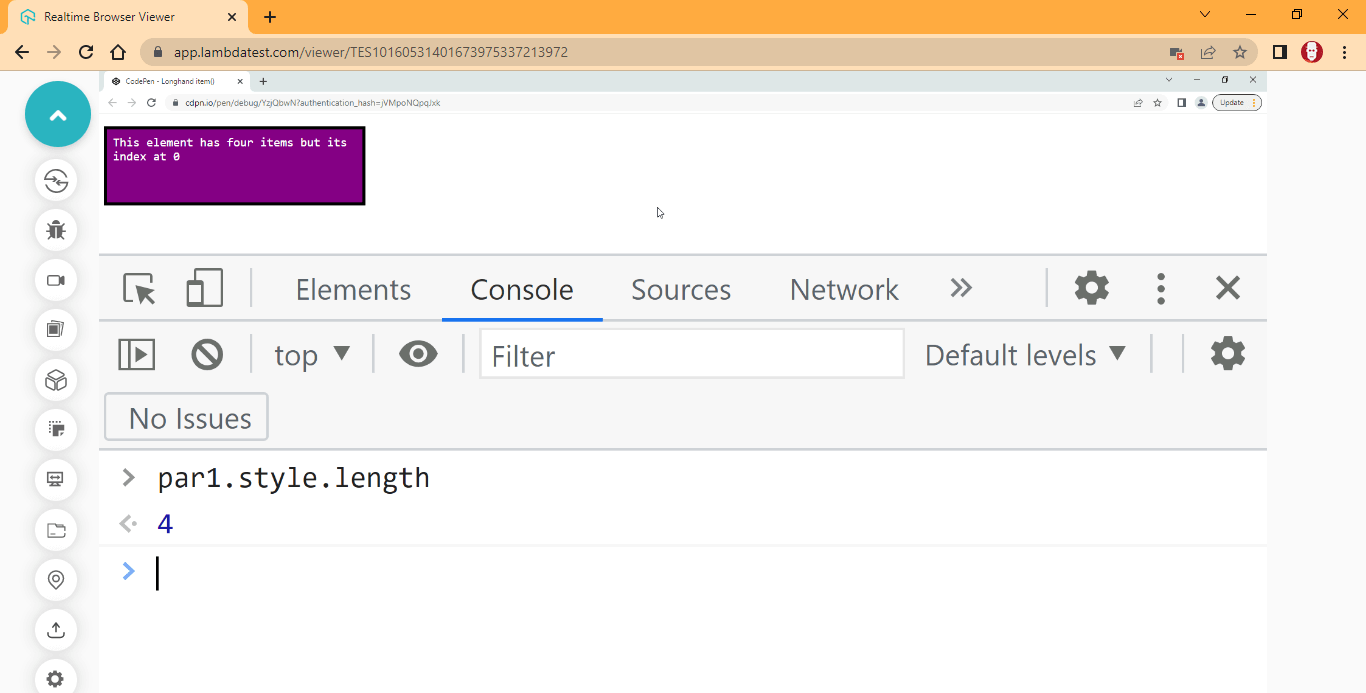
The length of the properties passed to the style attribute is 4, as seen from the console.
Using item() to access shorthand properties
Now that we have seen how longhand works, let’s add two shorthand properties and remove two longhand properties from the style attribute.
Try the code below.
HTML:
<main class="first-case">
        <p class="p one" style="color: white;
                                background: purple;
                                font-family: monospace;
                                border: 5px solid black;
        ">
       This element has four items but its index at 0
       </p>
From the HTML code above, we replace just two colors as follows;
Background-color longhand property to background shorthand
width to border
While the remaining two remain the same.
Try the JavaScript code below.
JavaScript:
// Section ONE
    const par1 = document.querySelector('.one');

    // Section TWO
    const proOne = par1.style.item(0);
    const proTwo = par1.style.item(5);
    const proThree = par1.style.item(3);

    // Section THREE
    console.log(proOne);
    console.log(proTwo);
    console.log(proThree);
Type and run the JavaScript code above.
Browser Output:
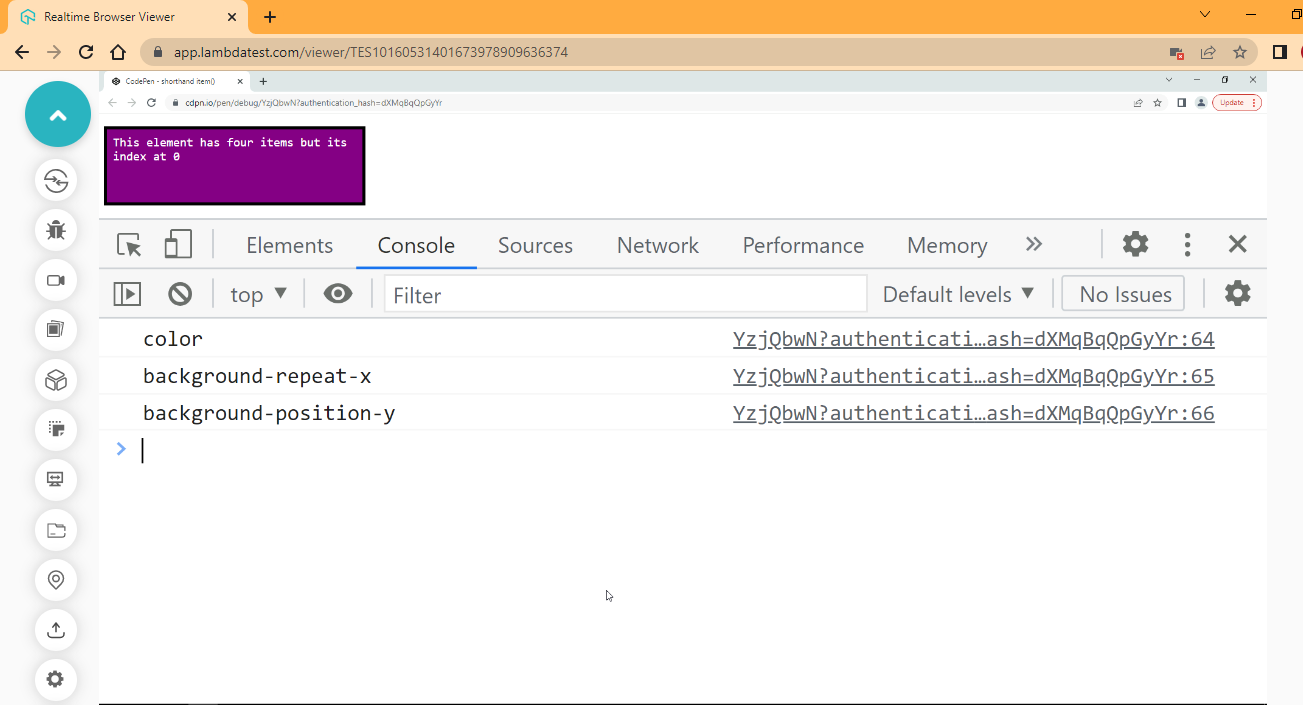
From the browser output, we have color background-repeat-x, and background-position-y printed on the console.
The HTML file has the same number of properties just like the first one; the only difference is that we have two shorthand properties. So the item() fetches and returns every other property associated with the shorthand properties we assigned to the style attribute whether or not we explicitly specified it.
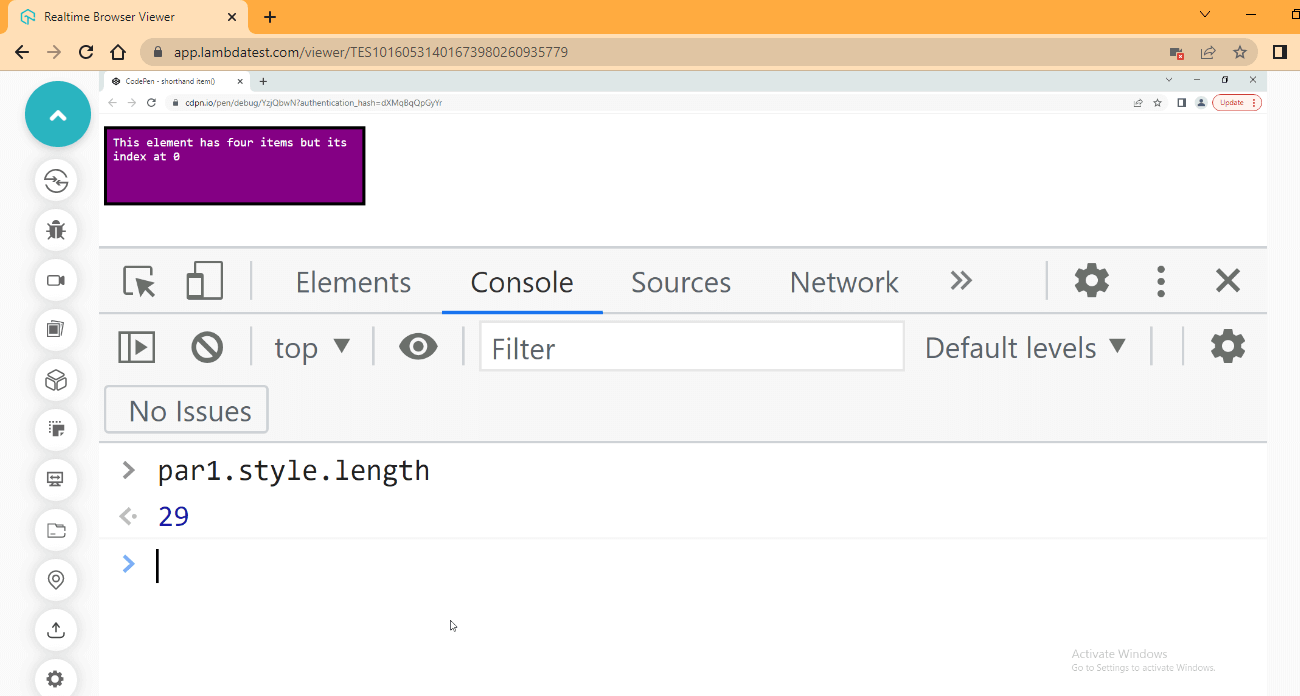
To see how this was done, let’s access the length.
Console:
par1.style.length
This should return the length value.
Upload your app for testing within seconds using the LambdaTest cloud and perform mobile app test right away. Find bugs early on, improve performance, quality, user experience and make the most of mobile application testing on LambdaTest.
From the browser output, 29 is printed out, as seen from the console.
To check all the properties being returned. Type and run the code below on the console.
Console:
par1.style
This should return all the properties associated with the element.
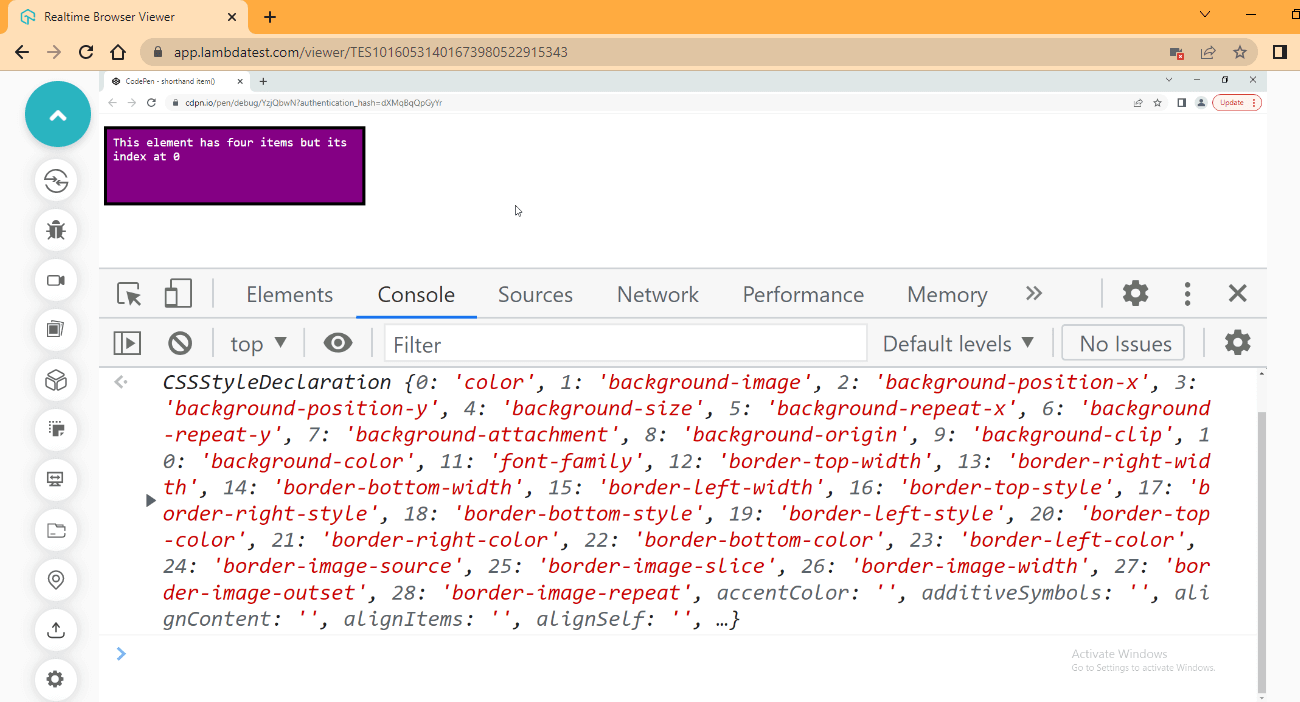
It’s essential to remember that the length is 28, and its index is 0, making it 29.
StyleSheet interface
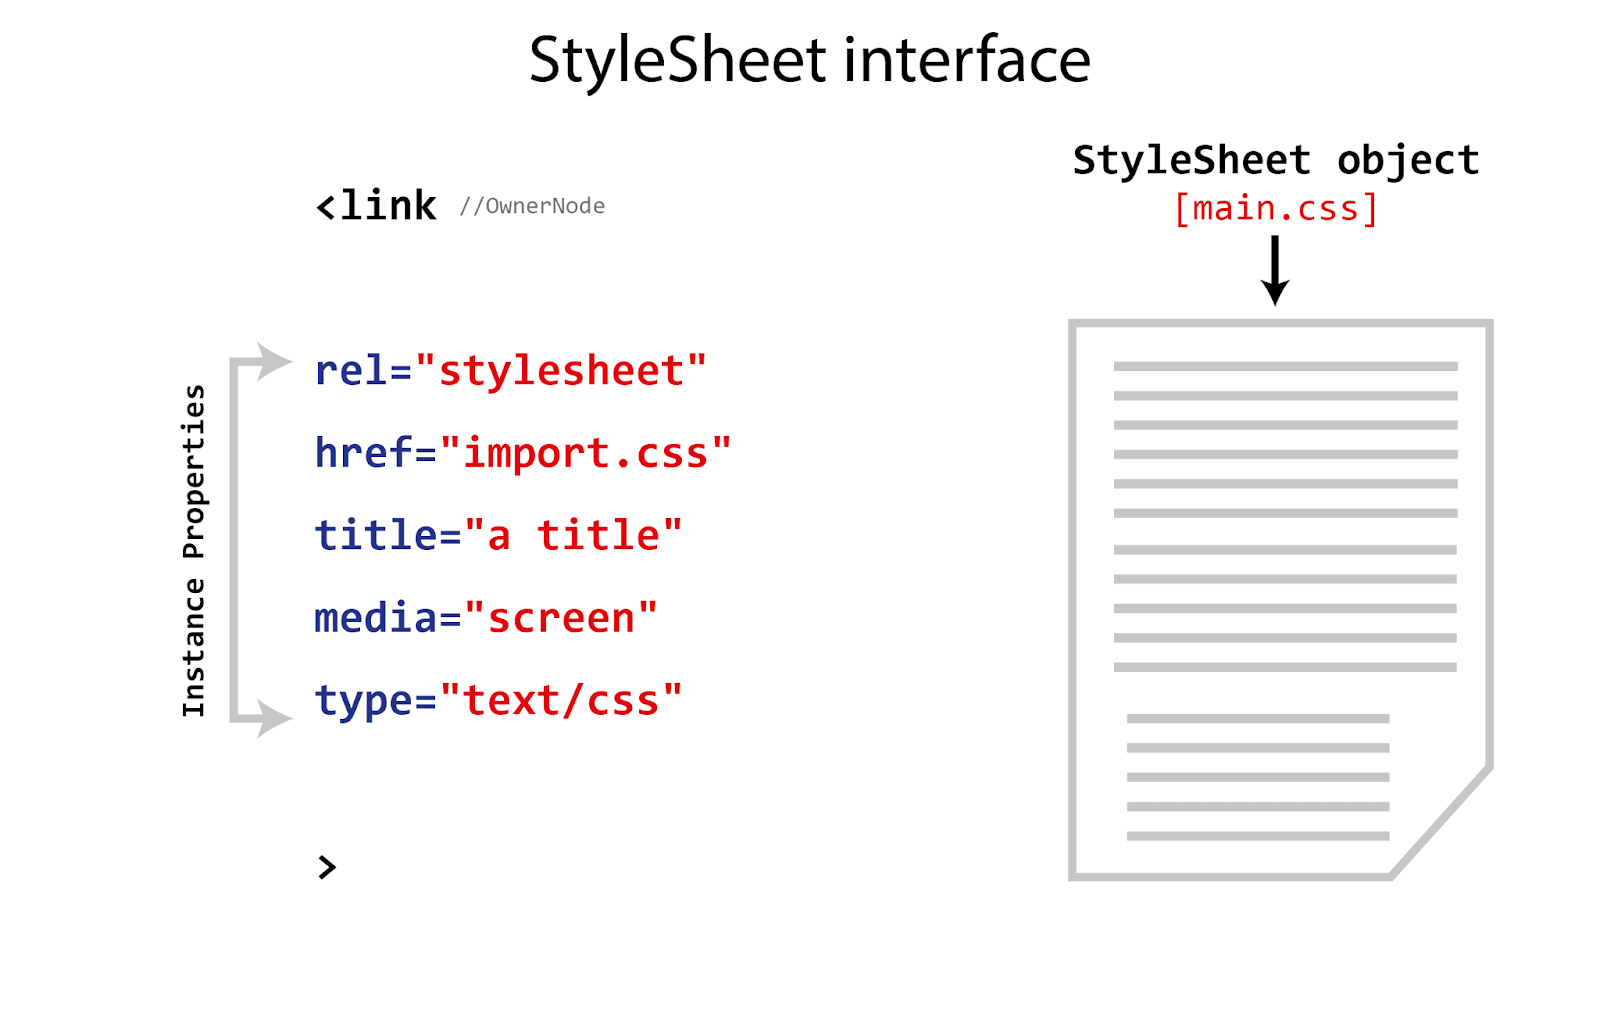
Now, in this section, we’ll discuss another style interface that comes under CSS Object Model, i.e., the Stylesheet interface presents an object, a single stylesheet within the HTML document.
See the illustration for a better understanding.
Instance Properties:
To put it in simple terms, the instance properties of the stylesheet interface represent the attributes within the HTML < link > tag, including the following.
disabled: this is a boolean value that determines whether the stylesheet is prevented from applying to the document.
href: use to return the location of the stylesheet.
media: used to set or specify the media the stylesheet is made for, E.g, screen/print.
ownerNode: return the node connecting the stylesheet to the document. E.g., the
< link >tag.parentStyleSheet: return the current stylesheet if present or null if not present.
title: returns the advisory title of the current stylesheet.
type: return a string specifying the style language of the stylesheet.
StyleSheetList
This is another important style in the CSS Object Model, i.e., the StyleSheetList interface that returns a collection of CSSStyleSheet objects and behaves like an array-like object. It can be accessed using length property and item() methods.
Consider the illustration below.
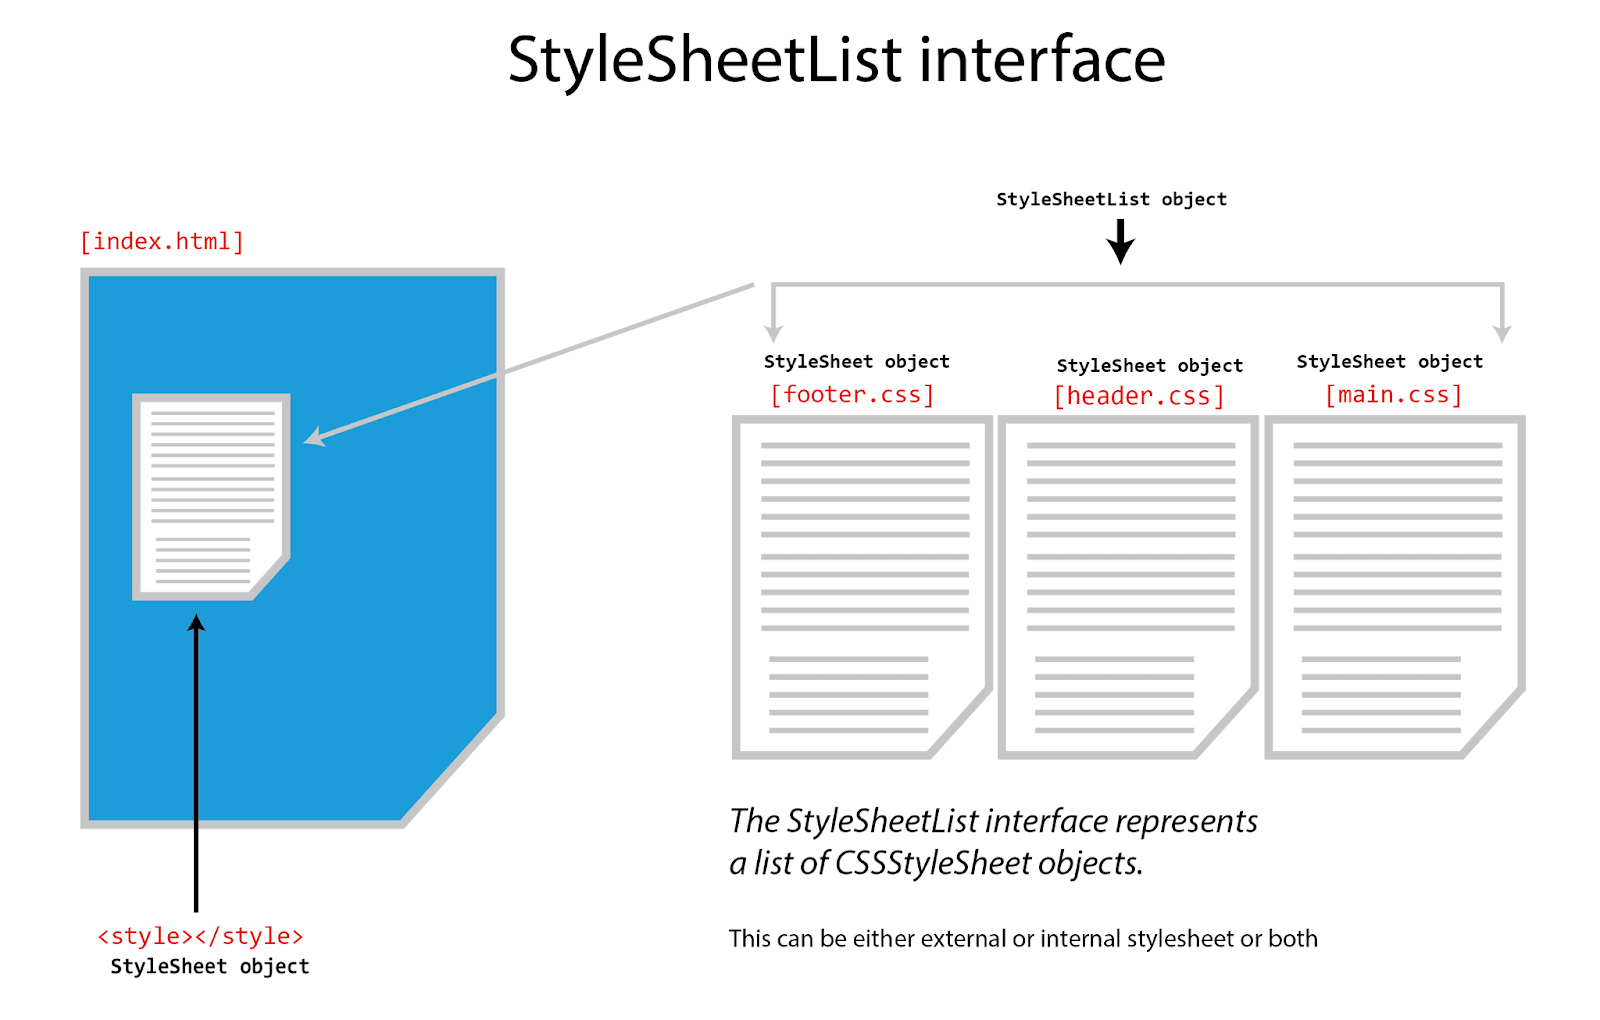
Before we write any code, let’s see exactly how StyleSheetList works in the CSS object model.
- length (Instance Property)
The length instance property of the StyleSheetList object returns the total length of the stylesheet object present in the document. For example, when we link a stylesheet to our HTML document using the HTML < link > tag, we have added one stylesheet object to that document which will be returned by the length instance property anytime we try to access it.
However, if we use the internal style tag < style > instead, we have added a stylesheet object. So the number of < link > we add determines the number that will be returned by the length property when we choose to use it.
Also, remember that using the @ import CSS keyword to import an external file through the CSS file, the length property will not return it, as its only return using the < link > tag and internal < style > tag.
And if there happens to be no tag, that is < link > and < style > tag. The length property returns 0 integers.
Consider the code example below,
HTML:
<!DOCTYPE html>
<html lang="en">
<head>
    <meta charset="UTF-8">
    <meta http-equiv="X-UA-Compatible" content="IE=edge">
    <meta name="viewport" content="width=device-width, initial-scale=1.0">
    <title>CSSOM EXAMPLES</title>

    <link rel="stylesheet" href="main.css">
    <link rel="stylesheet" href="style.css">
    <link rel="stylesheet" href="import.css" title="a title" media="screen" type="text/css">

</head>

<style>
    /*
  PLEASE NOT THIS WAS INTENTIONAL
  This internal style tag was keep like this on purpose
*/
</style>

<body>
...
</body>
</html>
From the HTML code example above, we added three < link > tags and one < style > tag. Making it four stylesheet objects we have added to the document.
Now let’s see if the length property will return the stylesheet number of 4 as expected.
Consider the JavaScript code below,
JavaScript:
const stylesheet = document.styleSheets.length;
 console.log(stylesheet);
The JavaScript code seems very basic here. We use the length property to return the number of stylesheet objects in the document.
Console:

As seen from the console. The number 4 integer is logged out.
- item() (Instance Method)
The item() instance method of the StyleSheetList object returns a single stylesheet item from the total length of the stylesheet object present in the document.
For example, all you have to do is pass in a positive integer as an argument, and the item() returns the exact stylesheet based on the index provided.
Syntax:
item(index)
It’s important to note that the item() method is indexed at 0 integers. So index three will log out the fourth item.
Consider the JavaScript code below.
JavaScript:
const stylesheet = document.styleSheets;
console.log(stylesheet. item(3));
Console:
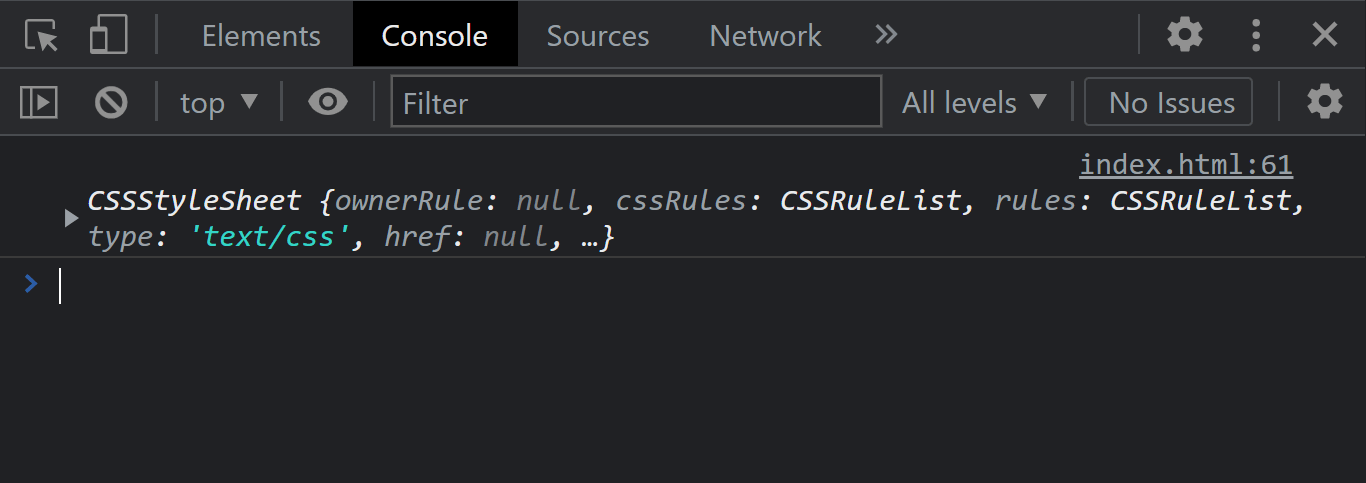
We have successfully logged the fourth item of the CSSStylesheet object.
- Passing StyleSheet Object to a new Array
Using array methods will throw an error, but we can use a for loop to convert it into an array and loop through them.
Now let’s see some examples below.
JavaScript:
const stylesheet = document.styleSheets;

let newArr = [];

for(let i = 0; i < stylesheet.length; i++){
    let output = newArr.push(stylesheet[i]);

    console.log(output)
}
From the code, what we are doing is using a for loop to loop over each item of the stylesheet object and then assign it to a new array called newArr.
Then we store the value in an output variable logged into the browser console.
Console:
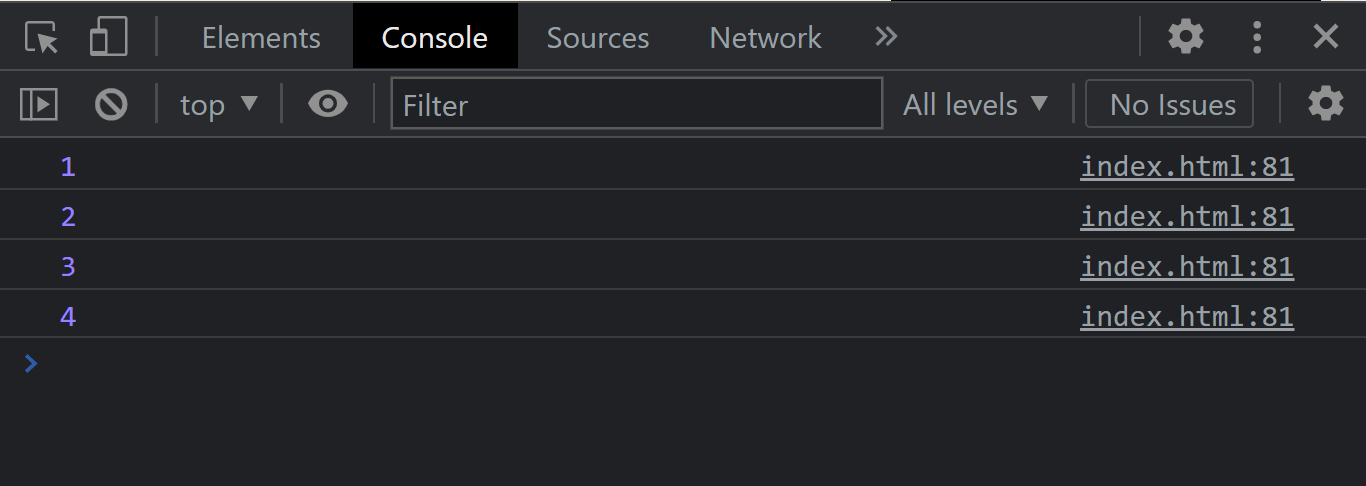
As seen from the console. The four stylesheet objects are printed out.
CSSStyleSheet
The CSSStyleSheet interface lets you inspect, return or modify CSS properties and values within the stylesheet objects. This behaves like an array-like object and can be accessed through the length property and the CSSStyleSheet instance methods under CSS Object Model properties.
Consider the illustration below.
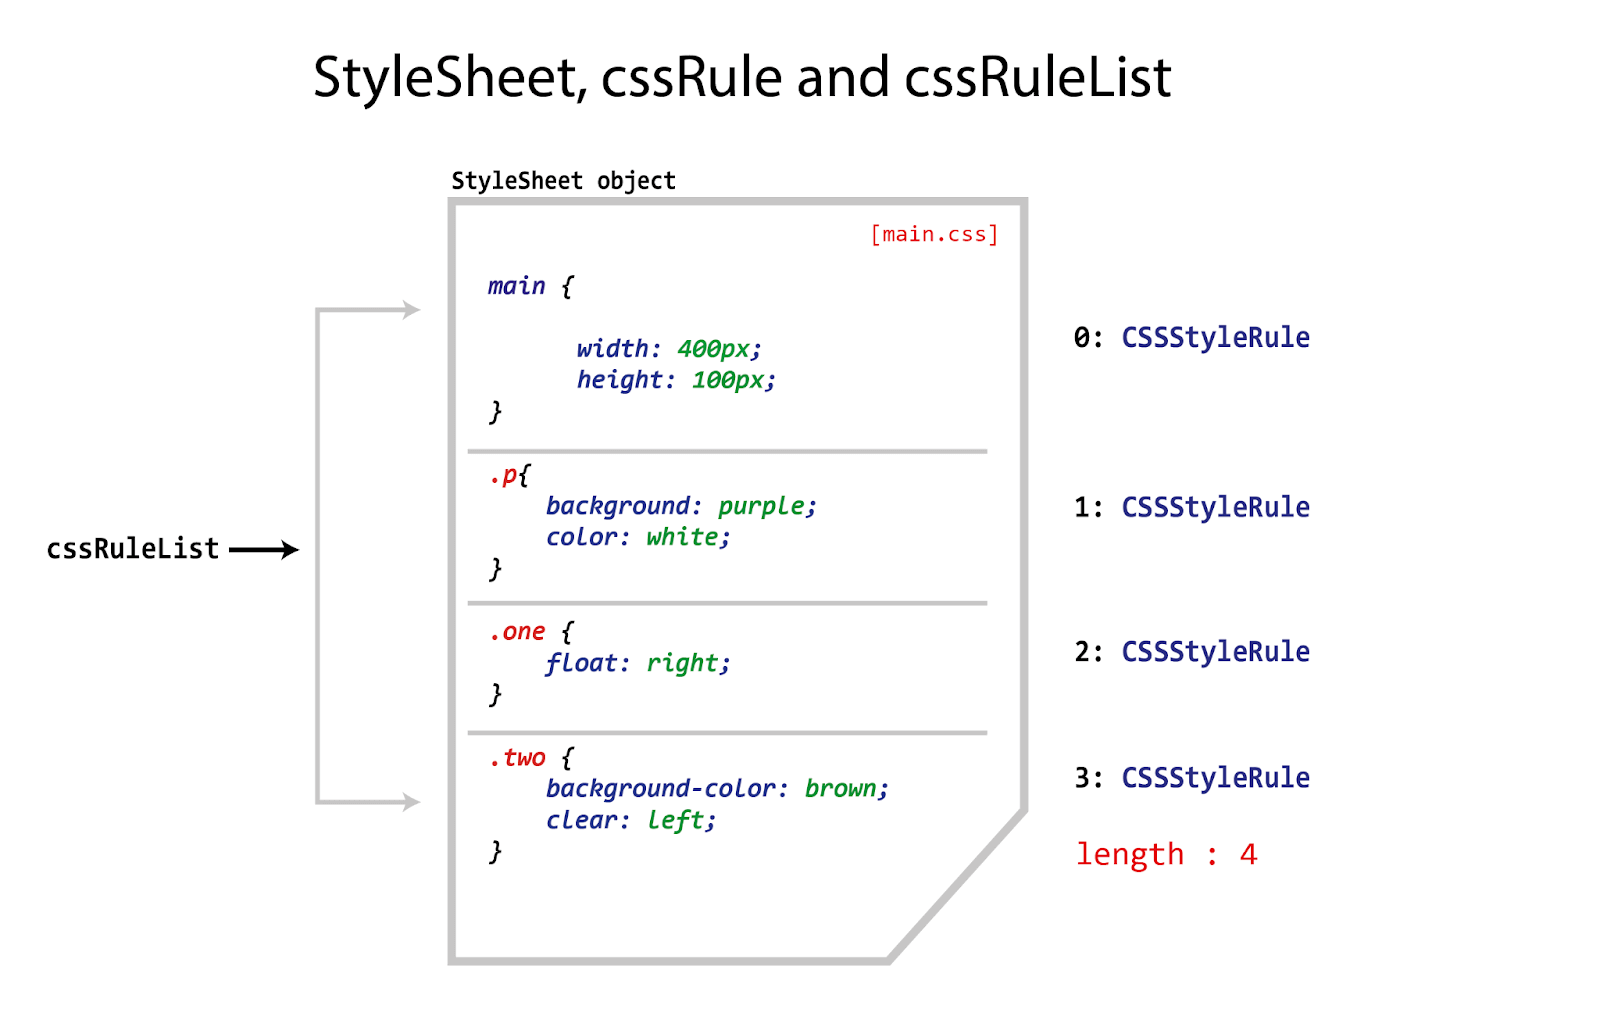
The stylesheet object contains a collection of CSS properties and values in a code block for context.
Consider the code below,
CSS:
main {

    width: 400px;
    height: 100px;
}
The above CSS code is one code block, which is a cssRule. A code block in CSS is a collection of properties and values wrapped inside open and closed curly braces.
This code block is what is referred to as a cssRule. When we have two or more cssRule, it is called a cssRuleList, a list of cssRule. The cssRuleList can be accessed via the cssRules property.
The @import and @media are also part of the cssRuleList.
Instance Properties
- cssRules
The cssRules of the CSSStyleSheet interface lets you return a live cssRuleList within the stylesheet object. This is a real-time update of the cssRuleList.
Try and run the code below.
CSS:
<style>
main {

    width: 400px;
    height: 100px;
}

.p{
    background: purple;
    color: white;
}

.one {
    float: right;
}

.two {
    background-color: brown;
    clear: left;
}

div {
    font-size: 20px;
    font-family: monospace;

    padding: 10px;
    margin-right: 20px;
    border: 5px solid black;
}

</style>
From the CSS code above, we have five cssRule which is declared inside a stylesheet object. The stylesheet object, in this case, is in the < style > tag.
Now let’s see how we can return each cssRule with JavaScript.
Type and run the JavaScript code below,
JavaScript:
const stylesheet = document.styleSheets[0].cssRules;
console.log(stylesheet);
Console:
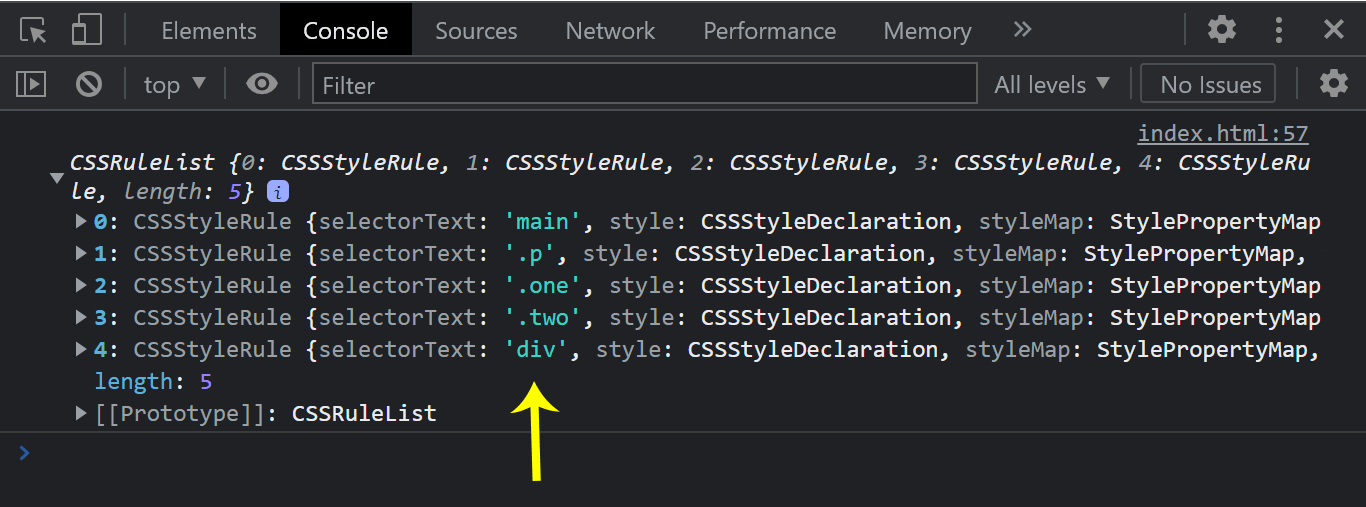
As indicated by the yellow, see each property on the console.
ownerNode
The ownerNode of the CSSStyleSheet interface lets you return the stylesheet object in the document.
Try the code below,
JavaScript:
const stylesheet = document.styleSheets[0].ownerNode;
console.log(stylesheet);
Console:
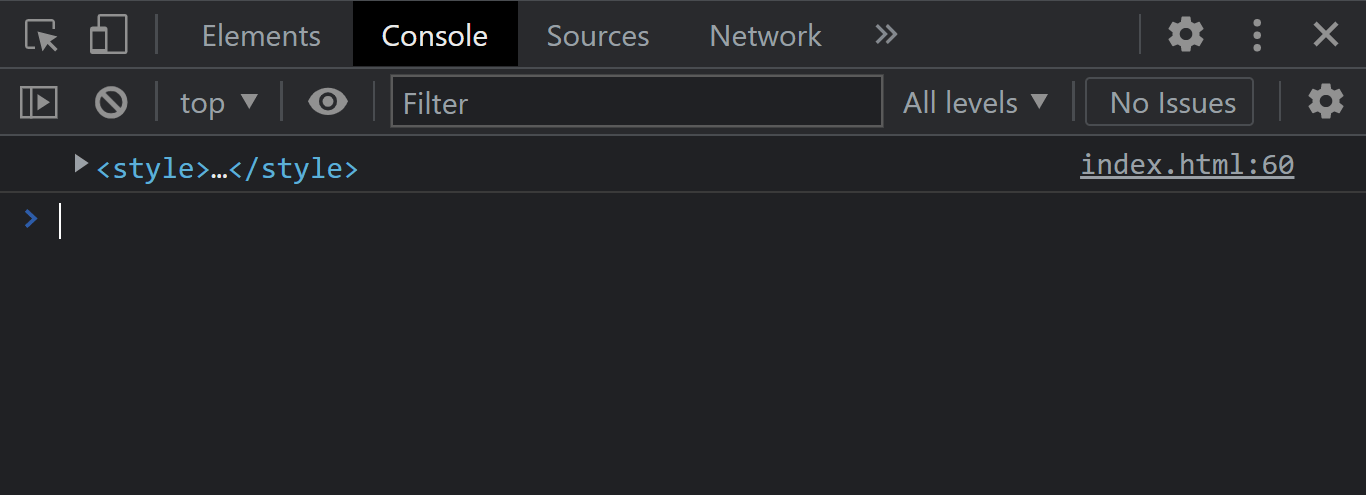
Since we make use of the < style > tag as our stylesheet object. This becomes the ownerNode.
Instance Methods
- deleteRule()
The deleteRule() method of the CSSStyleSheet interface lets you remove a cssRule within the stylesheet object.
Syntax:
stylesheet.deleteRule(0);
Try the JavaScript code below,
JavaScript:
const removeRule = document.styleSheets[0];
removeRule.deleteRule(1)

 console.log(removeRule.cssRules.length);
Console:
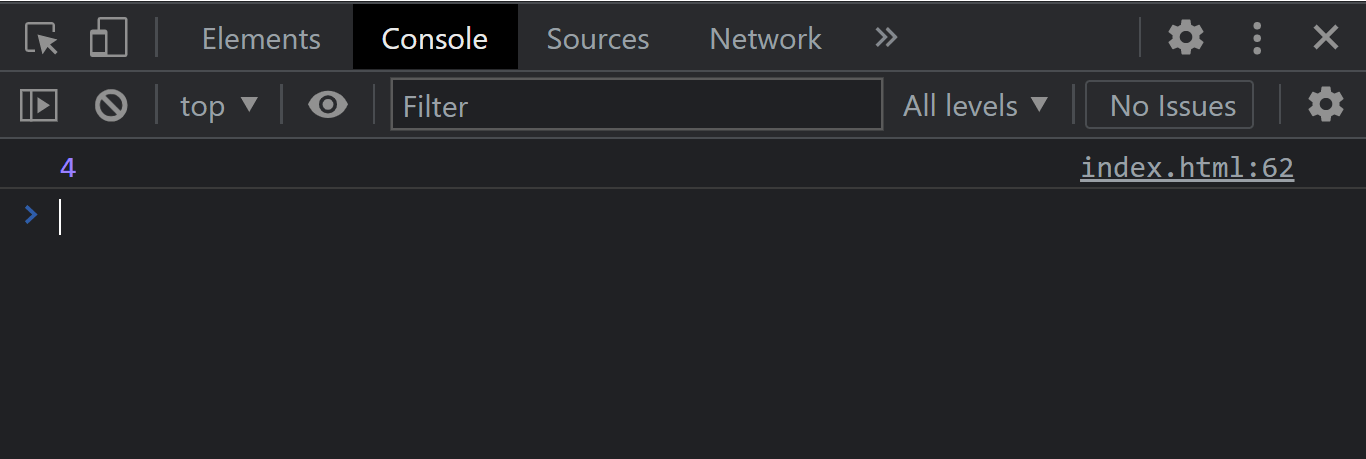
From the console output, we have an output of 4 as the return number.
- insertRule()
The insertRule() method of the CSSStyleSheet interface lets you insert a new cssRule within the stylesheet object.
Syntax:
stylesheet.insertRule(rule)
stylesheet.insertRule(rule, index)
Try the JavaScript code below,
JavaScript:
const addRule = document.styleSheets[0];
addRule.insertRule('p { color: red; }', 1);

console.log(addRule.cssRules.length);
From the JavaScript code example above, we insert the insertRule(); and then insert the p {color: red;} cssRule in the index 1 of the stylesheet object.
Making the total length of the cssRule 6 instead of 5. Now let’s check the browser output.
Console:
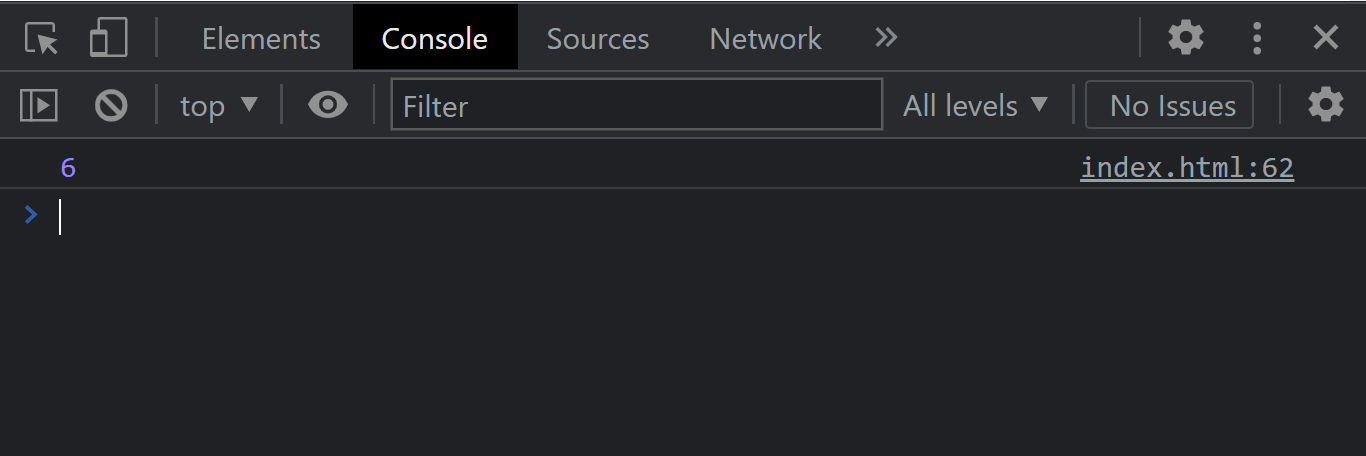
From the console output, the number 6 printout is the total length of the cssRuleList.
CSSRule
In this section, we’ll discuss the cssRules of the CSSStyleSheet interface in CSS Object Model that allows you to represent a single code block of a stylesheet object.
Instance Properties
- cssText
The cssText instance property of the cssRule interface returns the cssRule as plain text.
Try the code example below.
CSS:
main {

    width: 400px;
    height: 100px;
}

.p{
    background: purple;
    color: white;
}

.one {
    float: right;
}

.two {
    background-color: brown;
    clear: left;
}
JavaScript:
const printRule = document.styleSheets[0];
console.log(printRule.cssRules[1].cssText);
From the browser output, we used the cssText property to access the second cssRule from the stylesheet object of the current document. The 1 integer used represents the second index.
Console Output:
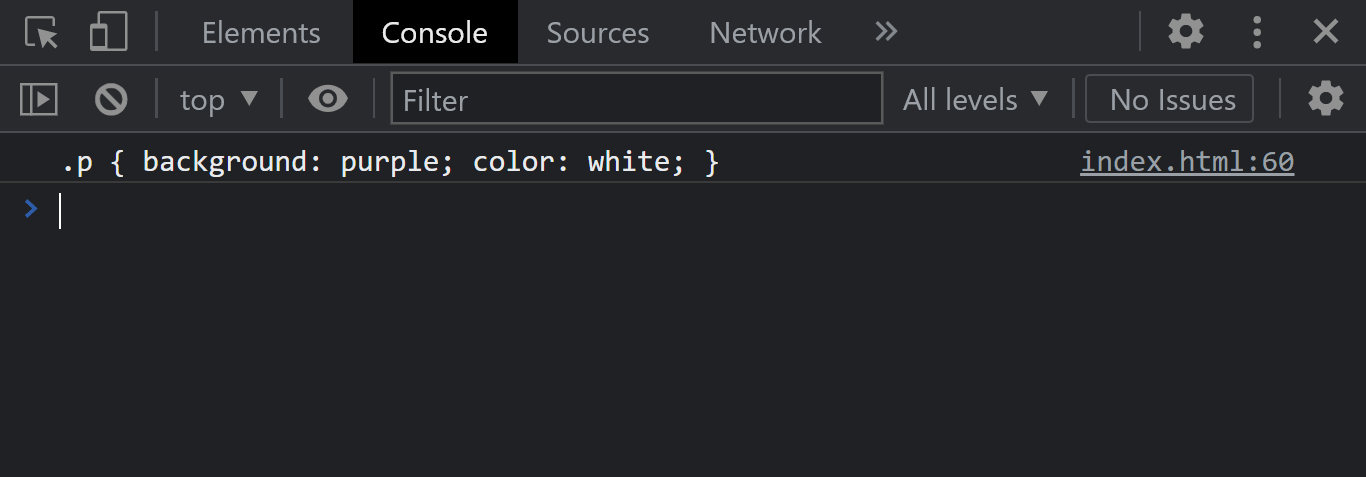
We have the second cssRule printed out from the console output.
- parentRule
The parentRule instance property of the cssRule interface returns the cssMediaRule. If this is not present, it returns a null.
Try the code example below.
CSS:
@media (min-width: 900px) {
   .header {
    display: flex;
    flex-direction: column;
    justify-self: unset;
    }
}

main {

    width: 400px;
    height: 100px;
}

.p{
    background: purple;
    color: white;
}

.one {
    float: right;
}

.two {
    background-color: brown;
    clear: left;
}
We have added the media queries to a class of .header, which takes a display of flex, a flex-direction of column and justify-self of unset.
Now let’s see how we can return the CSSMediaRule using the parentRule.
JavaScript:
const getRuleList = document.styleSheets[0].cssRules;
const getRules = getRuleList[0].cssRules;

console.log(getRules[0].parentRule);
Console Output:

From the console output, we logged out of the CSSMediaRule.
- parentStyleSheet
The parentStyleSheet instance property of the cssRule interface returns the CSSStyleSheet interface object where cssRule is defined in.
Type and run the code below:
JavaScript:
const getRuleList = document.styleSheets[0].cssRules;
const getParent = getRuleList[0].cssRules;
console.log(getParent[0].parentStyleSheet);
From the code above, we are accessing the cssRuleList and returning the parentStyleSheet of the cssRule, which is a CSSStyleSheet object.
Console Output:

We logged out the parent stylesheet object, the CSSStyleSheet interface, from the console output.
CSSMediaRule
An important rule in the CSS Object Model is the CSSMediaRule interface that represents a single CSS @media rule of the CSS at-rule object. It takes a condition and a statement; when the condition is met, the statement is returned.
Instance Properties
- Media
The CSSMediaRule.media instance property of the CSSMediaRule interface returns a MediaList.
Try the code example below.
CSS:
 @media (min-width: 900px) {
    .header {
    display: flex;
    flex-direction: column;
    justify-self: unset;
    }
}

main {

    width: 400px;
    height: 100px;
}

.p{
    background: purple;
    color: white;
}

.one {
    float: right;
}
JavaScript:
let getMedia = document.styleSheets[0].cssRules;
console.log(getMedia[0].media);
We are using the media property to return the first mediaRule from the MediaList of CSSMediaRule
Interface.
Now let’s take a look at the console for output.
Console Output:

From the console output, we have the first mediaRule logged out, an index at 0.
CSSKeyframeRule
CSS keyframes are one of the kinds of animations used in the CSS Object Model that represents a set of CSS rules for a given keyframe.
Instance Properties:
keyText
0% to 100% (This will have an index of 0 and 1 and a length of 2)
The CSSKeyframeRule.KeyText instance property returns the CSSKeyframesRule selector. Which range from 0% to 100%. Each selector can be accessed by specifying a value based on the index of the selector. For example, a keyframe selector might range from the following.
0%, 50% to 100% (This will have an index of 0, 1, and 2 and a length of 3)
0%, 40%, 80% to 100% (This will have an index of 0, 1, 2 and 4 and a length of 4)
This will largely depend on the number of ranges(%) available.
Try the code example below,
CSS:
@keyframes animate {
  0% {
    background-color: red;
  }

  50% {
    background-color: green;
  }

  100% {
    background-color: blue;
  }
}

main {

    width: 400px;
    height: 100px;
    animation: animate 5s infinite;
}

.p{
    background: purple;
    color: white;
}
JavaScript:
let getKeyframes = document.styleSheets[0].cssRules;
let returnKey = getKeyframes[0];
console.log(returnKey[2].keyText);
From the code example above, we are accessing the first CSSKeyframeRule by using the 0 indexes at the getKeyframes[0] and returning the last selector, 100%, by specifying the index value 2 at returnKey[2].keyText.
Console:

From the console output, we logged the 100% selector using the keyText from the CSSKeyframeRule
While working with CSS, web developers can leverage some of the best CSS frameworks to create user-friendly and browser-compatible websites and web pages. CSS Frameworks provide a solid foundation for developers to build upon and can save time and effort in the development process.
Further, with LambdaTest’s cross browser testing cloud, devs and QA can perform real-time testing and ensure their CSS-developed web applications render perfectly across multiple browsers environments.
You can also subscribe to our LambdaTest YouTube Channel to learn about web automation tools like Selenium, Playwright, Appium, and more.
Run your Selenium Testing scripts on the LambdaTest cloud grid. Test on 3000+ desktop & mobile environments.
Conclusion
We just covered a complete guide to CSS Object Model (CSSOM) covering topics on styling DOM elements, different CSS style interfaces, and different rules used in the CSS Object Model. Using the CSS Object Model, developers can create more sophisticated and interactive websites. With this guide, developers can use the CSS Object Model to improve their web applications and build more engaging user interfaces to provide a seamless user experience. Thanks for taking the time to read this article to completion. Feel free to ask questions in the comment below, and I’ll gladly reply.
Happy Testing!
#LambdaTestYourApps
Frequently Asked Questions (FAQs)
1.What is the DOM model in CSS?
A programming interface called the DOM (Document Object Model) is used in web development to show the structure of an HTML or XML document as a hierarchical tree. Developers can create dynamic and aesthetically pleasing web pages by selecting particular elements in the tree and applying styling rules to them using the DOM model in CSS.
2. How do DOM and CSS Object Model work?
A programming interface for web documents called Document Object Model (DOM) represents a page as a hierarchical tree structure. The interface used to modify the styling of elements in the DOM tree is the CSS Object Model (CSSOM). The DOM and CSS Object Model enable developers to change the content and styling of the page using JavaScript and CSS, resulting in dynamic web pages.
3.How is the CSS Object Model constructed?
By combining CSS files with the DOM tree and parsing CSS files, the CSS Object Model is created. Each document’s CSS Object Model, which the browser creates, contains all the rules applied to the elements in the DOM tree. The browser can render the website using the specified styles thanks to this process.
Subscribe to my newsletter
Read articles from Alex Anie directly inside your inbox. Subscribe to the newsletter, and don't miss out.
Written by
