Persistent Volume and Liveness Probe in Kubernetes 🤩🚀
 SAFIA KHATOON
What is Persistent Volume?
it is a way to store data that can be accessed by different pods even if they are running on different nodes in the cluster.
Advantages of Persistent Volume
The advantages of using Persistent Volumes in Kubernetes are:
Data Persistence: Persistent Volumes allow data to persist beyond the lifecycle of a pod. This means that even if a pod is deleted, the data stored in the Persistent Volume will still be available for other pods to use.
Data Sharing: Multiple pods can access the same Persistent Volume, making it easy to share data between different parts of an application.
Data Replication: Persistent Volumes can be replicated across multiple nodes in a cluster, providing data redundancy and ensuring that data is always available.
Data Backup and Restore: Persistent Volumes can be backed up and restored, making it easy to recover data in case of a disaster.
Overall, Persistent Volumes provide a reliable and flexible way to manage storage resources in Kubernetes.
what is a Persistent Volume Claim in Kubernetes?
In simple terms, a Persistent Volume Claim (PVC) in Kubernetes is a request for storage made by a user or a pod. It specifies the amount of storage and the access mode required. It's like asking for a hard drive or a USB stick to store your files. When a PVC is created, Kubernetes will try to find a suitable Persistent Volume (PV) to bind to the claim. If a matching PV is found, it will be bound to the claim and the pod can use it to store data. If a matching PV is not found, Kubernetes can dynamically provision a new PV that matches the claim's requirements.
"What is the difference between a Persistent Volume and a Persistent Volume Claim in Kubernetes?"
A Persistent Volume (PV) is a storage resource in Kubernetes that has been set up by an administrator or dynamically provisioned using a storage class. It's like a hard drive or a USB stick that can be used to store data.
A Persistent Volume Claim (PVC) is a request for storage made by a user or a pod. It specifies the amount of storage and the access mode required. It's like asking for a hard drive or a USB stick to store your files.
When a PVC is created, Kubernetes will try to find a suitable PV to bind to the claim. If a matching PV is found, it will be bound to the claim and the pod can use it to store data. If a matching PV is not found, Kubernetes can dynamically provision a new PV that matches the claim's requirements.
In summary, a PV is a storage resource, while a PVC is a request for that storage.
Can you explain how you would configure a Persistent Volume and a Persistent Volume Claim in Kubernetes?
Define the Persistent Volume (PV) in a YAML file. The YAML file should specify the storage capacity, access mode, and storage class of the PV. Here's an example:
 apiVersion: v1
 kind: PersistentVolume
 metadata:
   name: my-pv
 spec:
   capacity:
     storage: 1Gi
   accessModes:
     - ReadWriteOnce
   storageClassName: standard
   hostPath:
     path: /data/my-pv
Apply the PV definition to the Kubernetes cluster using the
kubectl applycommand:kubectl apply -f pv-definition.yamlDefine the Persistent Volume Claim (PVC) in a YAML file. The YAML file should specify the storage capacity, access mode, and storage class of the PVC. Here's an example:
apiVersion: v1 kind: PersistentVolumeClaim metadata: name: my-pvc spec: accessModes: - ReadWriteOnce resources: requests: storage: 1Gi storageClassName: standard- Apply the PVC definition to the Kubernetes cluster using the
kubectl applycommand:
- Apply the PVC definition to the Kubernetes cluster using the
kubectl apply -f pvc-definition.yaml
- Once the PVC is created, Kubernetes will automatically bind it to a suitable PV that matches the PVC's requirements. You can check the status of the PVC using the
kubectl get pvccommand:
kubectl get pvc
That's it! Now you have a Persistent Volume and a Persistent Volume Claim configured in your Kubernetes
How do you configure a Persistent Volume and a Persistent Volume Claim in Kubernetes?
To configure a Persistent Volume and a Persistent Volume Claim in Kubernetes, you need to define the PV and PVC in YAML files and apply them to the Kubernetes cluster using the
kubectl applycommand.What are the advantages of using Persistent Volumes in Kubernetes?
The advantages of using Persistent Volumes in Kubernetes are data persistence, data sharing, data replication, and data backup and restoration.
What is a ConfigMap in Kubernetes?
A ConfigMap in Kubernetes is a way to store configuration data that can
Hands-On :
Go To AWS Volumes:
and make sure your Availability Zone is samecreate volume

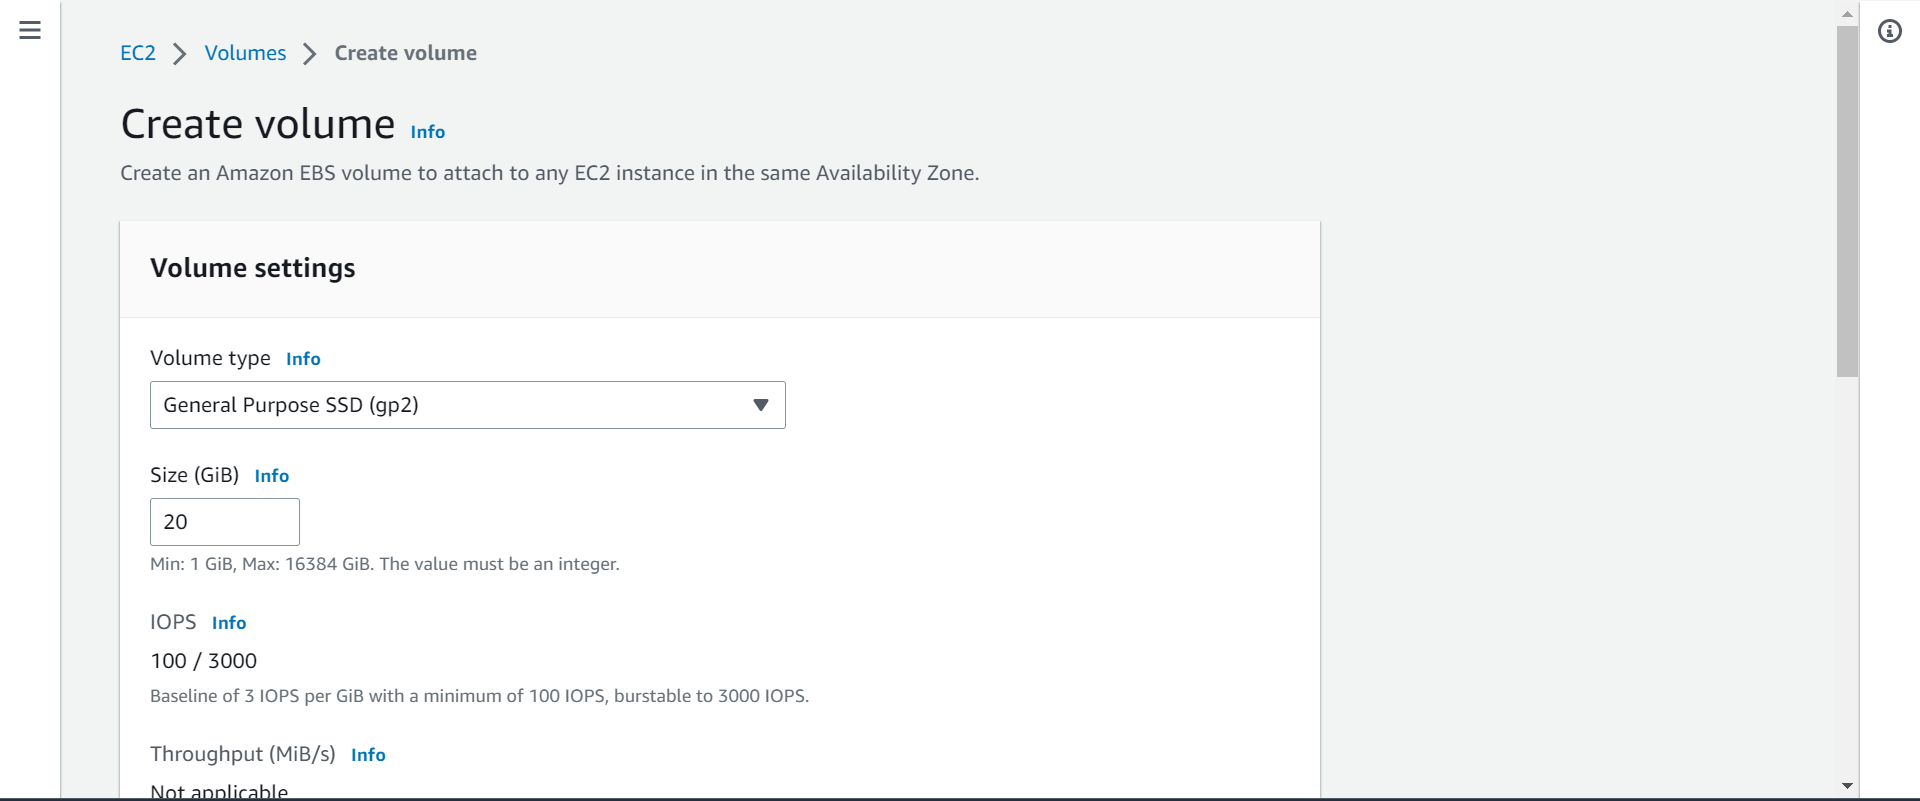
copy this volume id
vol-04190129d0e44251e

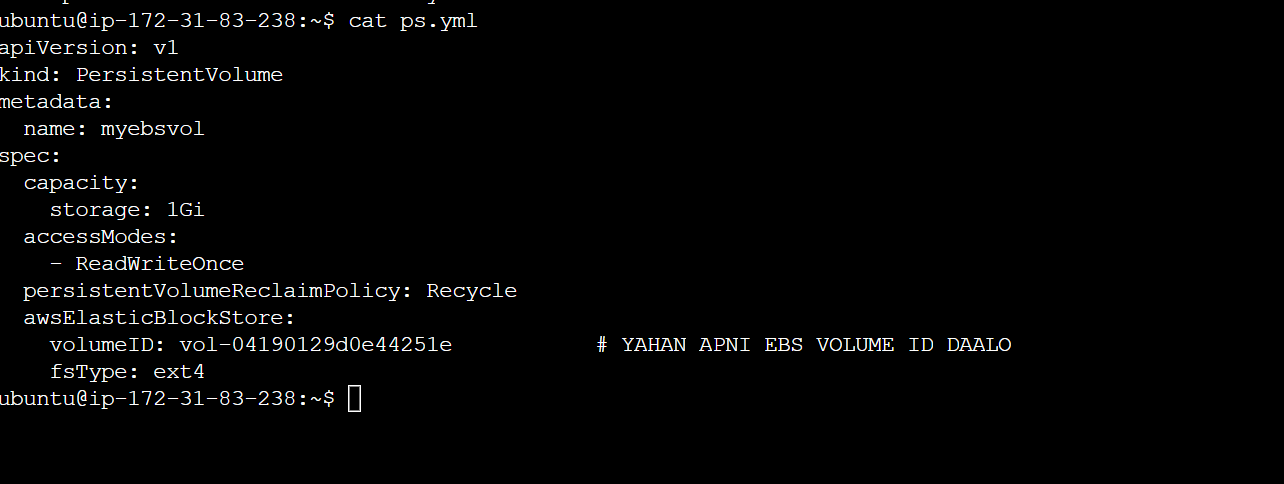

kubectl get pv

vim pvc.yml
pvc - persistence volume claim

kubectl apply -f pvc.yml

kubectl get pvc

vim deploymentpvc.yml
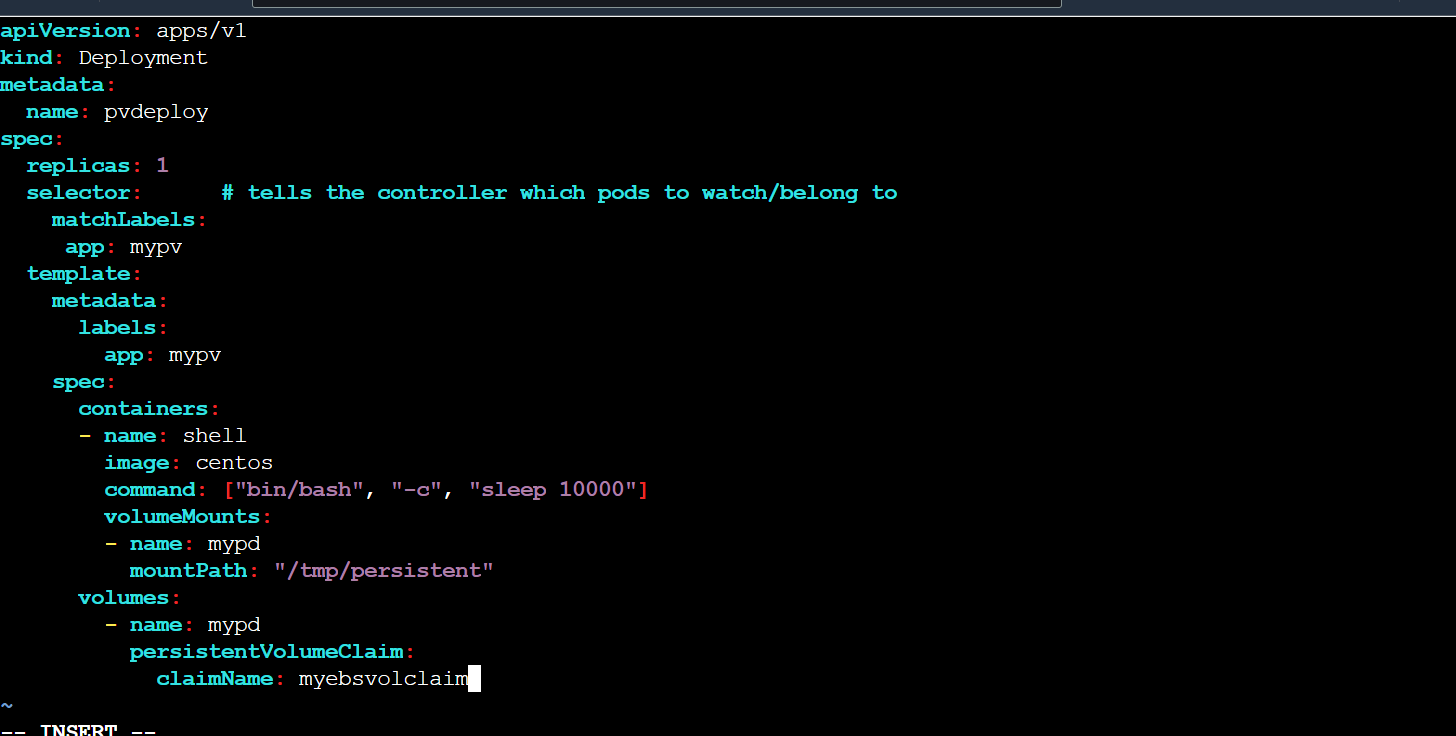
kubectl apply -f deploypvc.yml

kubectl get pods

vi testfile


exit
kubectl delete pod pvdeploy-f74845446-8n2zc
kubectl get pods
kubectl exec pvdeploy-f74845446-djzx6 -it -- /bin/bash
cd tmp
ls

Liveness Probe / Health Check
In Kubernetes, a Liveness Probe is a way to check if a container in a pod is running properly. It is like a health check for the container. The Liveness Probe periodically sends a request to the container and checks if it responds with a success code. If the container does not respond with a success code, Kubernetes will automatically restart the container. This helps to ensure that the application running in the container is always available and responsive.
some interview Questions :
What is a Liveness Probe in Kubernetes?
A Liveness Probe in Kubernetes is like a health check for a container. It checks if the container is running properly by periodically sending a request and checking for a success code. If the container doesn't respond with a success code, Kubernetes will automatically restart the container.
How does a Liveness Probe work in Kubernetes?
A Liveness Probe in Kubernetes periodically sends a request to a container to check if it is running properly. If the container responds with a success code, the Liveness Probe considers the container to be healthy. If the container does not respond with a success code, Kubernetes will automatically restart the container. This helps to ensure that the application running in the container is always available and responsive.
What is the purpose of a Liveness Probe in Kubernetes?
The purpose of a Liveness Probe in Kubernetes is to check if a container in a pod is running properly by periodically sending a request to it. If the container does not respond with a success code, Kubernetes will automatically restart the container. This helps to ensure that the application running in the container is always available and responsive.
How do you configure a Liveness Probe in Kubernetes?
To configure a Liveness Probe in Kubernetes, you need to add a
livenessProbesection to the container specification in the pod definition file. In this section, you can specify the type of probe, the path to access, and the port number to use. You can also set the initial delay, the period, and the timeout for the probe. Once you have added thelivenessProbesection to the pod definition file, you can apply the changes to the Kubernetes cluster using thekubectl applycommand.What are the different types of Liveness Probes in Kubernetes?
There are three types of Liveness Probes in Kubernetes:
HTTP Probe: This type of probe sends an HTTP request to the container and checks for a success response code. If the container responds with a success code, it is considered healthy.
TCP Probe: This type of probe checks if the container is listening on a specific port. If the container is listening on the specified port, it is considered healthy.
Exec Probe: This type of probe runs a command inside the container and checks the exit code. If the exit code is 0, the container is considered healthy.
How do you troubleshoot a failing Liveness Probe in Kubernetes?
If a Liveness Probe fails in Kubernetes, you can troubleshoot it by following these steps:
Check the logs of the container to see if there are any errors or issues that could be causing the probe to fail.
Check the configuration of the Liveness Probe to ensure that it is configured correctly. Make sure that the path, port, and other settings are correct.
Check the network connectivity between the container and the probe. Ensure that the container is reachable from the probe and that there are no network issues.
Increase the timeout period for the Liveness Probe to give the container more time to respond.
Check the resource utilization of the container to ensure that it has enough resources to respond to the probe.
If all else fails, you can try restarting the container or the pod to see if that resolves the issue.
By following these steps, you should be able to troubleshoot and resolve any issues with a failing Liveness Probe in Kubernetes.
What happens if a container fails a Liveness Probe in Kubernetes?
If a container fails a Liveness Probe in Kubernetes, it means that the container is not running properly or is unresponsive. When a Liveness Probe fails, Kubernetes will automatically restart the container to try to resolve the issue. If the container continues to fail the Liveness Probe after multiple attempts, Kubernetes may mark the pod as "unhealthy" and stop sending traffic to it. This helps to ensure that the application running in the container is always available and responsive.
Can you have multiple Liveness Probes in a single container in Kubernetes?
Yes, you can have multiple Liveness Probes in a single container in Kubernetes. This can be useful if you have multiple services running inside the container and you want to check the health of each service separately. To set up multiple Liveness Probes, you can add multiple
livenessProbesections to the container specification in the pod definition file, each with its own settings and configuration.How do you test a Liveness Probe in Kubernetes?
To test a Liveness Probe in Kubernetes, you can intentionally make the container unresponsive by stopping the service or process that the probe is checking. Then, you can monitor the pod's status using the
kubectl get podscommand and observe if Kubernetes restarts the container after the probe fails. Once the container is restarted, you can check the logs to see if the issue has been resolved and if the Liveness Probe is now passing.What are some best practices for using Liveness Probes in Kubernetes?
Here are some best practices for using Liveness Probes in Kubernetes:
1. Use Liveness Probes to check the health of your containers and ensure that your application is always available and responsive.
2. Use the appropriate type of Liveness Probe based on the needs of your application. HTTP Probes are best for web applications, TCP Probes are best for non-web applications, and Exec Probes are best for custom checks.
3. Set the initial delay, period, and timeout for the Liveness Probe based on the expected response time of your application.
4. Use a failure threshold that is appropriate for your application. A high threshold may result in unnecessary restarts, while a low threshold may result in a slow response time
5. Monitor the logs and metrics of your application to ensure that the Liveness Probe is working correctly and that there are no issues or errors.
By following these best practices, you can ensure that your Liveness Probes are effective and reliable in keeping your application running smoothly in Kubernetes.
Hands - ON :
vim liveness.yml
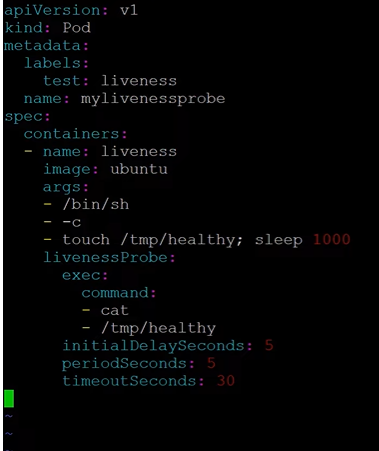
kubectl apply -f liveness.yml

kubectl get pods

kubectl describe pod mylivenessprobe


kubectl exec mylivenessprobe -it -- /bin/bash


echo $?
0
Status Healthy
echo $?
1
Status Not Healthy
Thank you for reading this blog. Hope it helps.
— Safia Khatoon
Happy Learning :)
Subscribe to my newsletter
Read articles from SAFIA KHATOON directly inside your inbox. Subscribe to the newsletter, and don't miss out.
Written by

SAFIA KHATOON
SAFIA KHATOON
Hi! My name is Safia Khatoon. I am complete my Bachelors in Technology from RTC Institute Of Technology. My specialisation in Computer Science and Engineering.I love contributing to Open Source with the help of the skills I gain. Also, I'm working on my YouTube Channel as well where I teach about DevOps tools and make technical content. You can have a look at it through my profile. Feel free to reach out to me! I'd be happy to connect with you.