Terraform and Exoscale
 Quentin Badoud
Terraform is useful for managing infrastructures because it automates the deployment and management of infrastructure resources, ensures consistency across environments, allows for collaboration and scalability, and provides version control for infrastructure code. It simplifies infrastructure management, making it an essential tool for organizations.
In this article, we will code a terraform project to deploy:
a virtual machine (Ubuntu 22.04)
a private network
a security group with security rules
Let's get started
As a prerequisite, you will need to install terraform client -> Terraform install doc.
First thing is to create an IAM key on our Exoscale organization. This key will be used in terraform for the exoscale authentication.
To do so, go to your exoscale portal and create a Key under "IAM" > "API KEYS".
For the tutorial, we created an "unrestricted key", but you can limit the rights to match only needed resources.
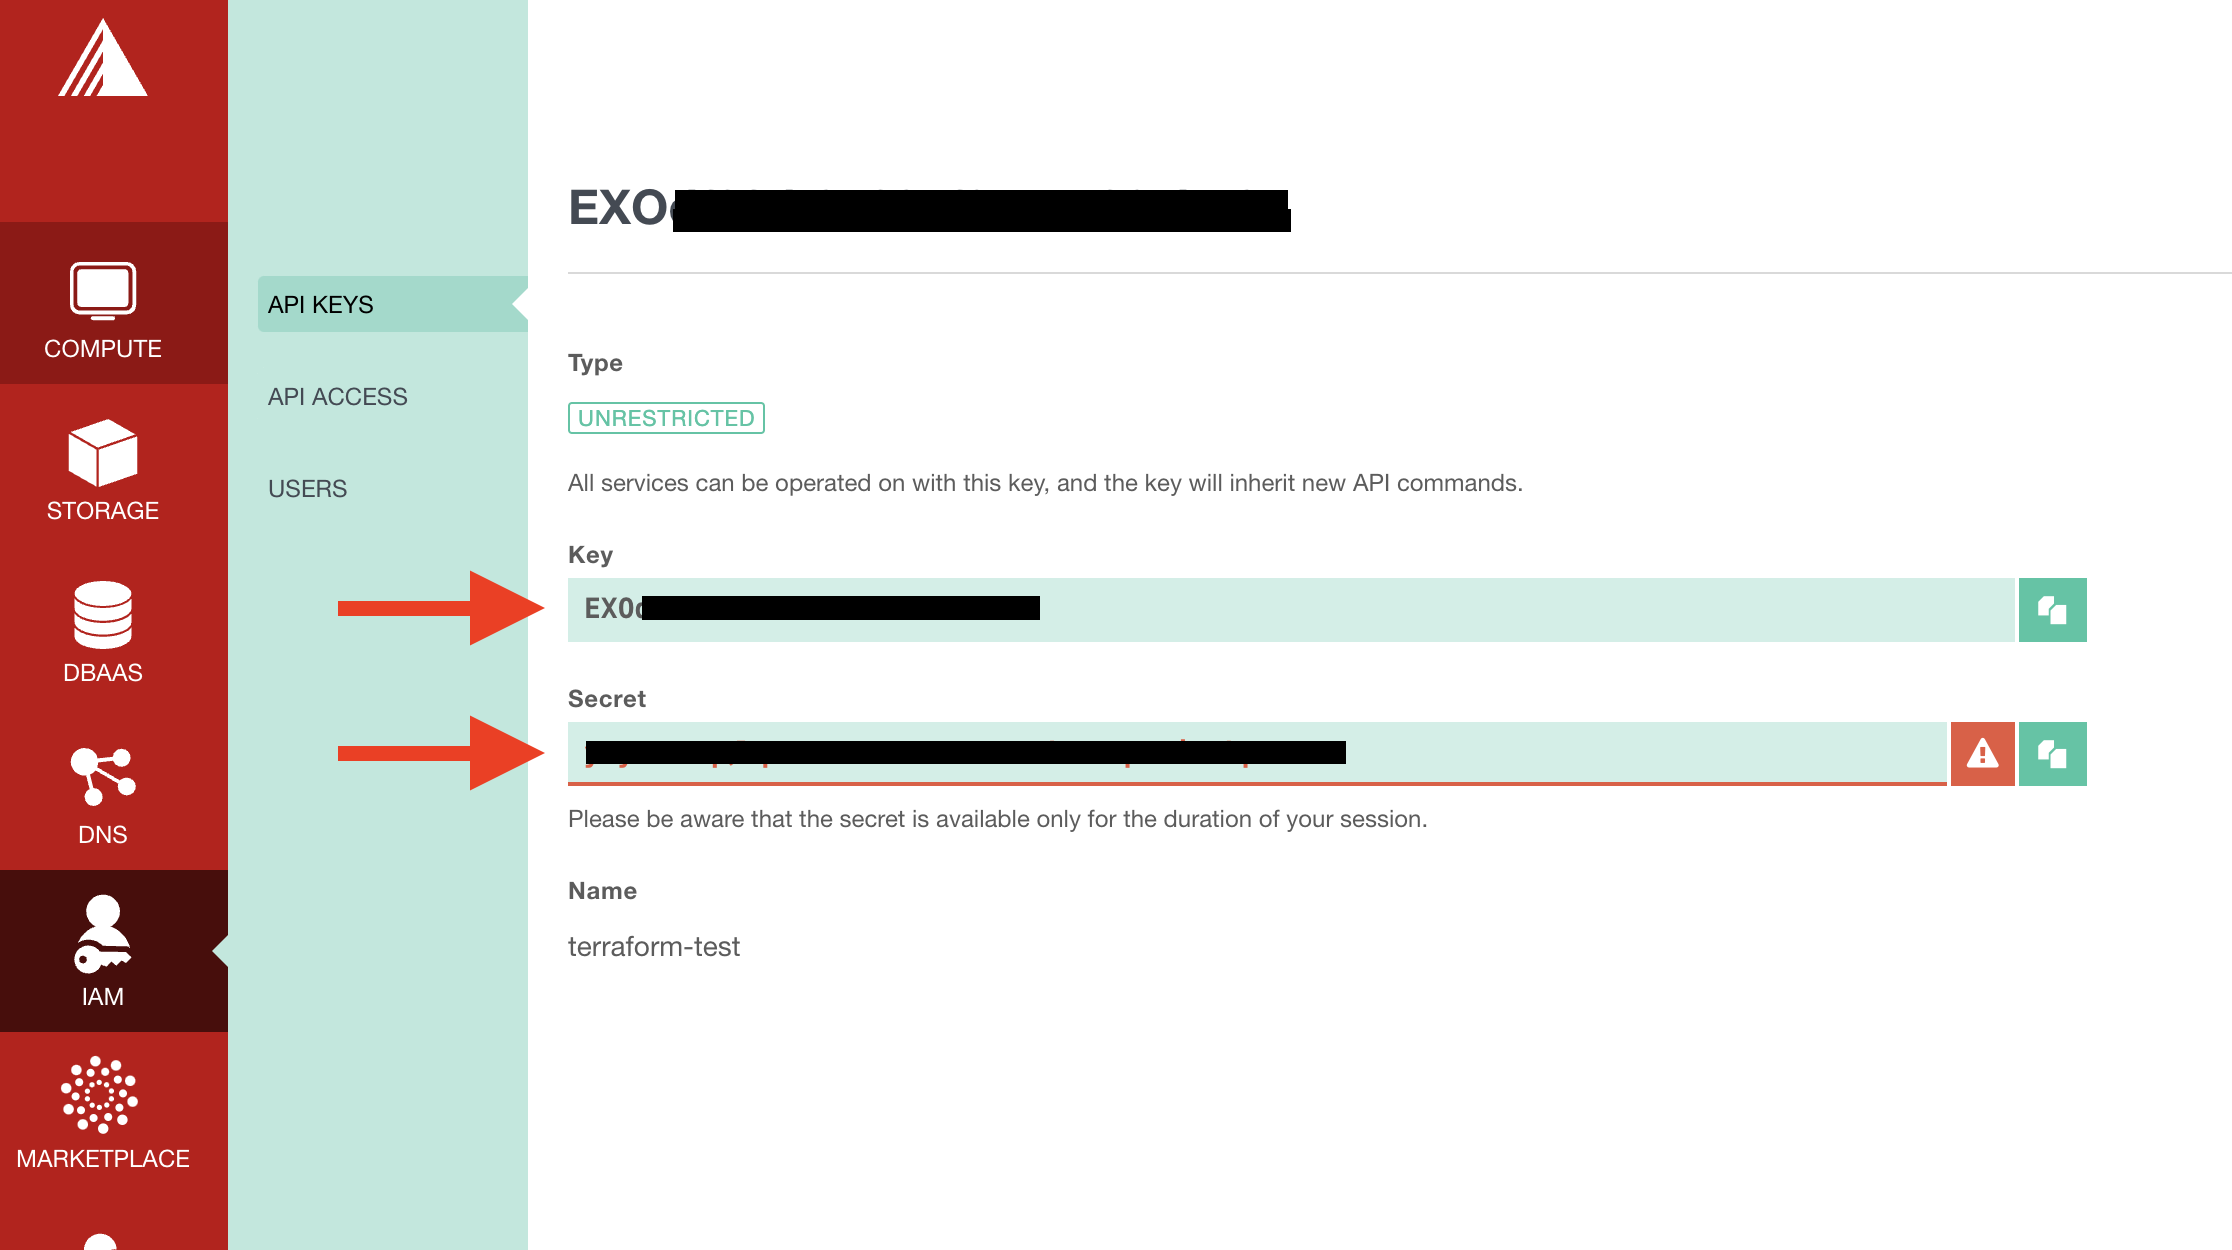
Note somewhere the secret, we will need it later.
We will now create the main file "main.tf" that contains the exoscale provider and the input variables for authentication.
# Define the required providers for this configuration
terraform {
  required_providers {
    # Use the "exoscale/exoscale" provider
    exoscale = {
      source  = "exoscale/exoscale"
      # Optional version constraint for the provider
      #versversion = "0.44.0"
    }
  }
}

# Define the required variables for this configuration
variable "exoscale_api_key" {
  # The type of the variable is a string
  type = string
}
variable "exoscale_api_secret" {
  # The type of the variable is a string
  type = string
}

# Configure the "exoscale" provider
provider "exoscale" {
  # Use the value of the "exoscale_api_key" variable for the "key" parameter
  key    = var.exoscale_api_key
  # Use the value of the "exoscale_api_secret" variable for the "secret" parameter
  secret = var.exoscale_api_secret
}
This code will ask you to enter the key and secret when using terraform plan or terraform apply.
Next we will create a separate file for the virtual machine and the private network. We will call it compute.tf.
# Define some local variables for convenience
locals {
  my_zone     = "ch-gva-2"
  my_template = "Linux Ubuntu 22.04 LTS 64-bit"
}

# Retrieve information about the desired template
data "exoscale_template" "my_template" {
  zone = local.my_zone
  name = local.my_template
}

# Create a new Exoscale compute instance
resource "exoscale_compute_instance" "my_instance" {
  zone        = local.my_zone
  name        = "my-server-name"

  # Use the ID of the retrieved template
  template_id = data.exoscale_template.my_template.id
  type        = "cpu.extra-large"
  disk_size   = 100

  # Define the network interface for the instance
  network_interface {
    network_id = exoscale_private_network.private_network.id
    ip_address = "192.168.1.21"
  }
}

# Create a new Exoscale private network
resource "exoscale_private_network" "private_network" {
  zone = "ch-gva-2"
  name = "my-private-network"
  netmask  = "255.255.255.0"
  start_ip = "192.168.1.20"
  end_ip   = "192.168.1.253"
}
You can use the exo CLI to list available templates with exo compute instance-template list and available instance types with exo compute instance-type list. The code below is a straightforward example that creates a compute instance of type 'cpu-extra-large' with 100 GB of disk in the 'geneva 2' zone. It also creates a private network in the same zone with a defined range of IP addresses. The compute instance is associated with the private network and assigned the IP address 192.168.1.21.
At this point, we have a virtual machine with a private IP address on a private subnet. Additionally, every compute instance on Exoscale is assigned a public IP address by default, which is convenient. However, access to the virtual machine is denied by default, so we will create some security groups to allow access from specified IP addresses or ports.
We create a terraform file called security-group.ft.
What we want to open:
Access from any IP on port 80 and 443
Access from any IP to ping (ICMP)
Access from only your public ip for SSH (22)
- To check your IP address -> curl https://ifconfig.me
# Create a new Exoscale security group
resource "exoscale_security_group" "my_security_group" {
  name = "my-secu-group"
}

# Define a new security group rule for SSH access
resource "exoscale_security_group_rule" "ssh_security_group_rule" {
  # Associate the rule with the "exoscale_security_group" resource created above
  security_group_id = exoscale_security_group.my_security_group.id
  type              = "INGRESS"
  protocol          = "TCP"
  cidr              = "YOU_PUBLIC_IP/32"
  start_port        = 22
  end_port          = 22
}

# Define a new security group rule for HTTP access
resource "exoscale_security_group_rule" "http_security_group_rule" {
  # Associate the rule with the "exoscale_security_group" resource created above
  security_group_id = exoscale_security_group.my_security_group.id
  type              = "INGRESS"
  protocol          = "TCP"
  cidr              = "0.0.0.0/0"
  start_port        = 80
  end_port          = 80
}

# Define a new security group rule for HTTPS access
resource "exoscale_security_group_rule" "https_security_group_rule" {
  # Associate the rule with the "exoscale_security_group" resource created above
  security_group_id = exoscale_security_group.my_security_group.id
  type              = "INGRESS"
  protocol          = "TCP"
  cidr              = "0.0.0.0/0"
  start_port        = 443
  end_port          = 443
}

# Define a new security group rule for ICMP access
resource "exoscale_security_group_rule" "icmp_security_group_rule" {
  # Associate the rule with the "exoscale_security_group" resource created above
  security_group_id = exoscale_security_group.my_security_group.id
  type              = "INGRESS"
  protocol          = "ICMP"
  icmp_code         = 0
  icmp_type         = 8
  cidr              = "0.0.0.0/0"
}
In the code above, we create a resource group and add 4 rules in it. One for ssh, one for HTTP, one for HTTPS, and one for ICMP. Note that 0.0.0.0/0 stands for any source IP.
Now we need to bind this security group with our compute instance.
To do so we need to edit our compute.tf file and add the reference to the secruity group defined above.
...
resource "exoscale_compute_instance" "my_instance" {
  zone        = local.my_zone
  name        = "my-server-name"

  template_id = data.exoscale_template.my_template.id
  type        = "cpu.extra-large"
  disk_size   = 100

  network_interface {
    network_id = exoscale_private_network.private_network.id
    ip_address = "192.168.1.21"
  }
  ##### BELOW RED TO THE SECURITY GROUP ####
  security_group_ids = [
    exoscale_security_group.my_security_group.id,
  ]
}
...
n the previous step, we created some security groups to allow access to the virtual machine. In this step, we add the 'security_group_ids' parameter to the 'exoscale_compute_instance' resource to associate the virtual machine with the created security group.
Now that we have defined all the required resources in our Terraform configuration, we can use the 'terraform plan' command to review the proposed changes and 'terraform apply' to apply the configuration and create the resources.
terraform plan
terraform apply
Et Voilà!
Pretty straightforward forward isn't it?
Subscribe to my newsletter
Read articles from Quentin Badoud directly inside your inbox. Subscribe to the newsletter, and don't miss out.
Written by