How To Connect Your React (ViteJS) App to Spotify's API
 Toyosi Odukale
Introduction
A major problem for me since I started learning and building web apps with react last year was the development speed, especially on a 3 year old windows pc like mine. While searching for a temporary fix, I found vite (pronounced vit). Now, I use vite to create most of my frontend applications and I believe it is the fastest way to scaffold a react application. If you follow me on Twitter then you have probably seen me tweet about ViteJS and how I think it is the next best thing since Nigerian jollof rice. For real guys, it's amazingly fast, and I can't wait for you to see for yourself.
In this article I will be showing you how to:
create a single-page application with ViteJS,
create a spotify developer account
connect to the spotify API and authenticate with postman.
display the song currently playing when you listen on spotify as I did in my personal portfolio website.
This tutorial is inspired by developers Henry Desroches and Steve Hayes, I read their blogs when I got stuck trying to implement the feature in my website, tried their methods and did like a mix-n-match to make mine tailored specifically for my application.
Check out the github repo here. The site is live here
Requirements:
You need basic knowledge of reactjs, css and also a react app. It's okay if you don't have an app, I will show you how you can create one with vite in a few minutes. However, if you do not know react or javascript generally, you can start learning here.
Your Spotify Developer client ID, client secret, and refresh token.
You need to have an active spotify account.
A postman account.
Npm and node.js installed on your computer.
Getting Started
Before you get into the technical nitty gritty and start coding away, here's a brief explanation of what vite is and why it is so awesome.
Vite (French word for "quick", pronounced /vit/, like "veet") is a javascript build tool that bundles your code for production and simplifies the build. Because the dependencies when creating a react app can become so large as the app increases in size, tools like CRA (create-react-app) can sometimes take an unreasonably long wait (sometimes up to minutes! takes about 3-5 minutes on my PC) to start up, and changes can take a couple of seconds to be reflected in the browser.
Vite aims to solve this problem, thereby increasing developers' productivity and overall happiness.
How vite works is it uses ES modules in the browser to load your source code. Vite transforms and serves the source code on demand, as the browser requests it. This makes the site start and build time super fast, irrespective of the app size or how many changes you make.
A major feature is its Hot Module Replacement (HMR) which provides precise updates to your page as you make them without reloading the page or blowing away the application state.
Vite is framework agnostic meaning you can use it with any framework eg vanilla javascript, react, vue, svelte, etc. You will be using react in this tutorial.
Here is a link to their official documentation if you want to read more about vite.
Creating the local folder
Type "npm init vite" in the terminal of your computer or vs code terminal and follow the prompt.
npm init viteName your project (mine is called frontend), choose react as the framework.
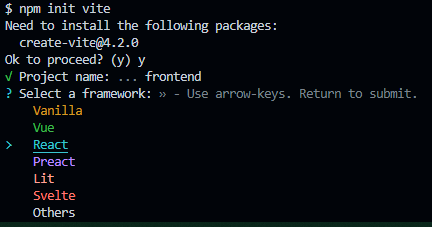
Cd into the project folder (frontend), and run the following commands
 cd frontend
 npm install
 npm run dev
Viola! You've set up a vite web application, yaay.
Setting up the frontend with Tailwind CSS
Tailwind CSS works by scanning your code for class names, generates the corresponding styles and then writes them to a static CSS file. Tailwind is my preferred choice for styling static apps. You can use regular CSS, or follow the steps below to setup tailwind for the first time
Install tailwind via npm:
 npm install -D tailwindcss postcss autoprefixer
 npx tailwindcss init -p
Add tailwindcss and autoprefixer to your postcss.config.js file
 export default {
   plugins: {
     tailwindcss: {},
     autoprefixer: {},
   },
 }
Add the paths to all of your template files in your tailwind.config.js file. I added my custom tailwind config for colors and font and fontsize. You can customize this however you like.
 /** @type {import('tailwindcss').Config} */
 export default {
   content: ["./src/**/*.{html,jsx,js}"],
   theme: {
     extend: {
       colors: {
         'mint': '#dbfff8',
         'black': '#000000',
         'gray-dark': '#242423',
         'gray-light': '#525453',
         'white': '#EFF2F4',
       },
       fontFamily: {
         GT_Flexa: ['GT-Flexa', 'sans-serif'],
       },
       fontSize: {
         xs: '0.5rem',
         sm: '1rem',
         base: '16px',
         '1xl': '1.5rem',
         '2xl': '2rem',
         '3xl': '5rem',
       },
     },
   },
   plugins: [],
 }
Add the @tailwind directives for each of Tailwind’s layers to your main CSS file. I am using a local font which I am importing from the assets folder as '@font-face'
 @tailwind base;
 @tailwind components;
 @tailwind utilities;

 @font-face {
   font-family: "GT-Flexa";
   src: url("./assets/font/GT-Flexa/GT-Flexa-Mono-Light-Trial.otf")
     format("opentype");
   font-weight: light;
 }
Add the following lines of code to your App.jsx file
 import spotifyLogo from './assets/icons/spotifyLogo.svg'

 function App() {

   return (
     <div className="flex flex-col items-center justify-center w-full h-screen bg-black">
       <div className="flex items-center justify-between gap-6 w-fit">
         <div>
           <img src={spotifyLogo} alt="spotify-logo" />
         </div>
         <p className="text-white font-GT_Flexa">NOT CONNECTED</p>
       </div>
     </div>
   )
 }

 export default App
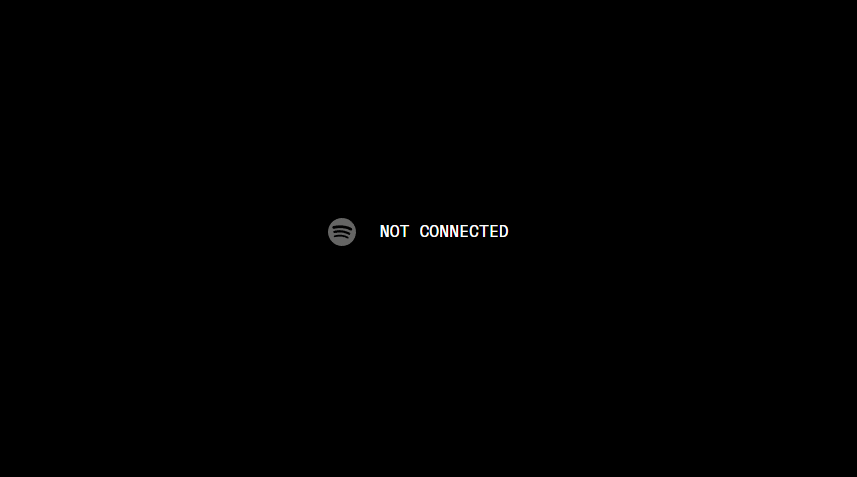
Once the server is up on localhost, your app should look like the screenshot below
Setting up your spotify app
To interact with spotify's API, first you need to create a Spotify developer account here.
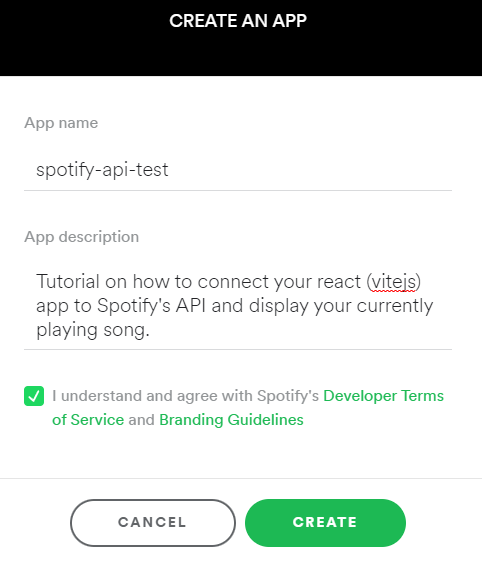
Sign in and create an app in your spotify for developers dashboard -
Get your Client ID, and Client secret. Copy these somewhere safe, you will need them soon.
Click on 'Edit settings'.
Add
`http://localhost:5173`your localhost url as the redirect URI and save.
Authenticating with Postman (get refresh token)
Go to your postman account and click on 'create new collection' in your workspace.
Name your collection, click on the options button and select 'Add request'
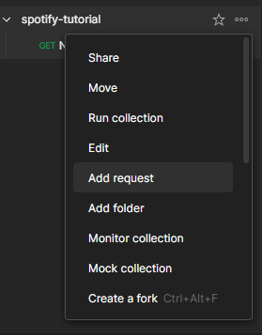
Create a new request with the following details
Set the method to GET.
Set the URL to
https://accounts.spotify.com/authorizeIn the params tab, you’ll add four parameters as key:value pairs
client_id: you’ll set this to the Client ID you copied down earlier.response_type: “code”redirect_uri: Set this to exactly the URL you specified in the spotify app setup.`http://localhost:5173`scope: This determines what Spotify endpoints your authentication code will have access to. In the feature for my site, I only needed to use theuser-read-currently-playingscope. You can read more in their official documentation here
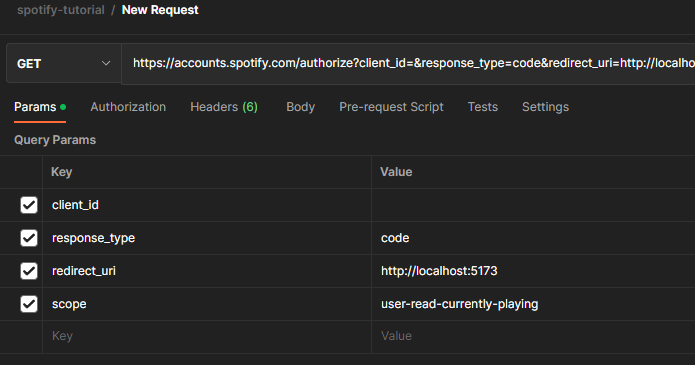
Copy the URL Postman assembles for you out of the URL field beside the GET dropdown in your request and paste it into your browser. You’ll be prompted to sign into Spotify and accept the permissions you designated in the
scopeparameter, and then redirected back to your app — click on the url and copy the code returned after the localhost address url.Next you'll create a new POST request. You'll set the URL of this request to
https://accounts.spotify.com/api/token.In the 'Headers' tab, we’ll add two entries, the first of which is:
Content-Type:application/x-www-form-urlencoded
The second entry is a little more involved. The key should be
Authorization, and then we need to base64 encode our Spotify Client ID and Client Secret, in the following format:client_id:client_secretHenry created a codepen to help convert to base64. Input your client id and client secret in the format above to get the base64 version
The result that you’ll plug into Postman should look like this:
Authorization:Basic andThenTheLongbase64StringThatProbablyEndsWithAnEqualsSign=
Next, you can move on to the Body tab of the request, and enter the following parameters under 'x-www-form-urlencoded':
grant_type:authorization_codecode: set this one to the code you got back from the first requestredirect_uri: set this to the same local URL (http://localhost:5173)
Now you can run the request. You should get a JSON response like this:
    {
        "access_token": "BQA79c5GX0QOmYsQ3kxoMj_iFS-gokvqvXKJdwMpGrJOnxbcTWRQ5nZGRaX2krBlJNA-TBRIY9jCbyeVh1WpuF_6L5HOBKwjAKAu7y3LorQG9oiMg8vWYyO9kaJVacpXVlNWYDt76fNyuxg7EUuVyZgzrK8jaBTWhpIbgcZinOUUl9oBvzSiC2SfDi70YntZiXmPGDWDZgQKKncb",
        "token_type": "Bearer",
        "expires_in": 3600,
        "refresh_token": "AQAWXmeJCKA_ZwuyvN63T8Z2jMkoleevelBV-NeQwA2bnHIhGgVEBvY4qj2rPbqu88LmFomWoAUJT-edvRHpP4EKEGkSE7XihRb_jCuTwoe4KeCz0Hy_f_2tXAYaVQA2J7Q",
        "scope": "user-read-currently-playing"
    }
Take note of the refresh_token. That is exactly what you need to move on to setting up the actual Spotify request in your app
(You need to connect your app before the token expires, if it does just run this process again to get another refresh token)
Wow! That was a lot right? If you've come this far then congratulations to you, you should be very proud of yourself, you're almost done.
Environment variables
Environment variables help you to hide sensitive information like your password and client id. To install dotenv, use the command "npm install dotenv --save" in the frontend folder.
Create your .env file and add your client ID, client secret, and refresh token.
VITE_APP_SPOTIFY_CLIENT_ID=
VITE_APP_SPOTIFY_CLIENT_SECRET=
VITE_APP_SPOTIFY_REFRESH_TOKEN=
Token endpoint
Create a SpotifyAPI.js file, which will be used to get your access token and fetch your currently played song
//install query-string 'npm install query-string' in the frontend directory
import queryString from 'query-string';

const TOKEN_ENDPOINT = `https://accounts.spotify.com/api/token`;

const NOW_PLAYING_ENDPOINT = `https://api.spotify.com/v1/me/player/currently-playing`;

const client_id = import.meta.env.VITE_APP_SPOTIFY_CLIENT_ID
const client_secret = import.meta.env.VITE_APP_SPOTIFY_CLIENT_SECRET
const refresh_token = import.meta.env.VITE_APP_SPOTIFY_REFRESH_TOKEN

const getAccessToken = async () => {
    // 'check note -- npm install buffer'
    const basic = Buffer.from(`${client_id}:${client_secret}`).toString("base64");
    const response = await fetch(TOKEN_ENDPOINT, {
        method: "POST",
        headers: {
            Authorization: `Basic ${basic}`,
            "Content-Type": "application/x-www-form-urlencoded",
        },
        body: queryString.stringify({
            grant_type: "refresh_token",
            refresh_token,
        }),
    });
    return response.json();
};
Note: you might need to install an esbuild-plugin for the buffer to work. I've highlighted the steps to follow
npm i buffer
npm i @esbuild-plugins/node-globals-polyfill
add this to your index.html
    <script type="module">
      import { Buffer } from "buffer";
      window.Buffer = Buffer;
    </script>
add this to your vite.config.js
import { NodeGlobalsPolyfillPlugin } from '@esbuild-plugins/node-globals-polyfill'

// https://vitejs.dev/config/
export default defineConfig({
  plugins: [react(), NodeGlobalsPolyfillPlugin({
    buffer: true
  })],
})
Now playing endpoint
In the same SpotifyAPI.js file, add
// now playing endpoint
export const getNowPlaying = async (client_id, client_secret, refresh_token) => {
    const { access_token } = await getAccessToken(client_id, client_secret, refresh_token);
    return fetch(NOW_PLAYING_ENDPOINT, {
        headers: {
            Authorization: `Bearer ${access_token}`,
        }
    });
};
This gets your authentication details and passes them into the NOW_PLAYING_ENDPOINT constant declared earlier.
Return data
Next, create a function that will return the data you need if authenticated successfully
// return data
export default async function getNowPlayingItem(
    client_id, client_secret, refresh_token
) {
    const response = await getNowPlaying(client_id, client_secret, refresh_token);
    if (response.status === 204 || response.status > 400) {
        return false;
    }
    const song = await response.json();

    const albumImageUrl = song.item?.album.images[0].url;
    const artist = song.item?.artists.map((_artist) => _artist.name).join(",");
    const isPlaying = song.is_playing;
    const songUrl = song.item.external_urls.spotify;
    const title = song.item.name;

    return {
        albumImageUrl,
        artist,
        isPlaying,
        songUrl,
        title,
    };
}
Your SpotifyAPI.js should look like this when done
import queryString from 'query-string';

const TOKEN_ENDPOINT = `https://accounts.spotify.com/api/token`;

const NOW_PLAYING_ENDPOINT = `https://api.spotify.com/v1/me/player/currently-playing`;

const client_id = import.meta.env.VITE_APP_SPOTIFY_CLIENT_ID
const client_secret = import.meta.env.VITE_APP_SPOTIFY_CLIENT_SECRET
const refresh_token = import.meta.env.VITE_APP_SPOTIFY_REFRESH_TOKEN

const getAccessToken = async () => {
    const basic = Buffer.from(`${client_id}:${client_secret}`).toString("base64");
    const response = await fetch(TOKEN_ENDPOINT, {
        method: "POST",
        headers: {
            Authorization: `Basic ${basic}`,
            "Content-Type": "application/x-www-form-urlencoded",
        },
        body: queryString.stringify({
            grant_type: "refresh_token",
            refresh_token,
        }),
    });
    return response.json();
};

// now playing endpoint
export const getNowPlaying = async (client_id, client_secret, refresh_token) => {
    const { access_token } = await getAccessToken(client_id, client_secret, refresh_token);
    return fetch(NOW_PLAYING_ENDPOINT, {
        headers: {
            Authorization: `Bearer ${access_token}`,
        }
    });
};

// return data
export default async function getNowPlayingItem(
    client_id, client_secret, refresh_token
) {
    const response = await getNowPlaying(client_id, client_secret, refresh_token);
    if (response.status === 204 || response.status > 400) {
        return false;
    }
    const song = await response.json();

    const albumImageUrl = song.item?.album.images[0].url;
    const artist = song.item?.artists.map((_artist) => _artist.name).join(",");
    const isPlaying = song.is_playing;
    const songUrl = song.item.external_urls.spotify;
    const title = song.item.name;

    return {
        albumImageUrl,
        artist,
        isPlaying,
        songUrl,
        title,
    };
}
Display song
After that, you can display your song. I made a new component called SpotifyNowPlaying.jsx, displayed the data, and styled using tailwind CSS.
import React from 'react'
import spotify from './assets/icons/spotifyLogo.svg'
import { useEffect, useState } from 'react'
import getNowPlayingItem from './SpotifyAPI'

const SpotifyNowPlaying = (props) => {
    const [loading, setLoading] = useState(true);
    const [result, setResult] = useState({});

    useEffect(() => {
        Promise.all([
            getNowPlayingItem(
                props.client_id,
                props.client_secret,
                props.refresh_token
            ),
        ]).then((results) => {
            setResult(results[0]);
            setLoading(false);
        });
    });

    return (
        <div className='flex
         min-w-md w-[250px] h-80 text-white items-center justify-center text-base border rounded-lg border-gray-dark bg-gray-dark font-GT_Flexa'>


            {loading ? <div className='flex p-2
         w-fit items-center justify-center text-gray  text-base'>
                <img className='w-fit p-1 object-contain h-fit' src={spotify} alt="" />
                <p className="tracking-wider px-1 text-base text-left ">Loading...</p>
            </div>
                :

                <div className='flex p-2
         w-fit  text-base h-full items-center justify-center'>{result.isPlaying ?
                        <div className=' w-fit  h-full py-2 flex flex-col   text-left justify-around'>

                            <div className='w-full h-fit relative'>
                                <img className='w-fit h-6 p-1 object-contain absolute -rotate-45 z-10' src={spotify} alt="" />
                                <img className='w-fit h-fit rounded-lg' src={result.albumImageUrl} alt="album-image" />
                            </div>

                            <div className='flex flex-col  text-left'>
                                <div className=''>
                                    <a className=" px-1  text-left underline " href={result.songUrl} target="_blank">{result.title}</a>
                                </div>
                                <div>
                                    <p className=" px-1 text-left ">{result.artist}</p></div>
                            </div>


                        </div> : "You are offline"}

                </div>
            }

        </div>
    )
}

export default SpotifyNowPlaying
C'est fini! Your app should look like this if styled with my custom tailwind styles
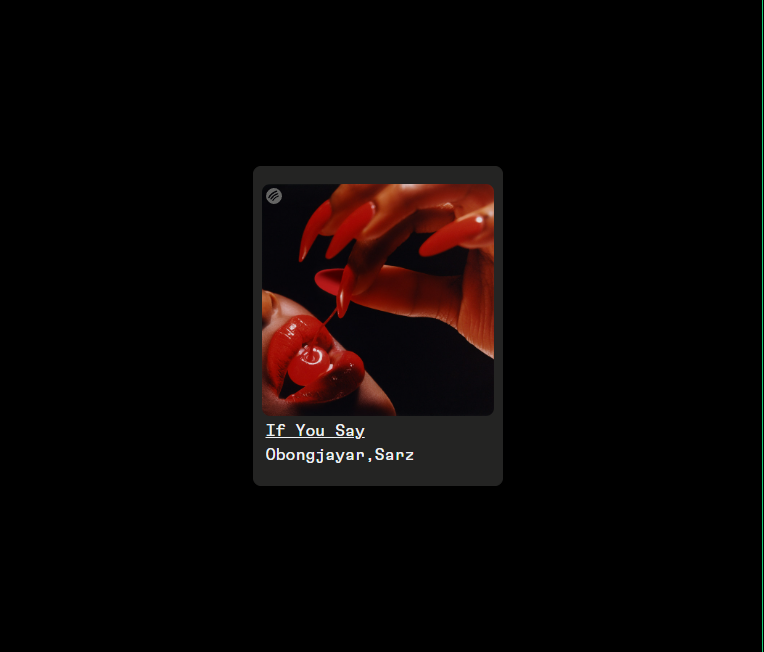
The full source code is available here, please star or share if this helped!
Subscribe to my newsletter
Read articles from Toyosi Odukale directly inside your inbox. Subscribe to the newsletter, and don't miss out.
Written by

Toyosi Odukale
Toyosi Odukale
I write about the things I write about