DevOps, Day - 11
 Vrishni Shree V B
What is git stash?

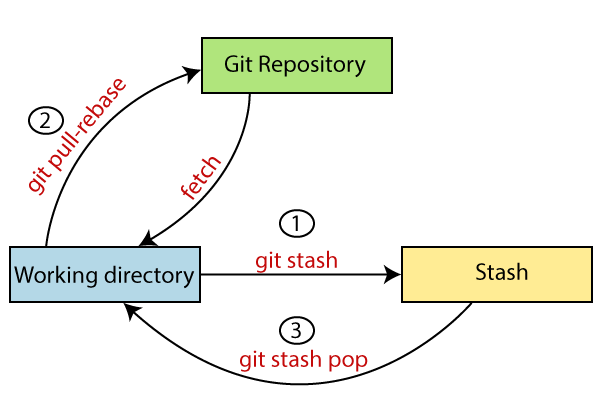
git stashis a command in Git that allows you to save your changes without committing them, by creating a temporary "stash".Using
git stashcan be useful when you want to switch branches or perform other actions that require a clean working directory, but you're not ready to commit your changes yet.When you run
git stash, Git will save your changes to a stash and revert your working directory to the last committed state.You can use
git stash applyorgit stash popto restore the changes from the stash and reapply them to your working directory when you're ready to continue working on your changes.You can customize
git stashbehaviour using various options and flags, such as specifying a message for the stash or saving only certain files.
What is cherry-pick?

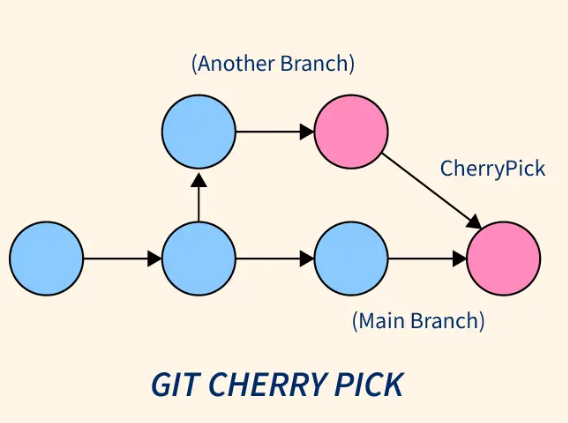
Cherry-pickis a command in Git that allows you to selectively apply a specific commit or a range of commits from one branch to another.This is useful when you want to bring in specific changes from another branch, such as a bug fix or a feature, without merging the entire branch.
To use
cherry-pick, you first need to identify the commit(s) you want to apply using Git commands likegit logorgit show.You can use
git cherry-pickfollowed by the commit hash(es) to apply the changes to your current branch, creating a new commit with the same changes.Cherry-pickis a powerful command, but it should be used carefully, especially when cherry-picking a range of commits, as it can introduce conflicts and create divergent histories.
Task 1:
Create a new branch and make some changes to it.
step 1: create a new_branch
step 2: create a file inside it, and add some contents inside the file.

Use git stash to save the changes without committing them.
step 1: After creating the file with some content, add it usinggit add .command, but don't commit it.step 2: Now use
git stashcommand, to save the changes, even without committing. Here, deleted dev branch is just a commit message.
Switch to a different branch, make some changes and commit them.
step 1: To switch into another branch use the commandgit checkout branch_name
step 2: create a file or do some changes in existing file, add it and commit it as shown below.

Use git stash pop to bring the changes back and apply them on top of the new commits.
NOTE: You can see the stash list and pop it even if you are in any other branch.
step 1: Before poping, typegit stash list
step 2: Now use the command
git stash popto remove the changes you did earlier.
step 3: After stash pop, if we try to
git stash list, we cannot see anything, something like this👇
step 4: Now we can see the commit list using
git logand our HEAD is pointing to the latest commit message.
Task 2:
Before committing other messages, dev branch had version01.txt file with only 1 line content.

In version01.txt of development branch add below lines after “This is the bug fix in development branch” that you added in Day10 and reverted to this commit.
Line2>> After bug fixing, this is the new feature with minor alteration
Commit this with message “Added feature2.1 in development branch”

Line3>> This is the advancement of previous feature
Commit this with message “ Added feature2.2 in development branch”

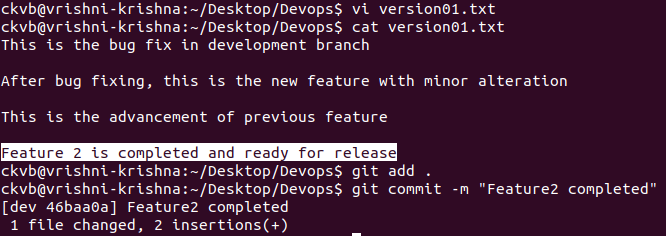
Line4>> Feature 2 is completed and ready for release
Commit this with message “ Feature2 completed”

All these commits messages should be reflected in Production branch too which will come out from Main branch
step 1: First checkout to your main branch

step 2: create a new production branch

step 3: To see the contents of our dev branch in production branch, just use the command
git rebase dev
step 4: Type
lsto see the contents of production branch in main branch andcat file_nameto see the contents within it.
Task 3:
In the Production branch Cherry pick Commit “Added feature2.2 in development branch” and add below lines in it:
Line to be added after Line3>> This is the advancement of previous feature
Line 4>>Added a few more changes to make it more optimized.
Commit: Optimized the feature
step 1: checkout to the production branch, typegit log --onelineto see your commit list.
step 2: Type
git cherry-pick commit_number
step 3: change the contents of the file.
Before change
After change

step 4: Final step is just to add and commit the message"Optimised the feature".

Thank you so much for reading
Follow me at LinkedIn to see interesting posts like this : )
Subscribe to my newsletter
Read articles from Vrishni Shree V B directly inside your inbox. Subscribe to the newsletter, and don't miss out.
Written by

Vrishni Shree V B
Vrishni Shree V B
💻 Python | Docker | Jenkins | Networking | Git | Linux 💻 Passionate about leveraging technology to drive efficiency and deliver innovative solutions. Proficient in Python development, Docker containerization, Jenkins automation, computer networking, Git version control, and Linux administration. Skilled in collaborating with diverse teams to deliver high-quality software products. Proficient in AWS EC2 instance management and deployment. Seeking new opportunities to apply my expertise and contribute to impactful projects. Let's connect and explore how we can work together! Inter-personal Skills: Communication, Adaptability, Emotional intelligence, Active listening, Collaboration. Happy To Connect🔗😊 Feel free to reach me out😃@ --> vrishnishreevb531@gmail.com 📬