WASI, first steps
 Philippe Charrière
This blog post is an introduction to WASI, the WebAssembly System Interface. But first, let's talk a little bit about WASM.
This blog post is the first of a long series dedicated to WASI.
Quick reminder: WASM?
WebAssembly (nickname: WASM) is a low-level, portable, binary format for executing code on the web (in a browser) and can be used as a compilation target for various programming languages, including C, C++, Go and Rust (but not only). The JavaScript VM of the browser is responsible for the execution of the WASM code.
Important facts
WASM is designed to be a complement to JavaScript, not a replacement for JavaScript
WebAssembly and JavaScript are made to work together
The maturity level of WASM (inside the browser) is lovable
Thanks to WASM, the code execution into the browser is at near-native speeds. Then you can develop complex and high-performance applications that run in web browsers. Today, thanks to WASM, you can already do crazy things with your browser. Let's have a look at the WebAssembly Google Earth edition: https://earth.google.com/web/search/Place+Bellecour,+Place+Bellecour,+Lyon,+France/ or even to the Web IDE of Stackblitz: https://stackblitz.com/edit/node-m26i89?file=README.md.
How WASM works
The WebAssembly specification is available at https://www.w3.org/TR/wasm-core/
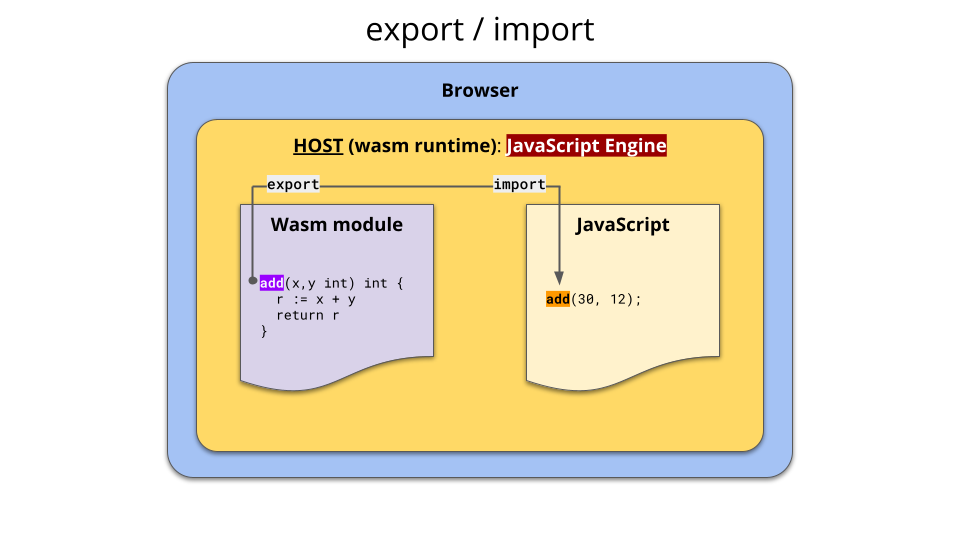
Export & Import
The JavaScript VM is responsible for executing the WASM module == the JS VM is the host runtime.
The WASM module exports a function
The JavaScript program imports this function and calls it

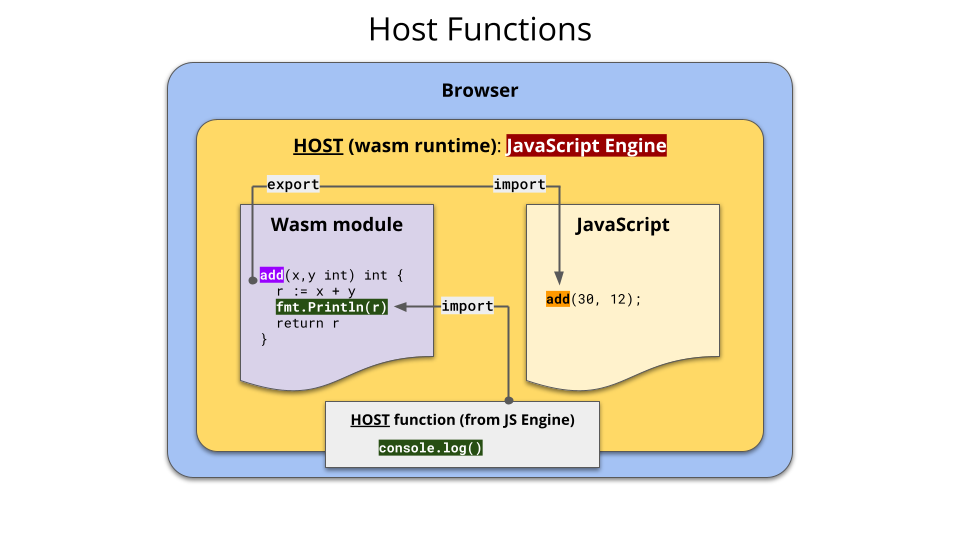
Host functions
The host runtime (the JavaScript engine/VM) can export host functions like the console.log() function. Then the WASM module can use the host function of the host, and print something to the console of the browser.

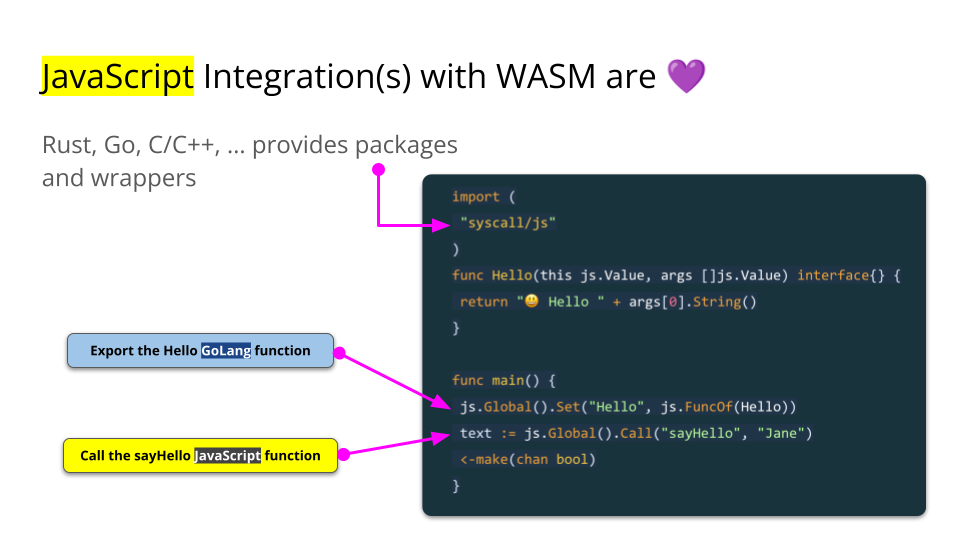
JavaScript integration with WASM
The existing JavaScript integrations (for the browser) are almost perfect and already usable, especially for Rust, Go and C/C++ (and AssemblyScript). For example, Go provides the syscall/js package and a JavaScript wrapper to simplify the interactions with the wasm module and the JavaScript VM. This allows interaction easily between Go and JavaScript in two ways.

If you want to go further with WASM inside the browser, you can read this blogpost: Foundations: Wasm in Golang is fantastic
The primary qualities of WASM
If I had to name the essential qualities of webassembly, I would say that:
WASM is fast (but don’t plan to rewrite everything, the JavaScript engine is very well optimized)
WASM is efficient: it takes less space and requires less power than other technologies used on the web
WASM is safe: WebAssembly is designed to be safe (the WASM module can not do more than what the browser can do)
WASM is versatile; you can use it to build a wide variety of applications (from games to Google Earth, for example)
And you have to know that since the beginning, WASM was designed to be portable, so it’s not surprising if, with all these qualities, people would like to run WASM outside the browser.
And, to make that wish come true, we have WASI!
WASI?
WASI for WebAssembly System Interface
WebAssembly System Interface (nickname: WASI) is a specification designed to be a portable system-level interface for WASM code, allowing it to run in various runtime environments (outside the browser), including servers and standalone applications: WASI is designed to allow WASM code to be run in multiple contexts, including as a standalone program or a function in a cloud environment.
WASI comes with a set of host functions provided by the host runtime environment and can be called from within the WASM code (for example, these functions allow interactions with the file system or with networking, but it's still constrained: the WASI specifications are in progress).
WASI runtimes
Today the (main) existing WASM runtimes implementing the WASI specifications are:
Wazero (it is dedicated to the GoLang host applications: "the zero dependency WebAssembly runtime for Go developers")
And, of course, I certainly forget some...
These runtimes projects offer both a CLI and an SDK:
A CLI to execute the WASM modules from a terminal.
The SDK allows you to embed/run the WASM modules into/from your applications.
The WASM modules are build to target the WASI specifications
👋 Important: Node.js comes with the WASI API, providing an implementation of the WebAssembly System Interface specification (it's a preview). We can consider Node.js as a WASI runtime (that means Node.js can execute and interact with WASM modules).
First CLI module
It's time to write our first WASM program.
Requirements
We need:
At least one WASI runtime (in fact, we're going to install several)
A language compiler able to compile the WASM modules to target WASI
👋 Important: many other languages target WASI, like Rust, C/C++, and Swift, ... But I think GoLang is easier for a first start (and I 💙 GoLang a lot).
Install the WASI runtimes.
# Install WasmEdge
curl -sSf https://raw.githubusercontent.com/WasmEdge/WasmEdge/master/utils/install.sh | bash
source ${HOME}/.wasmedge/env

# Install WasmTime
curl https://wasmtime.dev/install.sh -sSf | bash
source ${HOME}/.bashrc

# Install Wazero
curl https://wazero.io/install.sh | sh
sudo mv ./bin/wazero /usr/local/bin
rm -rf ./bin

# Install Wasmer
curl https://get.wasmer.io -sSfL | sh
source ${HOME}/.wasmer/wasmer.sh
Install Go and TinyGo
To install Go and TinyGo, you can follow the installation procedures of their respective sites (GoLang TinyGo), but I also give you what I use on my side:
GOLANG_VERSION="1.20"
GOLANG_OS="linux"
GOLANG_ARCH="arm64"

TINYGO_VERSION="0.27.0"
TINYGO_ARCH="arm64"

echo "Installing Go & TinyGo"

# -----------------------
# Install GoLang
# -----------------------
wget https://go.dev/dl/go${GOLANG_VERSION}.${GOLANG_OS}-${GOLANG_ARCH}.tar.gz

sudo rm -rf /usr/local/go
sudo tar -C /usr/local -xzf go${GOLANG_VERSION}.${GOLANG_OS}-${GOLANG_ARCH}.tar.gz

echo "" >> ${HOME}/.bashrc
echo "export GOLANG_HOME=\"/usr/local/go\"" >> ${HOME}/.bashrc
echo "export PATH=\"\$GOLANG_HOME/bin:\$PATH\"" >> ${HOME}/.bashrc

source ${HOME}/.bashrc

rm go${GOLANG_VERSION}.${GOLANG_OS}-${GOLANG_ARCH}.tar.gz

# -----------------------
# Install TinyGo
# -----------------------
wget https://github.com/tinygo-org/tinygo/releases/download/v${TINYGO_VERSION}/tinygo_${TINYGO_VERSION}_${TINYGO_ARCH}.deb
sudo dpkg -i tinygo_${TINYGO_VERSION}_${TINYGO_ARCH}.deb
rm tinygo_${TINYGO_VERSION}_${TINYGO_ARCH}.deb
👋 Adapt the script to your own needs
Ready to compile!
Create a new GoLang module and a main.go file (in a directory):
go mod init hello
touch main.go
This is the content of the file named main.go:
package main

import (
    "fmt"
)

func main() {
    fmt.Println("👋 Hello World from TinyGo 🌍")
}
Of course, emojis are not mandatory, but I 💜 emojis
And finally, compile the program with TinyGo:
tinygo build -o main.wasm -target wasi ./main.go
Then, you will obtain a new file called main.wasm. To execute the wasm module (== execute the main Function) with various WASI runtimes, type the below commands:
wasmedge main.wasm
wasmtime main.wasm
wasmer main.wasm
wazero run main.wasm
You should get the following:
👋 Hello World from TinyGo 🌍
👋 Hello World from TinyGo 🌍
👋 Hello World from TinyGo 🌍
👋 Hello World from TinyGo 🌍
🎉 Bravo 👏 and welcome to WASI! But let's go further with a second WASM module.
Second CLI module, use the arguments
I want to show you that you can pass arguments to the WASM module like any other CLI application. So, let's create a new GoLang module and a main.go file (in a directory):
go mod init hello-args
touch main.go
This is the content of the main.go File:
package main

import (
    "fmt"
    "os"
)

func main() {
    argsWithoutCaller := os.Args[1:]

    fmt.Println(argsWithoutCaller)
}
And finally, compile the program with TinyGo:
tinygo build -o main.wasm -target wasi ./main.go
To execute the wasm module with various WASI runtimes, type the below commands:
wasmedge main.wasm Hello Jane Doe from WasmEdge 💚
wasmtime main.wasm Hello John Doe from WasmTime 🧡
wazero run main.wasm Hello Bob Morane from Wazero 💜
wasmer main.wasm Hello Bill Balantine from Wasmer 💙
You should get the following:
[Hello Jane Doe from WasmEdge 💚]
[Hello John Doe from WasmTime 🧡]
[Hello Bob Morane from Wazero 💜]
[Hello Bill Balantine from Wasmer 💙]
Third CLI module, call a function
Host applications (and it's the case for some of the runtimes CLI) can call functions from the WASM module other than the main function.
So, let's create again, a new GoLang module and a main.go File (in a directory):
go mod init hello-function
touch main.go
This is the content of the main.go File:
package main

import "fmt"

func main() {
    fmt.Println("👋 Hello from TinyGo")
}

//export add
func add(x int, y int) int {
    return x + y
}

//export hello
func hello(name string) string {
    return "🤗 Hello " + name
}
👋 Important: to make the add function callable from host, we need to add the export add comment above the function.
Compile the program with TinyGo:
tinygo build -o main.wasm -target wasi ./main.go
To call the add function of the wasm module, type the below commands:
wasmedge --reactor main.wasm add 20 22 # == 42
wasmer main.wasm --invoke add 12 30 # == 42
Remark: you can invoke the
mainfunction like thiswasmedge --reactor main.wasm _startorwasmer main.wasm --invoke _start
👋 Important: if you try to invoke the hello function with the CLI, you will raise an error like terminate called after throwing an instance of 'std::invalid_argument'. 😢 You just have found one of the annoying limitations of WASI. You can only use integers or floating point numbers as the arguments or a return value for a WASM program. So, using a string as a function parameter or a return value is not trivial when you use a WASI runtime SDK to build your host applications. But don't worry; we'll get to that in an upcoming blog post.
Remark: For a WASM module executed by a runtime CLI, the workaround would be to call the function directly from the main function:
package main

import (
    "fmt"
    "os"
)

func main() {
    argsWithoutCaller := os.Args[1:]
    fmt.Println(hello(argsWithoutCaller[0]))
}

//export hello
func hello(name string) string {
    return "🤗 Hello " + name
}
And run the module like this: wasmtime main.wasm "Bob Morane"
Fourth CLI module, run it with Node.js
Requirements
Installation of Node.js
This is my script to install Node.js on my machine:
NVM_VERSION="0.39.3"
NODEJS_VERSION="19.9.0"

curl -o- https://raw.githubusercontent.com/nvm-sh/nvm/v${NVM_VERSION}/install.sh | bash
source $HOME/.bashrc

nvm install ${NODEJS_VERSION}
nvm use ${NODEJS_VERSION}
Otherwise, you can install Node.js manually: https://nodejs.org/en
Reuse of a previous WASM module
You can reuse the WASM module of the second example:
package main

import (
    "fmt"
    "os"
)

func main() {
    argsWithoutCaller := os.Args[1:]

    fmt.Println(argsWithoutCaller)
}
Run the WASM module from Node.js
Then, create a new JavaScript file: index.js
"use strict";
const fs = require("fs");
const { WASI } = require("wasi");

const wasi = new WASI({args: ["", "Hello Jane Doe from Node.js 💛"]}); // Like the args with a CLI

const importObject = { wasi_snapshot_preview1: wasi.wasiImport };

(async () => {
  const wasm = await WebAssembly.compile(
    fs.readFileSync("./hello/main.wasm") // adapt the path
  );
  const instance = await WebAssembly.instantiate(wasm, importObject);

  wasi.start(instance);
})();
Run index.js like this:
node --experimental-wasi-unstable-preview1 --no-warnings index.js
You should get the following:
[Hello Jane Doe from Node.js 💛]
That's it for this introduction to WASI. In the next blog post, we'll see how to pass a string to a WASM function and return a string to the Node.js host application.
Stay in touch to get the soon coming next blog post.
Subscribe to my newsletter
Read articles from Philippe Charrière directly inside your inbox. Subscribe to the newsletter, and don't miss out.
Written by
