Building a Proxy Server in Rust with Axum | Rust.
 Carlos Armando Marcano Vargas
In this article, we are going to build a proxy server using the Rust programming language and the Axum framework. The server is designed to block websites defined in a text file. We will use Axum's http-proxy example and add the feature to block the websites.
You can clone the Axum example repository from here.
Requirements
Rust installed
Basic Rust knowledge
What is a Proxy server?
According to Fortinet:
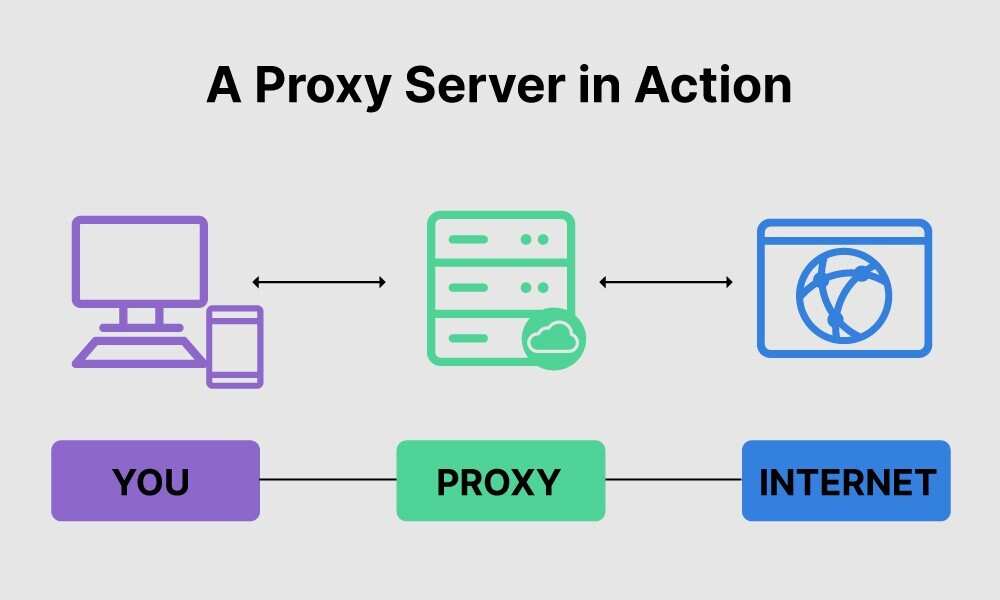
A proxy server is a system or router that provides a gateway between users and the internet. Therefore, it helps prevent cyber attackers from entering a private network. It is a server, referred to as an “intermediary” because it goes between end-users and the web pages they visit online.
Here is an image extracted from the article "What is a Proxy Server? How does it work?'" posted on the Fortinet website, that proxy server in action.
Project Structure
proxy-server/
    src/
        main.rs
    Cargo.toml
    blacklist.txt
Building the Proxy Server
cargo.toml
We add some crates to the original project. You can copy/paste the dependencies.
...

[dependencies]
axum = "0.6.4"
tokio = { version = "1.25.0", features = ["full"] }
tracing = "0.1.37"
tracing-subscriber = { version = "0.3.16", features = ["env-filter", "json"]}
tower-http = { version = "0.3.4", features = ["trace"] }
tower = { version = "0.4", features = ["make"] }
hyper = { version = "0.14", features = ["full"] }
main.rs
This is the main.rs file of the original project.
use axum::{
    body::{self, Body},
    http::{Method, Request, StatusCode},
    response::{IntoResponse, Response},
    routing::get,
    Router,
};
use hyper::upgrade::Upgraded;
use std::net::SocketAddr;
use tokio::net::TcpStream;
use tower::{make::Shared, ServiceExt};
use tracing_subscriber::{layer::SubscriberExt, util::SubscriberInitExt};

#[tokio::main]
async fn main() {
    tracing_subscriber::registry()
        .with(
            tracing_subscriber::EnvFilter::try_from_default_env()
                .unwrap_or_else(|_| "example_http_proxy=trace,tower_http=debug".into()),
        )
        .with(tracing_subscriber::fmt::layer())
        .init();

    let router_svc = Router::new().route("/", get(|| async { "Hello, World!" }));

    let service = tower::service_fn(move |req: Request<Body>| {
        let router_svc = router_svc.clone();
        async move {
            if req.method() == Method::CONNECT {
                proxy(req).await
            } else {
                router_svc.oneshot(req).await.map_err(|err| match err {})
            }
        }
    });

    let addr = SocketAddr::from(([127, 0, 0, 1], 3000));
    tracing::debug!("listening on {}", addr);
    axum::Server::bind(&addr)
        .http1_preserve_header_case(true)
        .http1_title_case_headers(true)
        .serve(Shared::new(service))
        .await
        .unwrap();
}

async fn proxy(req: Request<Body>) -> Result<Response, hyper::Error> {
    tracing::trace!(?req);

    if let Some(host_addr) = req.uri().authority().map(|auth| auth.to_string()) {
        tokio::task::spawn(async move {
            match hyper::upgrade::on(req).await {
                Ok(upgraded) => {
                    if let Err(e) = tunnel(upgraded, host_addr).await {
                        tracing::warn!("server io error: {}", e);
                    };
                }
                Err(e) => tracing::warn!("upgrade error: {}", e),
            }
        });

        Ok(Response::new(body::boxed(body::Empty::new())))
    } else {
        tracing::warn!("CONNECT host is not socket addr: {:?}", req.uri());
        Ok((
            StatusCode::BAD_REQUEST,
            "CONNECT must be to a socket address",
        )
            .into_response())
    }
}

async fn tunnel(mut upgraded: Upgraded, addr: String) -> std::io::Result<()> {
    let mut server = TcpStream::connect(addr).await?;

    let (from_client, from_server) =
        tokio::io::copy_bidirectional(&mut upgraded, &mut server).await?;

    tracing::debug!(
        "client wrote {} bytes and received {} bytes",
        from_client,
        from_server
    );

    Ok(())
}
The first thing we are going to do is add some changes to the main function, we add TraceLayer to the router_svc, so we can see the tracing and the logs in our command line. We import TraceLayer from tower_http, and Level from tracing. So we have to make sure we import them on the top of our main.rs file.
...
use tower_http::trace::{self, TraceLayer};
use tracing::Level;

#[tokio::main]
async fn main() {
     tracing_subscriber::registry()
        .with(tracing_subscriber::fmt::layer())
        .init();

    let router_svc = Router::new()
        .route("/", get(|| async { "Hello, World!" }))
        .layer(
            TraceLayer::new_for_http()
                 .make_span_with(
                        trace::DefaultMakeSpan::new()
                            .level(Level::INFO)
                    )
                .on_response(
                        trace::DefaultOnResponse::new()
                            .level(Level::INFO)),
                    );

    let service = tower::service_fn(move |req: Request<Body>| {
        let router_svc = router_svc.clone();
        async move {
            if req.method() == Method::CONNECT {
                proxy(req).await
            } else {
                router_svc.oneshot(req).await.map_err(|err| match err {})
            }
        }
    });

    let addr = SocketAddr::from(([127, 0, 0, 1], 3000));
    tracing::debug!("listening on {}", addr);
    axum::Server::bind(&addr)
        .http1_preserve_header_case(true)
        .http1_title_case_headers(true)
        .serve(Shared::new(service))
        .await
        .unwrap();
}
Then, we run cargo run in our command lines. We should see the following message in the terminal.

In another terminal, we run Curl, with the following command: curl -v -x "127.0.0.1:3000" https://tokio.rs.
We should see the following message:
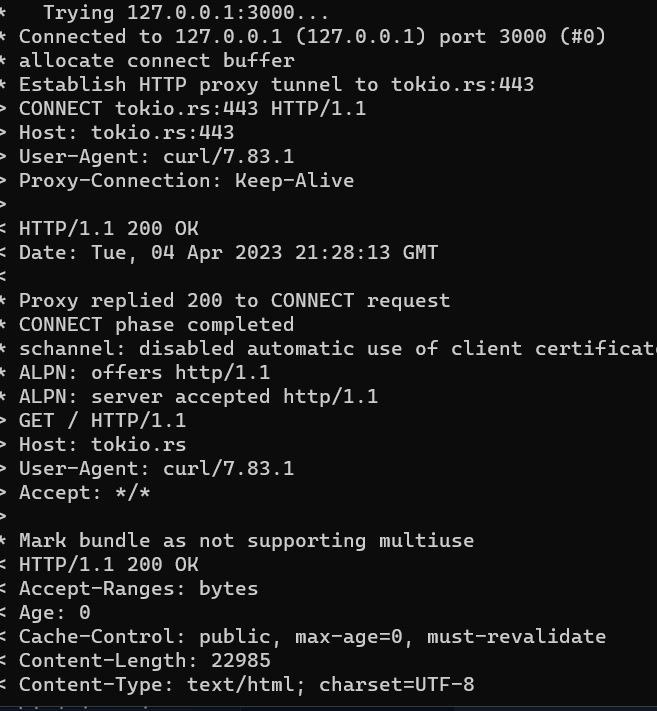
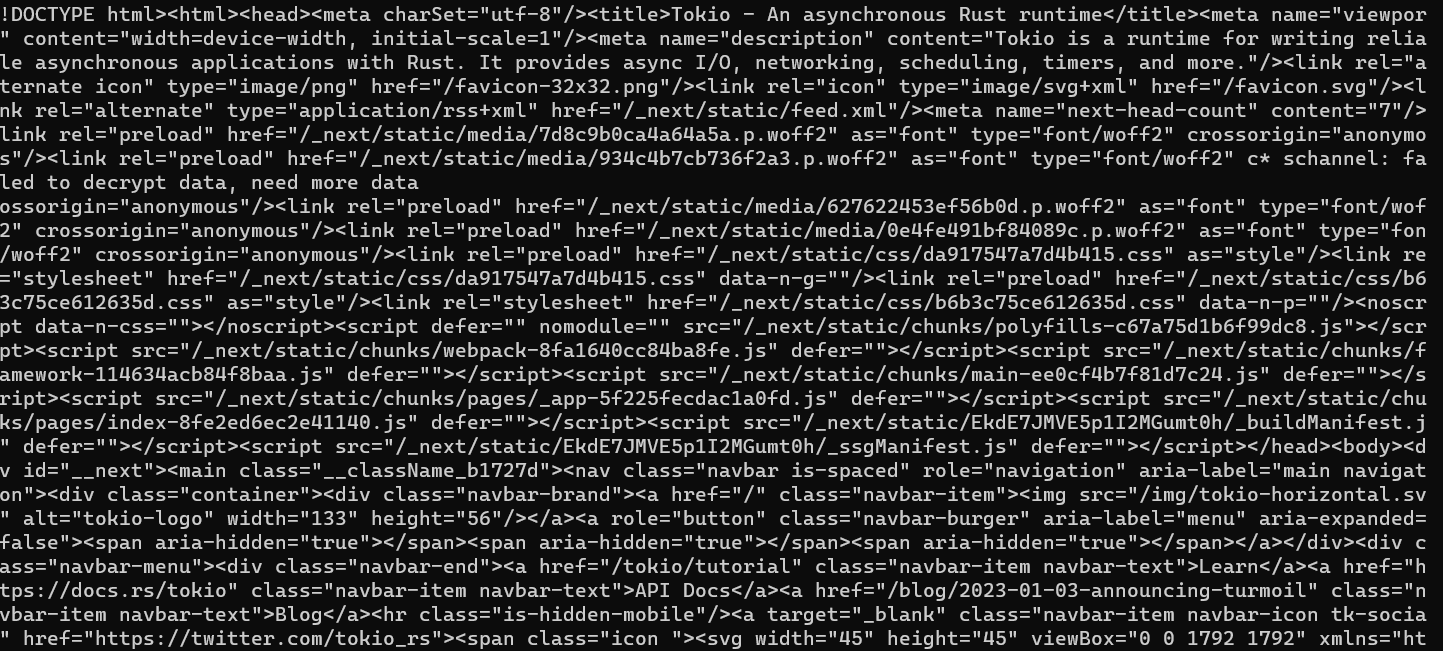
Also, we should see the trace of our server in its terminal:

Creating helpers.
helpers.rs
We create a new file, src/helpers.rs. In this file, we are going to write the code that reads the URL addresses of the sites we want the proxy server to block from the .txt file.
use std::fs;
use std::io::BufReader;
use std::io::BufRead;
use std::io;


pub fn read_file_lines_to_vec(filename: &str) -> io::Result<Vec<String>> {
    let file_in = fs::File::open(filename)?;
    let file_reader = BufReader::new(file_in);
    Ok(file_reader.lines().filter_map(io::Result::ok).collect())
}
This code defines a function read_file_lines_to_vec that takes a filename as a string parameter and returns a vector of strings or an io::Result.
The function tries to open the file with the given filename using fs::File::open() and returns an error if it failed using the ? operator.
Then, it creates a BufReader object from the file_in object from the previous line to efficiently read the file line-by-line.
Finally, the function returns the lines of the file as a vector of strings by first calling .lines() on the file_reader object to get an iterator over the lines in the file. Then the iterator is filtered using the filter_map() method which filters out the errors and unwraps the Result objects. The resulting lines are collected into a vector using the collect() method and returned as the Ok() variant of an io::Result object - this result indicates the successful execution of the function.
Now, let's create a new file in the project's root directory, and write text in it to test if the function can read the text from the file.
blacklist.txt
instagram.com
twitter.com
main.rs
...

use tracing_subscriber::{layer::SubscriberExt, util::SubscriberInitExt};
use tower_http::trace::{self, TraceLayer};
use tracing::Level;
mod helpers;
use helpers::{read_file_lines_to_vec};


#[tokio::main]
async fn main() {
    let file_path = "./blacklist.txt";
    println!("{:?}", read_file_lines_to_vec(&file_path.to_string()));

    tracing_subscriber::registry()
    .with(tracing_subscriber::fmt::layer())
    .init();

...
}
...

helpers.rs
pub fn check_address_block(address_to_check: &str) -> bool {
    let addresses_blocked = read_file_lines_to_vec(&"./blacklist.txt".to_string());
    let addresses_blocked_iter: Vec<String> = match addresses_blocked {
        Ok(vector) => vector,
        Err(_) => vec!["Error".to_string()]
    };

    let address_in = addresses_blocked_iter.contains(&address_to_check.to_string());
    return address_in

}
The check_address_block function takes a parameter address_to_check of type &str. This function is used to check if the given address address_to_check is present in a list of blocked addresses defined in the blacklist.txt file.
The next line defines a variable addresses_blocked using a function read_file_lines_to_vec. It reads all the lines of text from the 'blacklist.txt' file and stores them in a vector of strings.
The variable addresses_blocked_iter is used to hold the block addresses returned by read_file_lines_to_vec. Here, we are using match expression to handle the possible results. If the result is an Ok variant, we assign it to the vector. If the result is an Err, then we return a string error message.
Next, we use the contains method on the addresses_blocked vector to search for address_to_check.
Finally, the function returns true if the address_to_check is found in the addresses_blocked vector, and false otherwise.
Now, let's use this function and verify it behaves as we expect it.
main.rs
...

use helpers::{check_address_block};

#[tokio::main]
async fn main() {

    println!("{:?}", check_address_block("https://instagram.com"));

    tracing_subscriber::registry()
    .with(tracing_subscriber::fmt::layer())
    .init();
...
}
...

async fn proxy(req: Request<Body>) -> Result<Response, hyper::Error> {
    tracing::trace!(?req);

    if let Some(host_addr) = req.uri().authority().map(|auth|                     auth.to_string()) {
       if check_address_block(&host_addr) == true {
           println!("This site is blocked")
       } else {
            tokio::task::spawn(async move {
            match hyper::upgrade::on(req).await {
                Ok(upgraded) => {
                    if let Err(e) = tunnel(upgraded, host_addr).await {
                        tracing::warn!("server io error: {}", e);
                    };
                }
                Err(e) => tracing::warn!("upgrade error: {}", e),
                }
            });
       }

        Ok(Response::new(body::boxed(body::Empty::new())))
    } else {
        tracing::warn!("CONNECT host is not socket addr: {:?}", req.uri());
        Ok((
            StatusCode::BAD_REQUEST,
            "CONNECT must be to a socket address",
        )
            .into_response())
    }
}
The
proxyfunction takes aRequestobject as an argument and returns aResultobject that wraps aResponseobject or ahyper::Error.The first line in the function logs the incoming request using the
tracingRust library.The function then checks if the incoming request URI contains the
authoritycomponent (i.e., the hostname or IP address). If it does not have anauthority, aBAD_REQUESTresponse is returned.If the URI does contain an
authority, the function then checks if the address is blocked or not using thecheck_address_blockfunction. If it is blocked, the function logs a message and does not proceed with the proxying.If the address is not blocked, a new task is spawned using
tokio::task::spawn. This task executes asynchronously and invokes thehyper::upgrade::onfunction to upgrade the incoming HTTP request to an HTTP CONNECT request, which sets up a tunnel between the proxy server and the destination server.The
tunnelfunction is then invoked with the upgraded request and the host address, which is responsible for handling the actual proxying logic.If there is an error during the upgrade or tunneling process, it is logged using the
tracinglibrary.Finally, a
Responseobject is created with an empty body and returned to indicate success.
async fn tunnel(mut upgraded: Upgraded, addr: String) -> std::io::Result<()> {
    let mut server = TcpStream::connect(addr).await?;

    let (from_client, from_server) =
        tokio::io::copy_bidirectional(&mut upgraded, &mut server).await?;

    tracing::debug!(
        "client wrote {} bytes and received {} bytes",
        from_client,
        from_server
    );

    Ok(())
}
The tunnel function takes in the upgraded TCP stream and the address of the destination server and then creates a new TCP stream to connect to the destination server. It then uses tokio::io::copy_bidirectional to copy data between the two streams, i.e., from the client to the server and vice versa.
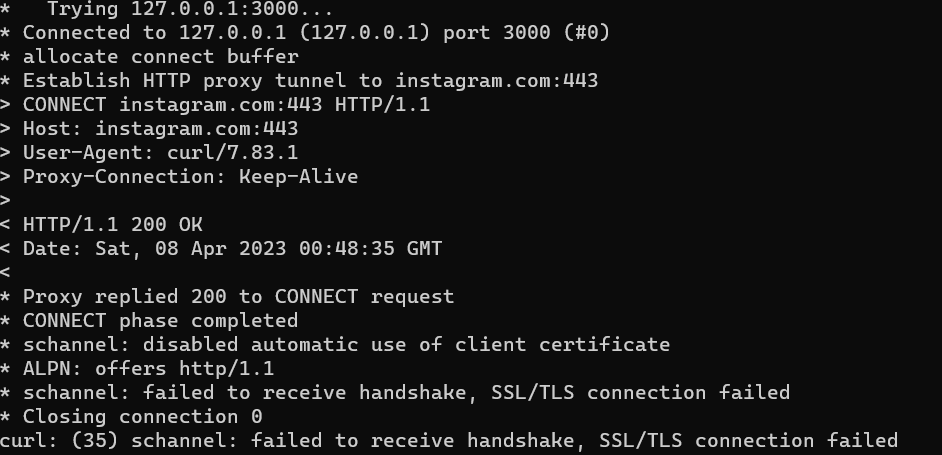
Now let's modify the blacklist.txt file. Let's add the port from where the host is listening.
www.instagram.com:443
twitter.com:443
Adding the Proxy to the Browser.
I will show how to add the proxy server to Google Chrome as an example.
First, we click on the menu button in the top right and click on Settings. Then we click on System. And click on where it says "Open your computer's proxy settings".
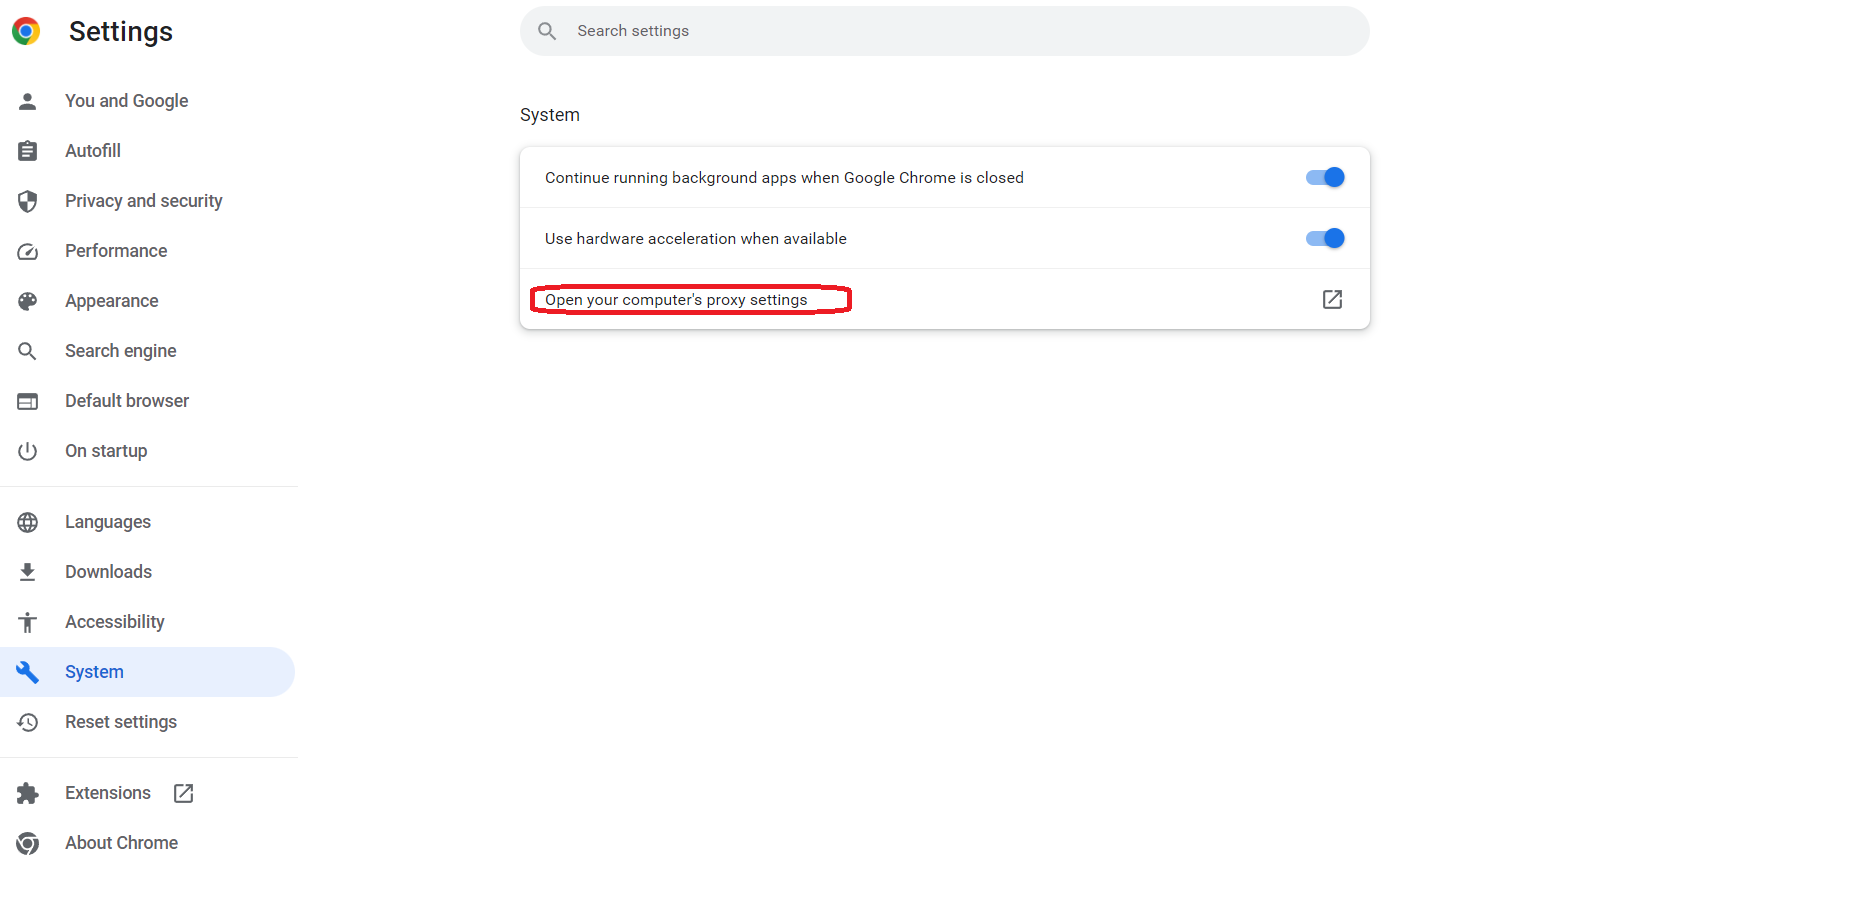
Chrome will redirect the user to the native proxy settings of the OS.
The proxy IP is 127.0.0.1. And the port is 3000.
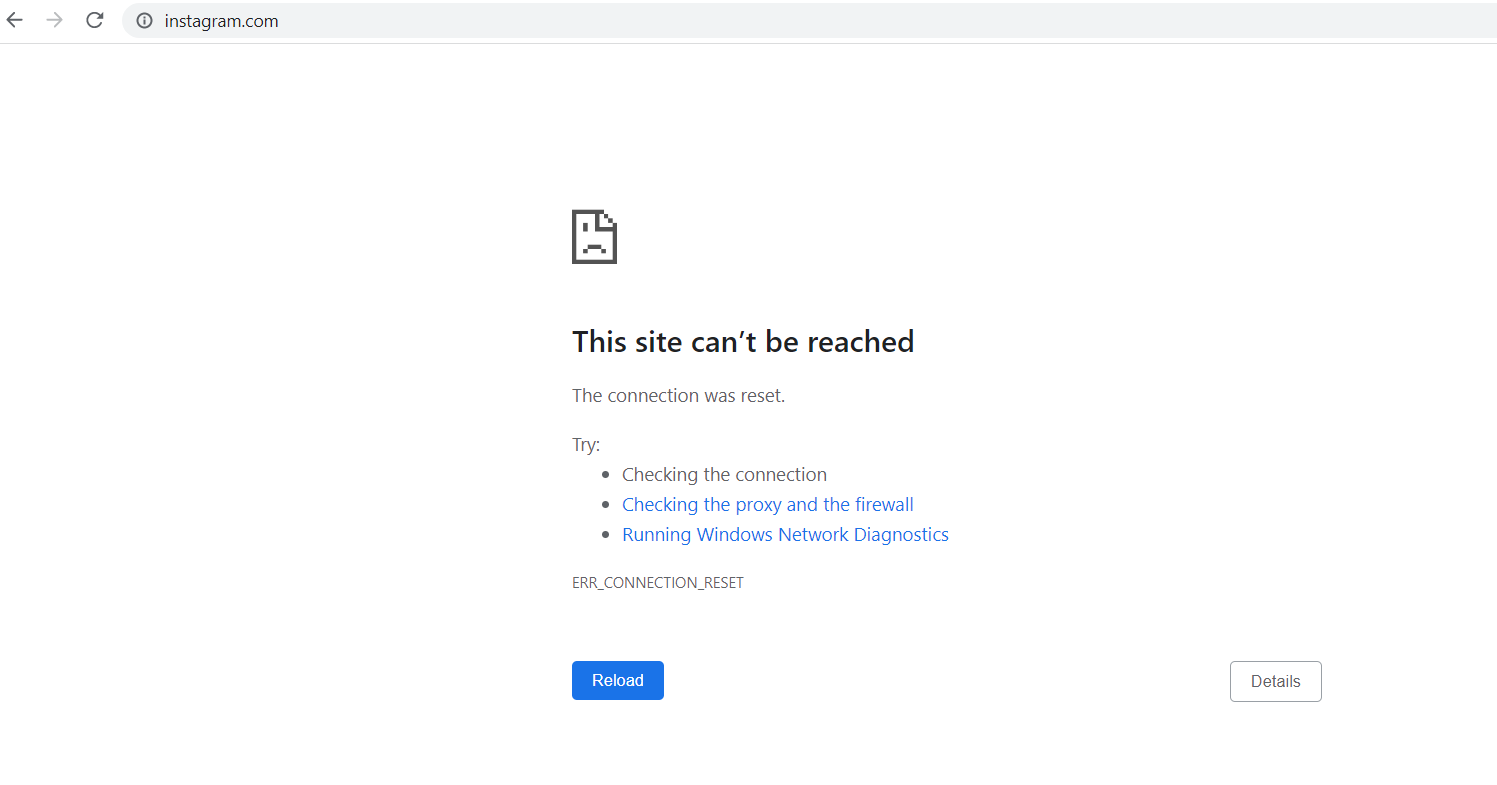
If we try to visit one of the sites we specify in the blacklist.txt file, the browser will show this page:
Recommendations
If you want to use your browser to use the proxy server, make sure to start the server first. If you don't, you will see the page "No Internet".
Before writing on the blacklist.txt file, make sure to write the host the server is making the request. To know this information, use the proxy and visit the site you want to block, and the host will appear in the command line. I have an issue trying to block Instagram, I wrote
instagram.com, andhttps://instagram.com, and it didn't work. Butwww.instagram.comworks.

Don't forget to write the port, is 443 for HTTPS and port 80 for HTTP.
Remember this is a project for learning purposes to continue learning Rust and Axum. I don't recommend using this proxy server in a production environment or as a default proxy for your machine.
Conclusion
In conclusion, this article provided a step-by-step guide on how to build a proxy server using Axum in the Rust programming language. It also demonstrated how to block websites from a blacklist using a helper function and how to add the blocking feature to the proxy server.
Thank you for taking the time to read this article.
If you have any recommendations about other packages, architectures, how to improve my code, my English, or anything; please leave a comment or contact me through Twitter, or LinkedIn.
The source code is here.
Resources
Subscribe to my newsletter
Read articles from Carlos Armando Marcano Vargas directly inside your inbox. Subscribe to the newsletter, and don't miss out.
Written by

Carlos Armando Marcano Vargas
Carlos Armando Marcano Vargas
I am a backend developer from Venezuela. I enjoy writing tutorials for open source projects I using and find interesting. Mostly I write tutorials about Python, Go, and Rust.