Using Azure Workload Identity on AKS Clusters
 KahHoe Tan
As an Azure Kubernetes Service (AKS) cluster operator, I have been analyzing and testing Azure AD Workload Identity at work lately. With it hitting GA this month, I thought I would share with you what Azure Workload Identity is, and how to implement it.
In this guide, I will be sharing with you:
How to enable Azure Workload Identity on your AKS cluster
Setup necessary for Azure Workload Identity to work on Azure
Deploying a simple Node.js API application that authenticates with Azure Storage Account via Azure Workload Identity to AKS cluster
I will assume you already have basic knowledge of AKS and Azure CLI.
Introduction
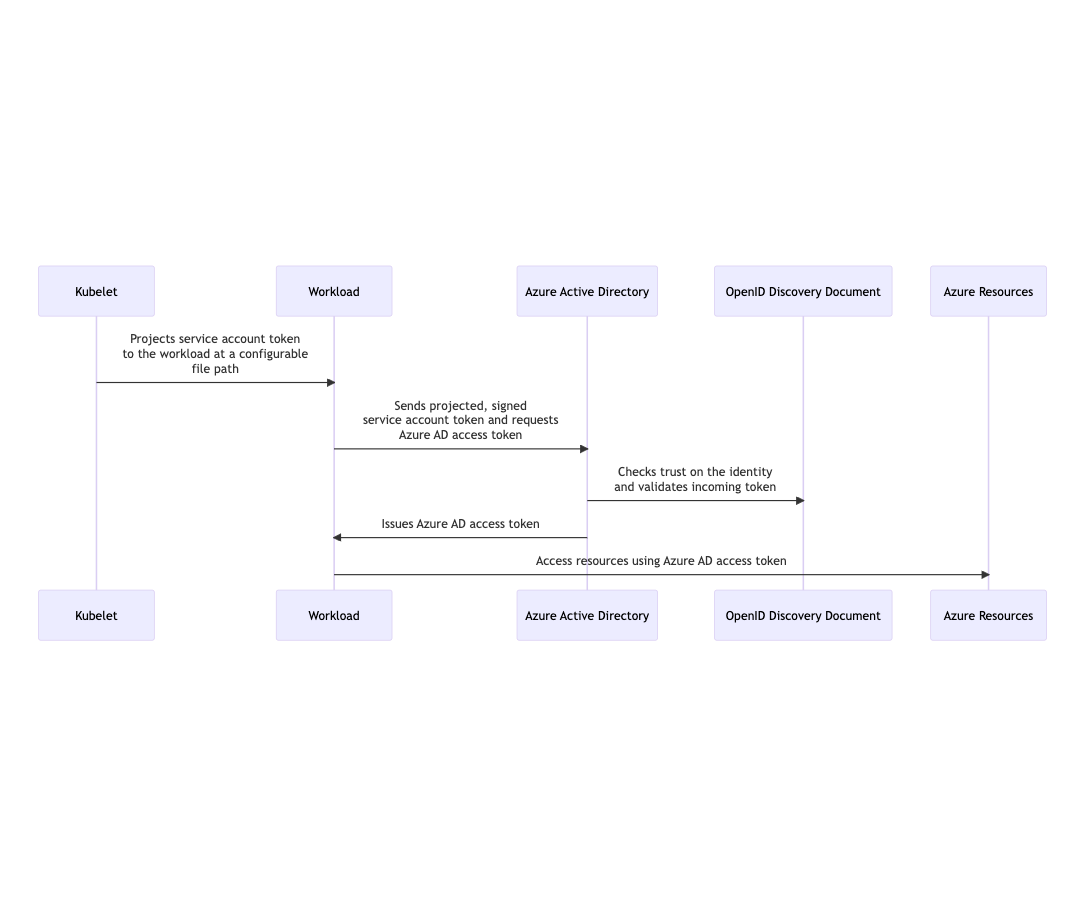
Azure AD Workload Identity is a managed service that enables you to securely access Azure resources from your applications running on AKS clusters. With Azure Workload Identity, you can simplify the management of secrets and eliminate the need to store sensitive information such as credentials, keys, and tokens in your application code or configuration files.

Further reading on what Azure workload identity is:
Prerequisites
Install the following tools on your workstation if you want to follow further with my guide.
Azure CLI - https://learn.microsoft.com/en-us/cli/azure/install-azure-cli
kubectl- https://kubernetes.io/docs/tasks/tools/
Enable Workload Identity on AKS
First, you need to enable Azure workload identity feature on your AKS cluster. Run this Azure CLI command to update your AKS cluster.
az aks update -n <clusterName> -g <resourceGroup> \
    --enable-oidc-issuer \
    --enable-workload-identity
--enable-oidc-issuerenables AKS cluster as the OIDC issuer. You can read more about AKS and OIDC here. Take note that enabling AKS OIDC issuer is permanent and you cannot undo this.--enable-workload-identityparameter installs the Workload Identity webhook controller on your AKS cluster.
Take a cup of coffee while waiting for the command to finish running. When it's done, it should output a list of your AKS cluster's new attributes. You can get its OIDC issuer URL by running this command. Note the OIDC issuer URL, you will need it later.
az aks show -n <clusterName> -g <resourceGroup> \
  --query "oidcIssuerProfile.issuerUrl" -otsv
To verify if the webhook controller is running on your AKS cluster, run this command. It should show some pod(s) with names such as "azure-wi-webhook-controller-manager".
kubectl -n kube-system get pod -l azure-workload-identity.io/system=true
Also, a word of warning when you enable OIDC issuer on your AKS cluster:
Warning:
Enable OIDC Issuer on existing cluster changes the current service account token issuer to a new value, which can cause down time and restarts the API server. If your application pods using a service token remain in a failed state after you enable the OIDC Issuer, we recommend you manually restart the pods.
Managed Identity and Access
Next, create a Managed Identity on Azure. Run this Azure CLI command.
az identity create --name <identityName> \
  --resource-group <resourceGroup> \
  --location <location>
Take note of your managed identity's Client ID when your identity is created. You will need it later.
Now you will need to grant the newly created managed identity access to your Azure resource. In this demo, the access needed was to access blob container in storage account. The "Storage Blob Data Contributor" role will suffice.
az role assignment create --assignee <identityClientId> \
  --role "Storage Blob Data Contributor" \
  --scope <storageAccountId>
Service Account
Next, deploy a service account on your AKS cluster. This service account's token will be issued by the AKS cluster's OIDC issuer to be authenticated with Azure AD.
apiVersion: v1
kind: ServiceAccount
metadata:
  name: sa
  annotations:
    azure.workload.identity/client-id: <clientId>
    azure.workload.identity/tenant-id: <tenantId>
Take note of the name and annotations:
azure.workload.identity/client-id: <clientId>- Replace<clientId>with the managed identity's Client IDazure.workload.identity/tenant-id: <tenantId>- Replace<tenantId>with your Azure tenant ID
You can refer to the full list of service account annotations here.
Establish federated identity credential
Now you will need to establish a federated identity credential between the managed identity, the service account issuer, and the subject.
az identity federated-credential create --name <credentialName> \
  --resource-group <resourceGroup> \
  --identity-name <identityName> \
  --issuer <oidcIssuerUrl> \
  --subject system:serviceaccount:<namespace>:sa
--name- Name of the federated credential. This cannot be edited after creation.--resource-group- Name of the resource group--identity-name- Name of the managed identity--issuer- AKS cluster's OIDC issuer URL--subject- Subject identifier in the format ofsystem:serviceaccount:<namespace>:<serviceAccount>
Implementation on application
We are almost there! The next section is about implementing Workload Identity on your application.
I have developed an extremely simple Node.js API application that retrieves JSON file from Azure Storage Account based on the tutorial here. You can refer to the repository here for the source code.
The important part is the implementation of DefaultAzureCredential class. Here is the Azure documentation on what it is and how to use it.
Application requests to Azure Blob Storage must be authorized. Using the
DefaultAzureCredentialclass provided by the Azure Identity client library is the recommended approach for implementing passwordless connections to Azure services in your code, including Blob Storage.
DefaultAzureCredentialsupports multiple authentication methods and determines which method should be used at runtime. This approach enables your app to use different authentication methods in different environments (local vs. production) without implementing environment-specific code. The order and locations in whichDefaultAzureCredentiallooks for credentials can be found in the Azure Identity library overview.For example, your app can authenticate using your Azure CLI sign-in credentials with when developing locally. Your app can then use a managed identity once it has been deployed to Azure. No code changes are required for this transition.
You should now implement this class in your application, test it out locally, build Docker image, and prepare your application for deployment to AKS cluster.
Deploying to AKS
Prepare a deployment manifest for the application. Here is the sample deployment manifest I use.
apiVersion: apps/v1
kind: Deployment
metadata:
  name: get-storage
  labels:
    app: get-storage
spec:
  replicas: 1
  selector:
    matchLabels:
      app: get-storage
  template:
    metadata:
      labels:
        app: get-storage
        azure.workload.identity/use: "true"
    spec:
      serviceAccountName: sa
      containers:
        - name: get-storage
          image: chester2004/get-storage
          ports:
            - containerPort: 8080
Add the pod label
azure.workload.identity/use: "true". This label is required in the pod template spec. Only pods with this label will be mutated by the azure-workload-identity mutating admission webhook to inject the Azure specific environment variables and the projected service account token volume.serviceAccountName: sa- Remember to add this line. This will mount the service account token for authentication with Azure AD.
Test it out
After you have deployed your application, let's test out the application. Run a HTTP GET request to get the JSON file content.
### Request to get blob content
GET http://<host>:<port>/api/<storageAccount>/<container>/<filename>

### Example
GET http://localhost:8080/api/testkahoe/test/sample.json
It should return the JSON file content.
Summary
Workload identity gives us the advantage to not save any secrets needed to authenticate with Azure AD in Kubernetes.
It also needs changes on application code, not just Kubernetes manifests.
Subscribe to my newsletter
Read articles from KahHoe Tan directly inside your inbox. Subscribe to the newsletter, and don't miss out.
Written by

KahHoe Tan
KahHoe Tan
DevOps engineer from Malaysia | Cat lover | Loves reading sci-fi novels | Trying to write something other than YAML