Introduction to Ansible
 Hemanth Narayanaswamy
What's this, Ansible?
Ansible is open-source software for provisioning, configuration management, interservice orchestration, and application deployment that enables infrastructure as code.
Ansible is a free automation tool that can automate IT tasks on the local machine where it is running and on remote servers.
Ansible Architecture

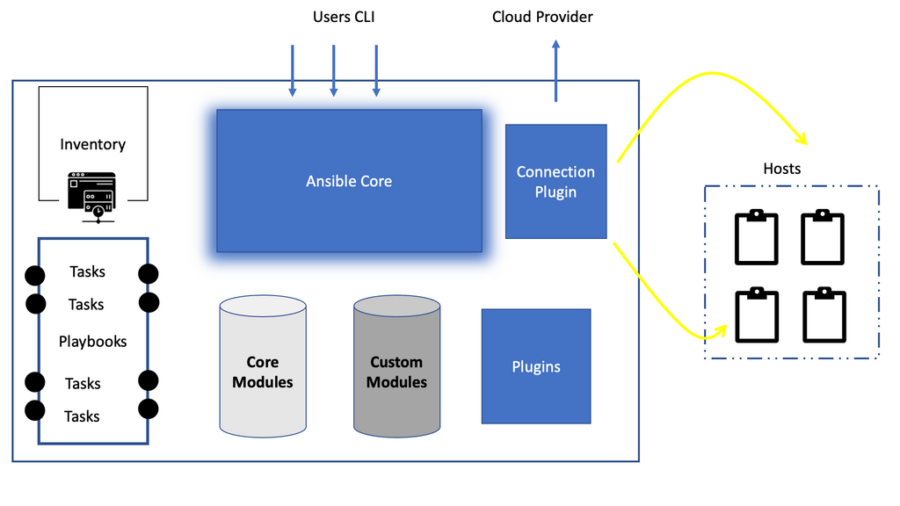
Being designed for multi-tier deployments since day one, Ansible models your IT infrastructure by describing how all of your systems interrelate rather than just managing one system at a time.
It uses no agents and no additional custom security infrastructure, so it’s easy to deploy. Most importantly, it uses an elementary language (YAML, in the form of Ansible Playbooks) that allows you to describe your automation jobs in a way that approaches plain English.
Please refer to the link for the YAML introduction. YAML
In this section, we’ll give you a really quick overview of how Ansible works so you can see how the pieces fit together.
Control Node/Ansible Server:
Server which runs an Ansible application and is used to control multiple hosts.
Modules:
The module is a command meant to be executed on the client side. Most of the IT tasks modules are already created and can be found on doc.
Ansible works by connecting to your nodes and pushing out scripts called “Ansible modules” to them. Most modules accept parameters that describe the desired state of the system. Ansible then executes these modules (over SSH by default), and removes them when finished. Your library of modules can reside on any machine, and there are no servers, daemons, or databases required.
Plugins:
Plugins augment Ansible’s core functionality. While modules execute on the target system in separate processes (usually on a remote system), plugins execute on the control node within the /usr/bin/ansible process. Plugins offer options and extensions for the core features of Ansible - transforming data, logging output, connecting to inventory, and more.
Inventory:
By default, Ansible represents the machines it manages in a file (INI, YAML, and so on) that puts all of your managed machines in groups of your own choosing.
Now that we have a control node, we have to reach out to the remote servers. So the remote servers should be listed in the control node.
It is listed in a file called "Hosts," the file is created during the Ansible installation, and that host file is our inventory file, which has information about remote clients and where tasks are executed.
Here’s what a plain text inventory file looks like:
---
[webservers]
www1.example.com
www2.example.com

[dbservers]
db0.example.com
db1.example.com
Once inventory hosts are listed, variables can be assigned to them in simple text files or directly in the inventory file.
All remote clients are considered inventory in Ansible. Ansible keeps its inventory information in a host file located in /etc/ansible/hosts
Playbooks:
Playbooks can finely orchestrate multiple slices of your infrastructure topology, with very detailed control over how many machines to tackle at a time. This is where Ansible starts to get interesting.
Playbooks are simply automation files with step-by-step execution of multiple tasks.
Here’s what a simple playbook looks like:
---
- name: "My first Playbook"
  hosts: localhost
  tasks:
     - name: "Print Hello World on the Hosts"
       debug: msg="Hello World"
Task:
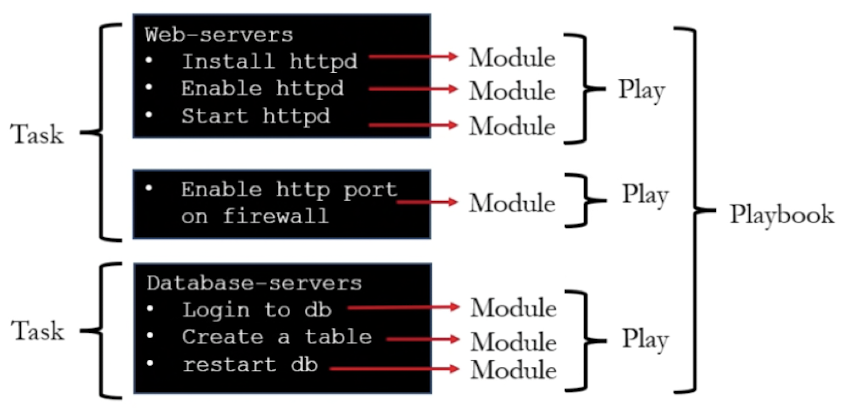
A task is a section that consists of a single procedure to be completed. A task can have multiple modules.
Tags:
A reference or alias to a specific task.
Variables:
Variables are like containers that hold the defined value, which can be used repeatedly.
Roles:
Splitting of playbooks into smaller groups. Roles let you automatically load related variables, files, tasks, handlers, and other Ansible artifacts based on a known file structure.
After you group your content into roles, you can easily reuse them and share them with other users.
Ansible Applications
Ansible can be used for various functions, like:
Examples of tasks
Provisioning
Bare-metal servers
Virtualization systems
Network devices
Storage systems
System Configuration Management
Updates or upgrades
Package installation
Service configuration
Stop | Start | Restart of services
Assigning permissions to files and directories
Application deployment
Backups
Weekly or monthly system reboots
How Ansible Works

If there is a configuration task you want to perform on the server, then usually we use SSH to login to the system and configure it.
But what if there are 100 servers? Then we can't log in individually to each server and configure it, so that's where Ansible comes into action.
We'll have a server running Ansible which is the control node. We just have to make changes on the control node server and push the changes onto the other servers.

Each specific task in Ansible is written through modules.
Multiple modules are written in sequential order as to how you want them to be executed.
The multiple modules for related tasks are called a "Play". If you have multiple modules to perform certain tasks or they are related to each other, then together those modules become a "play."
All play together to make a "Playbook".
Playbooks are written in a file format called YAML.
Installing Ansible on CentOS 7
we’ll explain to you how to install Ansible on CentOS 7. Ansible is an open-source tool for software provisioning, application deployment tool, and configuration management which enable infrastructure as code.
Prerequisites to Install Ansible on CentOS 7
You need CentOS 7 installed on the Server/VM
You must be logged in to CentOS 7 via SSH as sudo or root user.
Step 1: Update the system
This will update your system with the latest packages and security patches.
$ sudo yum -y update
Step 2: Install EPEL Repository
We are using the EPEL repository because the default yum repository has an old ansible version available. In this tutorial, we’ll install Ansible on CentOS 7 with EPEL repository with the latest version.
$ sudo yum install epel-release
Step 3: Install Ansible on CentOS 7
$ sudo yum -y install ansible
Step 4: Verify Ansible installation
$ ansible --version

You can see we have installed Ansible with version “ansible 2.14.2”.
Step 5: Configuring Ansible Hosts
The hosts file is used in Ansible, which keeps track of all servers. Before communicating with other servers, these steps must be taken.
$ sudo vi /etc/ansible/hosts

Let’s take an example: our servers IP are 192.168.16.1, 192.168.16.2 and 192.168.16.3. Let’s set this in an Ansible hosts file.
vi /etc/ansible/hosts

[servers]
host1 ansible_ssh_host=192.168.16.1
host2 ansible_ssh_host=192.168.16.2
host3 ansible_ssh_host=192.168.16.3
some of the Ansible configuration files
/etc/ansible/ansible.cfg      #Ansible Configuration File.

/etc/ansible/hosts            #List of all remote hosts.

/etc/ansible/roles            #Sepearte each play on a seperate files.
Step 6: Ping the remote server
$ ansible -m ping all

Output:-
host1 | SUCCESS => {
    "changed": false,
    "ping": "pong"
}

host2 | SUCCESS => {
    "changed": false,
    "ping": "pong"
}
Some of the Ping commands are mentioned below:
$ ansible -m ping servers

$ ansible -m ping host1

$ ansible -m ping host1:host2
command to check the memory on the remote host:
$ ansible -m shell -a 'free -m' host1
This is the end of the article, You have learned about Ansible and its architecture, the workings of Ansible, as well as some key terminologies for using Ansible.
Also, you have learned how to install Ansible on CentOS 7.
Subscribe to my newsletter
Read articles from Hemanth Narayanaswamy directly inside your inbox. Subscribe to the newsletter, and don't miss out.
Written by

Hemanth Narayanaswamy
Hemanth Narayanaswamy
I'm a DevOps Engineer with a passion for automating and streamlining operational processes. I'm constantly learning and adapting to new technologies, and always looking for ways to improve and expand upon existing solutions.