Kubernetes Storage and Security
 Aditya Murali
Why do we need storage in Kubernetes?
We need storage in Kubernetes to provide a way for applications to store and access persistent data. Persistent storage is important for many types of applications, including databases, file systems, and other stateful applications.
Kubernetes storage enables applications to store and retrieve data even if the underlying containers or nodes fail. This is because Kubernetes can automatically manage the storage resources and ensure that data is replicated and available even in the event of a failure.
In addition, Kubernetes storage allows applications to be designed to be more scalable and flexible. For example, applications can be designed to scale horizontally by adding more instances of the application, each with its own storage volume. This allows the application to handle more load and provide more capacity for storing data.
Kubernetes storage also provides a way for administrators to manage storage resources more efficiently. By using storage classes and dynamic provisioning, administrators can automatically allocate storage resources as needed, without having to manually provision and manage each storage volume.
Types of Storage and its Importance
There are several types of Kubernetes storage available, including:
Persistent Volume (PV) and Persistent Volume Claim (PVC)
StorageClass
Persistent Volumes and Persistent Volume Claims
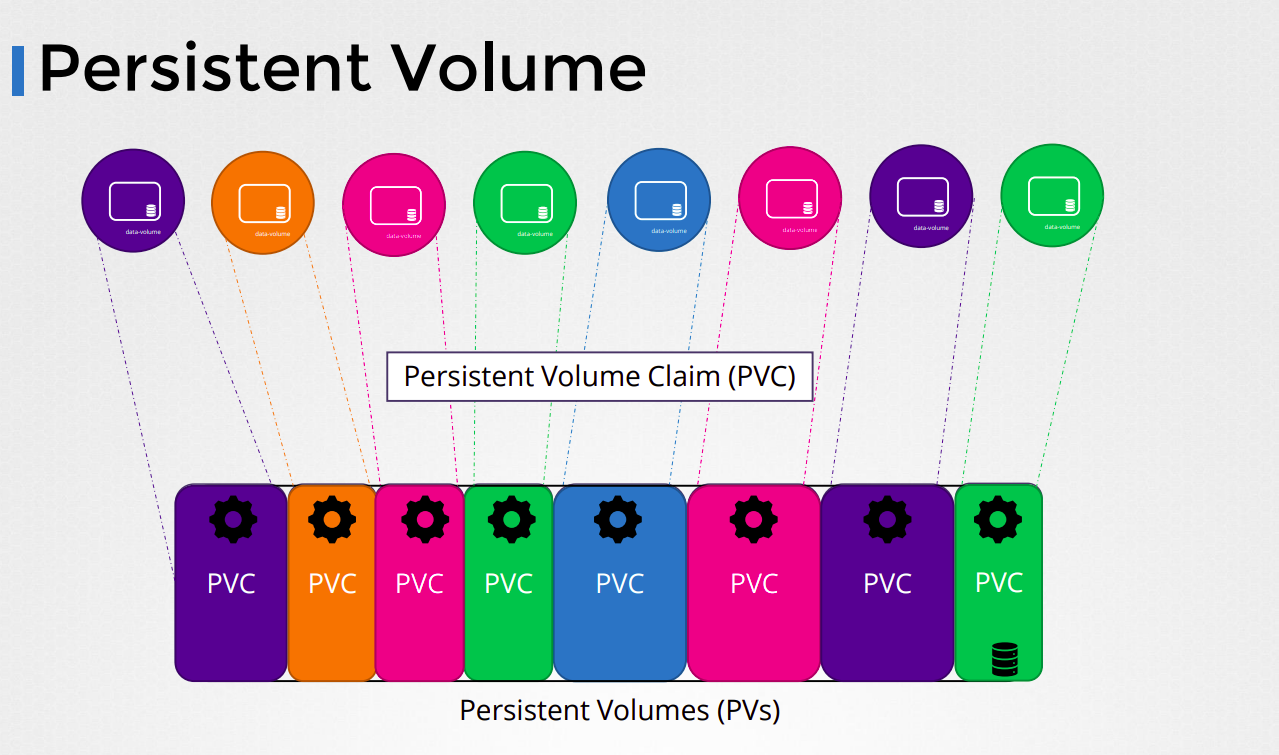
A Persistent Volume (PV) is a piece of storage in the cluster that has been provisioned by an administrator or dynamically provisioned using a storage class. PVs are abstract representations of physical storage devices, such as disks or SSDs, and can be used by applications to store data persistently.
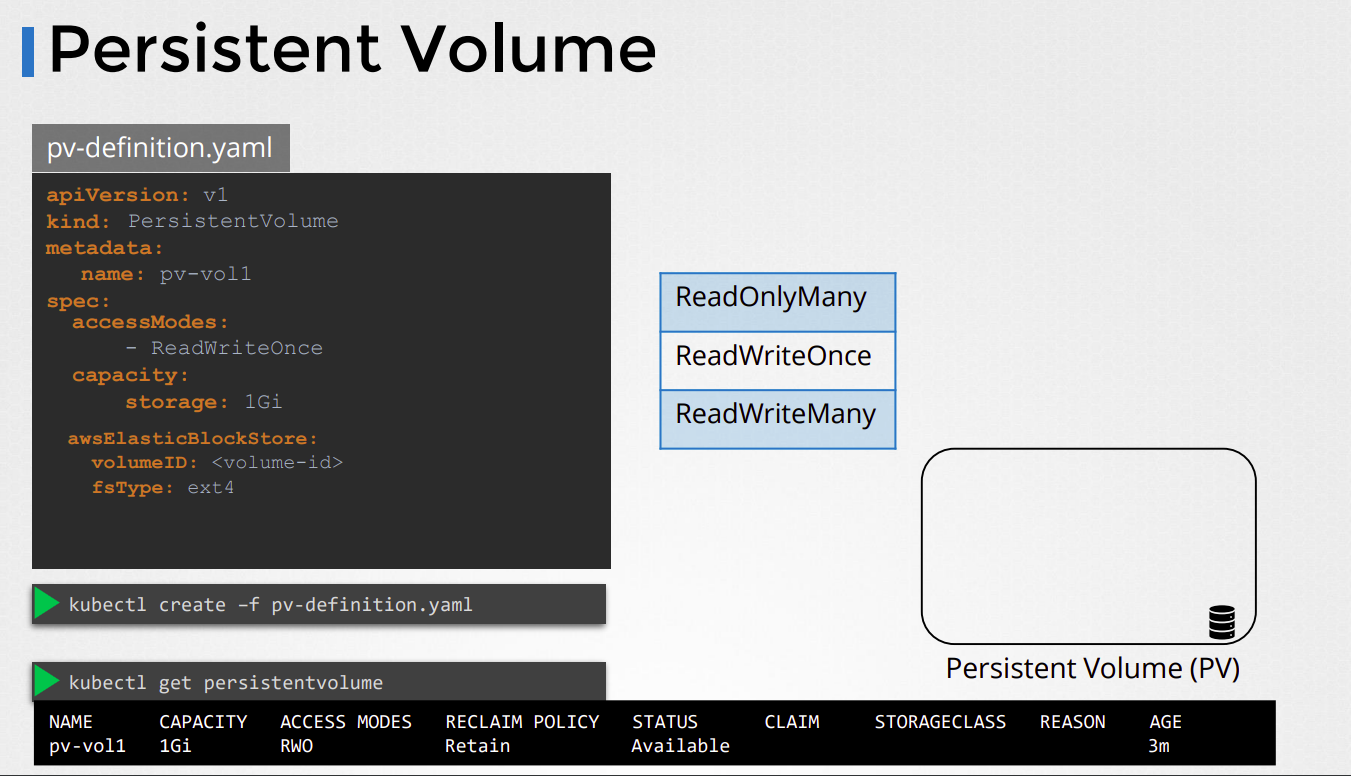
Here is an example to illustrate how PVs work in Kubernetes:
Let's say you have a Kubernetes cluster running multiple nodes, and you want to deploy a stateful application that requires persistent storage. You could create a Persistent Volume by first defining a YAML file like this:
apiVersion: v1
kind: PersistentVolume
metadata:
  name: my-pv
spec:
  capacity:
    storage: 10Gi
  accessModes:
    - ReadWriteOnce
  hostPath:
    path: /data/my-pv
This YAML file specifies the following:
apiVersionandkind: These fields specify that we are creating a PersistentVolume resource.metadata: This field specifies the name of the Persistent Volume.spec: This field specifies the details of the Persistent Volume, such as its capacity and access modes.
In this example, we are creating a Persistent Volume named "my-pv" with a capacity of 10 gigabytes, and with access mode "ReadWriteOnce". This means that the volume can be mounted by a single node at a time and can be both read from and written to.
We are using the hostPath field to specify that the Persistent Volume will be backed by a directory on the node's file system. In this case, the directory is /data/my-pv.
Once you have defined your Persistent Volume, you can create a Persistent Volume Claim (PVC) to request storage from it. The PVC can be defined like this:
apiVersion: v1
kind: PersistentVolumeClaim
metadata:
  name: my-pvc
spec:
  accessModes:
    - ReadWriteOnce
  resources:
    requests:
      storage: 5Gi
This YAML file specifies the following:
apiVersionandkind: These fields specify that we are creating a PersistentVolumeClaim resource.metadata: This field specifies the name of the Persistent Volume Claim.spec: This field specifies the details of the Persistent Volume Claim, such as its access modes and the amount of storage requested.
In this example, we are creating a Persistent Volume Claim named "my-pvc" with access mode "ReadWriteOnce" and requesting 5 gigabytes of storage.
When you create the PVC, Kubernetes will look for a PV that matches the access modes and capacity requested by the PVC. If a suitable PV is found, it will be bound to the PVC, and the PVC can then be used by your application to store data.
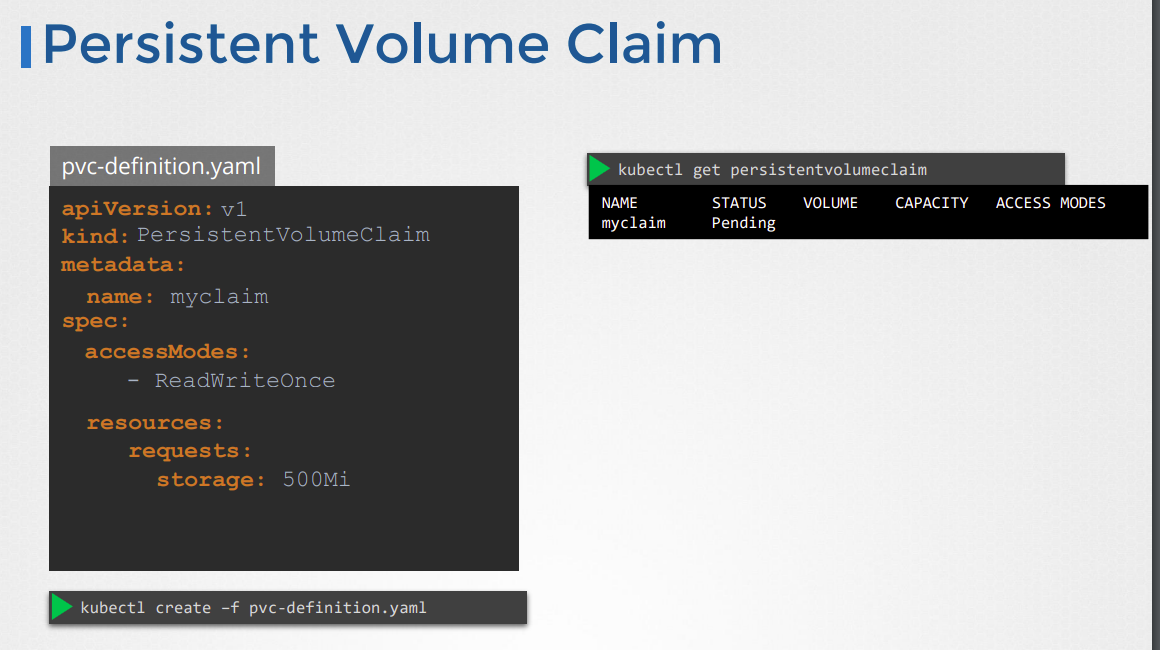
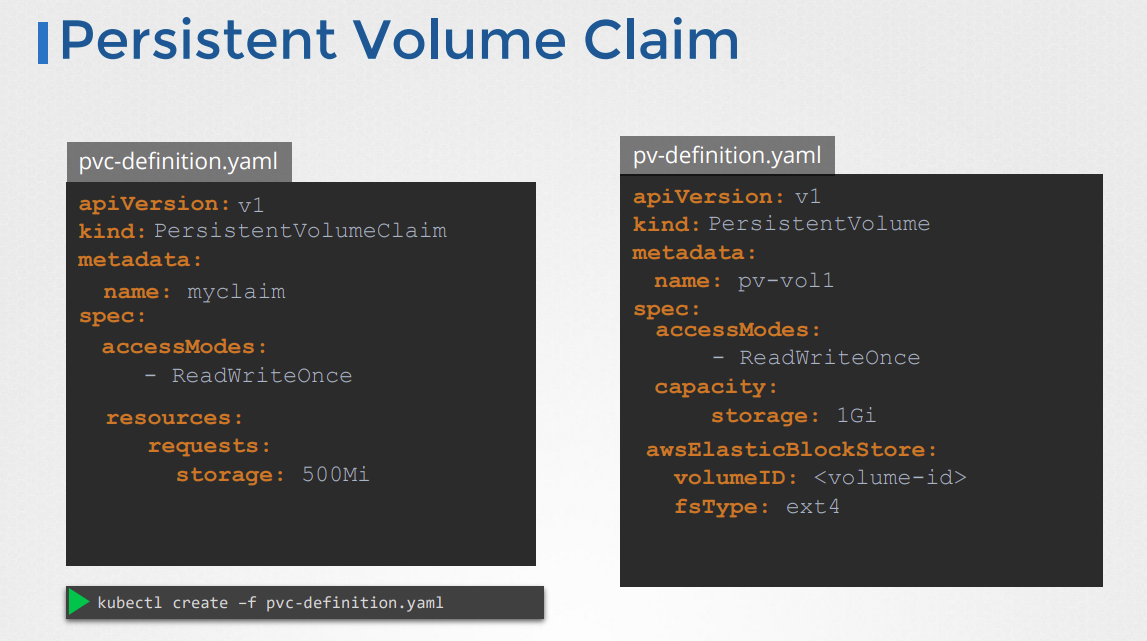

Here is an overview of how the binding of PVs and PVCs works in Kubernetes:
The administrator creates a Persistent Volume (PV) with a specific capacity, access modes, and storage type.
The user creates a Persistent Volume Claim (PVC) that specifies the required capacity, access modes, and optionally, a storage class.
Kubernetes matches the PVC to a suitable PV by checking if the PV's capacity, access modes, and storage class (if specified) match the PVC's requirements.
If a matching PV is found, Kubernetes binds the PV to the PVC. The PVC then becomes "bound" to the PV, and the user can use the PVC to store data.
If no matching PV is found, Kubernetes will either dynamically provision a new PV that matches the PVC's requirements (if a storage class is specified), or the PVC remains unbound and the user cannot use it to store data.
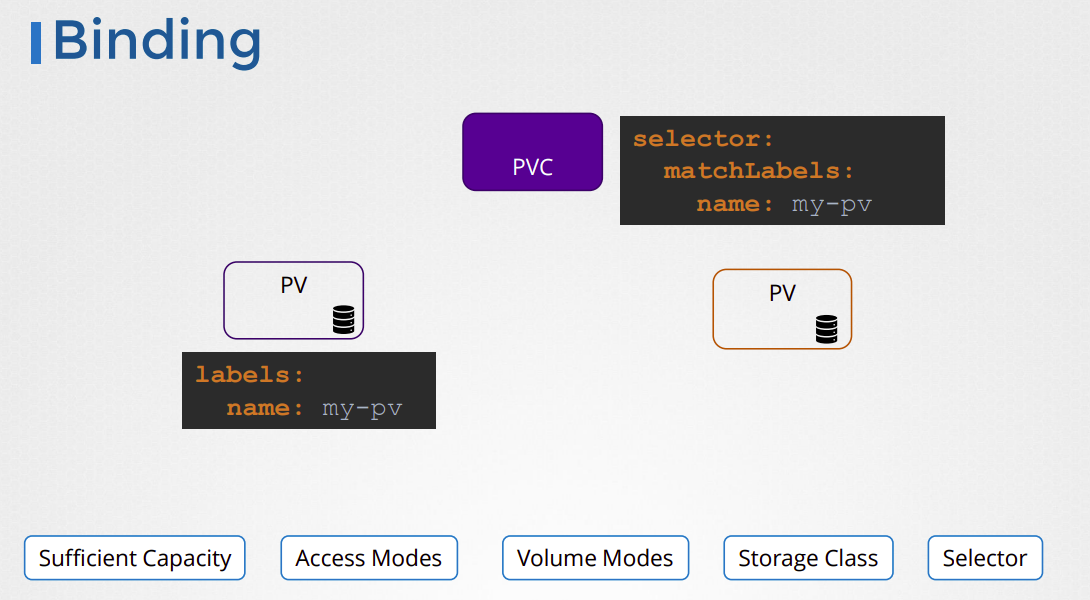
Once a PV is bound to a PVC, the user can use the PVC to store data in a container running in a pod. The user specifies the PVC name as the storage volume in the pod's YAML file, and Kubernetes will automatically mount the PVC to the container.
So, in summary, a Persistent Volume in Kubernetes is a way to provide persistent storage for applications running in a cluster. It allows applications to store data even if the underlying containers or nodes fail.
StorageClass
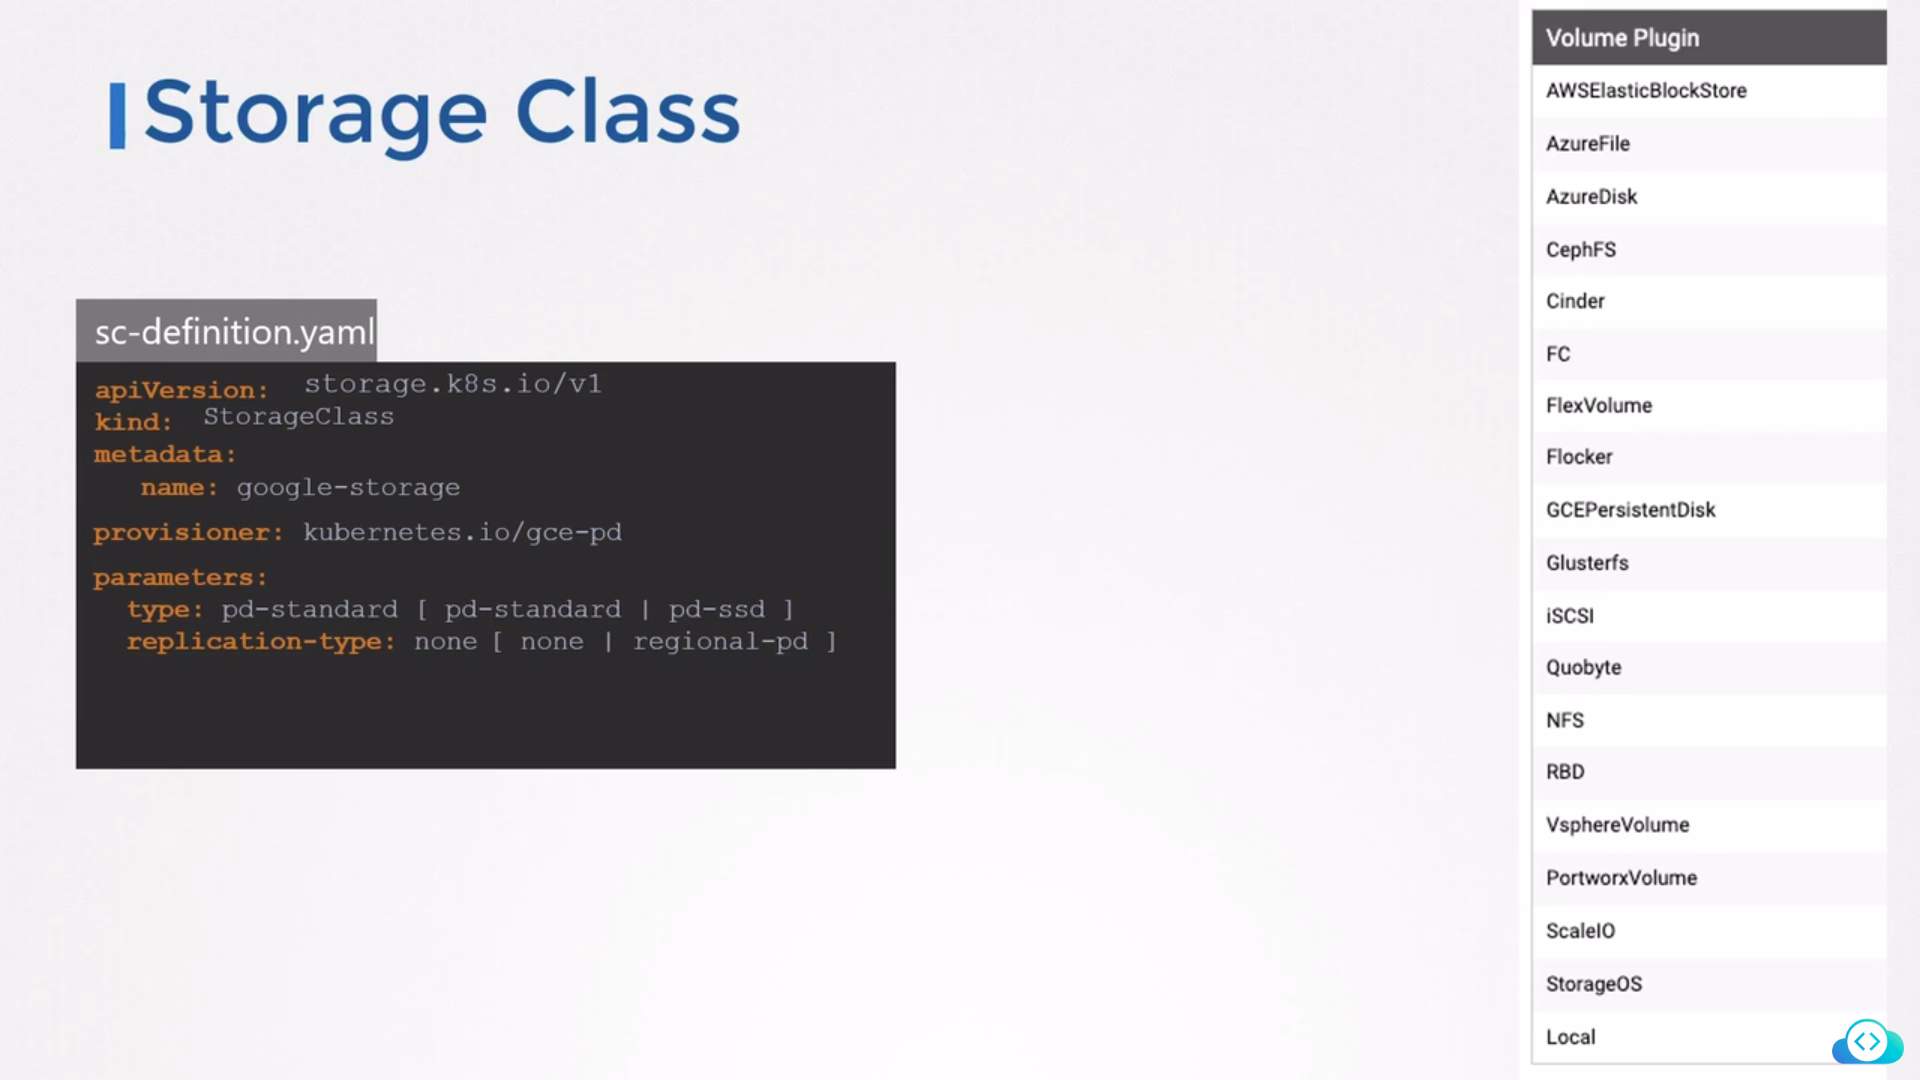
A storage class is a way to define the type and configuration of the storage that will be used to store persistent data in Kubernetes. It provides an abstraction layer between the application and the storage system, making it easier to manage and scale storage resources.
Here is an example of a StorageClass definition in Kubernetes:
kind: StorageClass
apiVersion: storage.k8s.io/v1
metadata:
  name: my-storage-class
provisioner: kubernetes.io/aws-ebs
parameters:
  type: gp2
  zone: us-west-2a
This example defines a storage class called "my-storage-class" that uses the AWS Elastic Block Store (EBS) provisioner to provision persistent volumes. The storage class is configured to use the gp2 volume type and the us-west-2a availability zone.
When a pod requests storage, it can specify the storage class to use, and Kubernetes will dynamically provision a persistent volume that meets the requirements of that storage class. This allows for easy management and scaling of storage resources in Kubernetes.
Container Storage Interface
The Container Storage Interface (CSI) in Kubernetes is a standard interface for connecting container orchestrators, like Kubernetes, with external storage systems. It allows Kubernetes to provision and manage storage resources from different storage vendors and technologies in a standardized way.
Before CSI, Kubernetes provided two storage plugins: in-tree volume plugins and FlexVolume plugins. In-tree volume plugins were integrated directly into the Kubernetes codebase, which made it difficult to add new plugins or update existing ones. FlexVolume plugins were more flexible, but still had limitations and were complex to maintain. CSI addresses these issues by providing a standardized interface that decouples the storage vendor's driver from the Kubernetes core.
With CSI, storage vendors can create their own CSI driver, which can be used by Kubernetes to provision and manage storage resources from the vendor's storage system. This allows for more flexibility and scalability in managing storage in The Container Storage Interface (CSI) works by providing a standard interface for communication between Kubernetes and external storage systems. CSI drivers are responsible for implementing this interface and enabling Kubernetes to manage storage resources from different vendors and technologies.
Here is a high-level overview of how CSI works in Kubernetes:
A user creates a PersistentVolumeClaim (PVC) object that requests storage resources with specific parameters, such as storage class, access mode, and capacity.
The Kubernetes scheduler uses a CSI driver to provision a PersistentVolume (PV) that satisfies the PVC requirements. The CSI driver communicates with the external storage system to create a new PV with the requested storage resources.
Once the PV is provisioned, the user creates a Pod that requires persistent storage, and includes the PVC in the Pod specification.
The Kubernetes scheduler uses the CSI driver to mount the PV to the Pod. The CSI driver ensures that the Pod has access to the correct volume and can read and write data to it.
If the Pod is deleted, the Kubernetes scheduler uses the CSI driver to unmount the volume and release the resources back to the storage system.
If the PV is no longer needed, the Kubernetes administrator can delete the PV and the CSI driver will communicate with the storage system to release the resources.
Statefulesets in Kubernetes
StatefulSets are a type of controller that manage a set of stateful pods, providing guarantees for the stable, unique identities of each pod in the set and support ordered, graceful deployment and scaling of the pods.
Let's say you have a stateful application that requires persistent storage, and you want to deploy it in a Kubernetes cluster using StatefulSets. Here are the steps you can follow:
Create a PersistentVolumeClaim (PVC) that defines the storage requirements for your application. For example:
 apiVersion: v1
 kind: PersistentVolumeClaim
 metadata:
   name: my-app-pvc
 spec:
   accessModes:
   - ReadWriteOnce
   resources:
     requests:
       storage: 1Gi
Create a StatefulSet that defines the deployment and scaling of your application. For example:
 apiVersion: apps/v1
 kind: StatefulSet
 metadata:
   name: my-app
 spec:
   replicas: 3
   selector:
     matchLabels:
       app: my-app
   serviceName: my-app
   template:
     metadata:
       labels:
         app: my-app
     spec:
       containers:
       - name: my-app
         image: my-app-image:latest
         ports:
         - containerPort: 8080
         volumeMounts:
         - name: my-app-storage
           mountPath: /data
   volumeClaimTemplates:
   - metadata:
       name: my-app-storage
     spec:
       accessModes:
       - ReadWriteOnce
       resources:
         requests:
           storage: 1Gi
This StatefulSet will deploy three replicas of your application, each with a unique hostname based on the StatefulSet name and the replica index (e.g. my-app-0, my-app-1, my-app-2). The StatefulSet also defines a volumeClaimTemplate that will dynamically create a PVC for each replica.
Apply the PVC and StatefulSet manifests to your Kubernetes cluster:
 kubectl apply -f my-app-pvc.yaml
 kubectl apply -f my-app-statefulset.yaml
Check the status of the StatefulSet:
kubectl get statefulset my-appThis should show you the current status of the StatefulSet, including the number of replicas running and their current state.
With this example, you now have a stateful application running in a Kubernetes cluster, with persistent storage provided by a StatefulSet and PVCs. Each replica has its own persistent storage, and you can scale the application up or down by adjusting the replicas value in the StatefulSet specification.
What is Security in kubernetes?
Kubernetes security refers to the various mechanisms and best practices used to protect the Kubernetes infrastructure, the applications running on it, and the sensitive data stored within the system.
There are several reasons why security is essential in Kubernetes:
Protection from attacks: Kubernetes is vulnerable to various types of attacks such as unauthorized access, privilege escalation, and denial of service (DoS) attacks. Proper security measures help prevent these attacks from being successful.
Compliance: Many organizations are subject to regulatory compliance requirements, such as HIPAA, GDPR, and PCI DSS, which require specific security measures to be in place. Kubernetes security helps organizations meet these requirements.
Data protection: Kubernetes can store sensitive data such as user credentials, API keys, and encryption keys. Proper security measures help protect this data from unauthorized access and misuse.
Reputation: Security breaches can damage an organization's reputation, leading to loss of customers and revenue. By implementing robust security measures in Kubernetes, organizations can protect their reputation and maintain the trust of their customers.
Types of Security
Here are some examples of Kubernetes security measures and best practices that you can implement:
RBAC (Role-Based Access Control): RBAC allows you to control access to Kubernetes resources by defining roles and permissions for different users or groups. For example, you can create a role that allows a developer too view and modify resources in a specific namespace, but not delete them.
Network Policies: Network policies allow you to control network traffic between Kubernetes pods and external networks. You can use network policies to limit access to sensitive resources and prevent unauthorized access. For example, you can create a network policy that only allows traffic from specific IP addresses or ports.
Secrets Management: Kubernetes provides a built-in secrets management system that allows you to securely store and manage sensitive information such as passwords, API keys, and certificates. You can use secrets to authenticate with external services, encrypt sensitive data, and control access to Kubernetes resources.
Container Image Scanning: You can use container image scanning tools like Trivy, Aqua Security, or Anchore to scan your container images for vulnerabilities, malware, or other security issues before deploying them to your Kubernetes cluster.
Pod Security Policies: Pod Security Policies (PSPs) are used to enforce security policies on the pods that run on a Kubernetes cluster. PSPs allow you to control the security settings of your pods, such as allowing or denying privileged containers, setting file permissions, and limiting the use of host resources.
TLS Encryption: Kubernetes allows you to enable TLS encryption for communication between Kubernetes components and between your applications and the Kubernetes API server. You can use TLS certificates to secure your network traffic and prevent unauthorized access.
Container Runtime Security: You can use container runtime security tools like SELinux, AppArmor, or seccomp to restrict the actions that a container can perform. These tools provide additional layers of security by limiting the privileges of the containers running on your Kubernetes cluster.
How to implement security
RBAC (Role Based Access Controls)
Create a new namespace called "test" using the following command:
kubectl create namespace testCreate a new role named "test-role" that allows a user to view, create, and delete pods in the "test" namespace:
 apiVersion: rbac.authorization.k8s.io/v1
 kind: Role
 metadata:
   name: test-role
   namespace: test
 rules:
 - apiGroups: [""]
   resources: ["pods"]
   verbs: ["get", "create", "delete"]
Create a new user named "test-user" using the following command:
kubectl create user test-userCreate a new role binding named "test-rolebinding" that binds the "test-role" to the "test-user":
 apiVersion: rbac.authorization.k8s.io/v1
 kind: RoleBinding
 metadata:
   name: test-rolebinding
   namespace: test
 subjects:
 - kind: User
   name: test-user
   apiGroup: rbac.authorization.k8s.io
 roleRef:
   kind: Role
   name: test-role
   apiGroup: rbac.authorization.k8s.io
Now, the "test-user" has permissions to view, create, and delete pods in the "test" namespace. You can test this by switching to the "test-user" context and running the following command:
kubectl get pods -n test
This should show you the list of pods in the "test" namespace. If you try to run the same command in a different namespace or with a different user, you will receive a "forbidden" error message.
This is just a simple example of how to use RBAC in Kubernetes. RBAC can be used to define more complex roles and permissions for different users and groups, and can help you control access to your Kubernetes resources.
Network Policies
Create a new namespace called "test" using the following command:
kubectl create namespace testCreate a network policy that allows traffic only from pods labeled "app=test" to other pods in the "test" namespace:
 apiVersion: networking.k8s.io/v1
 kind: NetworkPolicy
 metadata:
   name: test-networkpolicy
   namespace: test
 spec:
   podSelector:
     matchLabels:
       app: test
   policyTypes:
   - Ingress
   ingress:
   - from:
     - podSelector:
         matchLabels:
           app: test
Deploy two sample pods in the "test" namespace, one with the label "app=test" and one without:
 kubectl run nginx --image=nginx --labels=app=test --namespace=test
 kubectl run busybox --image=busybox --namespace=test
Try to ping the nginx pod from the busybox pod:
kubectl exec -it busybox --namespace=test -- ping nginxThis command should fail because the network policy we created in step 2 only allows traffic from pods labeled "app=test".
Label the busybox pod with the "app=test" label:
kubectl label pod busybox app=test --namespace=testTry to ping the nginx pod from the busybox pod again:
kubectl exec -it busybox --namespace=test -- ping nginxThis time the command should succeed because the busybox pod now has the required label and is allowed to communicate with the nginx pod according to the network policy.
This is just a simple example of how to use network policies in Kubernetes. Network policies can be used to define more complex rules for controlling traffic between pods in your cluster, and can help you ensure the security and reliability of your applications.
Secret Management
Create a new Secret object with the following command:
kubectl create secret generic mysecret --from-literal=username=myusername --from-literal=password=mypasswordThis creates a new Secret object named "mysecret" with two key-value pairs: "username" and "password". The values for these keys are set to "myusername" and "mypassword", respectively.
Use the Secret in a Pod by referencing it in the Pod's YAML definition file. For example:
 apiVersion: v1
 kind: Pod
 metadata:
   name: mypod
 spec:
   containers:
   - name: mycontainer
     image: myimage
     env:
     - name: MY_USERNAME
       valueFrom:
         secretKeyRef:
           name: mysecret
           key: username
     - name: MY_PASSWORD
       valueFrom:
         secretKeyRef:
           name: mysecret
           key: password
This YAML file creates a new Pod named "mypod" with a container named "mycontainer". The container's image is set to "myimage", and two environment variables are defined: "MY_USERNAME" and "MY_PASSWORD". The values for these environment variables are set using the "valueFrom" field, which references the "mysecret" Secret object and the "username" and "password" keys.
When the Pod is created, Kubernetes will automatically mount the "mysecret" Secret object as a file at the path "/var/run/secrets/kubernetes.io/mysecret". The container can then access the Secret's key-value pairs by reading this file.
In this example, the container reads the "username" and "password" keys from the mounted file and sets the "MY_USERNAME" and "MY_PASSWORD" environment variables, respectively.
Secrets can also be used to store other sensitive data like API keys, certificates, etc. The above example demonstrates how Secrets can be used to store and access sensitive data within a Kubernetes Pod.
Pod Security Policies
Create a new Pod Security Policy (PSP) object with the following YAML definition:
 apiVersion: policy/v1beta1
 kind: PodSecurityPolicy
 metadata:
   name: example-psp
 spec:
   privileged: false
   allowPrivilegeEscalation: false
   runAsUser:
     rule: 'RunAsAny'
   seLinux:
     rule: 'RunAsAny'
   fsGroup:
     rule: 'RunAsAny'
   volumes:
   - '*'
This PSP object is named "example-psp" and defines a set of security policies that all Pods in your cluster must adhere to. In this example, the policies include disallowing privileged containers, disallowing privilege escalation, allowing any user to run the Pod (via the "RunAsAny" rule for the "runAsUser" field), allowing any SELinux context to be used (via the "RunAsAny" rule for the "seLinux" field), allowing any group ID to be used (via the "RunAsAny" rule for the "fsGroup" field), and allowing any volume type to be used (via the "*" wildcard in the "volumes" field).
Bind the PSP to a specific service account with the following YAML definition:
 apiVersion: rbac.authorization.k8s.io/v1
 kind: RoleBinding
 metadata:
   name: example-psp-binding
 roleRef:
   apiGroup: rbac.authorization.k8s.io
   kind: ClusterRole
   name: psp:example-psp
 subjects:
 - kind: ServiceAccount
   name: default
   namespace: default
This RoleBinding object binds the "example-psp" PSP to the "default" service account in the "default" namespace. This means that any Pod created by the "default" service account must adhere to the policies defined in the "example-psp" PSP.
Create a Pod that adheres to the PSP with the following YAML definition:
 apiVersion: v1
 kind: Pod
 metadata:
   name: example-pod
 spec:
   containers:
   - name: example-container
     image: nginx
 serviceAccountName: default
This YAML file creates a new Pod named "example-pod" with a single container named "example-container" running the "nginx" image. The Pod specifies that it should use the "default" service account, which is bound to the "example-psp" PSP. Therefore, the Pod must adhere to the policies defined in the PSP.
In this example, the "example-container" container does not require any special privileges, so it should adhere to the PSP's policies. If the container attempted to run with privileged mode or escalate privileges, for example, the Pod would fail to launch.
TLS Encryption
Generate a self-signed certificate and private key with the following command:
openssl req -x509 -newkey rsa:4096 -keyout tls.key -out tls.crt -days 365 -nodesThis generates a self-signed certificate and private key with a 4096-bit RSA key, valid for 365 days, and stores them in files named "tls.key" and "tls.crt", respectively.
Create a new Kubernetes Secret object to store the certificate and private key with the following command:
kubectl create secret tls tls-secret --key tls.key --cert tls.crtThis creates a new Secret object named "tls-secret" and stores the "tls.key" and "tls.crt" files as the "tls.key" and "tls.crt" keys in the Secret object, respectively.
Modify the Kubernetes YAML file for your Deployment or Service to use the TLS certificate and private key. For example:
 apiVersion: apps/v1
 kind: Deployment
 metadata:
   name: example-deployment
 spec:
   replicas: 1
   selector:
     matchLabels:
       app: example
   template:
     metadata:
       labels:
         app: example
     spec:
       containers:
       - name: example-container
         image: myimage
         ports:
         - containerPort: 80
           protocol: TCP
         - containerPort: 443
           protocol: TCP
         volumeMounts:
         - name: tls-certs
           mountPath: /etc/tls
           readOnly: true
       volumes:
       - name: tls-certs
         secret:
           secretName: tls-secret
This YAML file creates a new Deployment object named "example-deployment" with a single container named "example-container" running the "myimage" image. The container exposes two ports: port 80 for HTTP traffic and port 443 for HTTPS traffic. The YAML file also specifies a volumeMount named "tls-certs" that mounts the "tls-secret" Secret object at "/etc/tls" inside the container.
The container can then access the TLS certificate and private key by reading the "/etc/tls/tls.crt" and "/etc/tls/tls.key" files, respectively. In this example, you would need to configure your web server running inside the container to use the TLS certificate and private key.
Note that this example uses a self-signed certificate, which is not recommended for production use. In a production environment, you would typically obtain a certificate from a trusted Certificate Authority (CA) and use that certificate instead.
Thanks for reading!
Subscribe to my newsletter
Read articles from Aditya Murali directly inside your inbox. Subscribe to the newsletter, and don't miss out.
Written by

Aditya Murali
Aditya Murali
Dedicated and hardworking DevOps aspirant who is eager to contribute skills and experience to help organizations solve real world use cases.