SFTP upload to Amazon S3 using AWS Transfer Family
 Freddy Ho

Introduction
Amazon S3 is a highly scalable and secure storage service provided by AWS. S3 offers several storage classes that when used effectively can make storage costs very cheap.
AWS provides the API, CLI and SDKs that can be used to programmatically transfer files to and from S3. However, businesses that wish to use S3 may want to use existing systems that support file transfer protocols such as SFTP, FTPS, FTP and AS2. To meet this need, there is the AWS Transfer Family which supports all the mentioned file transfer protocols.
AWS Transfer Family is a managed service that is easy to set up and takes away the overhead of hosting and managing your own file transfer service. For storage, it can use Amazon S3 buckets as well as the Amazon EFS file systems.
In this blog post, we will look at using AWS Transfer Family to support SFTP file uploads from a business file source server to an S3 bucket.
Use-case: SFTP upload files to S3 for cost-effective storage
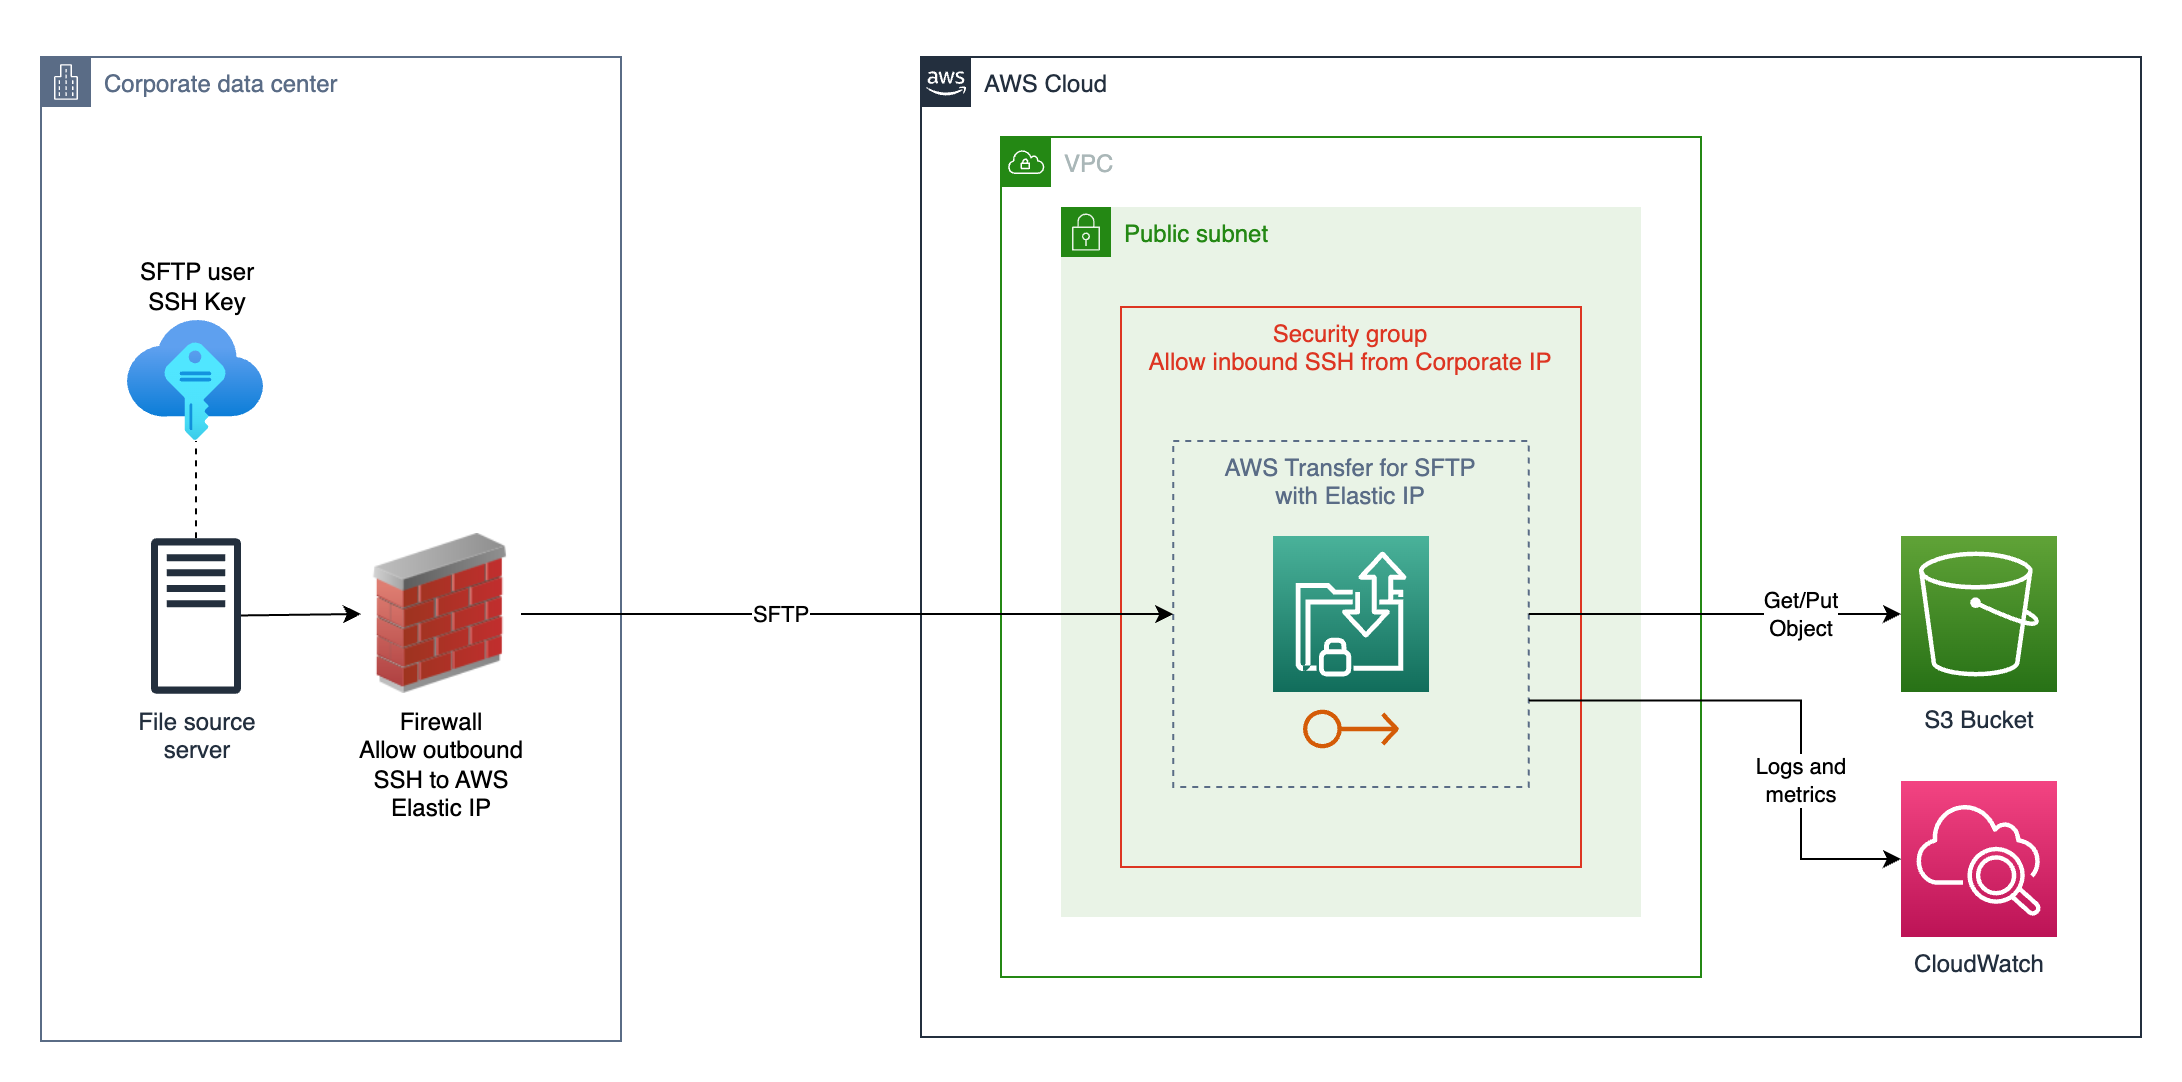
As an example use-case, we have a business that is wanting to use S3 to cost-effectively store files. To upload the files, they want to use an existing server in their corporate data centre that supports SFTP. Below is a table of the requirements and a solution overview:
| Requirement | Solution overview |
| Make use of an existing file source server that supports SFTP to upload files. | Use AWS Transfer service configured with SFTP support. |
| Use SSH keys for SFTP authentication. | Use AWS Transfer service with users configured with the SSH public key. |
| Avoid developing, hosting and managing a transfer service ourselves. | Use AWS Transfer service as a managed service with out-of-the-box SFTP and S3 support. |
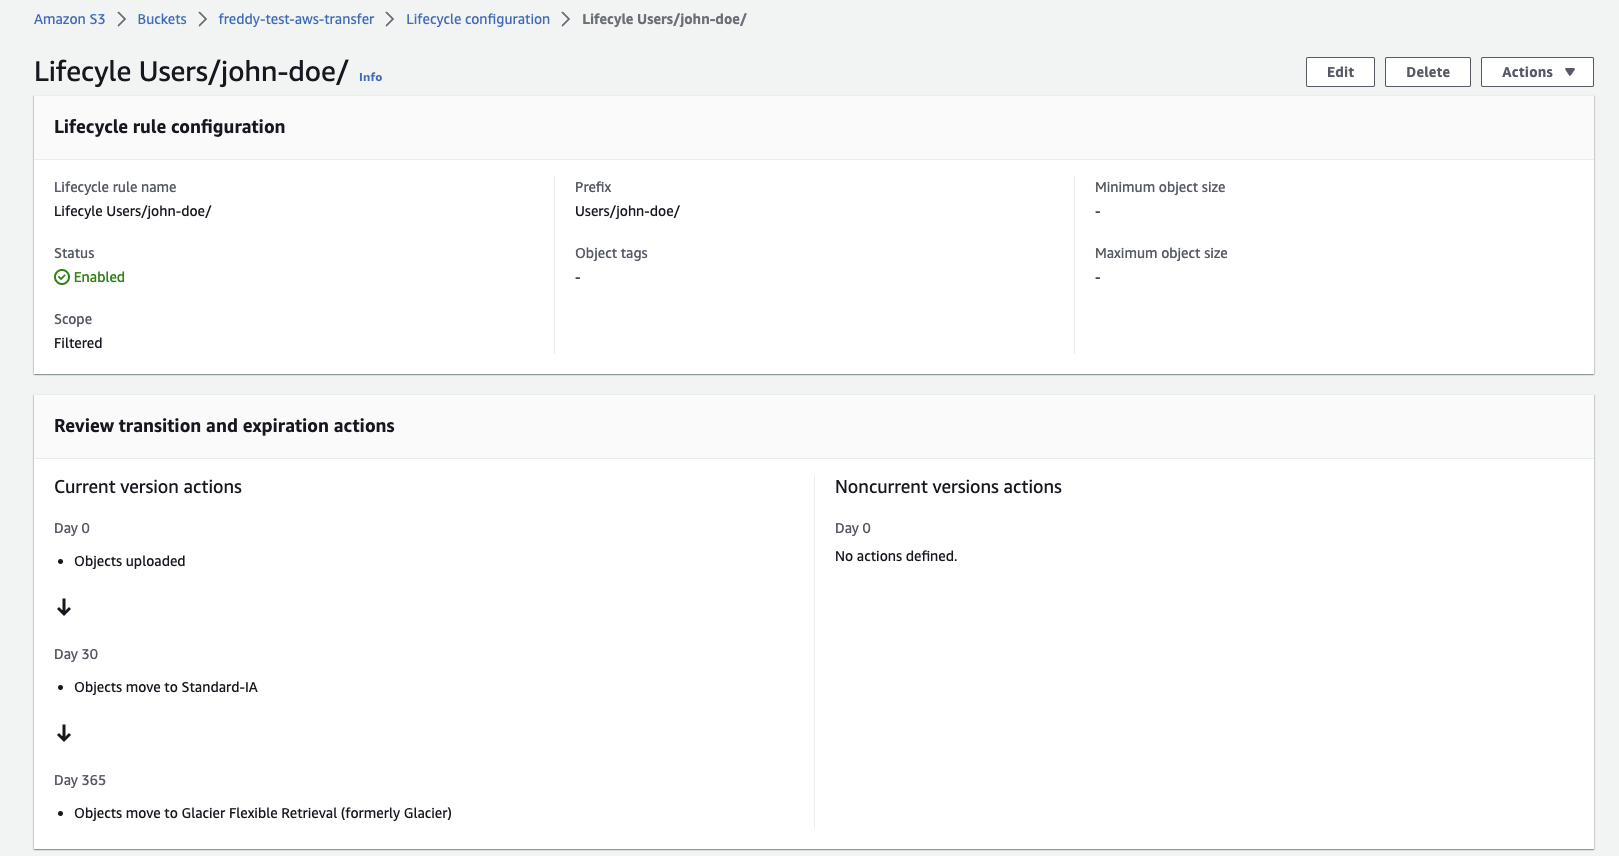
| Cost-effective storage for the following: files uploaded are rarely accessed after 1 month and files can be archived after 1 year. | Use S3 for storage with lifecycle rules to change file storage classes over time. |
| The SFTP destination endpoint should only allow connection from the source server public IP address in the corporate data center. | Use AWS Transfer service in a VPC and configure Security Group Rule to only allow SFTP inbound from the required IP address. |
| The corporate data center firewall allowlist needs a static IP address to allow outbound SFTP connectivity. | Use Elastic IP addresses with the AWS Transfer service in a VPC. |
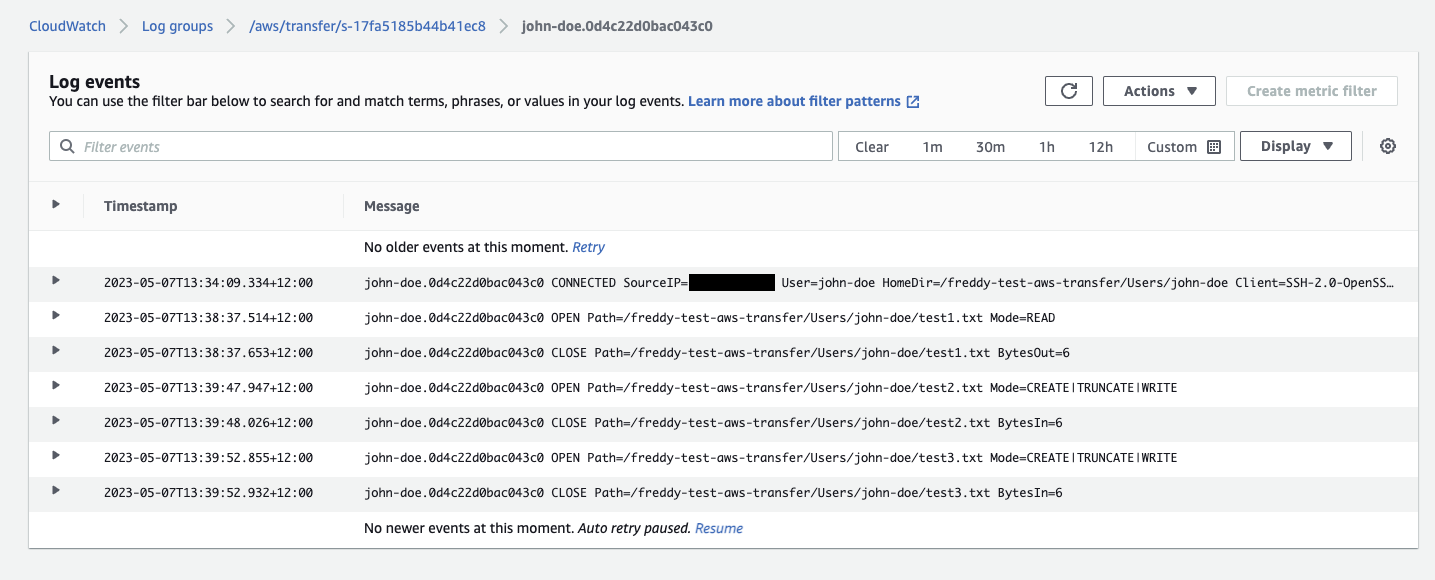
| SFTP connections need to be logged with timestamp, user name and file access. | Use AWS Transfer service configured with CloudWatch logs. |
The diagram below shows the use-case solution architecture:
AWS Transfer Family: Server instance setup
To use AWS Transfer for SFTP, a server instance needs to be created. The server instance provides the SFTP endpoint to connect to.
Create VPC resources
To control network access and provide a static IP to the AWS Transfer server instance, it needs to be deployed into a VPC. The VPC, Elastic IP address and Security group should be created before creating the server instance.
For the AWS Transfer server instance to be publicly accessible, the VPC should have at least one public subnet. For better resiliency, you can configure AWS Transfer Family to use up to 3 public subnets in different availability zones.
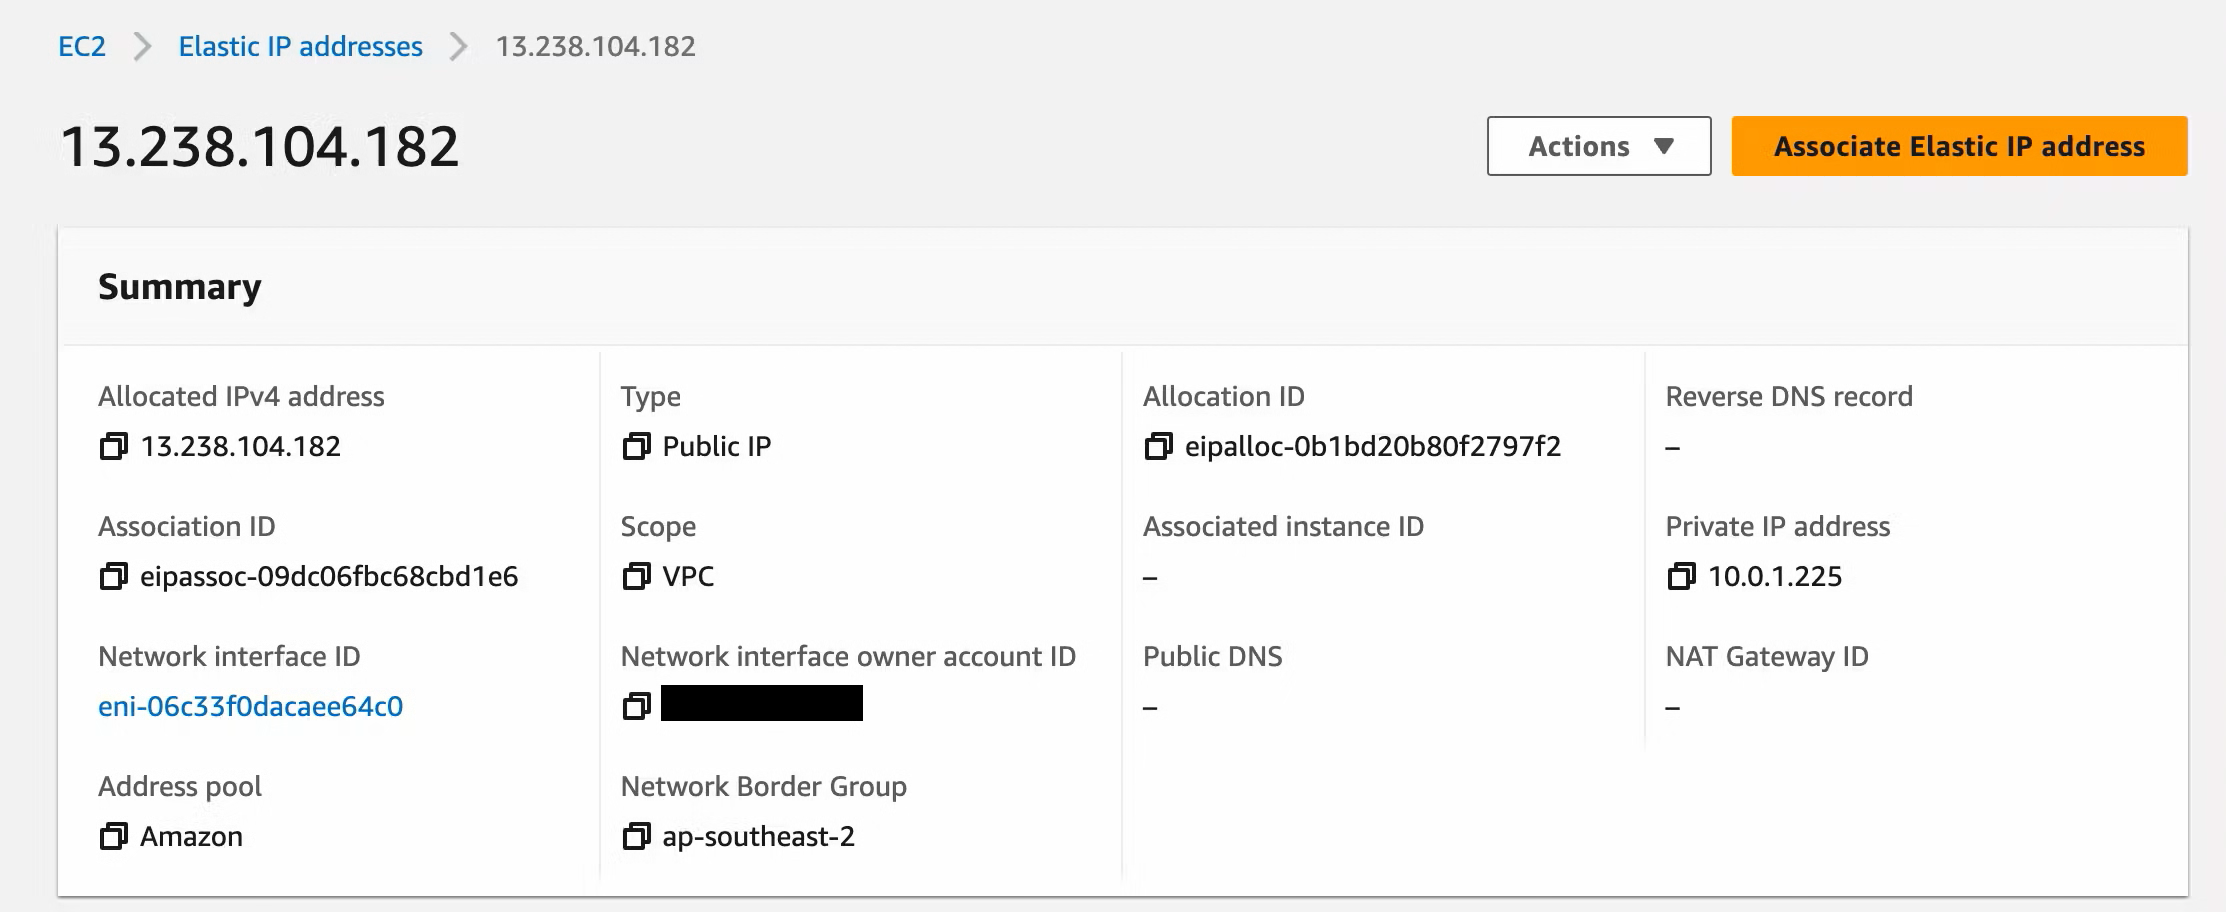
An Elastic IP address is used to provide a static public IP address to the AWS Transfer server instance. You will need to have an Elastic IP address for each subnet you use.
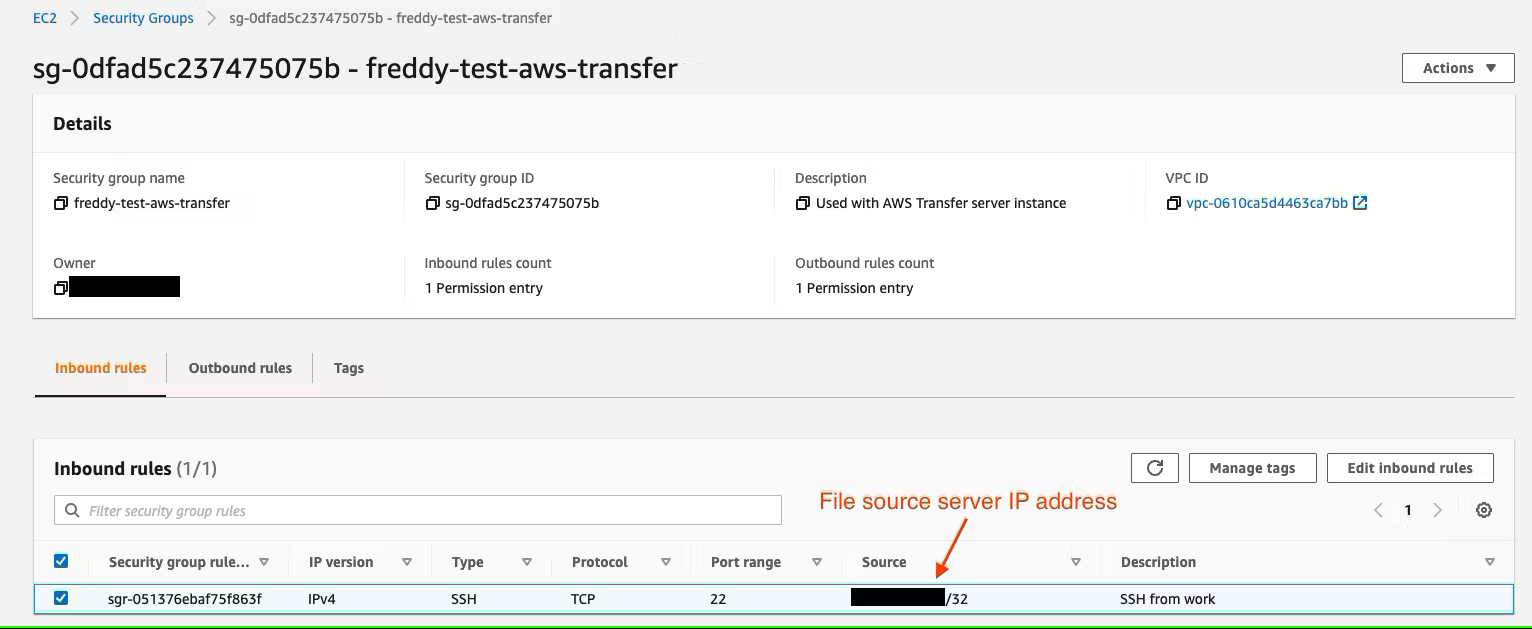
A Security group is created with a single inbound rule that only allows SFTP access (SSH port 22) from the file source server IP address.
Create AWS Transfer Family server instance
The AWS Transfer Family server instance can be created from the AWS Console at console.aws.amazon.com/transfer. Under Servers, click Create server.

The AWS Console will guide you through the process to create a new server. When creating the server select the following options:
Select the protocols you want to enable: select SFTP
Identity provider type: select Service managed
Under Choose an endpoint:
Endpoint type: VPC hosted
Access: Internet facing
Custom hostname: Choose your own or leave as None
VPC: select your VPC ID
Under Availability Zones: select your public Subnet Ids and Elastic IP address.
Security Groups: select your security group
Domain: Amazon S3
Under Configure additional details:
- CloudWatch logging: select either Create a new role or Choose an existing role.
For more information about creating the SFTP server instance see: https://docs.aws.amazon.com/transfer/latest/userguide/create-server-sftp.html
The server instance should be created with a new Endpoint address.
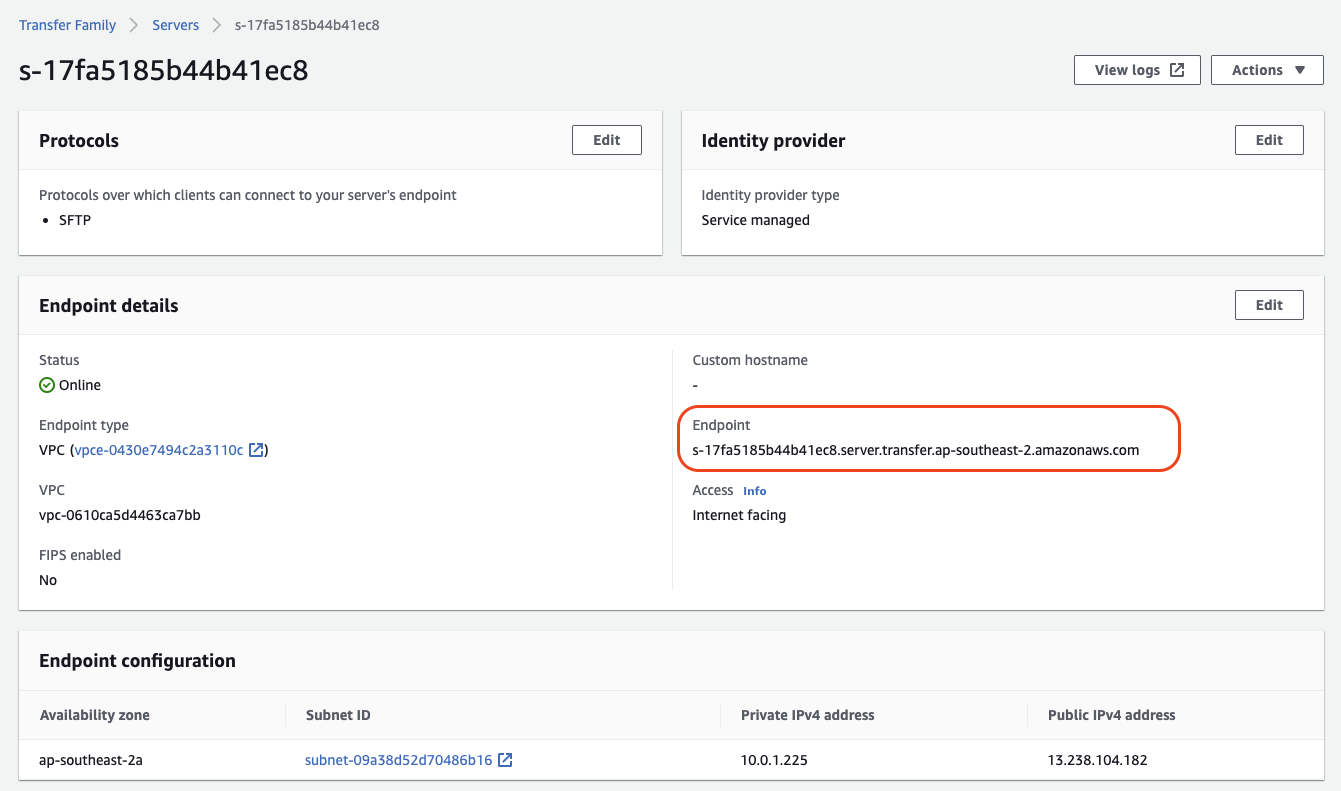
A DNS lookup of the server endpoint address shows that it resolves to our Elastic IP address.
$ nslookup s-17fa5185b44b41ec8.server.transfer.ap-southeast-2.amazonaws.com 8.8.8.8
Server:        8.8.8.8
Address:    8.8.8.8#53

Non-authoritative answer:
Name:    s-17fa5185b44b41ec8.server.transfer.ap-southeast-2.amazonaws.com
Address: 13.238.104.182
AWS Transfer Family: S3 Bucket and User setup
An S3 Bucket will be used as storage with lifecycle rules to change the uploaded files storage classes over time. S3 Bucket access is configured on a per-user basis.
Create an S3 bucket with lifecycle rules
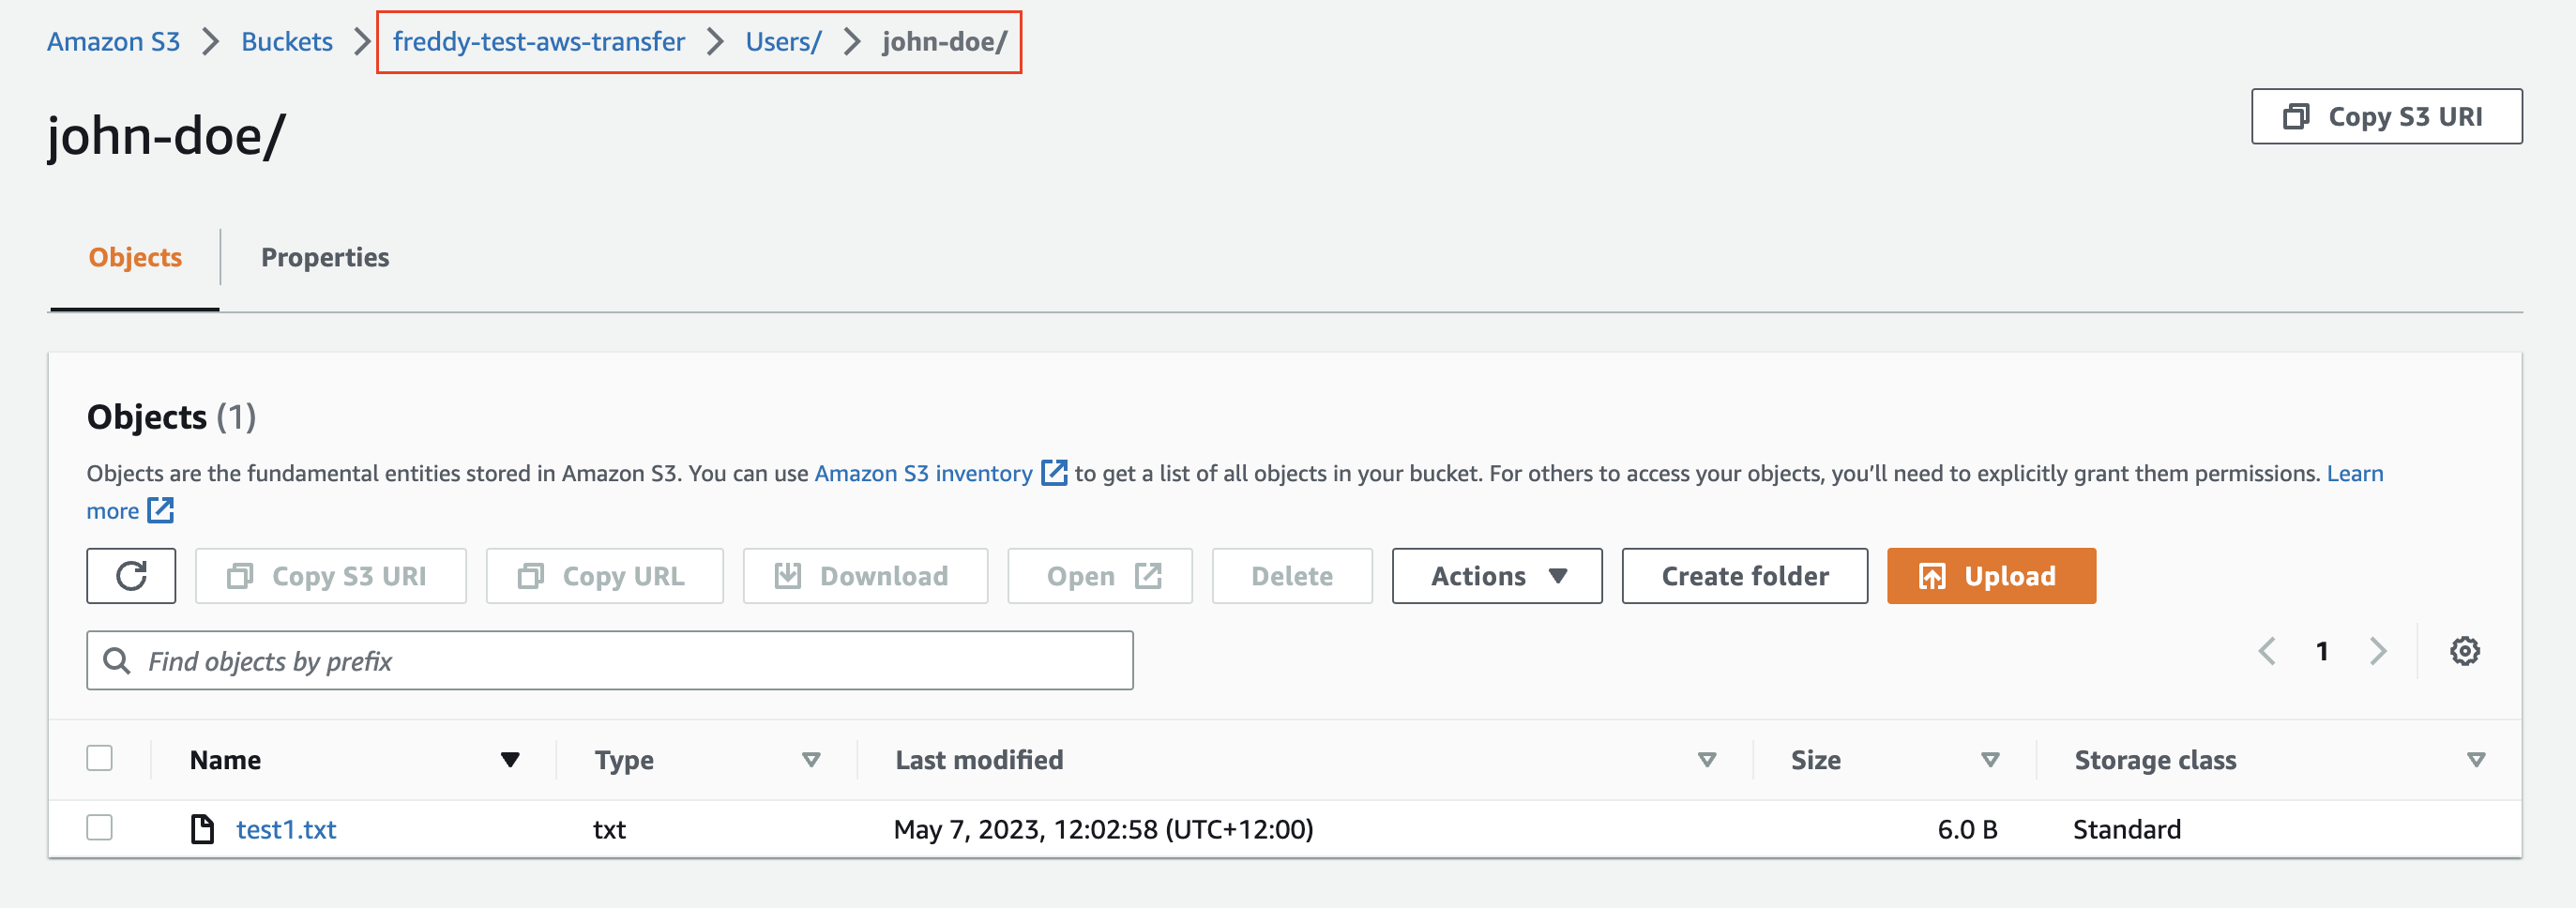
An S3 bucket is created with a directory for each SFTP user we intend to add.
Below is a bucket named freddy-test-aws-transfer with the directory Users/john-doe, intended for the user name john-doe. A single test1.txt file has been added to this directory.
Lifecycle rules are configured for the S3 Bucket directory to transition uploaded files to cheaper storage classes over time. The lifecycle rule meets the stated requirement: "Files uploaded are rarely accessed after 1 month and files can be archived after 1 year".
Create a user for SFTP and IAM permissions to access S3
An IAM role is created for the AWS Transfer Family server instance to allow its users to access the S3 bucket. To restrict the IAM role to our specific server instance, it is configured with a trust relationship that specifies the transfer.amazonaws.com service and our server instance ARN as shown below.
{
    "Version": "2012-10-17",
    "Statement": [
        {
            "Effect": "Allow",
            "Principal": {
                "Service": "transfer.amazonaws.com"
            },
            "Action": "sts:AssumeRole",
            "Condition": {
                "ArnLike": {
                    "aws:SourceArn": "arn:aws:transfer:ap-southeast-2:915922766016:user/s-17fa5185b44b41ec8/*"
                }
            }
        }
    ]
}
The IAM role is attached with the following IAM policy which provides download and upload access to our S3 bucket.
{
    "Version": "2012-10-17",
    "Statement": [
        {
            "Sid": "AllowListingOfUserFolder",
            "Action": [
                "s3:ListBucket",
                "s3:GetBucketLocation"
            ],
            "Effect": "Allow",
            "Resource": [
                "arn:aws:s3:::freddy-test-aws-transfer"
            ]
        },
        {
            "Sid": "HomeDirObjectAccess",
            "Effect": "Allow",
            "Action": [
                "s3:PutObject",
                "s3:GetObject",
                "s3:DeleteObject",
                "s3:DeleteObjectVersion",
                "s3:GetObjectVersion",
                "s3:GetObjectACL",
                "s3:PutObjectACL"
            ],
            "Resource": "arn:aws:s3:::freddy-test-aws-transfer/*"
        }
    ]
}
A user (john-doe) is created in the server instance with a home directory matching the directory we created in the S3 bucket (Users/john-doe). An SSH public key is also added to the user.
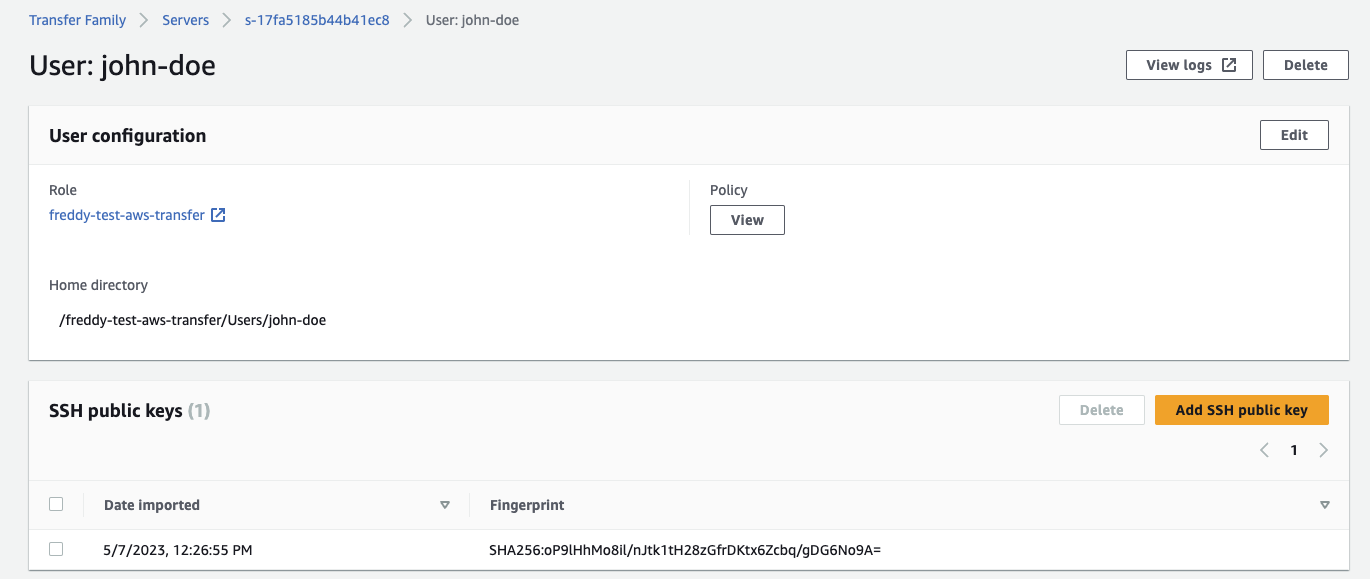
The user is attached with the IAM role we created previously which provides access to any object within the S3 bucket. To further restrict the user access to only it's home user directory in S3, it is also attached with the session policy below.
{
  "Version": "2012-10-17",
  "Statement": [
    {
      "Sid": "AllowListingOfUserFolder",
      "Action": [
        "s3:ListBucket"
      ],
      "Effect": "Allow",
      "Resource": [
        "arn:aws:s3:::${transfer:HomeBucket}"
      ],
      "Condition": {
        "StringLike": {
          "s3:prefix": [
            "${transfer:HomeFolder}/*",
            "${transfer:HomeFolder}"
          ]
        }
      }
    },
    {
      "Sid": "HomeDirObjectAccess",
      "Effect": "Allow",
      "Action": [
        "s3:PutObject",
        "s3:GetObject",
        "s3:DeleteObject",
        "s3:GetObjectVersion"
      ],
      "Resource": "arn:aws:s3:::${transfer:HomeDirectory}*"
    }
  ]
}
For more information about setting up AWS Transfer Family service-managed users see: https://docs.aws.amazon.com/transfer/latest/userguide/service-managed-users.html
Testing the SFTP connection
Using our created user we can use the sftp command to connect to our server instance endpoint.
$ sftp -i ~/.ssh/john-doe.pem john-doe@s-17fa5185b44b41ec8.server.transfer.ap-southeast-2.amazonaws.com

Connected to s-17fa5185b44b41ec8.server.transfer.ap-southeast-2.amazonaws.com.
Once connected, we can see we are in our users home directory which has the test1.txt we had previously uploaded to the S3 bucket.
sftp> pwd
Remote working directory: /freddy-test-aws-transfer/Users/john-doe

sftp> ls
test1.txt
We can download the test1.txt file from the S3 bucket.
sftp> get test1.txt .
Fetching /freddy-test-aws-transfer/Users/john-doe/test1.txt to ./test1.txt
We can also upload new files to the S3 bucket.
 sftp> put test2.txt .
Uploading test2.txt to /freddy-test-aws-transfer/Users/john-doe/./test2.txt

sftp> put test3.txt .
Uploading test3.txt to /freddy-test-aws-transfer/Users/john-doe/./test3.txt

sftp> ls
test1.txt  test2.txt  test3.txt
From the AWS Console, we can check the S3 bucket and see the newly uploaded files.

In CloudWatch Logs, we can see the timestamped entries of when we established the SFTP connection and downloaded and uploaded the files.
Conclusion
AWS Transfer Family is a managed service that allows you to access files in S3 buckets or EFS file systems using file transfer protocols such as SFTP, FTPS, FTP and AS2. AWS Transfer Family takes away the overhead of needing to develop, host and manage your own file transfer service.
In this blog post, we demonstrated a use-case where AWS Transfer Family was used with an existing file source server to upload files to S3 using SFTP. S3 was used as cost-effective storage for the SFTP uploaded files. These uploaded files were less frequently accessed over time. Thus, by utilising S3 lifecycle rules, the files can be transitioned to cheaper storage classes over time.
Subscribe to my newsletter
Read articles from Freddy Ho directly inside your inbox. Subscribe to the newsletter, and don't miss out.
Written by
