Birthday Reminder App
 Raj Sarkar
In this blog, we will build a simple and efficient Birthday Reminder App with the help of React.
Our Birthday Reminder App will consist of three components:
Data Component - This component will store the data of the people's names, images, and their birthdays.
List Component - This component will create a list of the birthdays and map over it.
Birthday Component - This component will import the other two components and render them on the screen.
Data Component
We'll create an array of objects that stores information about five Marvel superheroes - Tony Stark (Iron Man), Steve Rogers (Captain America), Thor Odinson, Peter Parker (Spider-Man), and Bruce Banner (Hulk). Each object in the array will have the following properties:
id: A unique identifier for the superhero.name: The name of the superhero.age: The age of the superhero.image: A URL to an image of the superhero.
export default  [
  {
    id: 1,
    name: 'Tony Stark',
    age: 49,
    image:
      'https://wallpapers.com/images/high/iron-man-snap-4k-marvel-iphone-ime2d368zkve5if6.webp',
  },
  {
    id: 2,
    name: 'Steve Rogers',
    age: 101,
    image:
      'https://wallpapers.com/images/high/captain-america-vs-ultron-vt8akbadajv5mzu7-vt8akbadajv5mzu7.webp',
  },
  {
    id: 3,
    name: 'Thor Odinson',
    age: 1500,
    image:
      'https://wallpapers.com/images/hd/chris-hemsworth-as-thor-qzytdg8xliuaelun-qzytdg8xliuaelun.webp',
  },
  {
    id: 4,
    name: 'Peter Parker',
    age: 16,
    image:
      'https://wallpapers.com/images/high/spiderman-digital-artwork-fgybo7dtpakw8tba-fgybo7dtpakw8tba.webp',
  },
  {
    id: 5,
    name: 'Bruce Banner',
    age: 50,
    image:
      'https://wallpapers.com/images/hd/standing-hulk-on-black-background-xtob1ybvh4y5lman-xtob1ybvh4y5lman.webp',
  },
];
We will export this array and use it in the List Component.
List Component
Let's create a functional component in React that renders a list of people passed as props.
We'll pass in a single prop called people, which is an array of objects containing information about each person to be displayed. The component will map over the people array and will render an <article> element for each person, displaying their name, age, and image.
import React from 'react';

const List = ({ people }) => {
  return (
    <>
      {people.map((person) => {
        const { id, name, age, image } = person;
        return (
          <article key={id}>
            <img src={image} alt={name} />
            <div>
              <h4>{name}</h4>
              <p>{age} years</p>
            </div>
          </article>
        );
      })}
    </>
  );
};

export default List;
In the above code, we used destructuring to extract the id, name, age, and image properties from each person object . We will export this component and use it in the Birthday Component.
Birthday Component
Let's import the useState hook and also the data and List Component.
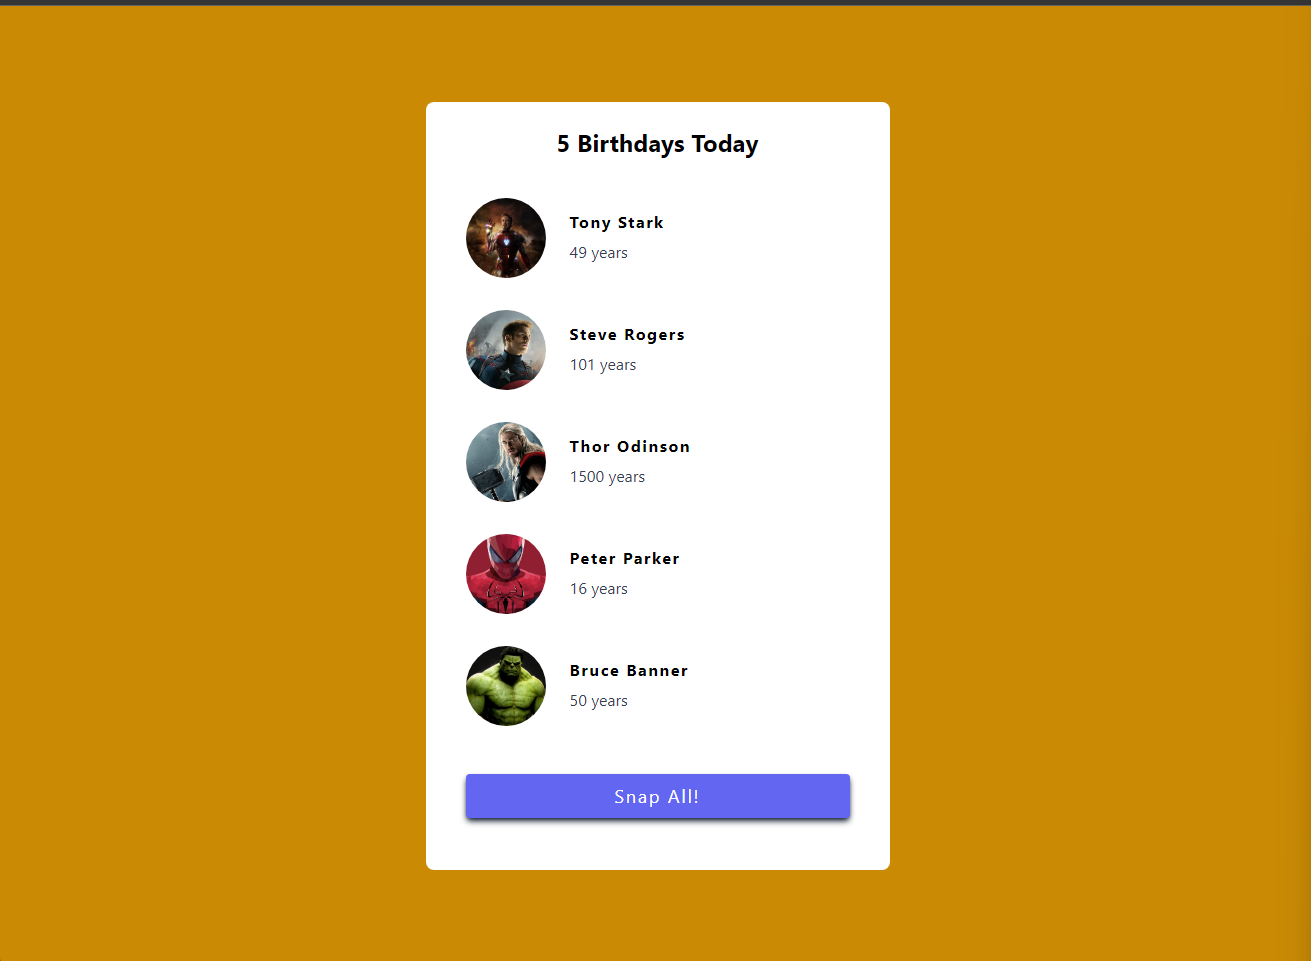
We will initialize the people state to the data imported from the data.js file. The <section> element will contain a heading with the number of birthdays today and we'll add the List component that will display the list of people with their name, age, and image. We'll also create a button element which will clear all the birthdays displayed on the page.
import React, { useState } from 'react'
import data from './data'
import List from './List'
function App() {
  const [people, setPeople] = useState(data)
  return (
    <main>
      <section>
        <h3>{people.length} birthdays today</h3>
        <List people={people} />
        <button onClick={() => setPeople([])}>clear all</button>
      </section>
    </main>
  )
}

export default App
In the above code, we passed the 'people' state as prop in the List component. This allowed the List component to access and display the data passed from the parent component. Also, we attached an onClick event listener to the button that sets the people state to an empty array when clicked, for clearing the birthdays.
Adding Tailwind
Let's add Tailwind CSS to both our List and Birthday Component. You can also change the values or add new ones to suit your preferences.
If you don't have Tailwind installed, do checkout my article on Installing Tailwind.
List Component Tailwind
import React from 'react';

const List = ({ people }) => {
  return (
    <>
      {people.map((person) => {
        const { id, name, age, image } = person;
        return (
          <article key={id} class='h-28 w-96 mx-10 flex items-center'>
            <img class='w-20 h-20 rounded-full object-cover mr-6' src={image} alt={name} />
            <div>
              <h4 class='mb-2 tracking-widest leading-5 font-bold'>{name}</h4>
              <p class='text-slate-700'>{age} years</p>
            </div>
          </article>
        );
      })}
    </>
  );
};

export default List;
Birthday Component Tailwind
import React, { useState } from 'react'
import data from './data'
import List from './list'
function Birthday() {
  const [people, setPeople] = useState(data)
  return (
    <main class='bg-yellow-600 h-screen flex justify-center'>
      <section class='bg-white m-24 rounded-lg'>
        <h3 class='text-2xl text-center my-6 capitalize font-bold'>{people.length} birthdays today</h3>
        <List people={people} />
        <button class='text-white bg-indigo-500 w-96 p-2 mx-10 my-8 text-lg rounded cursor-grabbing tracking-widest hover:bg-slate-800 shadow-md shadow-slate-800' onClick={() => setPeople([])}>Snap All!</button>
      </section>
    </main>
  )
}

export default Birthday
Import the Birthday Component into your App Component and checkout the result:

Conclusion
And there you go!
We've just created a simple Birthday Reminder App using React.
Thank you for taking the time to read this blog. Hope you found it informative and enjoyable! Do let me know your thoughts and feel free to connect with me on Twitter.
Catch you guys on the next one. Cheers .. ✌️
Also, if today is your birthday, Happy Birthday..!! 😉

Subscribe to my newsletter
Read articles from Raj Sarkar directly inside your inbox. Subscribe to the newsletter, and don't miss out.
Written by

Raj Sarkar
Raj Sarkar
Hi, I'm Rajarshi, a newbie blogger and a budding front-end developer. I started blogging to share my experiences and insights as a beginner in front-end development, as well as to connect with other developers and enthusiasts in the tech community.