How to add Badges to your GitHub Repository
 T Prayag
Table of contents

Adding badges to your readme files is a common task and almost everyone uses badges in their GitHub Repo. These badges increase the readability of Readme files, and as a result, the readers get a clear-cut idea about the tech stacks, license, version, build status...etc used in the repository.
So in this article, I will present some ways in which you can add GitHub Badges to your Readme files using the shields.io.
The URL
Firstly, find the icon you want that is readily available to use and follow the steps accordingly.
Now copy the above link and add a label to it by adding a - to it and writing the label along with it.
( Note: It is case-sensitive)
example - https://img.shields.io/badge/-chatGPT
If you want to write multiple words, add %20 instead of space between each work.
example - https://img.shields.io/badge/-chat%20GPT
The Colour
Shields.io already have a lot of inbuilt colours and if you want to add more you can always use the hex codes and use all the colours that are available in CSS.
You can use the following links to find the perfect colour and their hex codes:
https://htmlcolorcodes.com/color-picker/
After finding the suitable colour for your repo, add it to the link by adding a ' - colour_name/hexcode ' to the label.
example - https://img.shields.io/badge/chatGPT-74AA9C
The Logo
Most of the logos can be found on Simple Icons, after finding the desired logo you can copy the icon name and insert it into the link by adding ' ?logo=iconame '
example -
https://img.shields.io/badge/GitHub-black?logo=github
In some cases, if the icon is not available on the simple icons you can just add the name of the website ( lowercased ) and you will be able to get the icon
example -
https://img.shields.io/badge/chatGPT-74aa9c?logo=openai
(ChatGPT's icon is not available on small icons, so inserting the domain name will insert the icon used in the website automatically)
Logo Colour
The logo colour can be inserted by adding ' &logoColour = colour ' right next to the logo
example -
https://img.shields.io/badge/chatGPT-74aa9c?logo=openai&logoColor=white
Styling
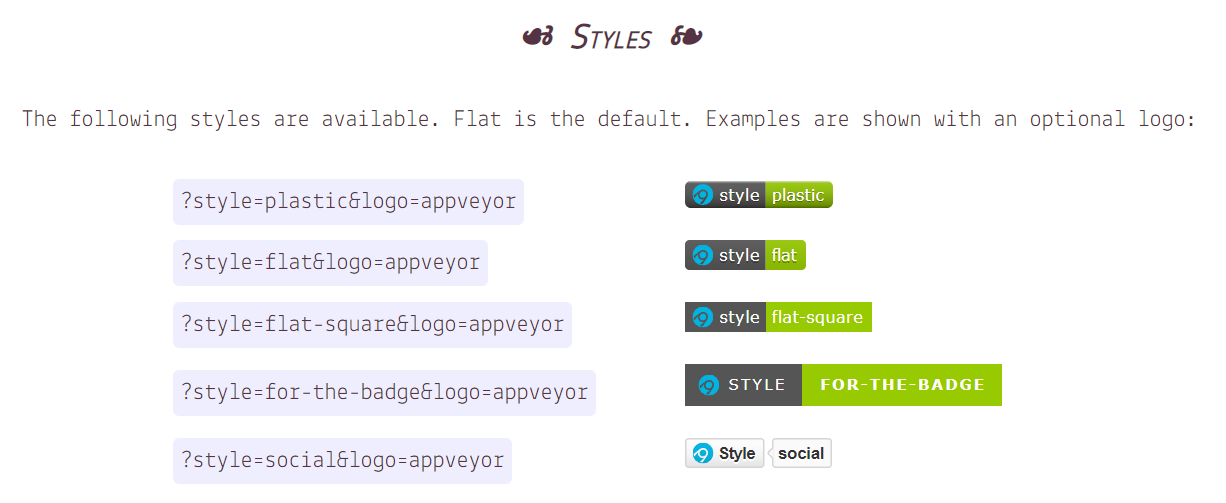
Sheild.io also offers some ways to style your badge:

example -
https://img.shields.io/badge/chatGPT-74aa9c?style=for-the-badge&logo=openai&logoColor=white
Note :
You can change the logo width by '&logoWidth = pixels '
example -
https://img.shields.io/badge/chatGPT-74aa9c?style=for-the-badge&logo=openai&logoColor=white&logoWidth=30
Add to Readme
[](where to point if you click the link)
example -
Conclusion
Badges can improve the readability of a GitHub repository.
Shields.io offers a lot of other options by which one can edit/style the badges.
Explore and find new innovative ways.
This is not the only way one can create badges there are other ways also like badgen.net and so.
Subscribe to my newsletter
Read articles from T Prayag directly inside your inbox. Subscribe to the newsletter, and don't miss out.
Written by


