Deploying Java-based applications using Maven, SonarQube, Jenkins, Argo CD, and finally deployment on Amazon EKS
 Charan kumar
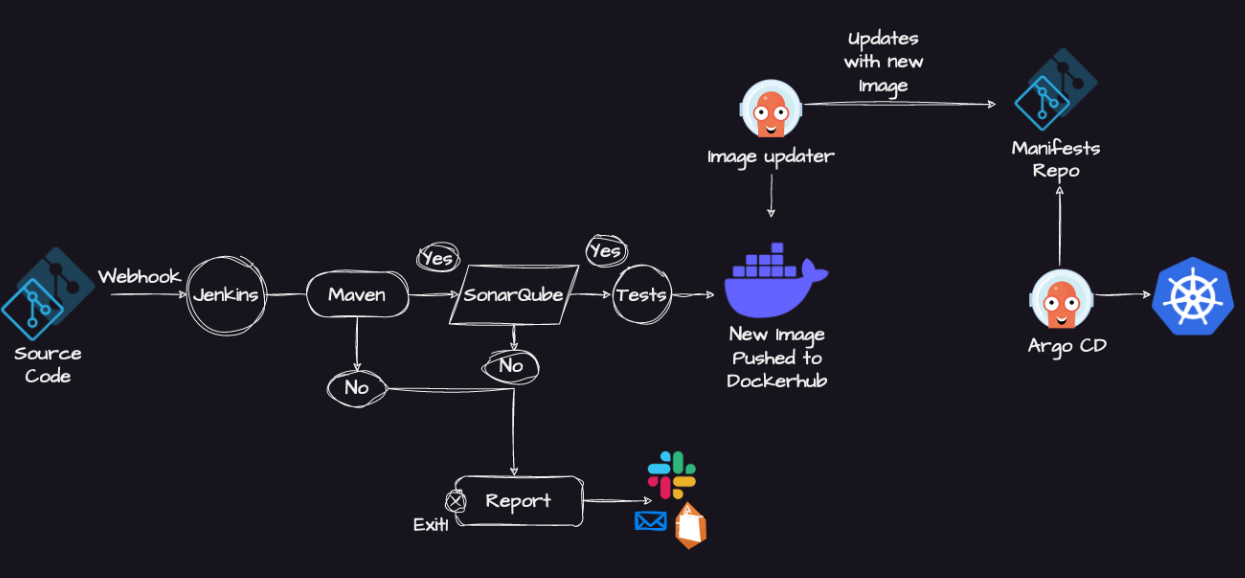
Components used —
Git — Git is a version control system that is widely used for software development. Git is distributed, meaning that each developer has a complete copy of the code repository on their computer, and changes can be merged between repositories. This makes it easy for teams to collaborate on code and manage changes. Git also allows developers to track changes to the code, revert to previous versions, and collaborate on code reviews. It is a powerful tool for managing software projects and is used by developers and organizations of all sizes.
Jenkins — Jenkins is an open-source automation server that helps automate parts of the software development process. It is used for continuous integration (CI) and continuous delivery (CD) of software applications. Jenkins allows developers to automate the building, testing, and deployment of their code, which helps reduce the time and effort required to release software.

SonarQube — SonarQube is an open-source platform used for continuous code quality inspection, code analysis, and static code analysis. It allows developers to identify and fix code quality issues early in the development process, thus improving the overall quality of the software.

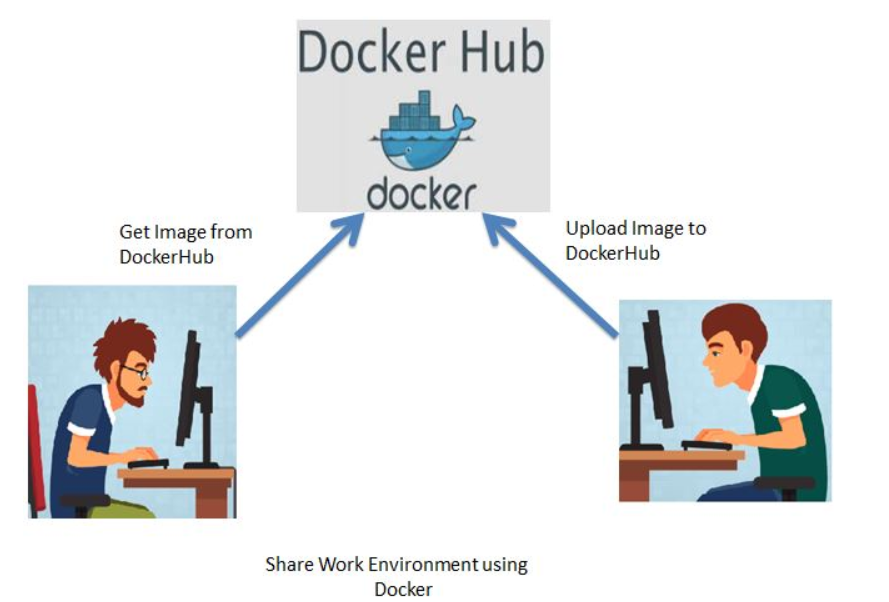
DockerHub — Docker Hub is a cloud-based registry service that provides a central repository for storing and sharing Docker container images.
Argo CD — Argo CD is an open-source continuous delivery tool that helps in deploying applications to Kubernetes clusters. It provides a declarative and GitOps-based approach to managing Kubernetes resources, which means that the desired state of the system is defined in code and version-controlled in Git. Argo CD continuously monitors the Git repository for changes and synchronizes the actual state of the Kubernetes resources with the desired state defined in the Git repository.

EKS — Amazon Elastic Kubernetes Service (EKS) is a managed Kubernetes service that allows developers to run Kubernetes clusters on the AWS cloud.
Let's get started
Step 1 — Launch an AWS EC2 Medium Instance
Step 2 — Clone the repository to your EC2 Instance and install dependencies Maven, Docker. From Dockerfile build Docker Image and then using docker run, a container is made. Expose port
Step 3 — Continuous Integration
3A) Install and Setup Jenkins
3B) Create a new Jenkins pipeline
3C) Install the Docker Pipeline and SonarQube Plugins
3D) Configure Sonar Server locally
Step 4 —Integrations
4A) Create Sonarqube credentials in Jenkins
4B) Create DockerHub Credential in Jenkins
4C) Create GitHub credential in Jenkins
Here, we have finished Continuous Integration Part
Step 5 — Continuous Delivery/Deployment Part
5A) Launch an AWS EC2 Medium Instance
5B) Install AWS CLI and Configure
5C) Install and setup Kubectl
5D) Install and setup eksctl
5E) Install Helm Chart
5F) Creating and EKS Cluster using eksctl
5G) Set up IAM Role for Service Accounts
5H) Install Argo CD Operator
5I) Deploy Sample application
5J) Clean up/Deprovision cluster
References
Let's gets started and dig deeper into each of these steps :-
Step 1 — Set up an AWS T2 Medium Ubuntu EC2 Instance.
You can select an existing key pair, and enable HTTP and HTTPS Traffic. Launch the instance and once it is launched you can connect to it using the key pair. Name it as Jenkins-Server.
Once it is launched, connect to the instance via console or using SSH Key Pair.
Step 2 — Clone the repository to your EC2 Instance and install dependencies
git clone https://github.com/CharanKumar93/Jenkins-Zero-To-Hero.git
cd Jenkins-Zero-To-Hero/java-maven-sonar-argocd-helm-k8s/spring-boot-app
sudo apt update
sudo apt install maven
mvn clean package
mvn -v
sudo apt update
sudo apt install docker.io
sudo usermod -aG docker ubuntu
sudo chmod 666 /var/run/docker.sock
sudo systemctl restart docker
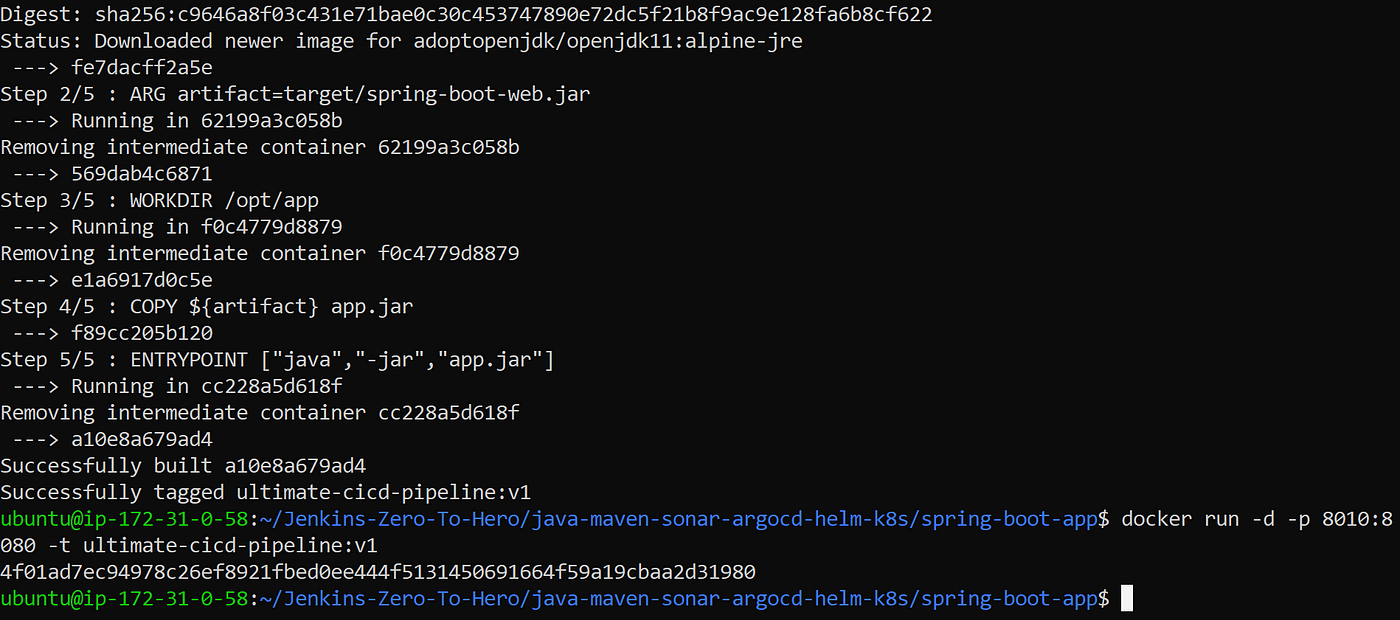
docker build -t ultimate-cicd-pipeline:v1 .
docker run -d -p 8010:8080 -t ultimate-cicd-pipeline:v1
The output of these would look like below
Add Security inbound rule for port 8010 on your AWS console. Goto your EC2 Instance, goto Security Group, Edit Inbound Rules →Custom TCP → 8010 and click on Save.

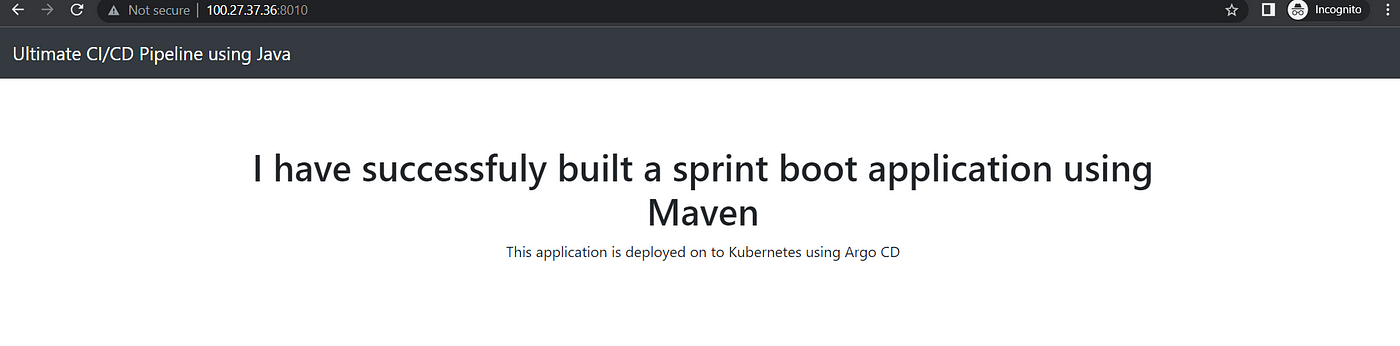
Now, try to access the application using
<Public IP address>:8010
You will get the output like below
Step 3 — Continuous Integration
3A) Install and setup Jenkins
sudo apt update
sudo apt install openjdk-11-jre
java -version
curl -fsSL https://pkg.jenkins.io/debian/jenkins.io-2023.key | sudo tee \
/usr/share/keyrings/jenkins-keyring.asc > /dev/null
echo deb [signed-by=/usr/share/keyrings/jenkins-keyring.asc] \
https://pkg.jenkins.io/debian binary/ | sudo tee \
/etc/apt/sources.list.d/jenkins.list > /dev/null
sudo apt-get update
sudo apt-get install jenkins
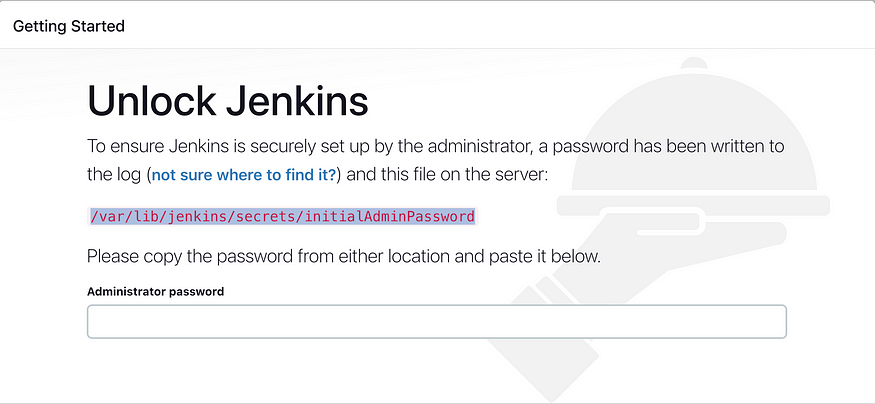
sudo cat /var/lib/jenkins/secrets/initialAdminPassword
3B) Set Up Jenkins
Goto your AWS EC2 Console, Security Group →Edit inbound Rules → Add Port 8080, since Jenkins works on Port 8080.

Using Public IP Address of EC2 Instance,
<Public IP Address>:8080
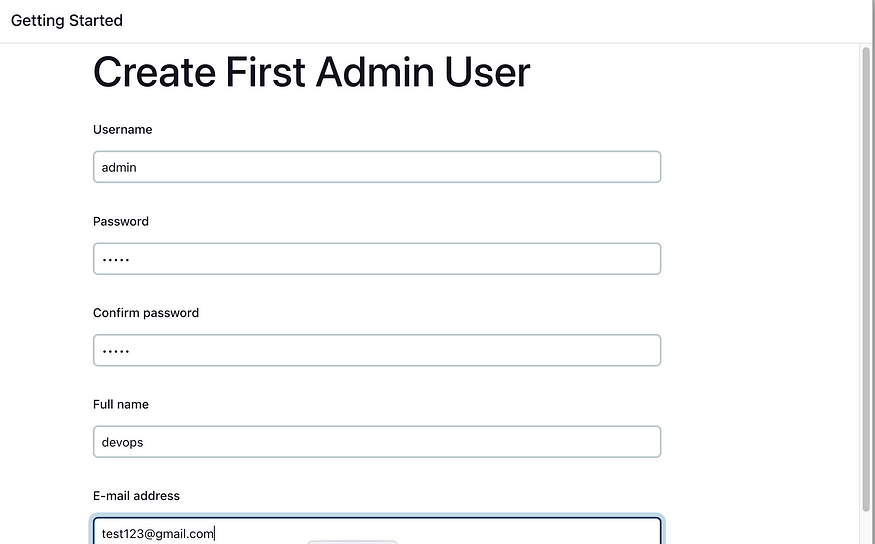
Login to Jenkins and unlock, and using this password unlock
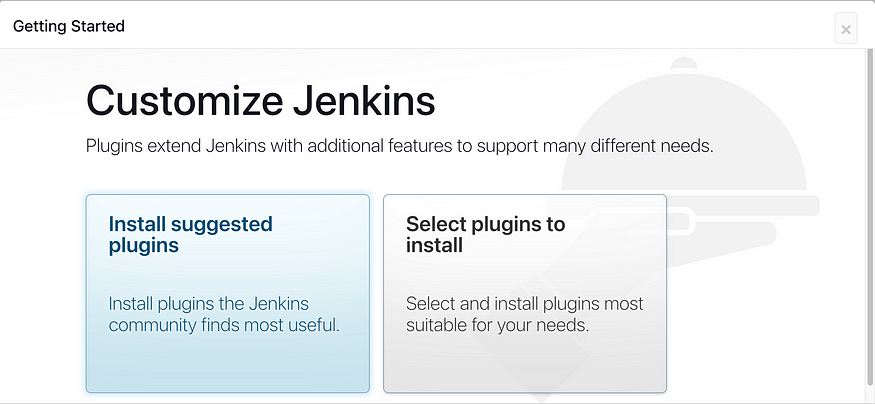
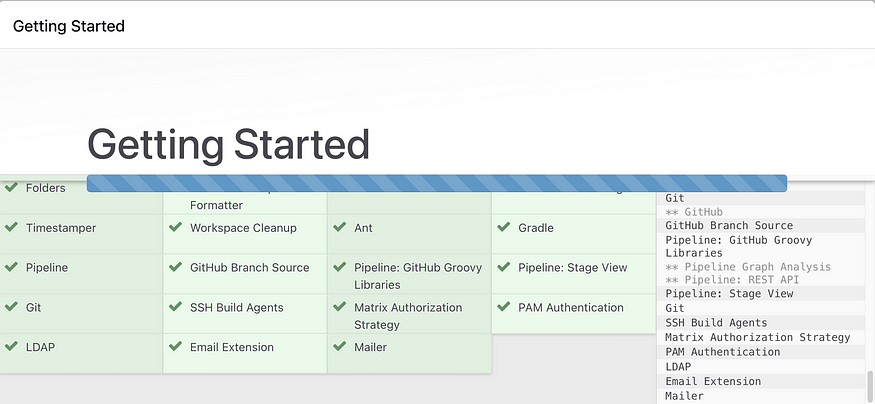
Install suggested plug ins
Jenkins Installation is Successful. You can now starting using the Jenkins
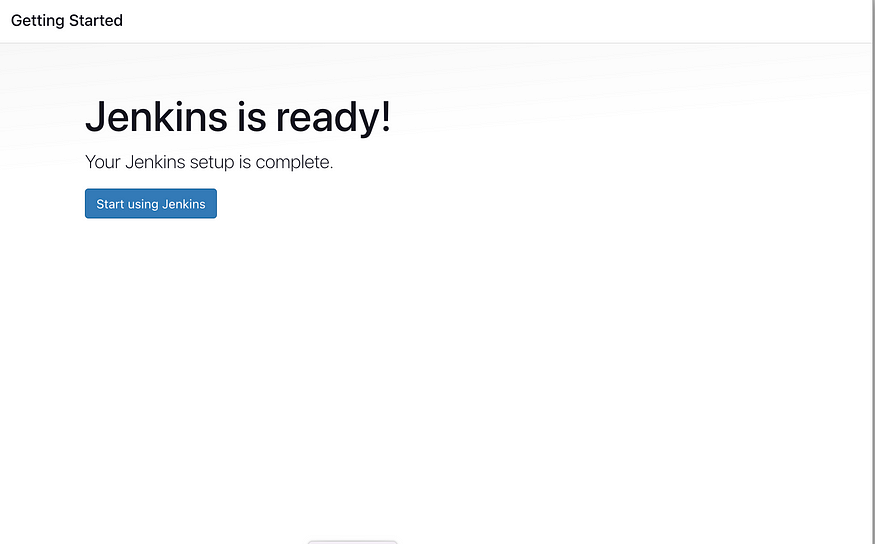
You can now start using Jenkins
3B) Create a new Jenkins Pipeline
Github: https://github.com/CharanKumar93/Jenkins-Zero-To-Hero.git
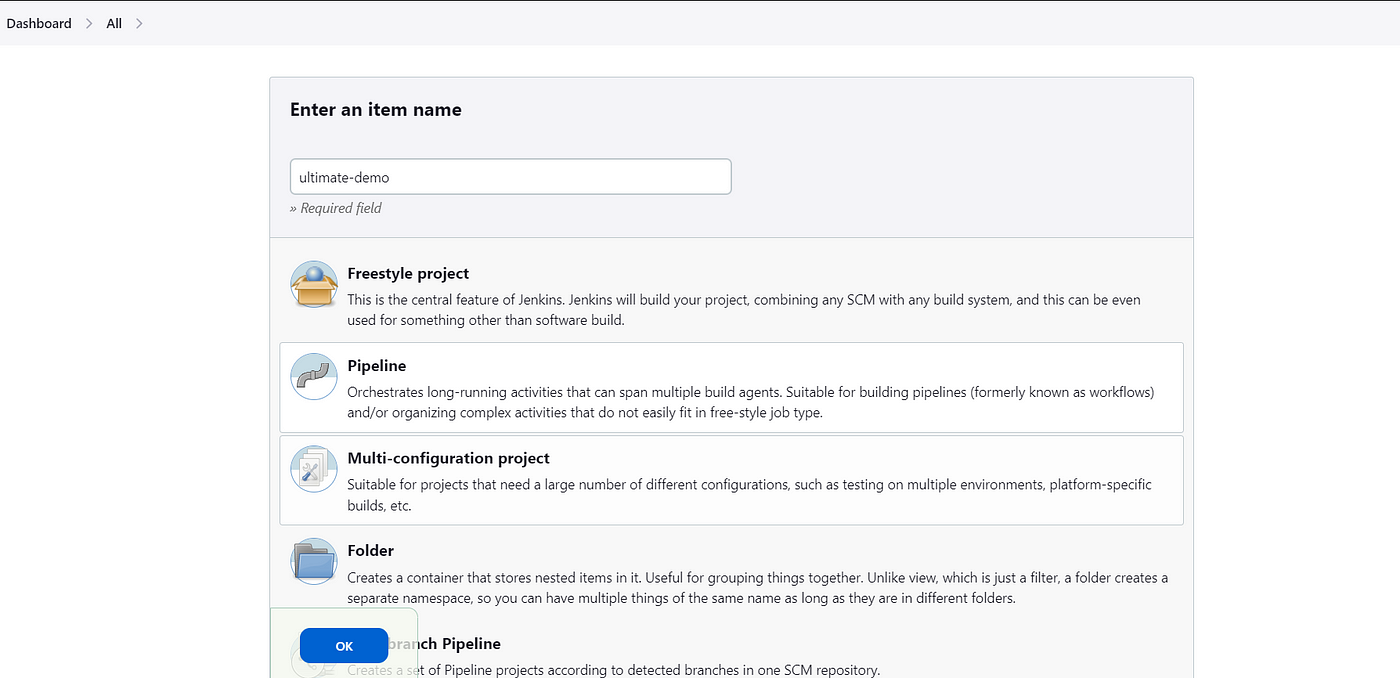
Click on New Item. Select Pipeline and Enter an Item name as Ultimate-demo and click OK.
Select your repository where your Java application code is present.
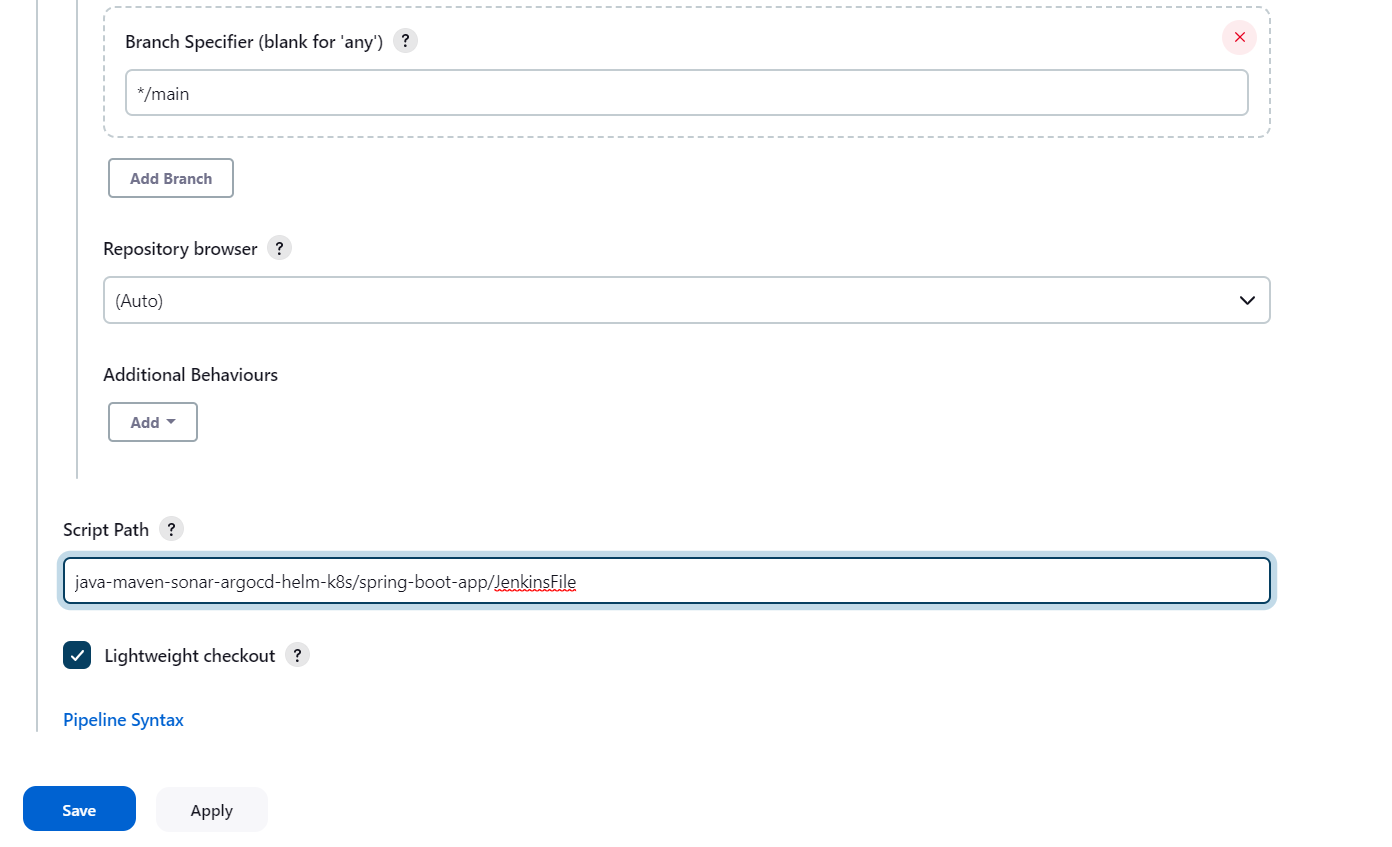
Make the branch as main, since ours is main instead of master and add the Script Path from Github Repo
3C) Install the Docker Pipeline and SonarQube Plugins
Install the following Plugins in Jenkins
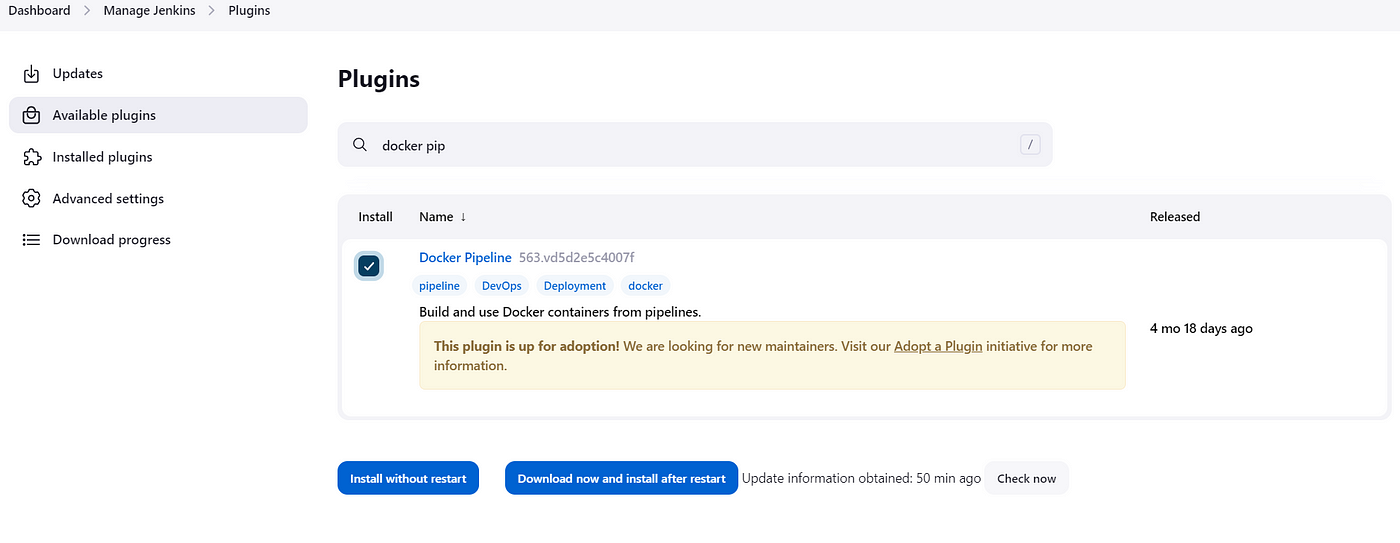
Goto Dashboard → Manage Jenkins →Plugins →Available Plugins →
a) Docker Pipeline Plug in
b)SonarQube Scanner
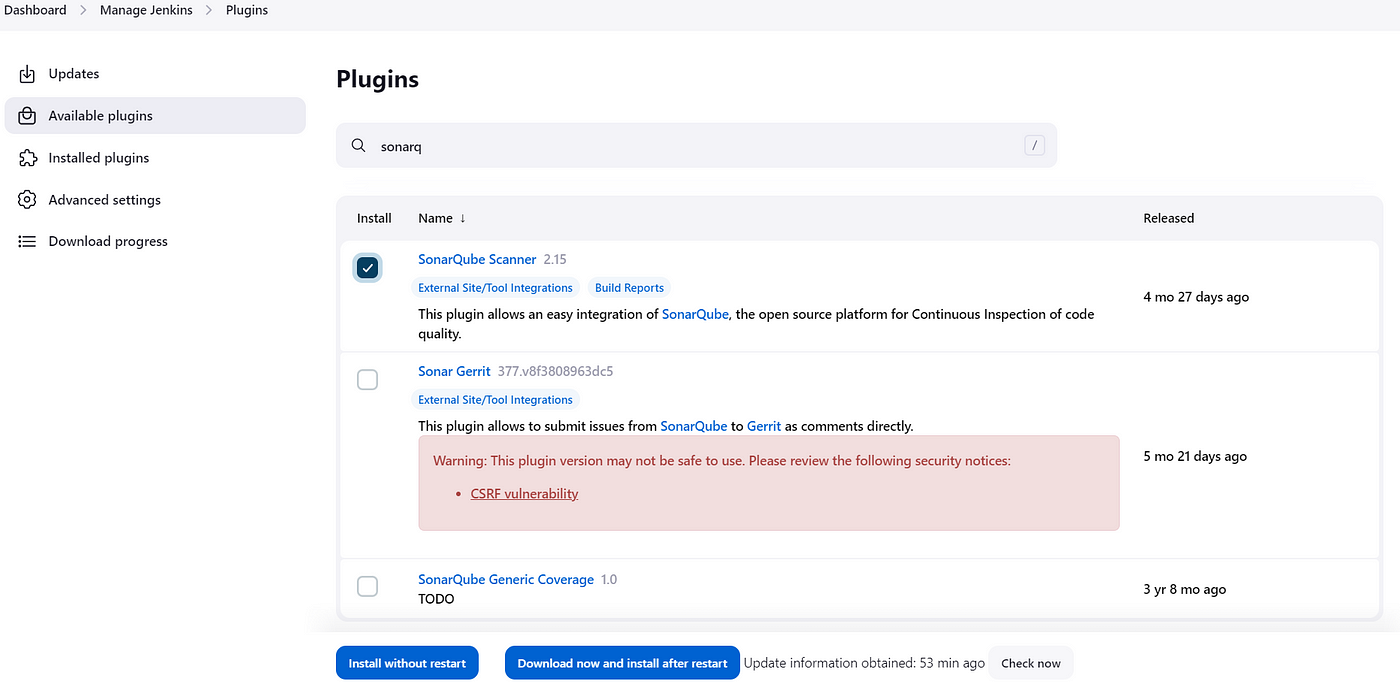
Click on Install without Restart
3D) Configure a Sonar Server locally
SonarQube is used as part of the build process (Continuous Integration and Continuous Delivery) in all Java services to ensure high-quality code and remove bugs that can be found during static analysis.
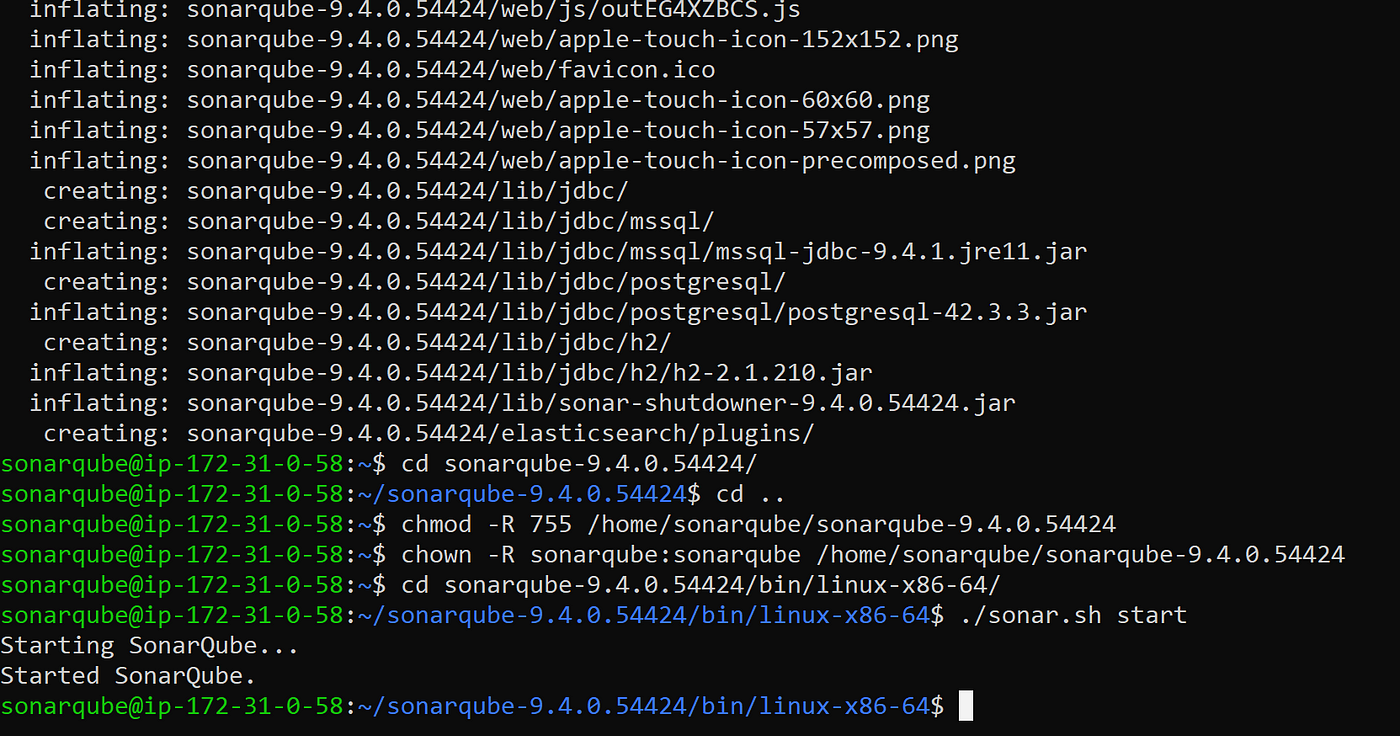
Goto your EC2 Instance and enter these commands to configure Sonar Server
sudo adduser sonarqube
<Enter any password when it prompts you>
sudo apt install unzip
sudo su - sonarqube
When you enter sudo su — sonarqube, you will switch user to sonarqube and then install the required binaries.
wget https://binaries.sonarsource.com/Distribution/sonarqube/sonarqube-9.4.0.54424.zip
unzip *
chmod -R 755 /home/sonarqube/sonarqube-9.4.0.54424
chown -R sonarqube:sonarqube /home/sonarqube/sonarqube-9.4.0.54424
cd sonarqube-9.4.0.54424/bin/linux-x86-64/
./sonar.sh start
The output would look like this
By default, the Sonar Server will start on Port 9000. Hence we will need to edit the inbound rule to allow custom TCP Port 9000.

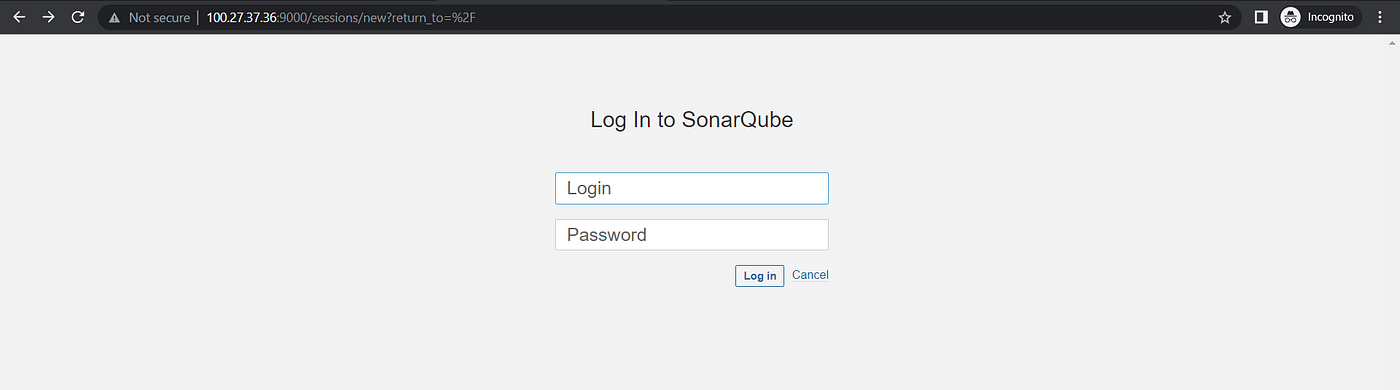
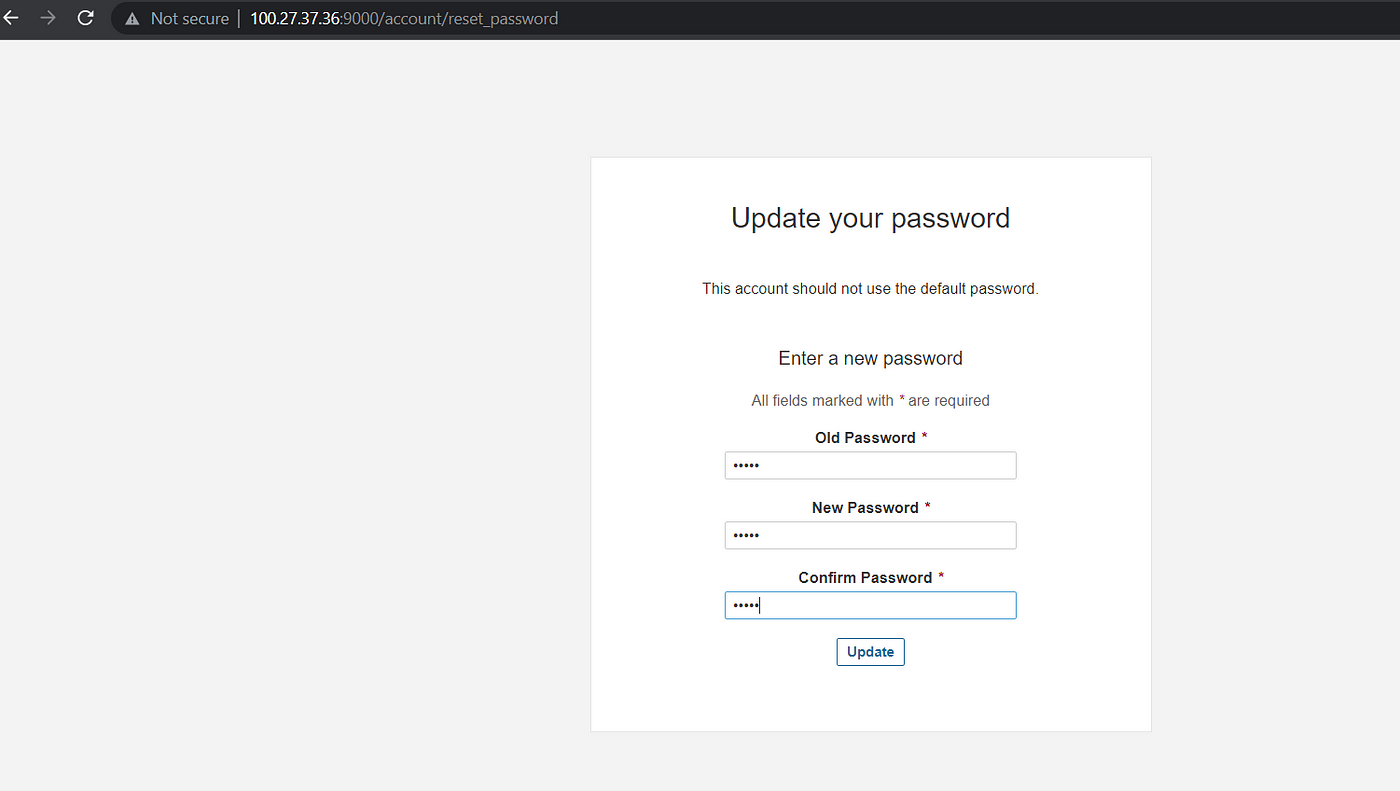
Enter Login as admin and Password as admin.
Change with a new password
Step 4 — Integrations
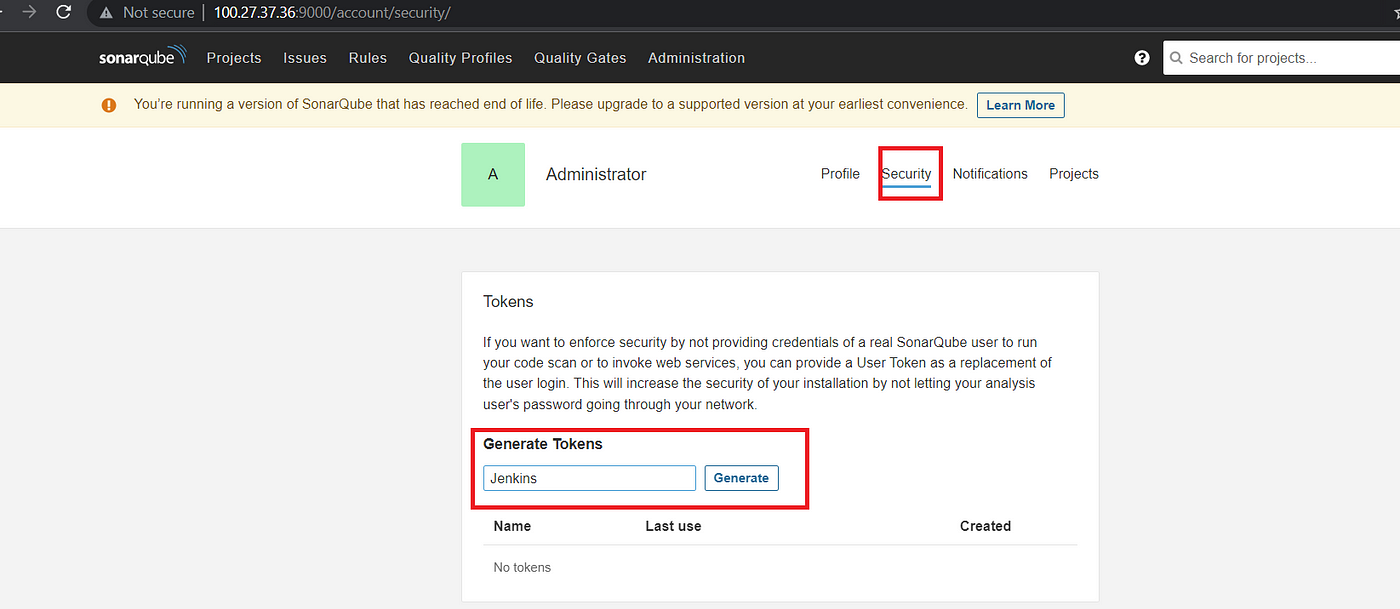
4A) Create Sonarqube credentials in Jenkins

Goto Sonar Qube → My Account → Click on Security → Write Jenkins and click on Generate
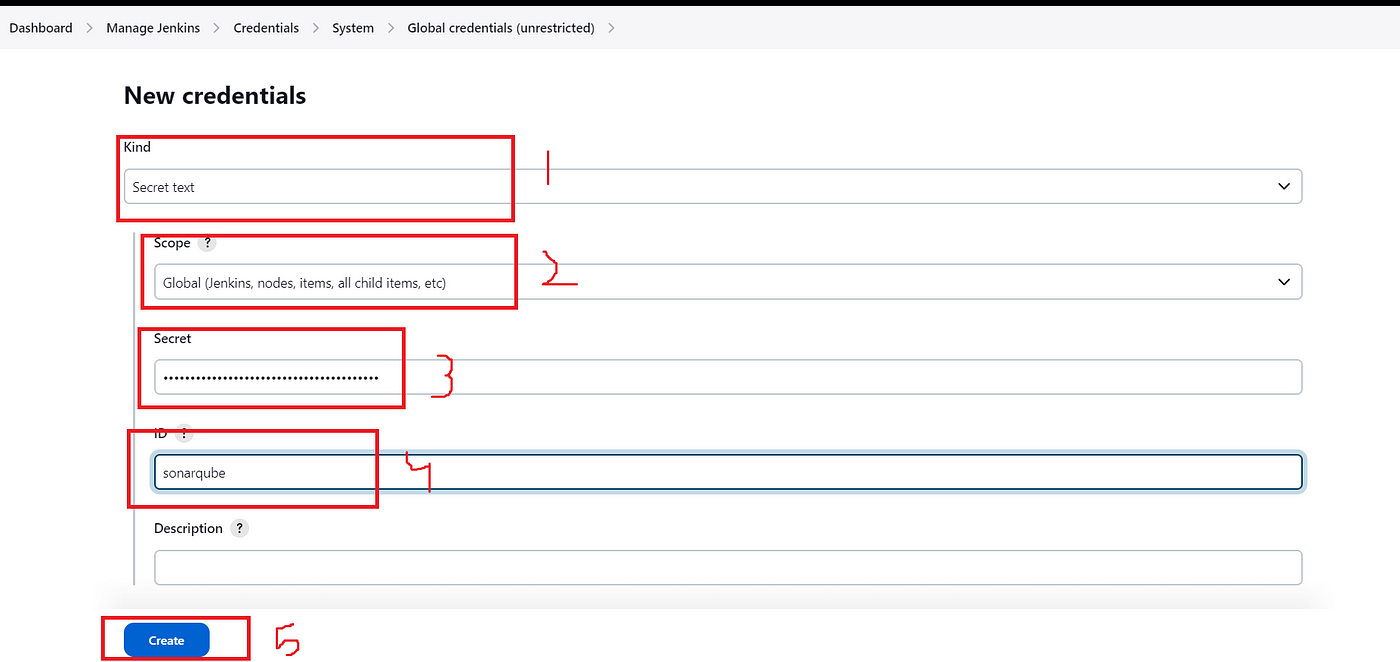
Next, goto your Jenkins → Manage Jenkins → Manage Credentials →System →Global Credentials → Add Credentials →
4B) Create DockerHub Credential in Jenkins
Run the below commands as root user to install Docker
sudo apt update
sudo apt install docker.io
sudo usermod -aG docker $USER
sudo usermod -aG docker jenkins
sudo systemctl restart docker
Once you have done these, its a best practice to restart Jenkins
Goto -> Jenkins -> Manage Jenkins -> Manage Credentials -> Stored scoped to jenkins -> global -> Add Credentials
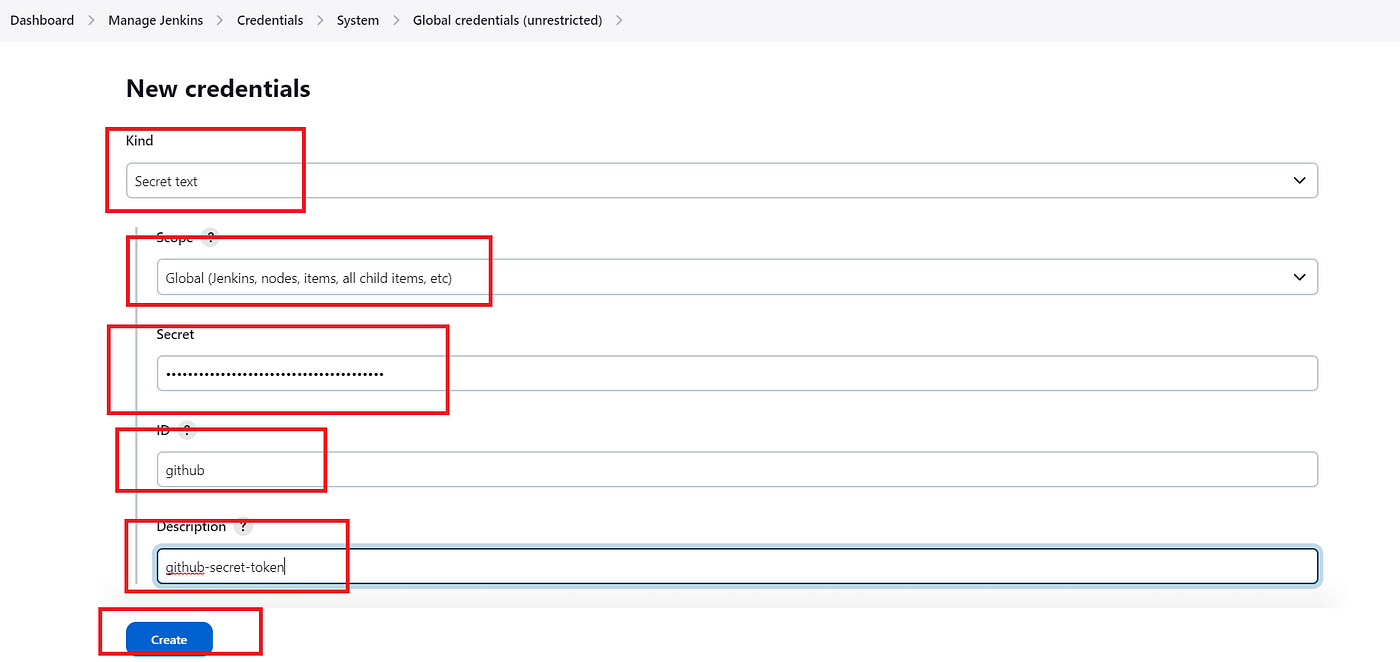
4C) Create GitHub credential in Jenkins
Goto GitHub — > Setting — > Developer Settings — > Personal access tokens — > Tokens(Classic) — > Generate new token

Now, you can see all three have credentials have been added

Now, when you click build now,

Wohoo, our pipeline is finally running
Lets look at the deployment.yaml files, you will see that the file has been recently updated.
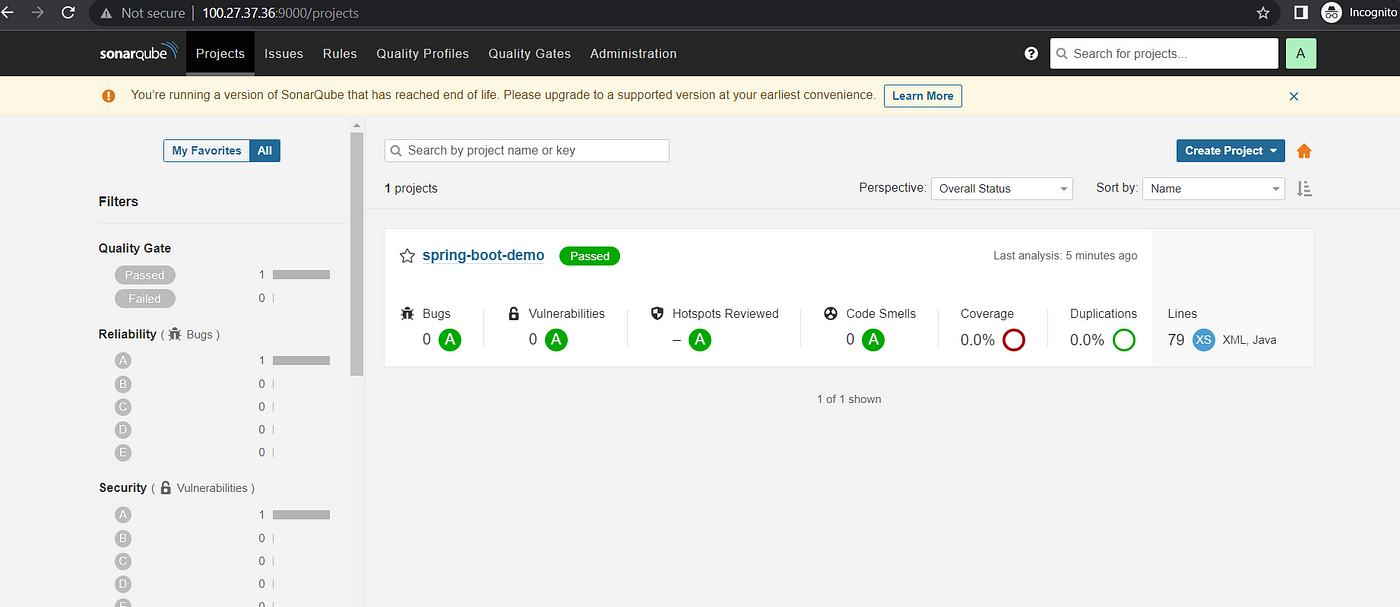
If we goto the Sonarqube console, you will see this output
If you check Dockerhub, you will see this output

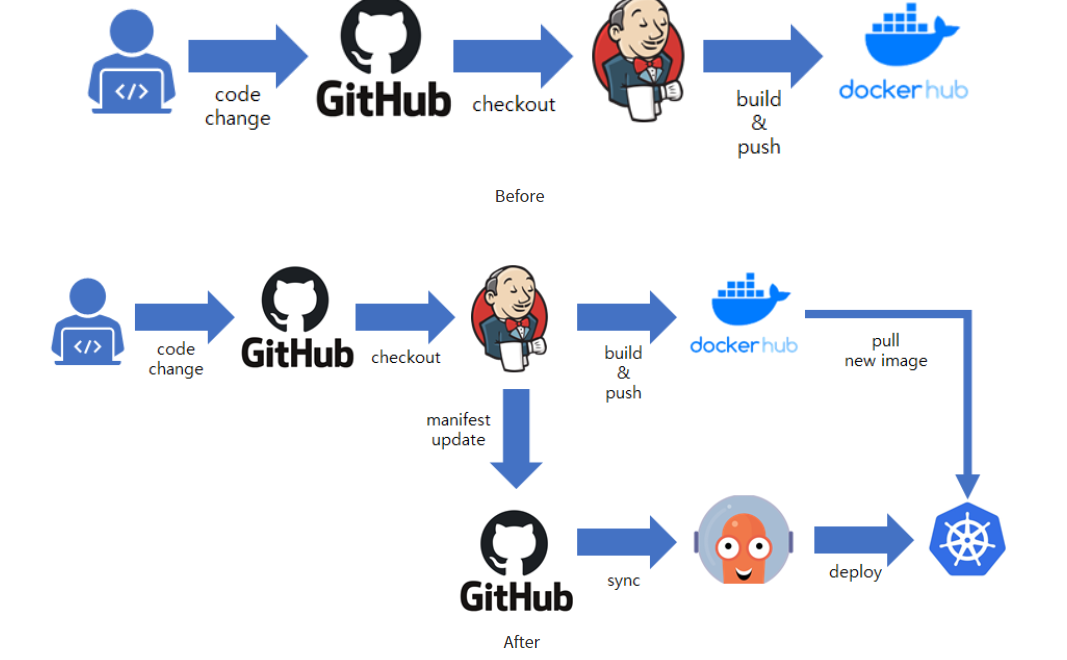
This way, we completed CI ( Continuous Integration) Part. Java application is built, SonarQube completed static code analysis and the latest image is created, pushed to DockerHub and updated Manifest repository with the latest image.
Step 5 — Continuous Delivery/Deployment Part(Using GitOps Tool Argo CD)
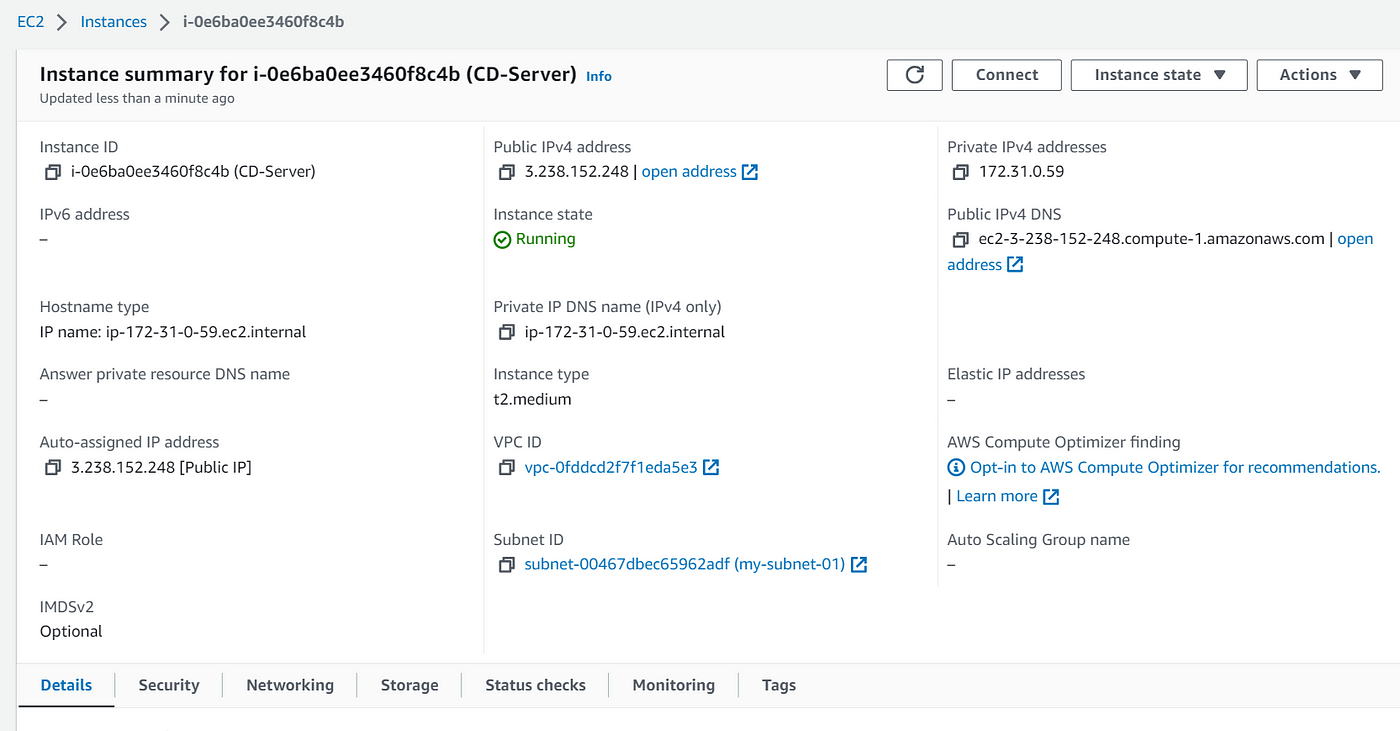
5A) Launch an AWS EC2 Medium Instance
Goto your AWS Console and log in using Admin Privileges. Select Ubuntu Image and T2 Medium Instance. Enable HTTP and HTTPS Settings. Use an existing key pair or you can create a new one. You can name your EC2 Instance as CD-Server. Now, click on launch instance.
5B) Install AWS CLI and Configure
Login to your console and enter these commands
curl "https://awscli.amazonaws.com/awscli-exe-linux-x86_64.zip" -o "awscliv2.zip"
sudo apt install unzip
unzip awscliv2.zip
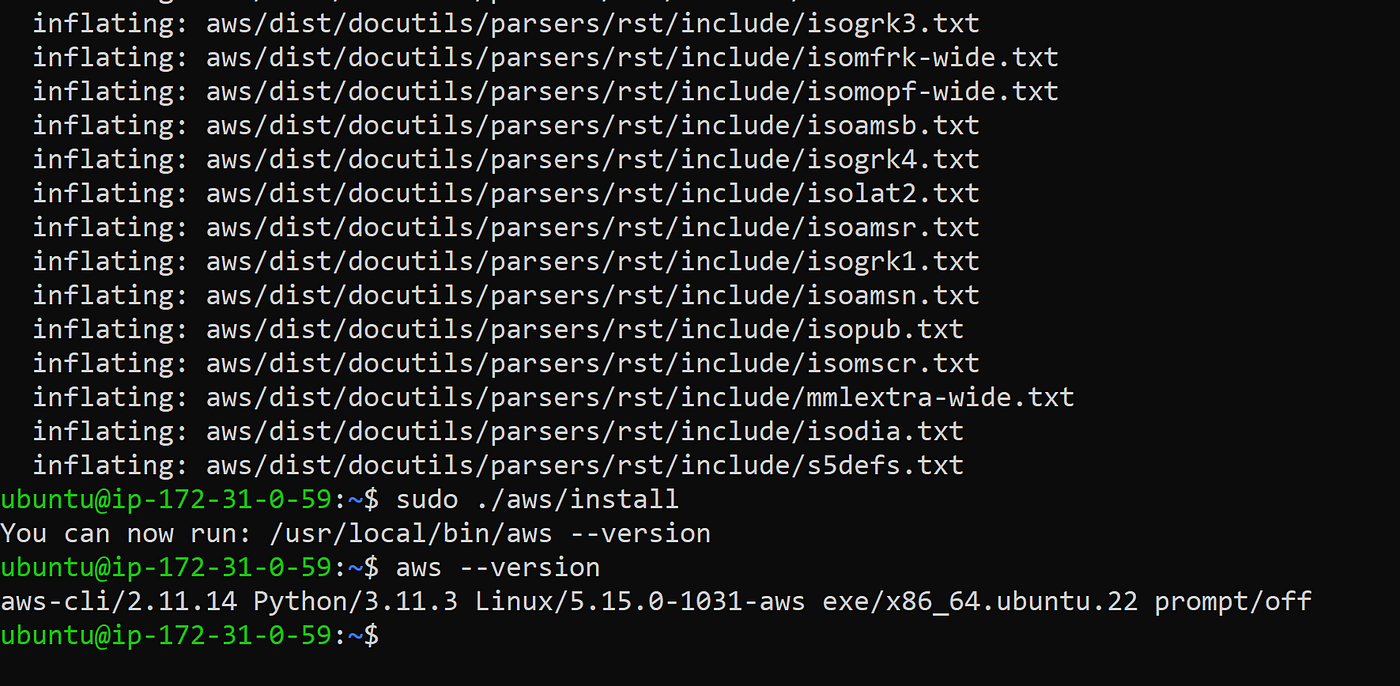
sudo ./aws/install
aws --version
You will see that AWS CLI is now installed
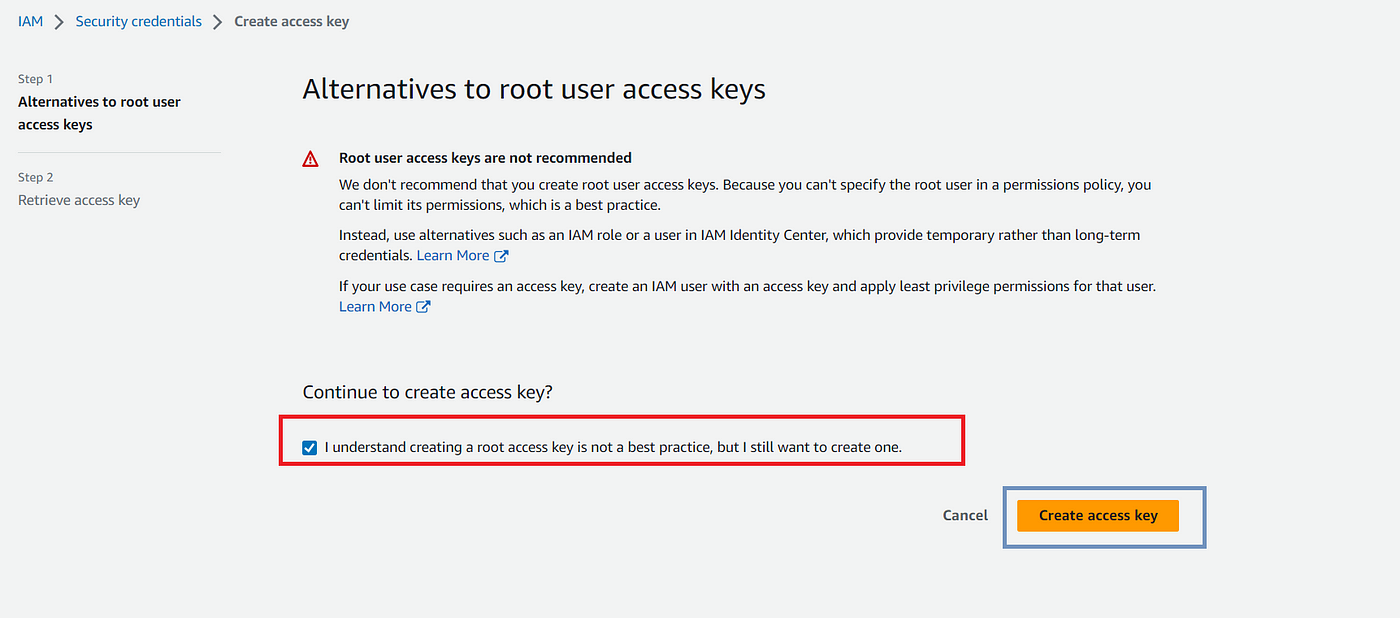
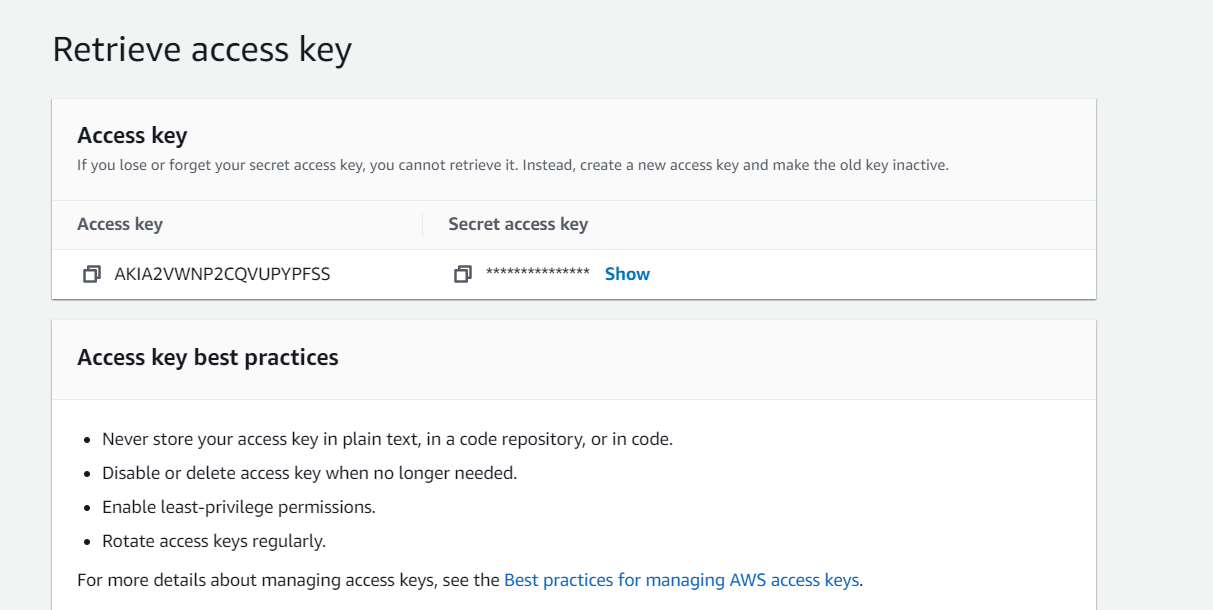
Now, you will need to go to the top right corner of your AWS Account and click on Security Credentials. Generate Access key and Secret Access key.

Goto Access Keys → Create Access Keys →Download CSV File. Remember to download the CSV File so that it can be in your downloads section.
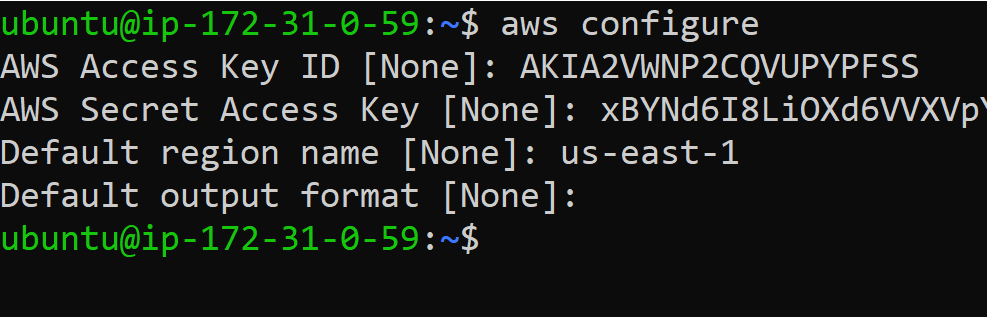
Now, go to your AWS Console login, and type below command
aws configure
You will need to enter the details
5C) Install and setup Kubectl
Kubectl is a command-line interface (CLI) tool that is used to interact with Kubernetes clusters. It allows users to deploy, inspect, and manage Kubernetes resources such as pods, deployments, services, and more. Kubectl enables users to perform operations such as creating, updating, deleting, and scaling Kubernetes resources.
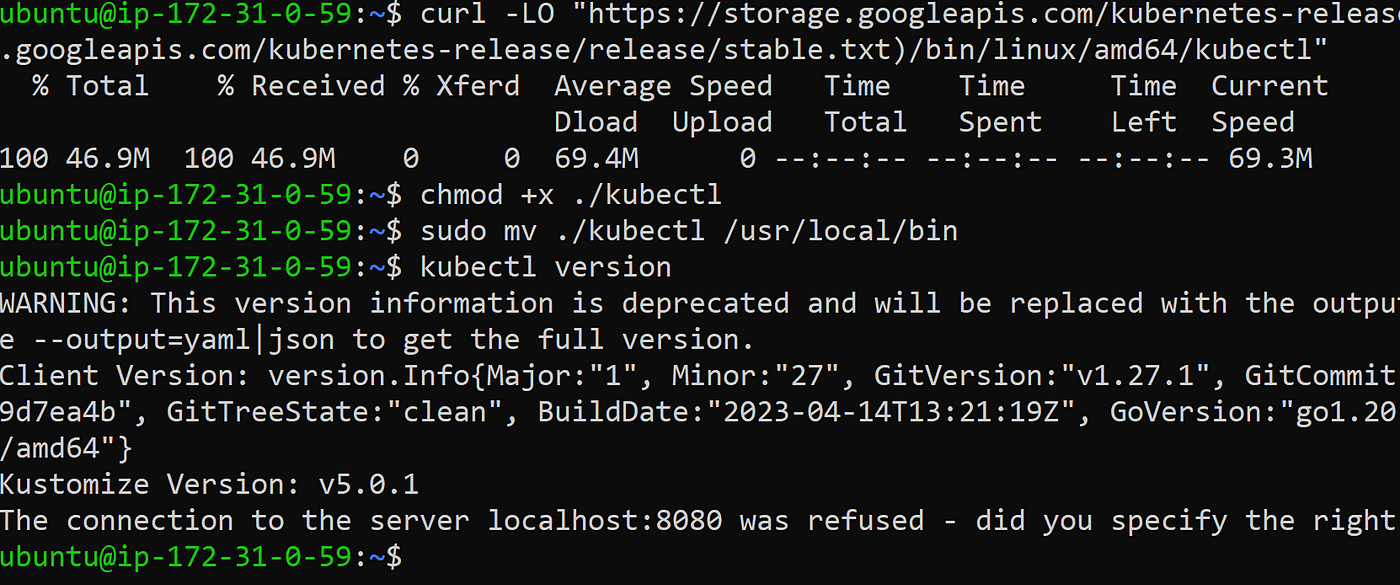
Run the following steps to install kubectl on EC2 instance.
curl -LO "https://storage.googleapis.com/kubernetes-release/release/$(curl -s https://storage.googleapis.com/kubernetes-release/release/stable.txt)/bin/linux/amd64/kubectl"
chmod +x ./kubectl
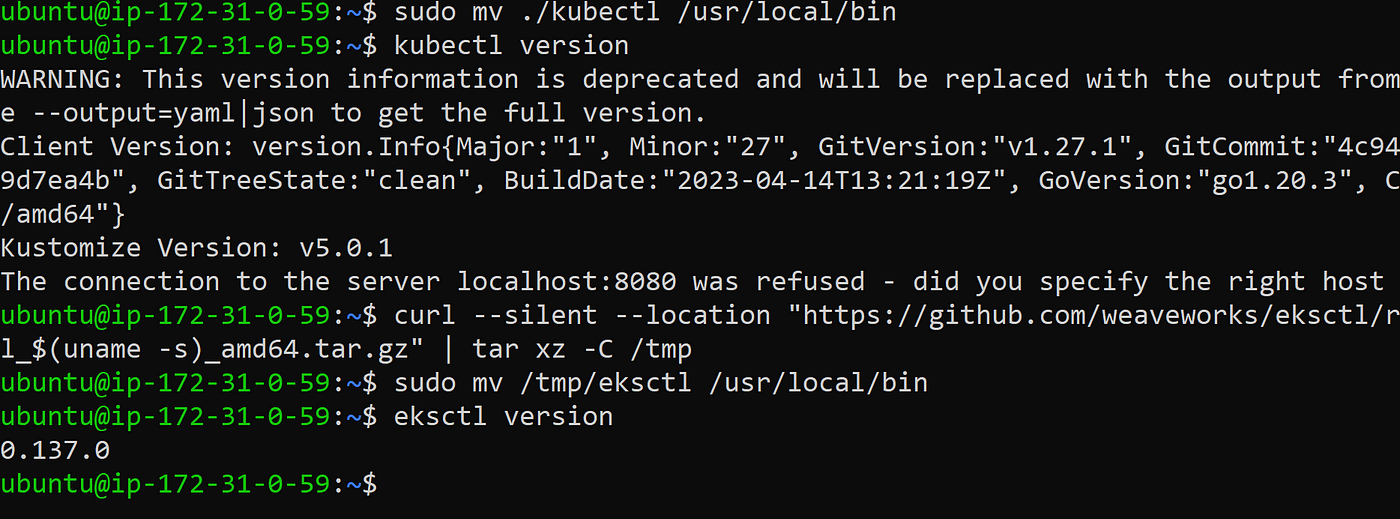
sudo mv ./kubectl /usr/local/bin
kubectl version
The output would look like this
5D) Install and setup eksctl
Download and extract the latest release of eksctl
curl --silent --location "https://github.com/weaveworks/eksctl/releases/latest/download/eksctl_$(uname -s)_amd64.tar.gz" | tar xz -C /tmp
Move the extracted binary to /usr/local/bin
sudo mv /tmp/eksctl /usr/local/bin
Test that your installation was successful with the following command
eksctl version
The output would look like this
5E) Install Helm Chart
The next tool we need is Helm Chart. Helm is a package manager for Kubernetes, an open-source container orchestration platform. Helm helps you manage Kubernetes applications by making it easy to install, update, and delete them.
Install Helm Chart — Use the following script to install the helm chart -
curl -fsSL -o get_helm.sh https://raw.githubusercontent.com/helm/helm/main/scripts/get-helm-3
chmod 700 get_helm.sh
./get_helm.sh
helm version
The output would look like this

5F) Creating and EKS Cluster using eksctl
Now in this step, we are going to create Amazon EKS cluster using eksctl
You need the following in order to run the eksctl command
Name of the cluster : — eks1
Version of Kubernetes : — version 1.24
Region : — region us-east-1
Nodegroup name/worker nodes : — nodegroup-name worker-nodes
Node Type : — nodegroup-type t2.medium
Number of nodes: — nodes 2
Minimum Number of nodes: — nodes-min 2
Maximum Number of nodes: — nodes-max 3
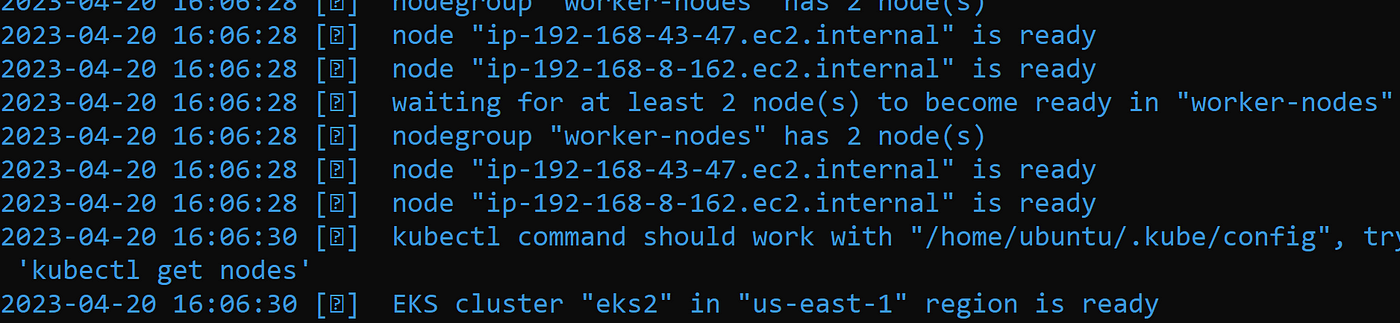
Here is the eksctl command. Now, sit back and relax as it will take time to make this cluster. It took me close to 20 minutes.
eksctl create cluster --name eks2 --version 1.24 --region us-east-1 --nodegroup-name worker-nodes --node-type t2.medium --nodes 2 --nodes-min 2 --nodes-max 3It took me 20 minutes to complete this EKS cluster.
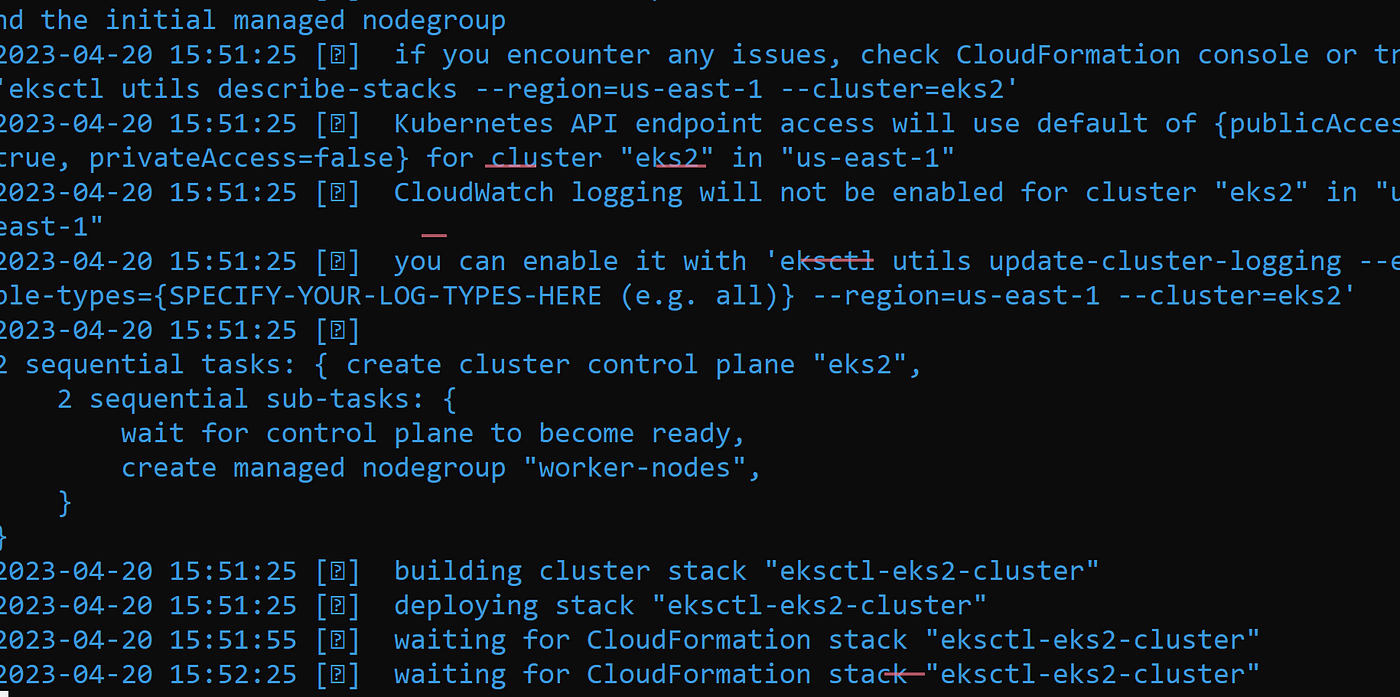
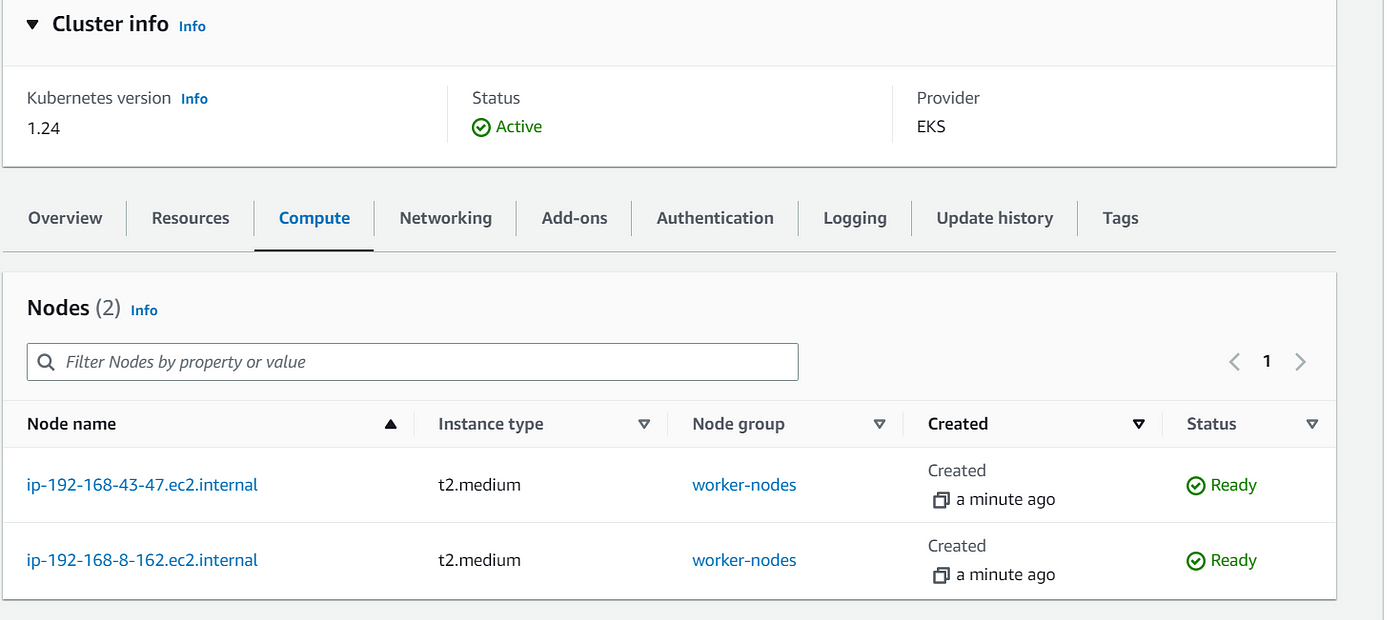
Now, when you goto your AWS Console, you will see the EKS and Worker Nodes created under Compute

5G) Set up IAM Role for Service Accounts
The controller runs on the worker nodes, so it needs access to the AWS ALB/NLB resources via IAM permissions. The IAM permissions can either be setup via IAM roles for ServiceAccount or can be attached directly to the worker node IAM roles.
1- your account id
2- Set the below values to your default AWS region,
3- EKS cluster name
AWS_ACCOUNT_ID=YOUR_ACCOUNT_ID_HERE
AWS_REGION=YOUR_AWS_REGION_HERE
EKS_CLUSTER_NAME=YOUR_EKS_CLUSTER_NAME_HERE

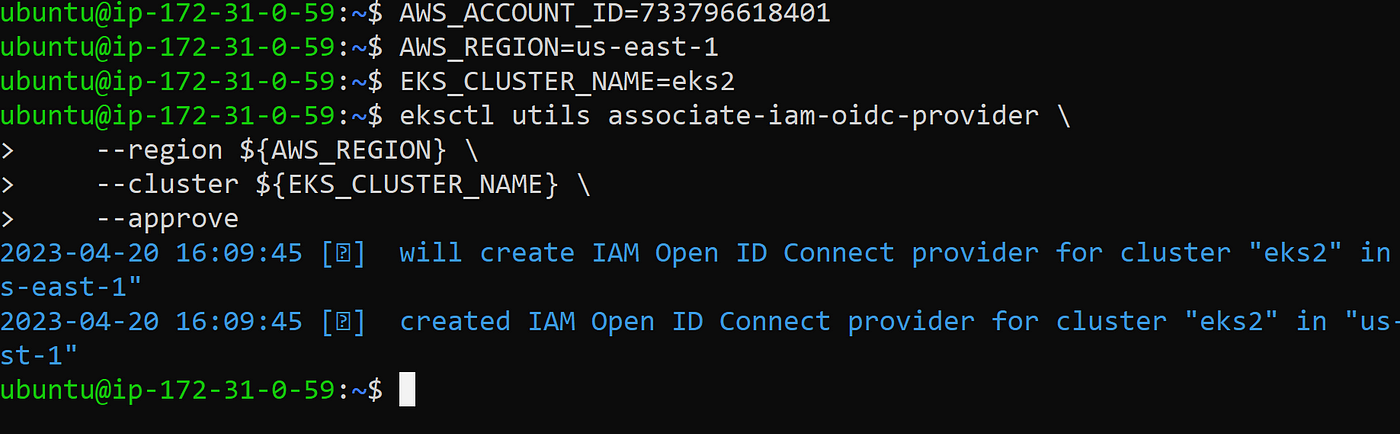
Create IAM OIDC provider
eksctl utils associate-iam-oidc-provider \
    --region ${AWS_REGION} \
    --cluster ${EKS_CLUSTER_NAME} \
    --approve
Download IAM policy for the AWS Load Balancer Controller using curl
curl -fsSL -o iam-policy.json https://raw.githubusercontent.com/kubernetes-sigs/aws-load-balancer-controller/v2.4.0/docs/install/iam_policy.json
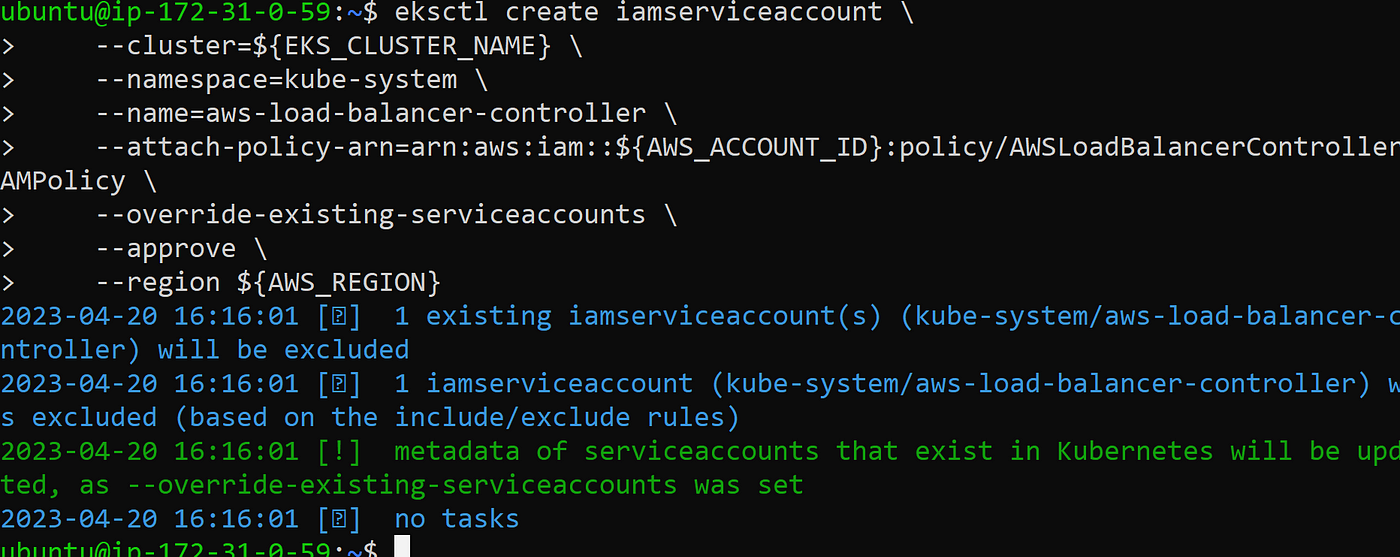
Create a IAM role and ServiceAccount for the AWS Load Balancer controller using eksctl tool
eksctl create iamserviceaccount \
    --cluster=${EKS_CLUSTER_NAME} \
    --namespace=kube-system \
    --name=aws-load-balancer-controller \
    --attach-policy-arn=arn:aws:iam::${AWS_ACCOUNT_ID}:policy/AWSLoadBalancerControllerIAMPolicy \
    --override-existing-serviceaccounts \
    --approve \
    --region ${AWS_REGION}
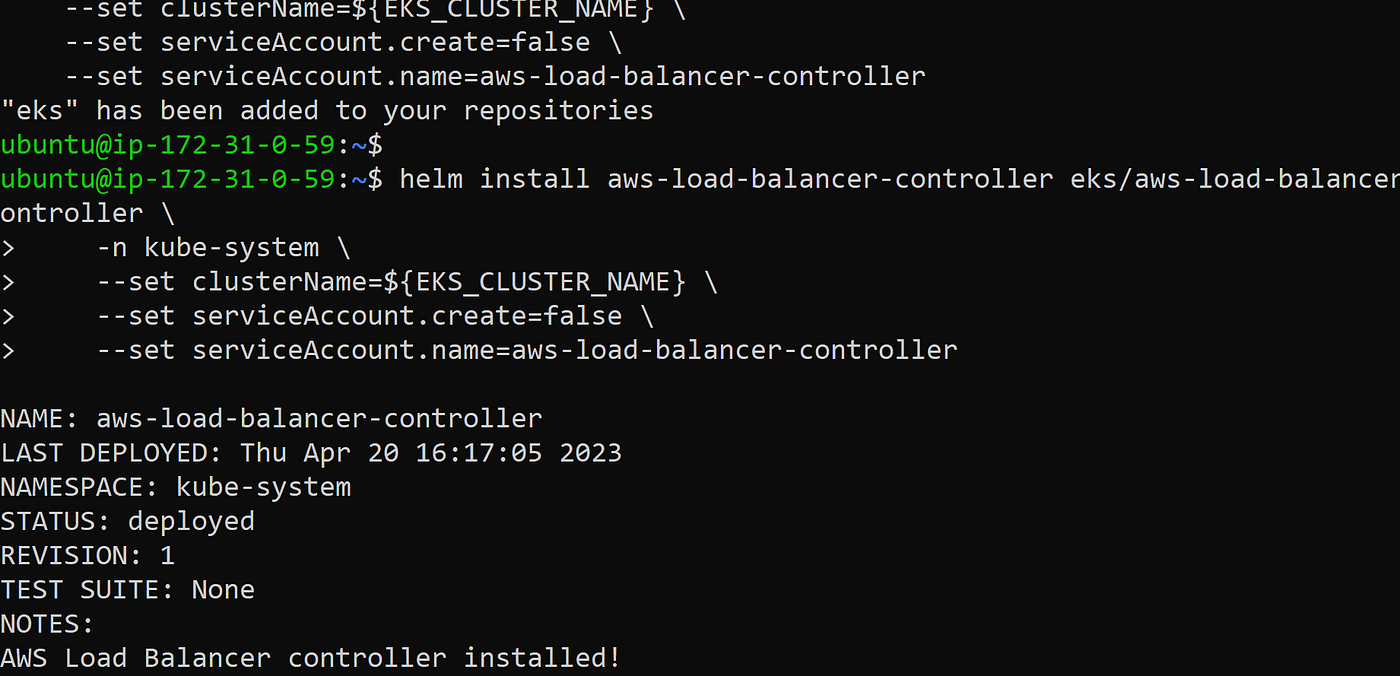
Install the helm chart by specifying the chart values
helm repo add eks https://aws.github.io/eks-charts

helm install aws-load-balancer-controller eks/aws-load-balancer-controller \
    -n kube-system \
    --set clusterName=${EKS_CLUSTER_NAME} \
    --set serviceAccount.create=false \
    --set serviceAccount.name=aws-load-balancer-controller
The output would look like this
Verify that the AWS Load Balancer controller is installed.
kubectl get deployment -n kube-system aws-load-balancer-controller
The output would look like this

5H) Install Argo CD Operator
ArgoCD is a widely-used GitOps continuous delivery tool that automates application deployment and management on Kubernetes clusters, leveraging Git repositories as the source of truth. It offers a web-based UI and a CLI for managing deployments, and it integrates with other tools. ArgoCD streamlines the deployment process on Kubernetes clusters and is a popular tool in the Kubernetes ecosystem.
You can refer to this URL https://argo-cd.readthedocs.io/en/stable/
The Argo CD Operator manages the full life cycle of Argo CD and its components.
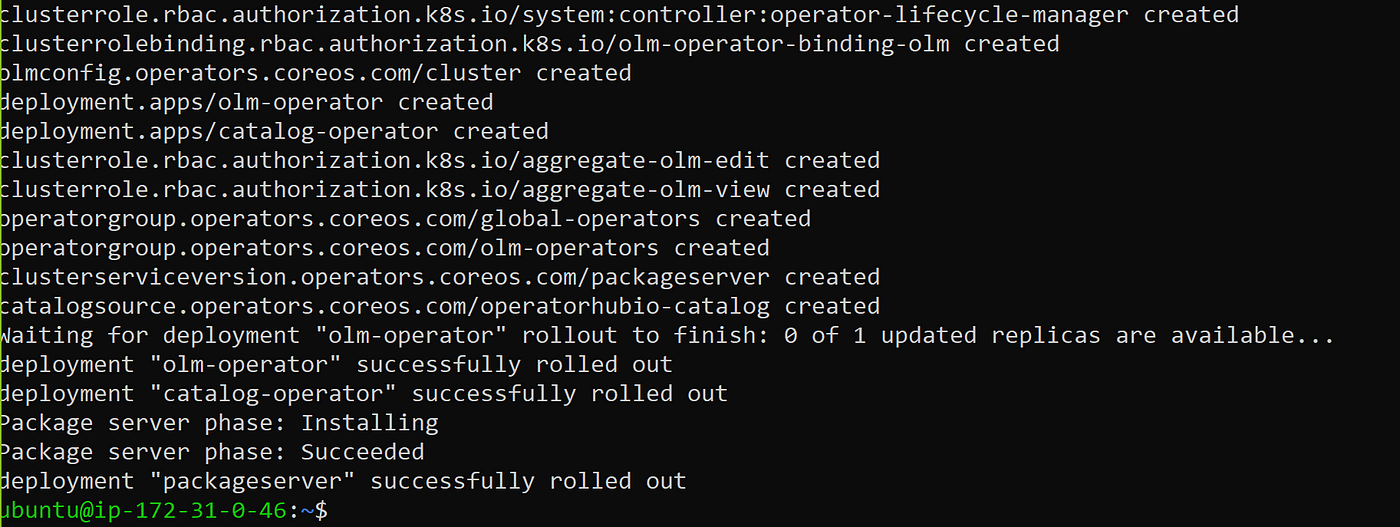
curl -sL https://github.com/operator-framework/operator-lifecycle-manager/releases/download/v0.24.0/install.sh | bash -s v0.24.0
kubectl create -f https://operatorhub.io/install/argocd-operator.yaml
kubectl get csv -n operators
kubectl get pods -n operators


Goto URL https://argocd-operator.readthedocs.io/en/latest/usage/basics/
The following example shows the most minimal valid manifest to create a new Argo CD cluster with the default configuration.
Create argocd-basic.yml with the following content.
apiVersion: argoproj.io/v1alpha1
kind: ArgoCD
metadata:
  name: example-argocd
  labels:
    example: basic
spec: {}
Then using these below commands you can get the details
kubectl apply -f argocd-basic.yml
kubectl get pods
kubectl get svc
kubectl edit svc example-argocd-server
kubectl get secret
The output would look like this


LoadBalancer services are useful for exposing pods to external traffic where clients have network access to the Kubernetes nodes.
And change the spec.type from ClusterIP to LoadBalancer using below command . Save it.
kubectl edit svc example-argocd-server
The output would look like this
Next, we need to get password for our Argo CD Operator
kubectl get secret
kubectl edit secret example-argocd-cluster

Copy admin.password
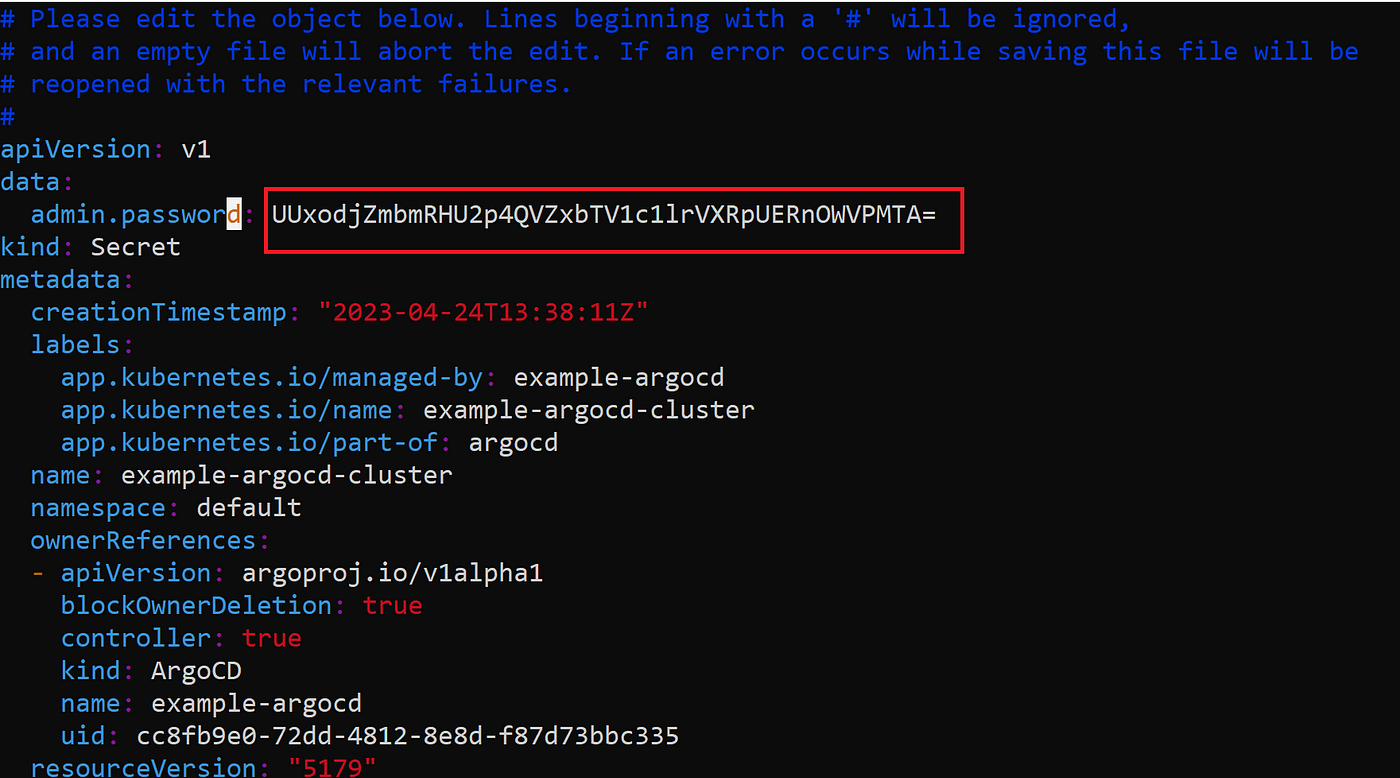
echo <admin.password> | base64 -d

5I) Deploy Sample application
Take the LoadBalancer link and open it in your browser. Click on Advanced ==> then click on the bottom link.
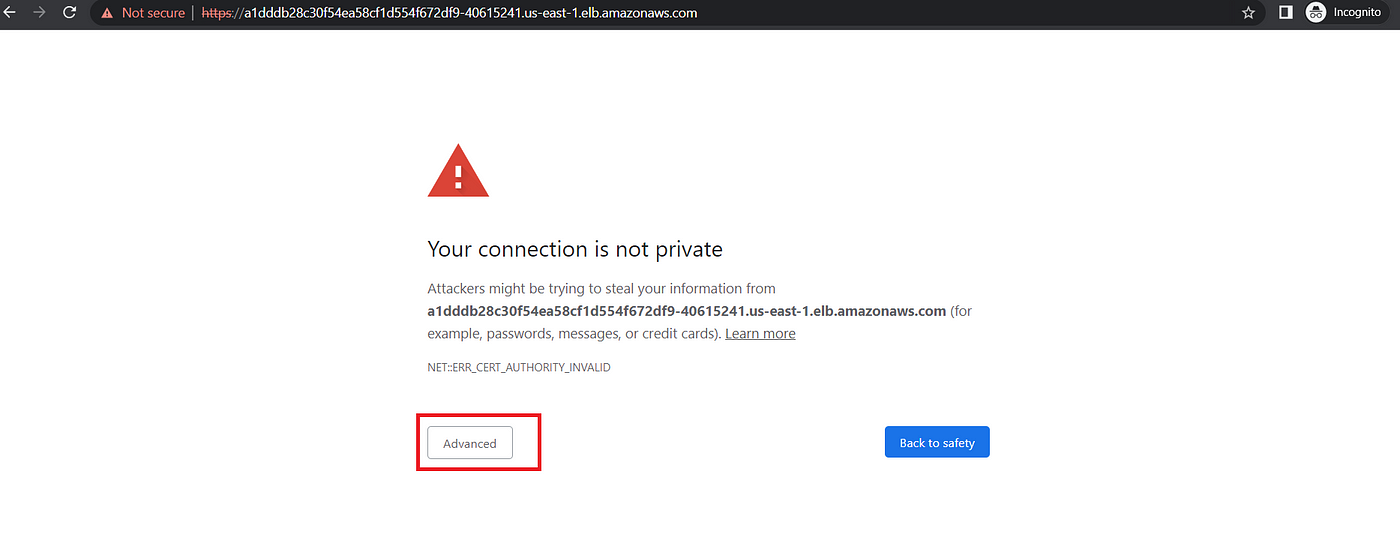
Username: admin
Password: QLhv6fndGSjxAVqm5usYkUtiPDg9eO10
We will use the Argo CD web interface to run sprint-boot-app.
Set up Github Repository manifest and Kubernetes cluster.
Enter details for your Deployment repository.
Application Name: test
Project Name: default
SYNC POLICY: Automatic
Repository URL: https://github.com/CharanKumar93/Jenkins-Zero-To-Hero
Path: java-maven-sonar-argocd-helm-k8s/spring-boot-app-manifests
Cluster URL: https://kubernetes.default.svc
Namespace: default
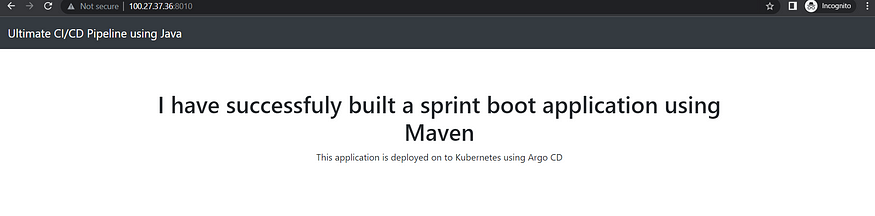
Argo CD is a Kubernetes controller, responsible for continuously monitoring all running applications and comparing their live state to the desired state specified in the Git repository.
We have successfully deployed our Spring Boot App using Argo CD.
5J) Clean up/Deprovision cluster
Delete EKS cluster with following command.
eksctl delete cluster --name eks2
Hope you found this useful. Follow me for projects and more content on DevOps. Thank you🙏
References
GithHub Link — https://github.com/CharanKumar93/Jenkins-Zero-To-Hero
Subscribe to my newsletter
Read articles from Charan kumar directly inside your inbox. Subscribe to the newsletter, and don't miss out.
Written by
Charan kumar
Charan kumar
Devops engineer at Acro Computing India. Skilled in Git, Ansible, Jenkins, Docker, Kubernetes.