Chronicling Achievement: How to Craft a Persistent Leaderboard System in Godot 4.0.1
 Efehi Idubor

Gaming culture and high competitiveness have been a package deal for decades now. The desire to excel, outperform one’s opponents and claim victory in whichever form - an esports trophy, last man alive in online multiplayer, or No. 1 on a leaderboard - has shaped the way games are designed, played, and experienced for the longest. But before robust trophy systems and massive tournaments, as early as the ’70s, games like the 1978 arcade classic “Space Invaders” had built-in high score systems, a persistent leaderboard that would record and display the player's score at the end of each game session and rank them against other players’ performance. This simple but effective system sparked a competitive spirit among players and drove them to score high as possible so they could leave their mark on the machine's leaderboard.
In this article, I’ll be guiding you through setting up a retro-style, persistent Leaderboard system for your beginner Godot project. We’ll cover:
Capturing players’ names/aliases and highscores.
Implementing a save/load system that ensures highscores persist across gaming sessions.
Setting up UI elements that will display the highscores in a list to the player.
To illustrate, I’ll be using my game ‘Hopjumper’, a flappy bird clone with a retro, sci-fi vibe to it, written in GDScript. I’ll show you the following:
How player names and highscores are captured and stored.
How the highscores are ordered in descending order.
How the highscores are saved to disk and retrieved on command (made persistent).
How the scores are drawn to a ‘High Scores’ UI, accessible at the push of a button.
Rudimentary knowledge of Godot's Scene Tree system and GDScript(ing) is assumed for this article. Let’s get right into it.
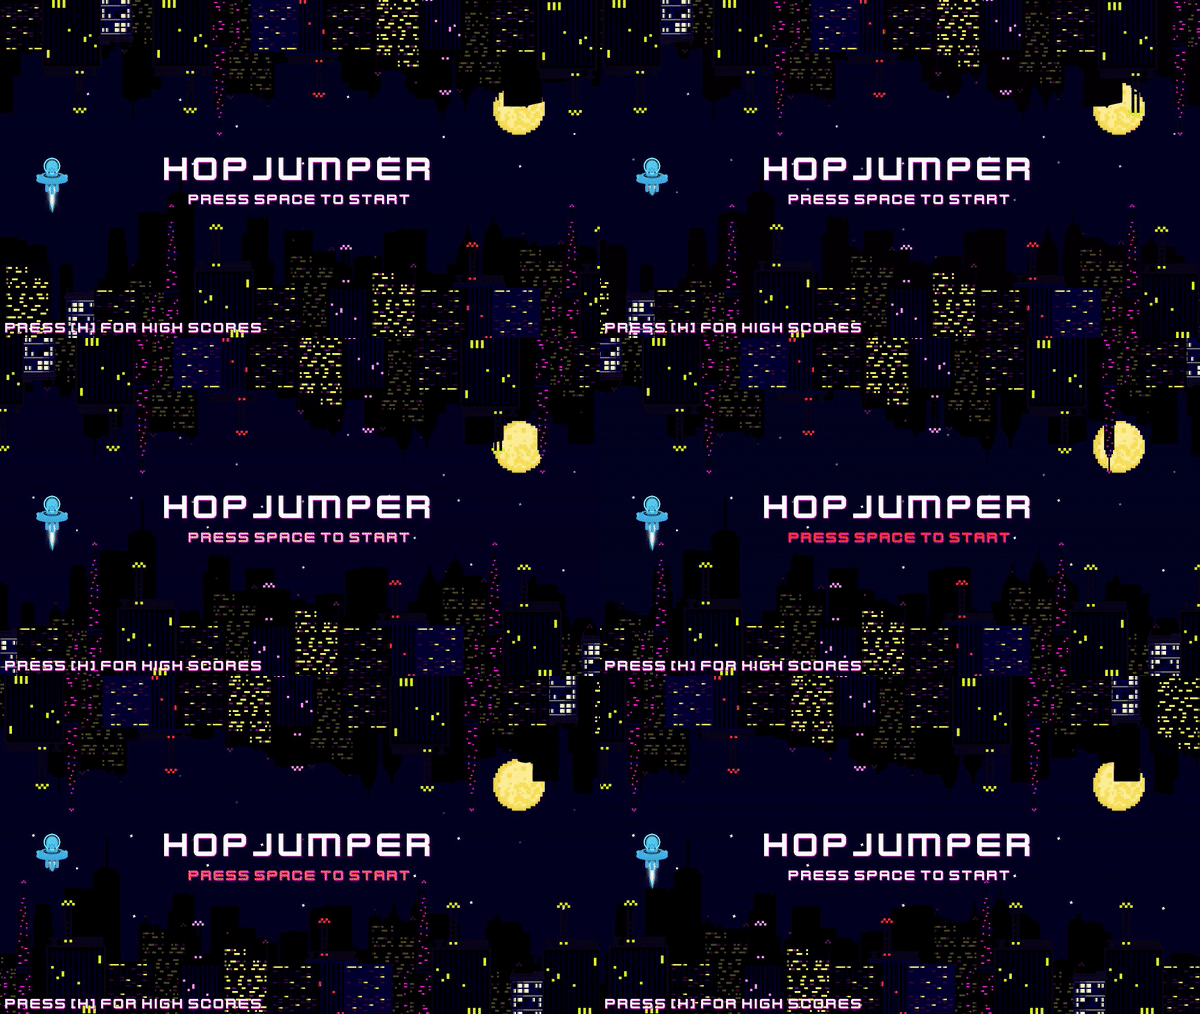
Capturing Player Highscore
Nobody goes to arcades anymore, and an account is required for everything these days, so needing to enter your name after breaking a record isn’t situation modern gamers are often confronted with – the system already knows who you are. But it’s the 80s, and a stranger just beat the high score of your notoriously difficult game - we must have a name. Follow the steps below:
Declare a dictionary variable
Before taking highscores, we need a place to store them. In your main script, declare a ‘highscores’ variable and set its type to ‘Dictionary’, like so
var highscores: Dictionary
It’s preferable to save your high scores to a dictionary because each key-value pair can hold the player’s name as the key and their score as the value.
Store the player’s name and score
Write an update_highscores() function that takes the player’s name as a string from a player-facing UI element, such as the LineEdit node. Hopjumper has a retro-style 3-character input interface.
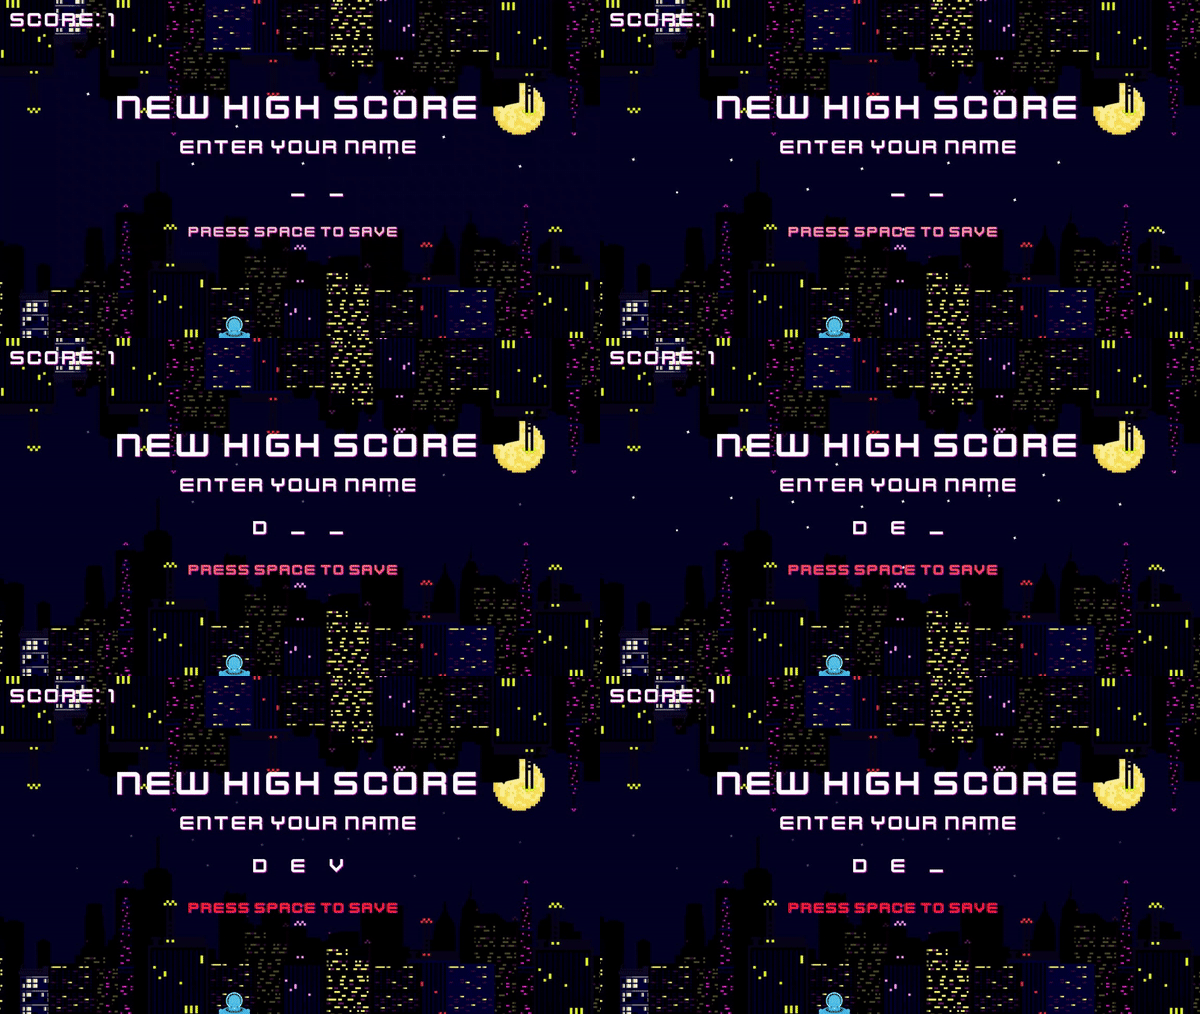
The function should then pass the player’s name into highscores as the ‘key’ in the key-value pair, and the score set by the high-scoring player as the ‘value’, creating a new entry. Like so:
func update_highscores(player_name):
    var name = player_name
    var score = player_high_score
    highscores[name] = score
update_highscores() should ordinarily be called at any point in the gameplay loop/script after the player has clocked a high score and entered/saved their name.
Set a highscore list limit
Hopjumper admits only the top 10 highscores into highscores at any given time. This upper limit is by no means mandatory, and you may opt to set the maximum number of entries in your highscores dictionary to a higher number or do away with an upper limit entirely.
To restrict highscores to only the top 10 highscores, write a while loop that will:
Execute only when the number of entries in our
highscoresexceeds 10 (or any number of your choosing).Iterate over the value (score) in each key-value pair to find the lowest score.
Delete the key-value pair with the lowest score from
highscoresRepeat until there are only 10 entries left in the dictionary.
 while highscores.size() > 10:
         var lowest_value: int = 100
         for entry in high_scores:
             if highscores[entry] < lowest_value:
                 lowestvalue = highscores[entry]

         for logged in highscores:
             if highscores[logged] == lowest_value:
                 highscores.erase(logged)
Note that the while loop above should be nested within the update_highscores() function.
Order the highscores list
Arranging the list of high scores in descending order is necessary to ensure that the highest score, the highest after that, and so on, are displayed at the top of the list when it comes time draw the highscores to your game’s highscore UI.
To do this, we’ll simply define a order_highscores() function that takes highscores as its lone argument and does the following:
Defines an empty dictionary-type variable named 'ordered_dict' in which the ordered list of highscores will be stored.
Passes a copy of the
highscoresto anoriginal_dictvariable for use in-function.Iterates over each key-value pair in
original_dict.Passes the key-value pair with the highest value into
ordered_dict.Deletes the just-passed key-value pair from
original_dict.Repeats steps 2 through 3 until
ordered_dictis populated with all the entries fromoriginal_dictin descending order; andReturns
ordered_dict.func order_highscores(score: Dictionary) -> Dictionary: var original_dict: Dictionary = highscores.duplicate() var ordered_dict: Dictionary for i in original_dict.size(): var highest_score: int = 0 for entry in original_dict: if original_dict[entry] > highest_score: highest_score = original_dict[entry] ordered_dict[original_dict.find_key(highest_score)] = highest_score original_dict.erase(original_dict.find_key(highest_score)) return ordered_dict
Now that our highscores is ready, it’s time to save it to disk so that it persists across game sessions. Things get interesting from this point on, so strap in.
Implementing a Persistent Load/Save System
Our highscore list wouldn’t be much use to anyone if it reset to empty after every session - our game would have to run forever for us to be able to use the list as intended. The highscore data needs to be saved on disk so that it’s available to update and populate highscores the next time we run the game. To do so, we’ll be using the ‘Resource’ class in Godot.
A Resource can be described as the fundamental building block for managing and representing data assets within the game engine, It serves as a base class for various types of resources, such as textures, sounds, scripts, scenes etc., and importantly, can be used to encapsulate data that can be loaded, instantiated, and manipulated within Godot.
We’ll begin by creating a new script that extends the Resource class. Follow these steps:
Go to the filesystem dock in Godot and right-click on the
res://folder, click on ‘New’ and create a new folder – name this folder ‘Resources’.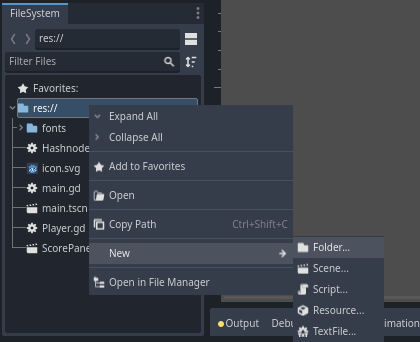
Right-click on the new ‘Resources’ folder, click ‘New’ and select ‘Script’ - the ‘Create Script’ dialog will appear.
Find the ‘Inherits’ input field, it is likely set to ‘Node’ by default. Clear the field and type in ‘Resource’ to set the script to inherit from the
Resourceclass.Give the script a suitable name, such as ‘save_game.gd’ and click ‘Create’
You should now have a script that looks like this:
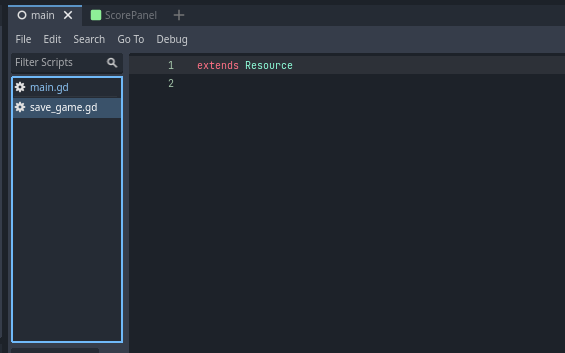
Next, we’ll assign our new Resource script a class_name and set it up to hold our highscore data. Do the following:
Define the script’s class name using the class_name keyword and set it to ‘SaveGame’.
Declare and export a ‘highscores’ variable with its type class set to ‘Dictionary’.
 extends Resource
 class_name SaveGame

 @export var highscores: Dictionary
Now that our save_game resource is set up; we’ll implement the resource management functionality that will handle saving and loading the resource’s data to and from disk on command – we’ll do this in our main script. We’ll be defining two separate functions, save_game() and load_game(), which will use the ResourceSaver and ResourceLoader utility classes, respectively, to achieve persistence.
First things first, however, we need a new instance of the SaveGame class and a place to save it. Follow these steps:
In your
main, create a new instance of theSaveGameobject by calling the.new()method on theSaveGameclass.Define a
gameSavevariable and pass theSaveGameinstance to it.var gameSave = SaveGame.new()Define a
save_pathvariable and pass it a path as a string, complete with a file name and appropriate file extension – in this case ‘.tres’. To specify our] save path, we’ll be using the “user://” path (as opposed to 'res://'), a special path in Godot that points to a directory dedicated to storing user-specific data and provides a convenient and platform-independent way to access user-specific files.var save_path = "user://scoresave.tres"
Now to define the save and load functions. We’ll start with save_game().
In your save_game() function. call the .save() method of the ResourceSaver class and pass the following as its arguments:
the
gameSaveobject instantiated earlier; andthe
save_pathfunc save_game(): ResourceSaver.save(gameSave, save_path)
Next, we’ll define the load_game() function. Before attempting to load the save file from disk, however, it’s good practice to check to see if the file exists at the path we’re trying to load from. Where the file is nonexistent, we could print an error message to the console.
First, we'll check if the file exists using an if condition by calling the .file_exists() method on the FileAccess class and passing save_path as its lone argument. This function call returns a bool value of true or false depending on the existence or otherwise of the file at save_path.
Next, where the if condition above returns true, implement the load functionality as follows:
Call the
.load()method of theResourceLoaderclass and passsave_pathas its lone argument – this returns thegameSaveresource saved to disk.Call the
.duplicate()method on the resource just loaded by suffixing it with the.load()call to create a copy of the resource.Assign the resource to the
gameSaveproperty[1]
If the file does not exist, print an error message to the console with that information.
func load_save():
    if FileAccess.file_exists(save_path):
        gameSave = ResourceLoader.load(save_path + save_name).duplicate(true)
        high_scores = gameSave.high_scores
    else:
        printerr('No save file found at path')
That should do it! Now we have a persistent save/load system. Remember that your high scores will only save and load if the save_game() and load_game() functions are called appropriately. Ideally, the load function should be called at runtime, in the _ready() function; the save function should be called when a new highscore is added to highscores.
Next, we’ll set up the UI elements that will take our highscores list and display them to the player on command.
Setting Up the Highscore UI
This part of the process has less to do with code and more to do with engaging with Godot’s robust Scene Tree system. What we’re going for is an interface that displays all of the current highscores in a list that players can view and scroll through. Let’s begin.
We’ll start by creating a heads-up display (HUD) node. This node will be the parent node for all UI elements for this guide. To set up the HUD node and its children, follow these steps:
Add a
CanvasLayernode as a child of your main scene, and rename it to ‘HUD’.Add a
Panelnode as a child ofHUD– search for 'panel' in the ‘Create New Node’ dialog – and rename it to ‘HighscorePanel’.Add a
Labelnode as a child ofHighscorePanel– this node will hold the highscore UI’s title banner.Set the
Labelnode’s text value to ‘High Scores’ in the Inspector dock at the right side of the window.Add a
ScrollContainernode as a child ofHighscorePanel, like you did theLabel(You might get a configuration warning saying this node is “intended to work with a single child control”, we’ll fix that in the next step).Finally, add a
VBoxContainernode as a child ofScrollContainer– this node will hold the scrollable list of highscores.
When you’re done, your scene tree should look like this:
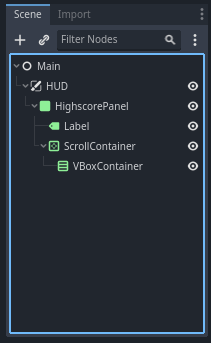
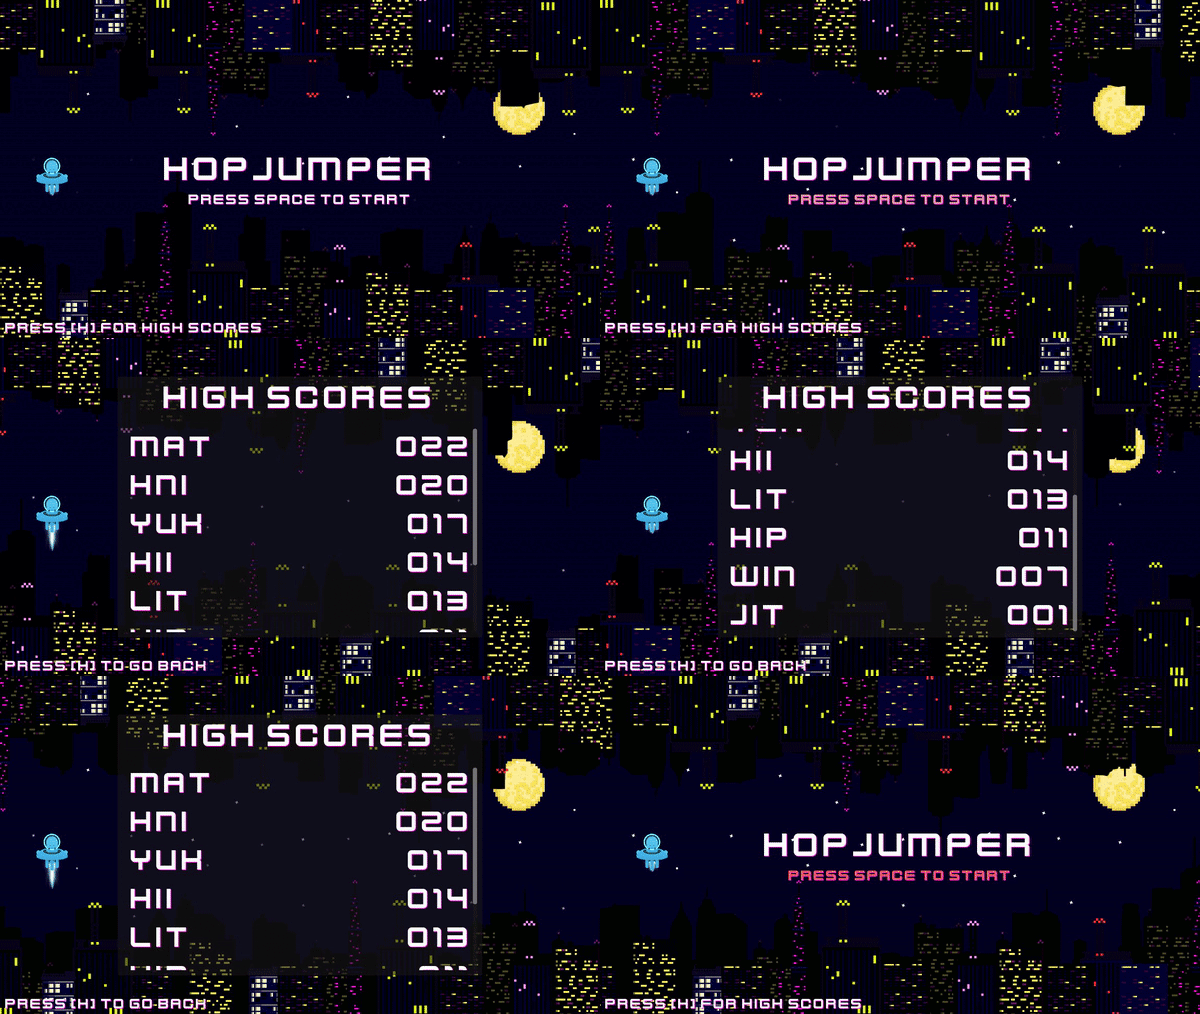
At this point, you’ll want to head over to the 2D tab in the engine and adjust the dimensions and position of the nodes you just created within the scene's viewport to match your vision for your game’s UI. Be sure to consider readability in your arrangement to make the UI as accessible as possible to the player. Here’s Hopjumper’s highscore UI design for reference:
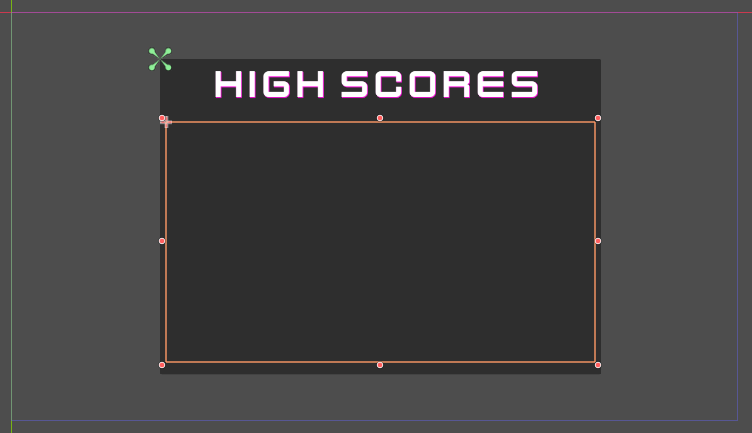
Our highscore UI panel is ready now, but empty. What it needs is yet another UI element (Panel) that will hold a player’s name and highscore, and draw them to the HUD node, inside the VBoxContainer. It will look something like this:
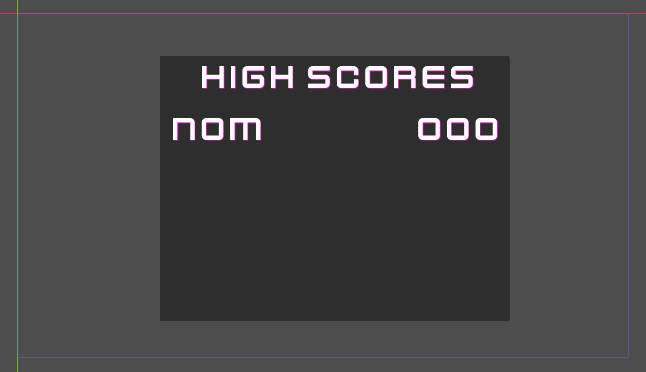
Note that because our highscore UI only needs to display as many list items as there are high scores, we need only ‘create’ and add as many Panel nodes as we need to display the available highscores. To achieve this functionality, we’ll create a new scene in our project that will be composed of a parent Panel node and two child Label nodes that will hold the player’s name and score, respectively. Follow these steps:
Create a new scene in your project and name it ‘ScorePanel”.
Add a Panel node from the “Create New Node” dialog.
Add two
Labelchild nodes toPanel- rename the first one to ‘Name’ and the second to ‘Score’. Your scene tree should look like this: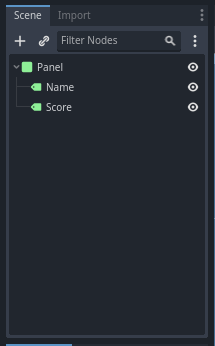
In alignment with the style of your Highscore UI, adjust the dimensions of your
PanelNode such that it fits within VBoxContainer in your HUD scene tree.Adjust the dimensions of your
Labelnodes, in turn, to fit within theScorePanelscene’sPanelnode, offset to the left and right sides ofPanel(you may set their text properties to a default value for now). Your scene should look something like this: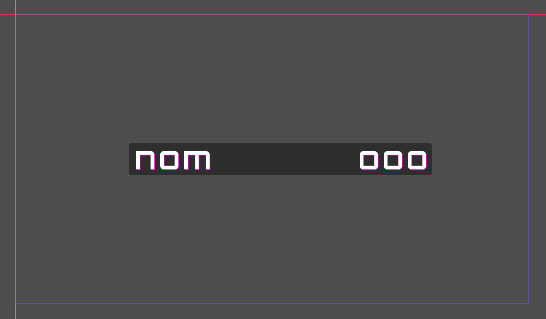
Save the scene.
Now, for a final bit of code to tie it all together. What we need is a draw_highscores_to_ui() function that, when called, deletes or ‘frees’ all ScorePanel nodes in the highscore UI and redraws them using data from the loaded save, to ensure that the list is always updated. Specifically, the function will do the following:
Take the
highscoresdictionary, loaded from disk, as its lone argument.Clear all current
ScorePanelnodes drawn to the highscore UI.Instantiate a new
ScorePanelScene for each key-value pair in the dictionary.Set the
Namenode’s text to the pair’s key.Set the
Scorenode’s text to the pair’s value.Add the
ScorePanelas a child node ofVBoxContainerin theHUDtree.
Follow these steps to implement this functionality:
Declare and export a ‘score_panel_scene’ variable in your main script and set its type to the
PackedSceneclass. This variable will hold a reference to ourScorePanelscene for instantiation.@export var score_panel_scene: PackedSceneDefine a
draw_highscores_to_ui()function.In this function, write a
forloop that iterates through theVBoxContainernode’s children and callsqueue_free()on each one to delete them.func draw_highscores_to_ui(highscores): for i in $VBoxContainer.get_child_count(): if get_child(i) != null: $VBoxContainer.get_child(i).queue_free()Write another
forloop that, for each key-value pair in thehighscores, does the following:Instantiates a new
ScorePanel.Assigns the key-value pair’s values to the
NameandScorelabels of the instantiatedScorePanelaccordingly; andAdds the
ScorePanelas a child node ofVBoxContainer.
    func draw_highscores_to_ui(highscores):

        //Code that clears VBoContainer goes here//

        for entry in highscores:
            var score_panel = score_panel_scene.instantiate()
            score_panel.get_child(0).text = entry
            score_panel.get_child(1).text = str(highscores[entry]).pad_zeros(3)
            $VBoxContainer.add_child(score_panel)
- Find your
ScorePanelscene in the FileSystem dock, it should be saved as a.tscnfile. Drag & drop it into your main script’sscore_panel_sceneproperty field in the Inspector dock.
Like before, it’s advisable to call draw_highscores_to_ui() in the _ready() function and at any point where highscores is updated or saved.
That should do it. With the player data capture, save/load functionality, and UI elements we’ve covered in this article set up properly, you should be able to store player highscore data, make it persistent across game sessions, and display it to the player via the highscore UI.
Conclusion
Game development, I believe, is, at its core, about problem-solving. This guide is meant to provide a simple foundation upon which you can build much more complex, and elegant systems for player data management and presentation – beyond just highscore numbers. I hope you’ve learned a thing or two about using Godot’s flexible tools to actualize your vision for your game or project. Keep learning and experimenting!
[1]While the gameSaveproperty holds a fresh instance of the SaveGame class at runtime, a successful load overwrites it with the loaded save, making it ready for use in the current session.
Subscribe to my newsletter
Read articles from Efehi Idubor directly inside your inbox. Subscribe to the newsletter, and don't miss out.
Written by

Efehi Idubor
Efehi Idubor
A game developer with a passion for creating immersive worlds and captivating interactive experiences, and a skilled writer adept at clearly communicating technical topics.