How to Build a RSS Reader with Hanami Framework
 Carlos Armando Marcano Vargas
Continuing learning about Ruby and Hanami. In this article, we are going to build a Full Stack application using the Hanami framework and React.
The project we are going to build is an RSS feed reader website. I take the idea from the list of projects on codementors.io.
The requirements will be slightly different from the ones listed in the description of the project.
Our project will have the following features:
The user can input an RSS feed URL.
The reader will display the title and link of the original content.
Also, the app will allow the user can add more than one RSS feed URL.
What is a RSS feed URL?
According to the article "How Do RSS Feeds Work" published in rss.com. RSS refers to files easily read by a computer called XML files that automatically update information.
This information is fetched by a user’s RSS feed reader that converts the files and the latest updates from websites into an easy-to-read format.
For example, if we go to any blog profile we can see this logo:

If we right-click on that button and copy the link: we would have something like this:
https://carlosmv.hashnode.dev/rss.xml
What we going to do with that link is use it in our application to receive updates from the blog. To achieve this we will use the Hanami framework to build the application, and an RSS parser to parse the URL and get the information.
Hanami
Hanami is a Ruby framework designed to create software that is well-architected, maintainable and a pleasure to work on.
Hanami is a full-stack Ruby web framework. It's made up of smaller, single-purpose libraries.
This repository is for the full-stack framework, which provides the glue that ties all the parts together:
Hanami::Router - Rack-compatible HTTP router for Ruby
Hanami::Controller - Full-featured, fast and testable actions for Rack
Hanami::View - Presentation with a separation between views and templates
Hanami::Helpers - View helpers for Ruby applications
Hanami::Mailer - Mail for Ruby applications
Hanami::Assets - Assets management for Ruby
These components are designed to be used independently or together in a Hanami application.
Requirements
Ruby installed
PostgreSQL installed
Installing Hanami
Hanami supports Ruby (MRI) 3.0+
gem install hanami
Creating a Hanami Project
hanami new feed-reader
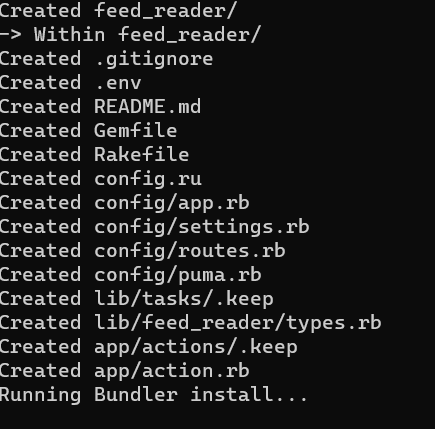
Project structure
cd feed-reader
tree .
.
├── Gemfile
├── Gemfile.lock
├── Guardfile
├── README.md
├── Rakefile
├── app
│   ├── action.rb
│   └── actions
├── config
│   ├── app.rb
│   ├── puma.rb
│   ├── routes.rb
│   └── settings.rb
├── config.ru
├── lib
│   ├── feedreader
│   │   └── types.rb
│   └── tasks
└── spec
    ├── requests
    │   └── root_spec.rb
    ├── spec_helper.rb
    └── support
        ├── requests.rb
        └── rspec.rb

9 directories, 16 files
bundle
bundle exec hanami server
If you are using a Windows machine, is possible to receive the following message in your command line:

To solve this issue, we have to open the project with a code editor and make some changes in the gemfile and config/puma.rb file.
gemfile
In the gemfile we have to add the line gem 'wdm', '>= 0.1.0' if Gem.win_platform?
# frozen_string_literal: true

source "https://rubygems.org"

gem "hanami", "~> 2.0"
gem "hanami-router", "~> 2.0"
gem "hanami-controller", "~> 2.0"
gem "hanami-validations", "~> 2.0"

gem "dry-types", "~> 1.0", ">= 1.6.1"
gem "puma"
gem "rake"
#Here we add the line:
gem 'wdm', '>= 0.1.0' if Gem.win_platform?

group :development, :test do
  gem "dotenv"
end

group :cli, :development do
  gem "hanami-reloader"
end

group :cli, :development, :test do
  gem "hanami-rspec"
end

group :development do
  gem "guard-puma", "~> 0.8"
end

group :test do
  gem "rack-test"
end
Then, we go to config/puma.rb.
puma. rb
In this file, we have to comment on the line workers ENV.fetch("HANAMI_WEB_CONCURRENCY", 2), according to this issue on Puma's GitHub page.
# frozen_string_literal: true

max_threads_count = ENV.fetch("HANAMI_MAX_THREADS", 5)
min_threads_count = ENV.fetch("HANAMI_MIN_THREADS") { max_threads_count }
threads min_threads_count, max_threads_count

port        ENV.fetch("HANAMI_PORT", 2300)
environment ENV.fetch("HANAMI_ENV", "development")
# workers     ENV.fetch("HANAMI_WEB_CONCURRENCY", 2)

on_worker_boot do
  Hanami.shutdown
end

preload_app!
Now, we try again.
bundle
bundle exec hanami server

We go to localhost:2300 in our browser.

Building the app
Now, let's go to config/routes.rb .
module FeedReader
  class Routes < Hanami::Routes
    root { "Hello from Hanami" }
  end
end
As the documentation says, Hanami provides a fast, simple router for handling HTTP requests.
Your application’s routes are defined within the Routes class in config/routes.rb
Each route in Hanami’s router is comprised of:
An HTTP method (i.e.
get,post,put,patch,delete,optionsortrace).A path.
An endpoint to be invoked.
Endpoints are usually actions within your application, but they can also be a block, a Rack application, or anything that responds to #call.
# Invokes the FeedReader::Actions:Feeds::Index action
get "/feeds", to: "feeds.index"

# Invokes the FeedReader::Actions:Feeds::Create action
post "/feeds", to: "feeds.create"
get "/rack-app", to: RackApp.new
get "/my-lambda", to: ->(env) { [200, {}, ["A Rack compatible response"]] }
To add a full set of routes for viewing and managing our feeds, you can either manually add the required routes to your config/routes.rb file, or use Hanami’s action generator, which will generate actions in addition to adding routes for you.
$ bundle exec hanami generate action feeds.index
$ bundle exec hanami generate action feeds.show
$ bundle exec hanami generate action feeds.new
$ bundle exec hanami generate action feeds.create
$ bundle exec hanami generate action feeds.update
$ bundle exec hanami generate action feeds.destroy
A root method allows you to define a root route for handling GET requests to "/". In a newly generated application, the root path calls a block that returns “Hello from Hanami”. You can instead choose to invoke an action by specifying root to: "my_action". For example, with the following configuration, the router will invoke the home action:
module FeedReader
  class Routes < Hanami::Routes
    root to: "home"
  end
end
Displaying the feed
Let's create a route and a controller to display all the entries in an RSS URL.
bundle exec hanami generate action feeds.index

Now, we go to the config/route.rb file, and we should see that a route for our index action was added.
module FeedReader
  class Routes < Hanami::Routes
    root { "Welcome to Feed Reader" }
    get "/feeds", to: "feeds.index"
  end
end
The FeedReader module contains the Routes class, which inherits from Hanami::Routes. The root method defines the root route of the web application with a welcome message. The get method defines a route for HTTP GET requests to the /feeds URL, which maps to the index action in the Feeds controller.
Now, we go to app/actions/feeds/index.rb to code our first controller.
module FeedReader
  module Actions
    module Feeds
      class Index < FeedReader::Action

        def my_feed
          feed = {
            "author": "Carlos Marcano",
            "title": "Carlos' Blog",
            "entries": [
              {
                "Entry 1": " link 1",
                "Entry 2": "link 2"
              }
            ]
          }
          return feed
        end

        def handle(*, response)
          feed = my_feed
          response.format = :json
          response.body = feed.to_json
        end
      end
    end
  end
end
The Index class inherits from FeedReader::Action and defines a handle method that takes two arguments: * and response. In Hanami, actions are responsible for receiving incoming HTTP requests, processing the request, and generating an appropriate response.
The my_feed method defines a JSON object with an author, a title, and an array of entries. This method would normally represent the logic for fetching data from a database or API and preparing a feed object to be sent back to the client.
The handle method calls the my_feed method to retrieve the JSON feed object sets the response format to JSON in response.format, and assigns the feed object as the response content in response.body by calling to_json on the feed object.
If we go to of browser and visit the address: localhost:2300/feeds, we should see the following response:

We need the RSS gem to be able to parse RSS feeds, so, we have to add the gem as a dependency.
gemfile
gem 'rss'
Now, we go to lib/feed_reader folder and create a new file, to write the code it will perform the RSS reader.
feed_service.rb
require 'rss'
require 'open-uri'

module Feed
    class Feed

        def initialize(url)
            @url = url
        end

        def get_title
            URI.open(@url) do |rss|
                feed = RSS::Parser.parse(rss)
                @title = feed.channel.title
                return @title
            end
        end

    end
end
The initialize method takes a single argument, url, and initializes an instance variable @url with it. This method sets up the URL that will be used to fetch RSS feed content.
The get_title method parses the RSS feed at the @url using the open-uri and rss standard Ruby libraries.
The URI.open(@url) block opens the URL as a stream and passes it to the RSS::Parser.parse method, which returns an RSS::Rss object. The @title instance variable is then set to the title of the RSS::Rss object.
Finally, the get_title method returns @title.
require 'rss'
require 'open-uri'

module Feed
    class Feed

      ...

        def get_items
            URI.open(@url) do |rss|
                feed = RSS::Parser.parse(rss)
                list_items = []
                feed.items.each do |item|
                    list_items << item.title
                end
                return list_items

            end
        end

    end
end
The get_items method works similarly to the get_title method. It first opens the RSS feed at the @url and parses its content using the open-uri and rss libraries.
It then creates an empty array called list_items and iterates through all the items in the feed using the feed.items.each method. For each item, it adds the title of the item to the list_items array.
Finally, the get_items method returns list_items, which is an array of the titles of all the items in the RSS feed.
require 'rss'
require 'open-uri'


class Feed

    ...

    def get_links
        URI.open(@url) do |rss|
            feed = RSS::Parser.parse(rss)
            array_links = []
            feed.items.each do |item|
                title = item.title
                link = item.link
                array_links << {title:title, link: link}

            end
            return array_links
        end
    end

end
The get_links method opens the URL, parses the RSS feed, and returns an array of hashmaps with the titles and links of every article.
Now, we go to app/actions/feeds/index.rb
# frozen_string_literal: true

require_relative '../../../lib/feed_reader/feed_service'

module FeedReader
  module Actions
    module Feeds
      class Index < FeedReader::Action
        include Feed

        def my_feed
          feed = Feed.new("https://carlosmv.hashnode.dev/rss.xml")
          title = feed.get_title
          entries = feed.get_links

           [{
            "author": "Carlos Marcano",
            "title": title,
            "entries": entries
          }]

        end

        def handle(*, response)
          feed = my_feed
          response.format = :json
          response.body = feed.to_json
        end
      end
    end
  end
end
The include statement adds the Feed module to this class. The Feed module is where is defined in the feed_reader/feed_service file from the lib directory.
The my_feed method is defined to fetch the feed data and return a JSON object containing the author, title, and entries. The handle method calls my_feed and sets the response format to JSON before returning the JSON object.
Now, we start our server again and go to localhost:2300/feeds , we should see the following response:
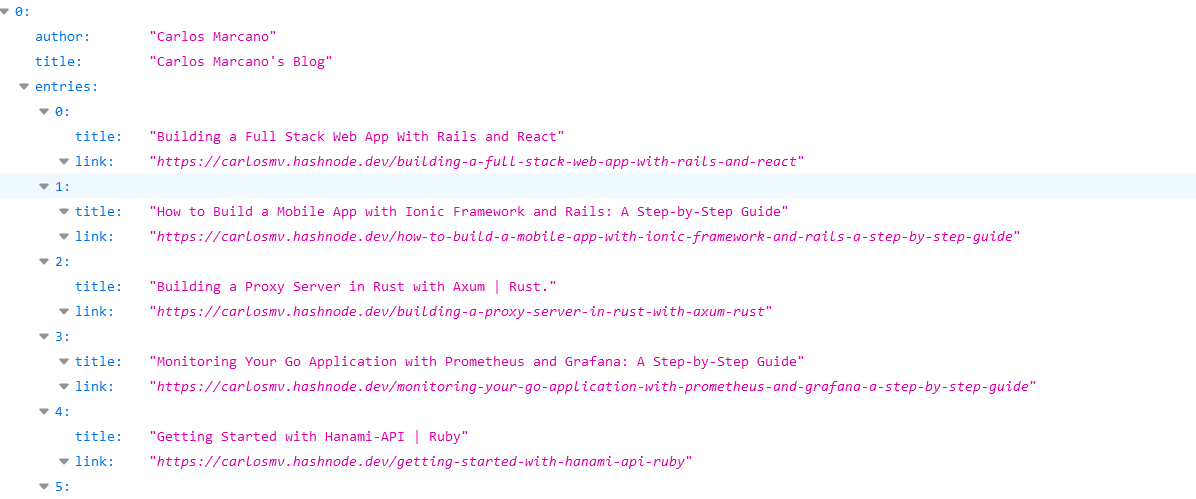
Now, the issue with this, is that the server is parsing always the same RSS URL and displaying its items.
What I want to do, is that the server stores the URL in a Database and displays its items.
To add a database, we are going to use PostgreSQL.
We need to add these dependencies to the gemfile and run bundle install:
# Gemfile
gem "rom", "~> 5.3"
gem "rom-sql", "~> 3.6"
gem "pg"

group :test do
  gem "database_cleaner-sequel"
end
We run bundle in our command line.
And use the following commands:
$ createdb feed_reader_development
$ createdb feed_reader_test
Or you can create a new database using the Postgres Shell:
CREATE DATABASE feed_reader;
According to the documentation, in Hanami, providers offer a mechanism for configuring and using dependencies, like databases, within your application.
Copy and paste the following provider into a new file at config/providers/persistence.rb:
Hanami.app.register_provider :persistence, namespace: true do
    prepare do
      require "rom"

      config = ROM::Configuration.new(:sql, target["settings"].database_url)

      register "config", config
      register "db", config.gateways[:default].connection
    end

    start do
      config = target["persistence.config"]

      config.auto_registration(
        target.root.join("lib/feed_reader/persistence"),
        namespace: "FeedReader::Persistence"
      )

      register "rom", ROM.container(config)
    end
  end
For this persistence provider to function, we need to establish a database_url setting.
Settings in Hanami are defined by a Settings class in config/settings.rb:
# frozen_string_literal: true

module FeedReader
  class Settings < Hanami::Settings
    # Define your app settings here, for example:
    #
    # setting :my_flag, default: false, constructor: Types::Params::Bool
    setting :database_url, constructor: Types::String
  end
end
Settings can be strings, booleans, integers and other types. Each setting can be either optional or required (meaning the app won’t boot without them), and each can also have a default.
You can read more about Hanami’s settings in the Application guide.
Let’s add database_url and make it a required setting by using the Types::String constructor:
.env file
DATABASE_URL=postgres://user:password@localhost:port/feed_reader
Rakefile
Enable rom-rb's rake tasks for database migrations by appending the following code to the Rakefile:
# frozen_string_literal: true

require "hanami/rake_tasks"
require "rom/sql/rake_task"

task :environment do
  require_relative "config/app"
  require "hanami/prepare"
end

namespace :db do
  task setup: :environment do
    Hanami.app.prepare(:persistence)
    ROM::SQL::RakeSupport.env = Hanami.app["persistence.config"]
  end
end
With persistence ready, we can now create a feeds table.
To create a migration, run the following command:
$ bundle exec rake db:create_migration[create_feeds]
Now, we go to db/<timestamp>_create_feeds.db which is the migration file, to define our table.
# frozen_string_literal: true

ROM::SQL.migration do
  change do
  end
end
Now, we change this file, to create our table.
Initially, I want to store the RSS URL in the database, for now.
Here, we define the table, with two fields: Primary key, and rss.
ROM::SQL.migration do
  change do
    create_table :feeds do
      primary_key :id
      column :rss, :text, null: false

    end
  end
end
Now we run the following command to run migrations:
bundle exec rake db:migrate
Then, let’s add a rom-rb relation to allow our application to interact with our feed table. Create the following file at lib/feed_reader/persistence/relations/feeds.rb:
module FeedReader
    module Persistence
      module Relations
        class Feeds < ROM::Relation[:sql]
          schema(:feeds, infer: true)
        end
      end
    end
  end
Now, we run the following command to create a new action:
$ bundle exec hanami generate action feeds.create
This new action is to perform a POST operation and create a new row in the database.
We have to add the body_parser middleware to be able to parse the body of a POST request.
We go to the config/app.rb file and add the line config.middleware.use :body_parser, :json to the App class.
require "hanami/action"

module FeedReader
  class App < Hanami::App
    config.middleware.use :body_parser, :json
  end
end
If we go to config/routes.rb we can confirm that was created a route for the POST request.
# frozen_string_literal: true

module FeedReader
  class Routes < Hanami::Routes
    root { "Welcome to Feed Reader" }

    get "/feeds", to: "feeds.index"
    post "/feeds", to: "feeds.create"
  end
end
We go to app/actions/tasks/create.rb to write how the app should handle a POST request.
# frozen_string_literal: true

# frozen_string_literal: true

module FeedReader
  module Actions
    module Feeds
      class Create < FeedReader::Action
        include Deps["persistence.rom"]


        params do
          required(:feed).hash do
            required(:rss).filled(:string)
          end
        end

        def handle(request, response)

          if request.params.valid?
            feed = rom.relations[:feeds].changeset(:create, request.params[:feed]).commit

            response.status = 201
            response.body = feed.to_json
          else
            response.status = 422
            response.format = :json
            response.body = request.params.errors.to_json
          end
        end
      end
    end
  end
end
One of the classes, Create, is an action that creates a new feed in a database using the values passed in a POST request with a JSON payload.
The include statement pulls in the persistence.rom dependency.
The params block defines the expected format of the POST request payload, which must be a JSON object containing a feed key that has an rss value.
The handle method processes the incoming request payload to create a new feed in the database through the persistence.rom library. If the request is valid, a new feed is created and returned as JSON with a 201 status code. If the request is invalid (e.g. missing required fields), a 422 status code is returned along with a JSON object containing the validation errors.
So far we have an API that can display a list of RSS URLs and able to add RSS URL to the database.
But what about displaying a list of entries or items extracted from the RSS URL?
Let's create an endpoint to display all the entries from a blog.
bundle exec hanami generate action feed_entries.index

# frozen_string_literal: true
require_relative '../../../lib/feed_reader/feed_service'
module FeedReader
  module Actions
    module FeedEntries
      class Index < FeedReader::Action
        include Feed
        include Deps["persistence.rom"]

        def my_feed
          feed = rom.relations[:feeds]
            .select(:rss)
            .to_a

          hash = feed[0]

          rss = hash[:rss].to_s

          entry = Feed.new(rss)

          entries = entry.get_links

           [{

            "entries": entries
          }]

        end

        def handle(*, response)

          entries = my_feed
          response.format = :json
          response.body = my_feed.to_json
        end
      end
    end
  end
end
The Index class includes the Feed module and the persistence.rom dependency. The my_feed method defines the logic to retrieve entries from the RSS feed.
It first queries the database using rom.relations[:feeds] to retrieve the rss feed URL. Then, it initializes a new Feed object with the retrieved URL and calls the get_links method to retrieve the entries from the feed. Finally, it returns the entries as an array of JSON objects.
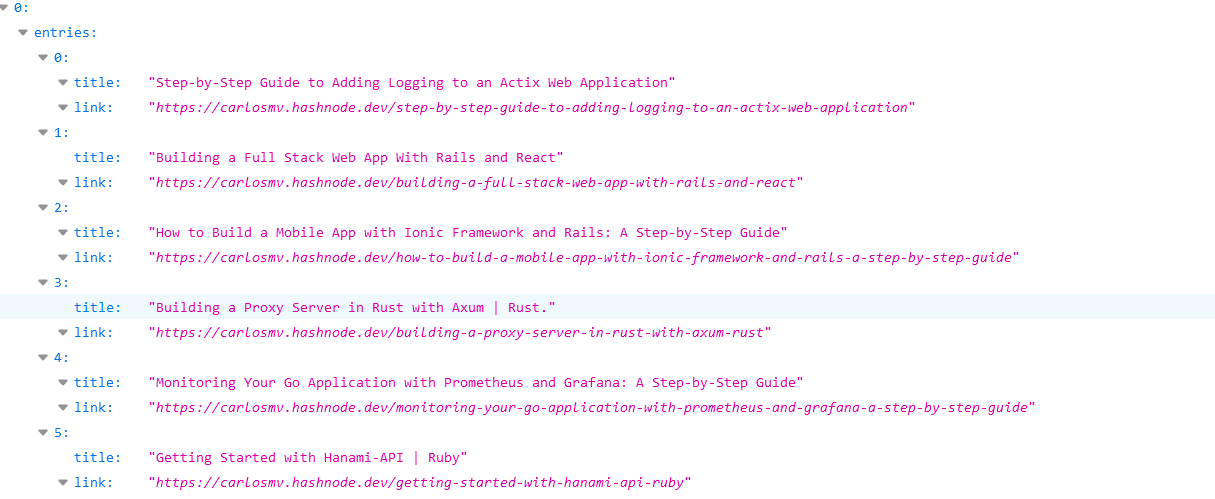
So far, we have only one RSS URL added to the database. We need to add one more RSS URL to see if the server will show all the entries.
We make a POST request to add another RSS address.

All the RSS feeds so far.

But it will not show all the entries from both RSS, because in our code we only are retrieving the URL of index 0 in the array.
We have to change the code in the file app/actions/feed_entries/index.rb
# frozen_string_literal: true
require_relative '../../../lib/feed_reader/feed_service'
module FeedReader
  module Actions
    module FeedEntries
      class Index < FeedReader::Action
        include Feed
        include Deps["persistence.rom"]

        def my_feed
          feed = rom.relations[:feeds]
            .select(:rss)
            .to_a

          array_entries = []

          feed.each do |element|
            rss = element[:rss].to_s
            entry = Feed.new(rss)

            entries = entry.get_links
            array_entries << entries
          end

          [{

            "entries": array_entries
          }]

        end

        def handle(*, response)

          entries = my_feed
          response.format = :json
          response.body = my_feed.to_json
        end
      end
    end
  end
end
The feed.each loop iterates through each of the RSS feed elements retrieved, and for each element, it gets the link entries by initializing a new Feed object with the value of the rss attribute.
Each set of links obtained for the feeds is appended to the entries array, which is then appended to the array_entries array. The entries array contains all the link entries corresponding to all the feeds.
The my_feed method returns a JSON object that contains an array of all the link entries for all the feeds, with each group of links nested under the "entries" key.
With these changes, now we can see all the entries when we see localhost:2300/feed_entries.
Now, it is time to create a UI.
By the time I'm writing this article, Hanami does not have Views, it will be introduced in version 2.1. But the page recommends any Ruby template engine. But I will use React library to create the UI.
CORS
I didn't find in the documentation anything about CORS, but Hanami uses Rack, so we can use rack-cors to the feature to our app.
We need to add rack-cors to the gemfile.
gem 'rack-cors'
Then we run bundle in our command line.
Then, we go to the config/app.rb file and add the CORS middleware.
# frozen_string_literal: true

require "hanami"
require "rack/cors"

module FeedReader
  class App < Hanami::App
    config.middleware.use :body_parser, :json

    config.middleware.use Rack::Cors do
      allow do
        origins '*'
        resource '*', headers: :any, methods: [:get, :post, :patch, :put]
      end
    end
  end
end
The Rack::Cors middleware is being used, and a wildcard * is specified for the origins configuration, allowing any domain to make cross-origin requests. For the resource configuration, headers and methods are specified, allowing any HTTP method for any resource endpoint.
This middleware allows the server to respond to cross-origin requests made by any webpage or application, making the API or the service widely available to any desired host.
Creating the UI.
For the UI, we will keep it simple, a form to add RSS URL and a page to display all the entries.
import React, { useState, useEffect } from "react";

const url = "http://localhost:2300/feed_entries";

interface Feed {
  title: string;
  link : String;

}

const AppFeed: React.FC = () => {
    const [feeds, setFeeds] = useState<[Feed[]]>([[]]);
    //const [feed, setFeed] = useState("");

    useEffect(() => {
        fetchtasks();
    }, []);

    const fetchtasks =  async () => {

        const response = await fetch(`${url}`)
        setFeeds(await response.json());


    };

    return (
        <div>
          <h1>Feeds</h1>
            <div>

            </div>
            {feeds.map((row, index) => (
                <li key={index}>
                {row.map((rss, j) => (
                  <li key={j}><a href={rss.link}>{rss.title}</a></li>

                ))}
              </li>
            ))}


        </div>

      );

};

export default AppFeed;
Firstly, we import React, and then we define the URL from where to fetch the feeds. We also define an interface Feed, which specifies the type of JavaScript object containing the title and the link of the feed.rstly, it imports React, and then it defines the URL from where to fetch the feeds. It also defines an interface Feed, which specifies the type of JavaScript object containing the title and the link of the feed.
Next, the state is set up using useState hooks. The state variable feeds is initialized with an array containing an empty array [[]], which can be updated with the fetched feed data. useEffect is also used to fetch the feeds only once when the component mounts.
The function fetchtasks() fetches the feed data from the URL using fetch(), converts it to JSON with response.json(), and updates the feeds state with the fetched data.
The component returns a react element including the h1 heading title and the list of the feeds using the map() method to iterate through each row of the feeds state variable. Furthermore, it displays each feed item title and link using another map() method nested within the first map() method, where each feed item is displayed in an unordered list within the list item.
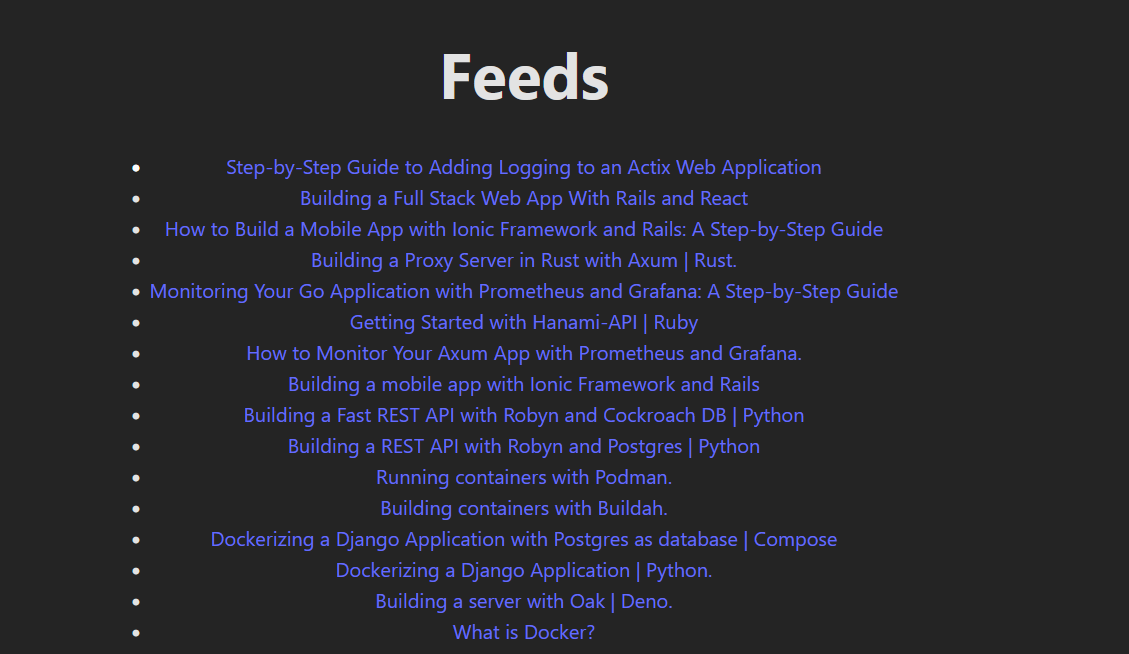
Now, we have to add a form to add an RSS URL.
const AddRss = async () => {
      const newRss = {feed: { rss}};
      const options =  {

          method: 'POST',
          headers: {
              'Content-type': 'application/json; charset=UTF-8',
          },
          body: JSON.stringify(newRss),

      };
      const response = await fetch(post_url, options)
      const data = await response.json();
      setRss(data);
      setRss("");
  };

    return (
        <div>
          <h1>Feeds</h1>
              <form onSubmit={(e) => e.preventDefault()}>
                <input
                  type="text"
                  value={rss}
                  onChange={(e) => setRss(e.target.value)}
                />
                <button onClick={() => AddRss()}>Add</button>
              </form>
          <div>
            ...
    );


};

export default AppFeed;
The function AddRss is defined as an async function to handle the POST request to the given URL. It first creates an object newRss that contains a feed object with the rss string as its value. Then, it sets the options for the POST request, including the headers and body, which is a stringified version of the newRss object. fetch() is then used to send the request and get the response data, which is then converted to JSON format with response.json(). The rss state variable is also reset to an empty string after the feed has been added.
The component returns a div element that includes a form with an input field and a button. The onSubmit event handler is used to prevent the default action of the form submission. The input field is bound to the rss state variable using the value and onChange attributes. The Add button calls the AddRss function when clicked.
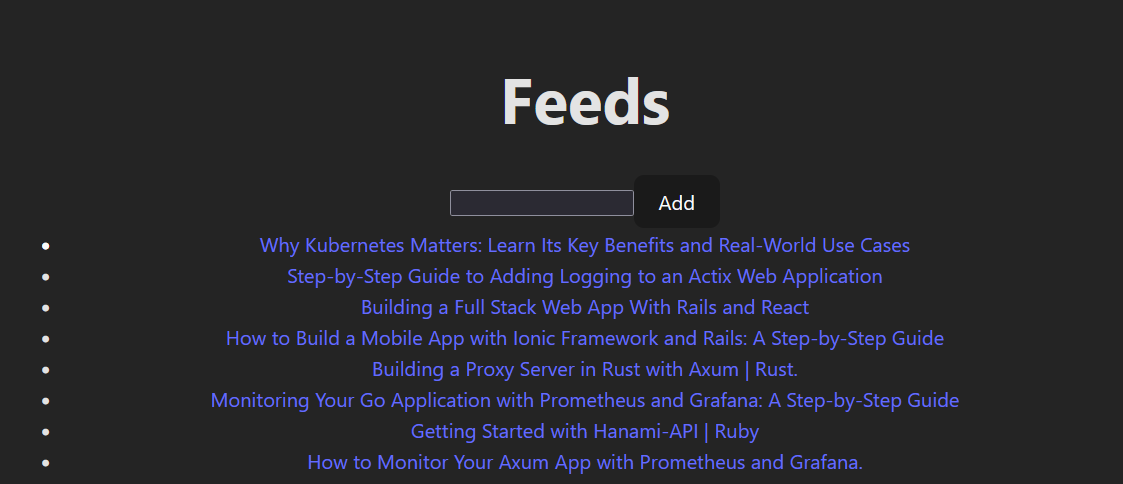
So far, we have an app that allows us to add a link to a database, showing the title and the link of the articles.
Conclusion
I have written this article to learn Hanami and continue to learn Ruby. We achieve all the requirements, adding an RSS URL, and displaying the title and link of all the articles. But as you may notice the GET request of /feed_entries is very slow in the response. Because it parses the RSS feed in every request. Probably it would be faster if we implement our own RSS parser or store the titles and links of all articles in the database as well. But then we have to check every time for any updates.
I hope this article was useful for anyone looking to learn about Hanami, I was looking to build something different from a CRUD API. Overall I like the framework. I hope in the next version we can have views, and database integration by default.
Thank you for taking the time to read this article.
If you have any recommendations about other packages, architectures, how to improve my code, my English, or anything; please leave a comment or contact me through Twitter, or LinkedIn.
The source code is here.
Resources
Subscribe to my newsletter
Read articles from Carlos Armando Marcano Vargas directly inside your inbox. Subscribe to the newsletter, and don't miss out.
Written by

Carlos Armando Marcano Vargas
Carlos Armando Marcano Vargas
I am a backend developer from Venezuela. I enjoy writing tutorials for open source projects I using and find interesting. Mostly I write tutorials about Python, Go, and Rust.