How to use ConfigCat with Redis
 Chavez Harris
Ever since the dawn of feature releases, feature flags have become the de facto standard for managing and controlling features in software applications. Many software development methodologies these days such as agile, are heavily focused on releasing continuous updates and features. In addition, a few companies have based their entire business around serving clients a cloud-based feature flagging solution. But in limited bandwidth situations or when you need to optimize the performance of your client-facing applications making API requests may not be ideal. This can be handled by implementing a process called caching with the help of a popular tool called Redis.
What are feature flags?
A feature flag can be described as a light switch for features. It holds a boolean value, that when set to true, the feature it controls can be displayed to the user and otherwise hidden.
The awesome thing about feature flagging is that it can be applied to a wide range of programming languages and frameworks. And because of its flexible nature, it can be used alongside other technologies. Let's look at how it can be implemented with a Redis cache to see how it works.
Pre-requisites
A code editor (e.g. Visual Studio Code)
NodeJS (version 16 or higher)
Have Docker installed on your computer.
To help you follow through with me, I've created a Node.js sample app that you can clone from the following link. Later on, we'll cover how to set it up.
Adding a feature flag
1. To get started, sign up for a free ConfigCat account.
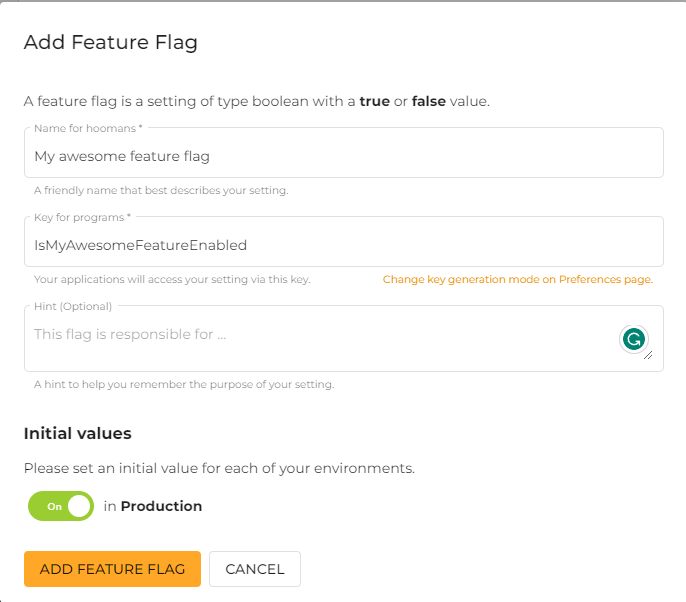
2. In your dashboard, create a feature flag with the following information:

Creating the Redis cache client
3. From the starter-code branch, open the file called configcat-redis-cache.js and add the following functions:
// ...

function configcatRedisCache(redisClientOptions) {

  this.isRedisAvailable = false;
  this.cacheClient = redis.createClient(redisClientOptions);

  this.cacheClient.connect();

  this.cacheClient.on("connect", () => {
    console.log("Connected to Redis");
    this.isRedisAvailable = true;
  });

  this.cacheClient.on("error", (error) => {
    console.log(`Redis error: ${error}`);
    this.isRedisAvailable = false;
  });

  this.lastCacheItems = {};
}

configcatRedisCache.prototype.get = async function (key) {
  if (!this.isRedisAvailable) {
    return this.lastCacheItems[key];
  }

  try {
    const getAsync = util
      .promisify(this.cacheClient.get)
      .bind(this.cacheClient);

    return JSON.parse(await getAsync(key));
  } catch (error) {
    console.error(`Cache read failed! \n ${error}`);
    return this.lastCacheItems[key];
  }
};

configcatRedisCache.prototype.set = async function (key, item) {
  this.lastCacheItems[key] = item;

  try {
    const setAsync = util
      .promisify(this.cacheClient.set)
      .bind(this.cacheClient);

    await setAsync(key, JSON.stringify(item));
  } catch (error) {
    console.error(`Cache write failed! \n ${error}`);
  }
};

// ...
Here's what each function does:
configcatRedisCache- Takes the client options as its parameter and sets up a connection to the docker Redis instance.configcatRedisCache.prototype.get- Uses the providedkeyto obtain the cached item from Redis.configcatRedisCache.prototype.set- Takes thekeyanditemas parameters. Puts theiteminto the redis cache that can be later accessed using thekey.
4. Open the index.js file and add the following code:
// ...
const redisOptions = { host: "localhost", port: 6379 };

const configCatClient = configcat.getClient("0yDbCLmNK0qIUakB2LFJDA/u0Z5j4oDjkuHKOVJkIo9Dw", configcat.PollingMode.AutoPoll,
  {
    cache: configcatRedisCache(redisOptions)
  }
);

setInterval(() => {
  configCatClient.getValueAsync("isMyAwesomeFeatureEnabled", false).then(value => {
    console.log(`${new Date().toTimeString()} isMyAwesomeFeatureEnabled: ${value}`);
  });
}, 5000);
Here's what the code is doing:
The configuration required to establish a connection to the Redis docker instance was saved to the
redisOptionsvariable.That variable was then used in the
configcat.getClientmethod passed as an argument to set up thecacheproperty.The
setIntervalfunction runs every 5 seconds to fetch the value of the feature flag, but instead of reaching out to ConfigCat, it obtains the value from the Redis cache and logs the result with the date to the console.
You can find the complete code for the index.js file here. If you're curious about learning more about using a custom cache with ConfigCat as we did, refer to this documentation.
With the code in place, let's look at how we can run the sample app to ensure it works.
Running the sample app
1. Clone the GitHub repository
2. Run the following commands to install the required node packages:
npm install
The configcat-node and redis npm packages will also be installed using this command. The configcat-node package will be used as a client to connect to and pull the feature flag status from your ConfigCat dashboard. redis will be used similarly and would connect to a local docker instance of Redis.
3. Using docker, pull the latest Redis docker image and run the container:
docker pull redis
docker run --name container-redis -p 6379:6379 -d redis
4. Start the node application with the following command:
npm start
You should see the following output logged to your terminal every 5 seconds:
> configcat-with-redis-sample@1.0.0 start
> node index.js

Connected to Redis
17:56:55 GMT-0300 (French Guiana Time) isMyAwesomeFeatureEnabled: false
17:57:00 GMT-0300 (French Guiana Time) isMyAwesomeFeatureEnabled: false
17:57:05 GMT-0300 (French Guiana Time) isMyAwesomeFeatureEnabled: false
17:57:10 GMT-0300 (French Guiana Time) isMyAwesomeFeatureEnabled: false
17:57:15 GMT-0300 (French Guiana Time) isMyAwesomeFeatureEnabled: false
17:57:20 GMT-0300 (French Guiana Time) isMyAwesomeFeatureEnabled: false
Toggling on or off the feature flag within your ConfigCat dashboard will force the cache to refresh. As a result, The new value will be pulled from ConfigCat to replace the existing value in the cache.
Final thoughts
If you're planning on cutting back or saving bandwidth utilization and optimizing for better performance on the client side then a caching solution like Redis can help. And, as we've seen from the code examples, Redis integrates quite easily with ConfigCat. With a caching solution in place, you can supercharge the way you do standard feature releases, canary deployments, and A/B testing. Besides Node.js, ConfigCat also supports many languages and frameworks and provides SDKs for easy configuration.
Stay updated
For more posts like this and other announcements, follow ConfigCat on Twitter Facebook, LinkedIn, and GitHub.
Subscribe to my newsletter
Read articles from Chavez Harris directly inside your inbox. Subscribe to the newsletter, and don't miss out.
Written by

Chavez Harris
Chavez Harris
I'm a frontend engineer and content creator. I write about web development and programming, and I build websites.