Basic Linux LVM (Logical Volume Manager):
 Anil Kushwaha
LVM is a widely used disk management system in Linux. The following topics are typically covered in LVM courses:
Introduction to LVM:
Overview of LVM Concepts and benefits
Understanding the logical volume, physical volume, and volume group
LVM Components:
Physical volumes (PV): Disk devices or partitions used by LVM
Volume groups (VG): A collection of physical volumes
Logical volumes (LV): Logical partitions created within volume groups
LVM metadata and configuration files
LVM Operations and Management:
Creating physical volumes and volume groups
Extending, reducing, and resizing logical volumes
Adding and removing physical volumes from volume groups
LVM mirroring and striping
LVM snapshots and backup/restore
Here are step-by-step instructions for performing practical exercises related to point number 1 and 2 (Introduction to LVM and LVM Components) in CentOS/RHEL:
Note: Please exercise caution while performing these steps on your system, as modifying disk partitions can lead to data loss if not done correctly. Make sure to back up your important data before proceeding.
++++++++++++++++++++++++++++++++++++++++++++++++++++
Introduction to LVM:
Overview of LVM Concepts and benefits
Understanding the logical volume, physical volume, and volume group
Ensure you have a CentOS 8 system installed or set up a virtual machine with CentOS 8.
For testing purposes in LVM added 60GB of additional "nvme" storage in the VMware machine.
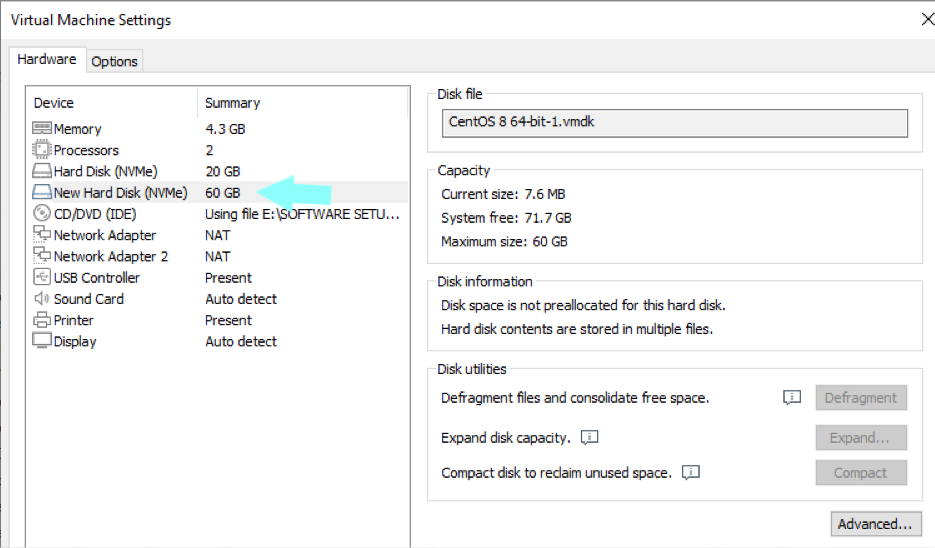
After adding a new NVMe 60GB additional storage to a VMware virtual machine (VM) running CentOS, here are the next steps to follow after powering on the VM:
Log in to the CentOS VM using your credentials.
Open a terminal or command prompt on the VM.
Run the following command to check if the new NVMe storage is detected:
#lsblk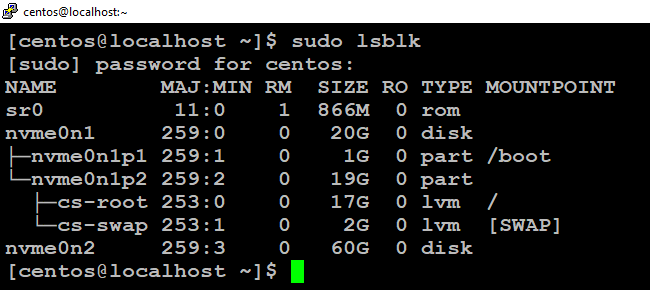
This command lists the available block devices. You should see the new NVMe drive listed, typically as
/dev/nvme0n2or something similar.
Done.
++++++++++++++++++++++++++++++++++++++++++++++++++++
2. LVM Components:
Physical volumes (PV): Disk devices or partitions used by LVM
* Volume groups (VG): A collection of physical volumes
* Logical volumes (LV): Logical partitions created within volume groups
* LVM metadata and configuration files
Open a terminal or SSH into your CentOS system.

List the available disk devices or partitions using the
lsblkcommand:#lsblk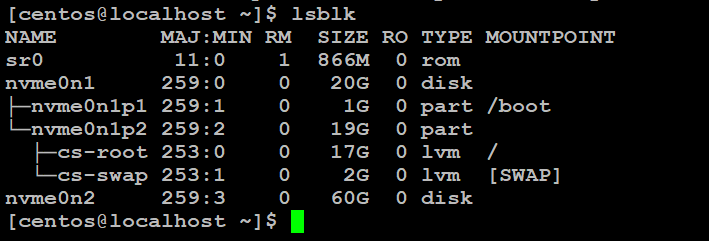
Identify the disk or partition you want to use as a physical volume for LVM.
Initialize the disk or partition as a physical volume using the
pvcreatecommand. Replace/dev/sdx1with the appropriate device or partition:#sudo pvcreate /dev/nvme0n2
b. Creating Volume Groups (VG):
Create a volume group using the
vgcreatecommand. Replacemyvgwith the desired volume group name, and/dev/sdx1with the physical volume you created:#sudo vgcreate myvg /dev/nvme0n2
Verify the created volume group using the
vgdisplaycommand:#sudo vgdisplay myvg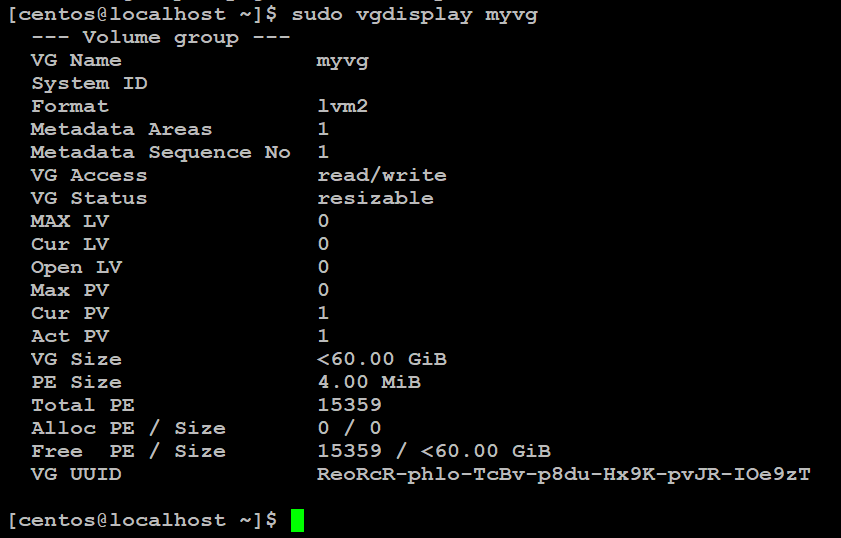
c. Creating Logical Volumes (LV):
Create a logical volume within the volume group using the
lvcreatecommand. Replacemylvwith the desired logical volume name,myvgwith the volume group name, and specify the desired size (e.g., 1G) for the logical volume:#sudo lvcreate -n mylv -L 1G myvg
Verify the created logical volume using the
lvdisplaycommand:#sudo lvdisplay /dev/myvg/mylv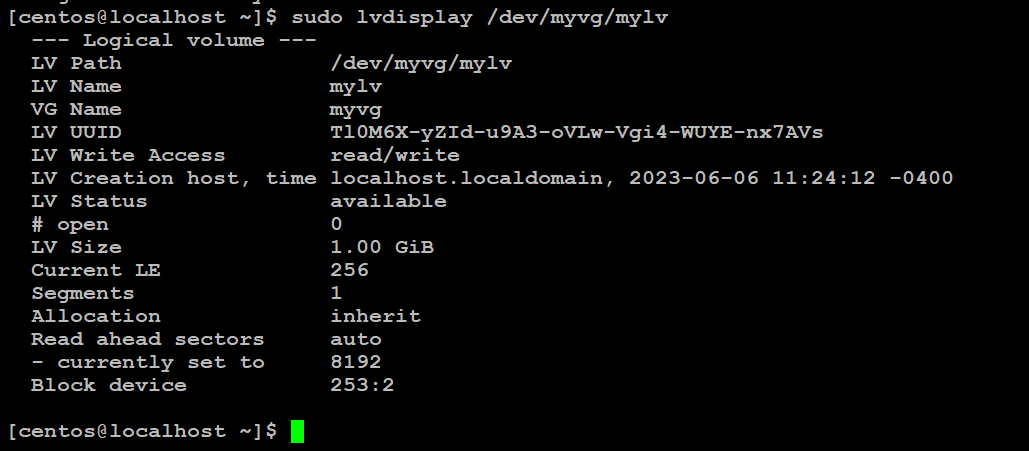
These steps provide a basic understanding of LVM and its components. Remember to adapt the commands and names according to your specific setup.
Done.
++++++++++++++++++++++++++++++++++++++++++++++++++++
LVM Operations and Management:
Creating physical volumes and volume groups
Extending, reducing, and resizing logical volumes
Adding and removing physical volumes from volume groups
LVM mirroring and striping
LVM snapshots and backup/restore
Here are the step-by-step instructions for performing practical exercises related to point number 3 (LVM Operations and Management) in CentOS:
Note: Please exercise caution while performing these steps on your system, as modifying disk partitions can lead to data loss if not done correctly. Make sure to back up your important data before proceeding.
LVM Operations and Management:
a. Extending Logical Volumes:
List the available logical volumes using the
lvdisplaycommand:#sudo lvdisplay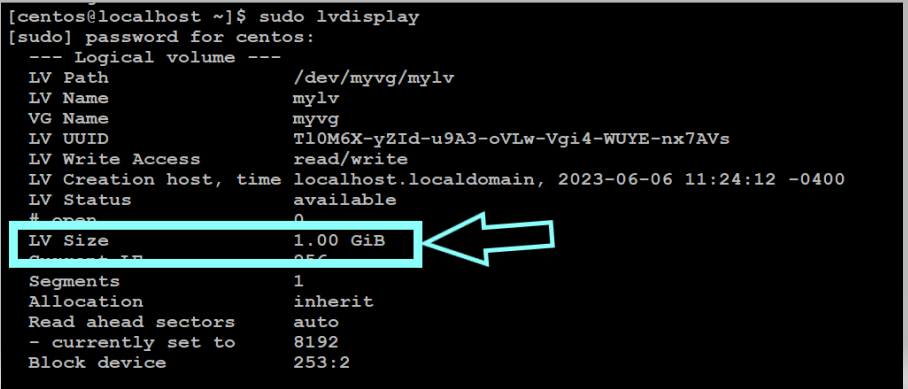
Identify the logical volume you want to extend and ensure that there is free space available in the associated volume group.
Extend the logical volume using the
lvextendcommand. Replace/dev/myvg/mylvwith the appropriate logical volume path, and specify the desired size (e.g., +2G) by which you want to extend the volume:#sudo lvextend -L +2G /dev/myvg/mylv
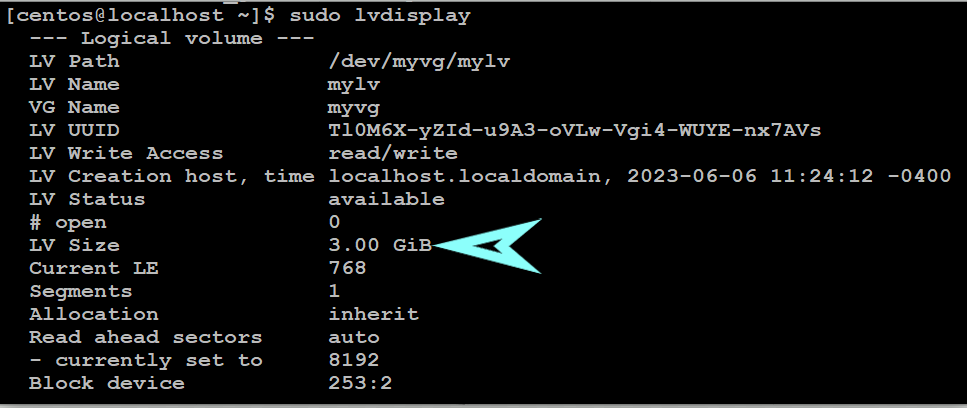
Logical volume does not have a file system, you need to format it.
#sudo mkfs.ext4 /dev/myvg/mylv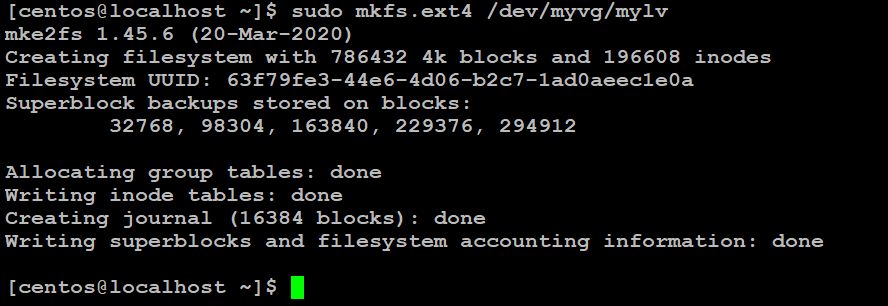
Above command will create an ext4 file system on the logical volume.
Resize the file system within the logical volume to utilize the newly allocated space. The command depends on the file system type. For example, if using ext4:
#sudo resize2fs /dev/myvg/mylv#sudo mkdir /mnt/nvme#sudo mount /dev/myvg/mylv /mnt/nvme/#df -hT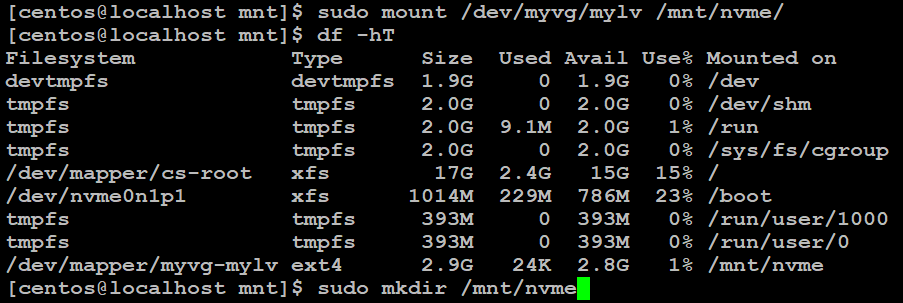

b. Reducing Logical Volumes:
Note: Reducing logical volumes is an advanced operation and should be performed with caution. Ensure you have a backup of the data within the logical volume before proceeding.
Before reducing the logical volume, ensure there is enough free space available within the logical volume to safely remove. You can check the used and available space using the
df -hcommand.#df -h
#sudo umount /mnt/nvme/
Shrink the file system within the logical volume to match the desired reduced size means what size is to keep out of 3Gig as here I am keeping it 2G. The command depends on the file system type. For example, if using ext4:
#sudo e2fsck -f /dev/myvg/mylvThe above command is to check the file system and it should be passed.

#sudo resize2fs /dev/myvg/mylv <target size>#sudo resize2fs /dev/myvg/mylv 2G
Reduce the logical volume size using the
lvreducecommand. Replace/dev/myvg/mylvwith the appropriate logical volume path, and specify the desired size (e.g., 2G) to which you want to reduce the volume:#sudo umount /mnt/nvme#df -h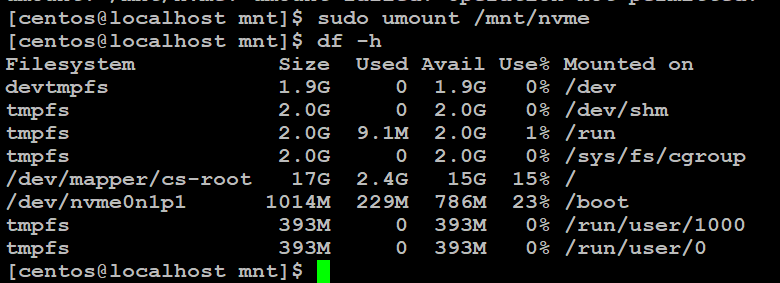
#sudo lvreduce -L 2G /dev/myvg/mylv
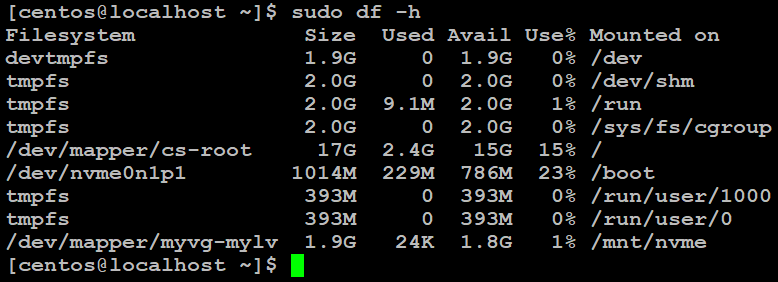
#sudo resize2fs /dev/myvg/mylvAfter reducing the LV size need to execute the "resize2fs" & mount and next will check the LV size by the "df -h" command below.

c. Resizing Logical Volumes:
If you have extended or reduced the size of a logical volume, you might need to resize the file system within it to utilize the new size. The command depends on the file system type. For example, if using ext4 and it's sample output is given in above.
#sudo resize2fs /dev/myvg/mylv
d. Adding and Removing Physical Volumes:
To add a physical volume to a volume group, use the
vgextendcommand. Replacemyvgwith the appropriate volume group name, and/dev/nvme0n3with the new physical volume:First, add 15G physical hard drive in a virtual machine in power-off mode.
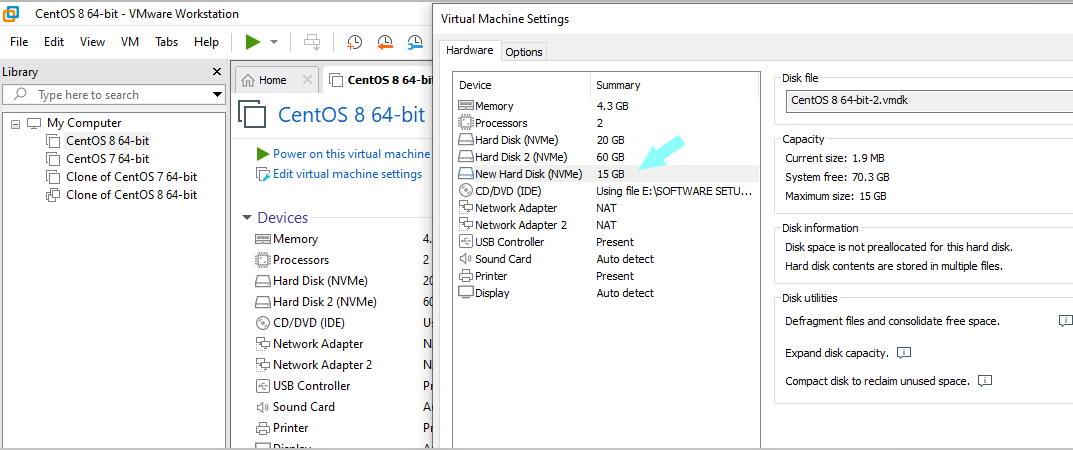
Next we can the newly added 15G volume storage in "lsblk"
#sudo lsblk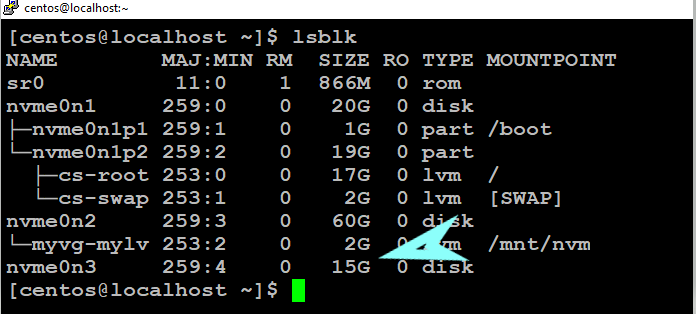
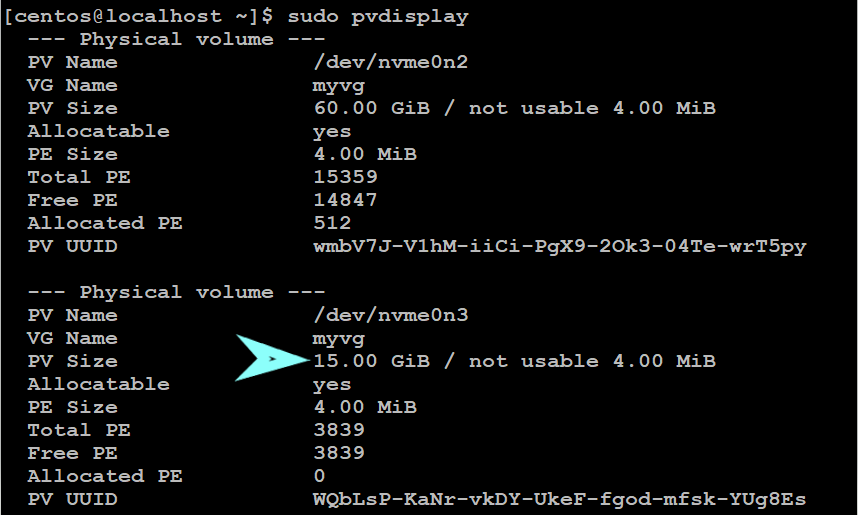
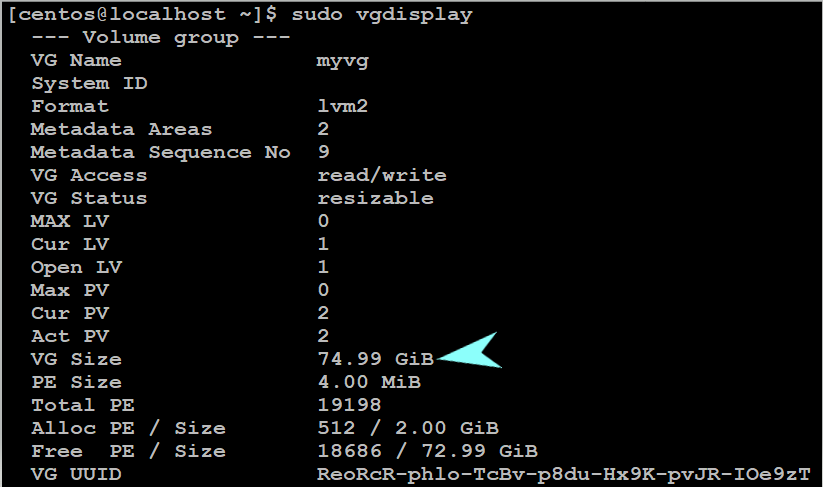
- Here, we need to extend an entire 15GB new voleme to our exiting Volume Group i.e. "myvg" here below.
#sudo vgextend myvg /dev/nvme0n3

#sudo pvdisplay
#sudo vgdisplay
To remove a physical volume from a volume group, use the
vgreducecommand. Replacemyvgwith the appropriate volume group name and/dev/nvme0n3with the physical volume you want to remove:#sudo vgreduce myvg /dev/nvme0n3
Remember to adapt the commands and names according to your specific setup. Always double-check the commands and verify the volume group and logical volume names before executing them.
Above mentioned points come under fundamental features of LVM and in future I will also come up with advanced level blogs of LVM.
All done.
Thanks,
Anil Kushwaha
Subscribe to my newsletter
Read articles from Anil Kushwaha directly inside your inbox. Subscribe to the newsletter, and don't miss out.
Written by

Anil Kushwaha
Anil Kushwaha
As a technology enthusiast with a passion for efficient operations, I specialize in Linux, AWS Cloud, Prometheus-Grafana, Security, Virtualization, and Git. With a deep understanding of these technologies, I am able to streamline development processes and ensure smooth operations for businesses.