Linux System Administration and Management Basics: Part 1
 Matthew Hard
I think it's time to delve deeper into the Linux operating system and focus on the administration side of things. Up to this point, I have covered Linux basics to get you familiar with the OS. Now, let's explore the commands that will help you gain full control over your system or systems. I have divided the topics into manageable parts to make the learning process less overwhelming.
In Part 1 of the Linux Administration series, we will cover the basics. We'll discuss key concepts such as users, groups, permissions, and processes. Additionally, we'll explore important tasks like package management, file system management, and system monitoring. Throughout the series, you'll find numerous command examples and explanations to facilitate your learning-by-doing approach.
Key Concepts
Before we dive into specific tasks, it's important to understand some key concepts for Linux system administration and management. Users and Groups: In Linux, everything is a file, and every file is owned by a user and group. Users are individual accounts that can access the system, while groups are collections of users with similar permissions.
To create a new user, use the "adduser" command:
sudo adduser username
To create a new group, use the "addgroup" command:
sudo addgroup groupname
Permissions: Permissions control who can read, write, and execute files on the system. There are three types of permissions: read (r), write (w), and execute (x). Permissions are set for the user, group, and other (everyone else) categories.
Elevating to the sudo user:
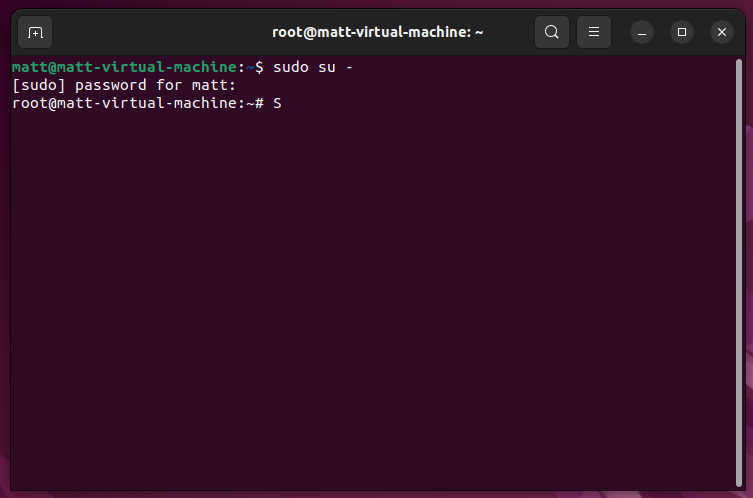
For occasional commands, it is sufficient to prefix the command with "sudo". However, if you anticipate working with multiple commands that require elevated privileges, it may be beneficial to elevate your permissions for the entire project. You can achieve this by using the following command to elevate to the sudo user: "sudo su -".
sudo su -
When you enter the command "sudo su -" to elevate to the sudo user, the system will prompt you to enter your password. If you have the necessary permissions to become a sudo user, the prompt will change to 'root' after a successful login. This indicates that you now have administrative privileges and can perform tasks that require elevated permissions.

Note: the password will not be visible but it is typing.
Once you have finished your tasks and need to exit the sudo environment, you can simply type 'exit' in the terminal. This will return you to your normal user permissions, allowing you to continue working with your regular privileges.

Let's break down the components of this command:
sudo: Thesudocommand allows a user to run a command with the privileges of another user, typically the root user. It stands for "Superuser Do." By usingsudo, you can execute commands that require administrative access without logging in as the root user.su: Thesucommand stands for "substitute user" and is used to switch to another user account. When you runsuwithout any arguments, it defaults to switching to the root user account.-: The-(hyphen or dash) aftersuis known as a login shell indicator. It tells the shell to execute the user's login scripts, which initialize the environment as if you had logged in directly as the specified user.
By combining sudo and su -, you are effectively running a new shell as the root user, with the environment and settings of the root user's login session.
Working with the system
To view the permissions of a file or directory, use the "ls" command with the "-l" option:
ls -l filename
Processes: Processes are running instances of a program. You can view running processes with the "ps" command:
ps aux
When you run the ps aux command, it is used to display a detailed list of all running processes on a Linux system. Let's break down the components of this command:
ps: Thepscommand stands for "process status" and is used to provide information about the currently running processes.aux: Theauxoptions are command-line options that modify the behavior of thepscommand. Here's what each option represents:a: Theaoption displays information about all processes, including those owned by other users. Without this option,pswould only display information about processes owned by the current user.u: Theuoption provides more detailed output, including the user who owns the process, the process ID (PID), the CPU and memory utilization, the start time, and the command associated with the process.x: Thexoption lists processes that do not have a controlling terminal. This includes background processes or daemons that are running independently of a user session.
Combining these options (aux) with the ps command gives you a comprehensive overview of all running processes on the system, regardless of the user and including detailed information about each process.
The output of ps aux typically includes columns such as USER (owner of the process), PID (process ID), %CPU (CPU utilization), %MEM (memory utilization), VSZ (virtual memory size), RSS (resident set size), TTY (controlling terminal), START (start time of the process), and COMMAND (the command associated with the process).
The ps command in Linux provides a wide range of options that allow you to customize the output and filter the list of processes based on specific criteria. Here are some commonly used options with the ps command:
a: Displays information about all processes on the system.u: Provides a detailed output that includes the user who owns the process, CPU and memory utilization, start time, and command associated with the process.x: Lists processes without a controlling terminal (background processes or daemons).e: Displays information about all processes, including those without a controlling terminal.f: Displays a tree-like representation of processes, showing the parent-child relationship.l: Provides a long format output, showing more detailed information about processes.r: Displays only running processes.t: Filters processes based on the associated terminal.N: Negates the effect of another option. For example,ps auxNwill display processes not owned by the current user.H: Displays process hierarchy with indentation to represent parent-child relationships.c: Shows the command name associated with each process.e: Displays the environment variables associated with each process.o: Allows you to specify custom output format by selecting specific fields to display.p: Displays information about specific process IDs.s: Filters processes based on their session ID.G: Displays information about processes in a specific process group.
Tasks
With those key concepts in mind, let's move on to some specific tasks that you'll need to know as a Linux system administrator.
Package Management: One of the most important tasks in Linux system administration is package management - installing, updating, and removing software packages. The package manager for most Linux distributions is "apt" (Advanced Package Tool).
To update the package list, use the "apt update" command:
sudo apt update
To install a new package, use the "apt install" command:
sudo apt install packagename
To remove a package, use the "apt remove" command:
sudo apt remove packagename
You can also combine multiple commands using the logical "AND" operator (&&). For example, to update and upgrade packages in one command, you can use the following command:
sudo apt update && sudo apt upgrade -y
File System Management: Another important task is file system management - creating, moving, and deleting files and directories. The "mv" command moves or renames a file or directory.
To move a file or directory and rename it at the same time, you can use the following syntax:
mv oldname newname
For example, if you have a file named "file.txt" in the current directory and you want to rename it to "newfile.txt", you would use the following command:
mv file.txt newfile.txt
If you want to move a file to a different location without renaming it, you need to specify the destination path along with the filename. For example, to move the file "file.txt" to the directory "/path/to/new/location", you would use the following command:
mv file.txt /path/to/new/location/
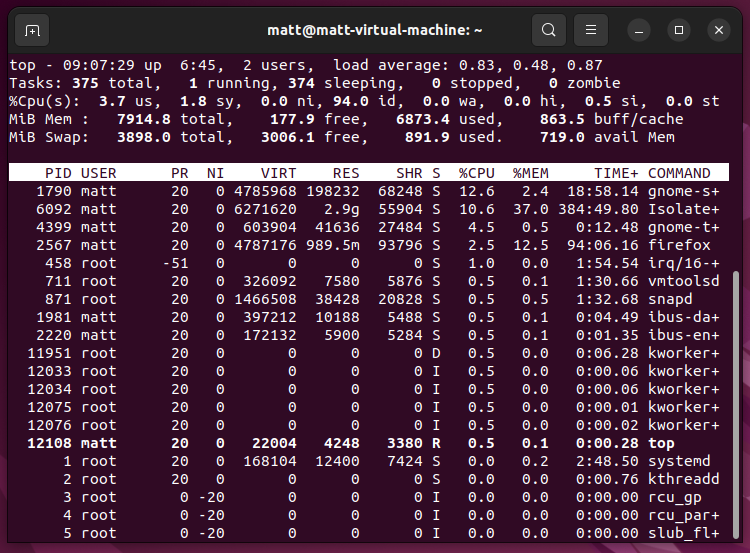
System Monitoring: Finally, it's important to monitor your system to ensure it's running smoothly and catch any issues before they become major problems. The "top" command provides a real-time view of system processes:
top
This command, called "htop," displays a list of currently running processes along with system resource usage information such as CPU and memory usage. What sets htop apart is its dynamic updating feature, which allows you to observe real-time changes in system load. As you monitor the display, you can see how the system's resource utilization fluctuates.

To quit the command, press "q".
I agree, "top" is a commonly used command-line tool that is often pre-installed with Linux distributions. It provides a basic overview of running processes and system resource usage. However, if you're looking for a more comprehensive and interactive alternative, you can download and use "htop."
sudo apt install htop
Htop offers additional insights into your system, including a more detailed display of processes, enhanced sorting and filtering options, color-coded representation of resource usage, and the ability to navigate and interact with the process list. It provides a richer and more user-friendly experience for monitoring system activity.

Another useful command for monitoring system performance is "vmstat":
vmstat
This command reports system-wide virtual memory statistics, including the amount of free memory, memory used by buffers, and memory used by the cache. It also reports CPU usage and disk I/O statistics. By default, it displays the statistics every second, but you can change the interval by specifying a number of seconds as an argument:
vmstat 5
This command will display the same statistics every 5 seconds.
So, let's recap. We covered several important topics related to Linux system administration and management. We started with an introduction to the Linux command line and covered basic commands for working with files and directories, managing processes, and controlling the system. We then looked at package management and learned how to install, update, and remove software packages using package managers. Next, we discussed user and group management, file permissions, and system hardening techniques to help secure your system against attacks. Finally, we covered system monitoring and introduced some useful commands for keeping an eye on system performance.
Mastering these concepts is the first step in becoming a skilled Linux system administrator. In the next parts of this series, we'll delve into these and many more topics in more detail and explore other important aspects of Linux system administration and management. Stay tuned!
Stay tuned for Part 2, where we'll dive deeper into advanced tips and techniques for Linux system administration and management.
Subscribe to my newsletter
Read articles from Matthew Hard directly inside your inbox. Subscribe to the newsletter, and don't miss out.
Written by

Matthew Hard
Matthew Hard
I'm Matthew, a cybersecurity enthusiast, programmer, and networking specialist. With a lifelong passion for technology, I have dedicated my career to the world of cybersecurity, constantly expanding my knowledge and honing my skills. From a young age, I found myself captivated by the intricate workings of computers and networks. This fascination led me to pursue in-depth studies in the fields of networking and cybersecurity, where I delved deep into the fundamental principles and best practices. Join me on this exciting journey as we explore the multifaceted world of technology together. Whether you're a beginner or a seasoned professional, I am here to share my knowledge, discuss the latest trends, and engage in insightful discussions. Together, let's embrace the ever-changing world of tech and navigate the complexities of cybersecurity with confidence and expertise.