Securing Your Website: Converting from HTTP to HTTPS with Certbot
 Gautam Patil
Table of contents

Hello Geeks,
As developers, ensuring security is of utmost importance to us. We take measures to store user passwords in encrypted form and fortify our databases and code against potential attacks.
In this blog, we will delve into the realm of hypertext transfer protocol security, commonly known as HTTPS. HTTPS provides SSL security across all protocols, offering numerous benefits over its counterpart, HTTP. Many of us are already familiar with the need for HTTPS, but for those who aren't, here are a few advantages: encryption, protection, data validation, and, notably improved SEO.
The focus of this blog is to guide you through converting HTTP to HTTPS using certbot. This article serves as the second part of my previous blog (you can read the first part by clicking here). We will pick up where we left off and continue our exploration on this exciting journey.
Prerequisite
Should know the basics of Nginx
Should be familiar with basic cmd commands in Ubuntu or Windows.
Should know about the Nginx default file
Introduction
In the previous blog post, we discussed the successful hosting of our web app. Now, it's time to secure it with an SSL certificate. To accomplish this, we have opted for "Let's Encrypt," a renowned certificate authority (CA) that offers free TLS/SSL certificates. By using Let's Encrypt, we can easily obtain and install these certificates, enabling encrypted HTTPS on our web servers. This process is made even simpler with the help of a software client.
In the upcoming sections of this blog post, we will walk you through the process of obtaining a free SSL certificate for Nginx on Ubuntu 20.04, utilizing Certbot. We will also cover how to set up automatic renewal for the certificate.
So, grab a cup of coffee and let's dive into the setup process!
Setup
To begin, we must install Certbot on our EC2 instance or server. To accomplish this, execute the following command in your terminal:
sudo snap install --classic certbot
sudo ln -s /snap/bin/certbot /usr/bin/certbot
Upon executing the command, you can expect to see the following output:

With Certbot successfully installed, and we are now ready to utilize its functionality. However, to configure the SSL certificate automatically, it is important to verify the correctness of our default Nginx file. To confirm this, execute the following command:
sudo nginx -t
Upon executing the above command, any errors present in the Nginx default file will be displayed as the output.

If you encounter any errors in the output, then review the Nginx default file and check its correct configuration. Once the necessary adjustments have been made, you can reload Nginx to apply the updated configuration. By executing the following command:
sudo service nginx reload
Now, Certbot is capable of identifying the appropriate server block and automatically updating it for SSL certificate.
Before proceeding with the Certbot commands to obtain the SSL certificate, we must update the firewall settings to allow HTTPS traffic. To enable the necessary firewall configurations, execute the following commands one by one:
sudo ufw allow ssh
sudo ufw allow 22/tcp
sudo ufw allow 'Nginx Full'
sudo ufw allow OpenSSH
When you execute the commands, you will receive the following output:

Next, we will enable the firewall by executing the following command:
sudo ufw enable
Executing this command will provide the following output:

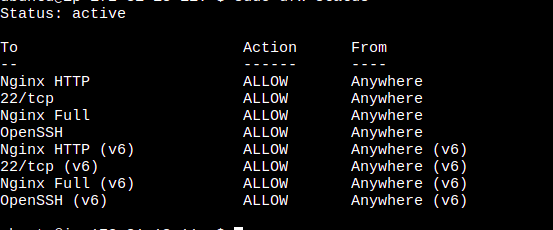
To confirm whether all the rules have been successfully added and if the firewall is enabled, run the following command for verification:
sudo ufw status
By executing this command, you will be able to view the current status of the firewall, including information about the active firewall rules.

Now that everything is in place, we can proceed with running the Certbot command to issue an SSL certificate for your domain using the Nginx plugin. To accomplish this, execute the following command:
sudo certbot --nginx -d <your-domain> -d www.<your-domain>
The command mentioned above runs Certbot with the --nginx plugin. By utilizing the -d flag, you can specify the domain name for which you want to obtain the certificate. you can request certificates for multiple domains by including them with the -d flag.
When running Certbot for the first time, you will be prompted to provide an email address and agree to the terms and services. Certbot will then proceed to verify your control over the specified domain. Once the verification is complete, Certbot will issue an SSL certificate for the domain. Additionally, it will prompt you for HTTPS configuration settings, as shown below:

Now, you can select the appropriate setting based on your specific use case for HTTPS configuration. After that, the SSL certificate will be automatically installed and configured in the Nginx default file. And Nginx will be reloaded to apply the new settings.
You can now access your website by typing its URL with https: indicating that it is now SSL secured.
However, it's important to note that the SSL certificate will expire after one year, requiring you to repeat this process annually. This manual renewal process may not be ideal for everyone. Fortunately, Certbot offers a feature to automate the certificate renewal process, which is set to occur within 30 days of its expiration by default. To enable this automated renewal, you will need to run one final command:
sudo certbot renew --dry-run
By including the --dry-run flag in the command, Certbot will conduct a test run to simulate the renewal process without actually renewing any certificates. This enables you to verify if the renewal process is functioning correctly and detect any possible issues before proceeding with the actual renewal.
Executing this command guarantees that your SSL certificate will be automatically renewed. If the automated renewal encounters any problems, Let's Encrypt will send a notification to the email address you provided, serving as a warning when your certificate is nearing its expiration date.
Conclusion
As of now, we have covered the process of obtaining a free SSL certificate on an Nginx server and have also explored how to enable and verify its auto-renewal. If you encounter any errors with Nginx, I recommend referring to my previous blog post where I delve into the Nginx default file in detail. You can access the previous blog by clicking here.
If Certbot fails to verify your domain automatically, there is an alternative method using the Certbot manual command. This manual process involves verifying the domain manually through DNS. I will create another blog post in the future specifically addressing this topic. Until then, Enjoy Your Work!!
Happy Coding!!
Subscribe to my newsletter
Read articles from Gautam Patil directly inside your inbox. Subscribe to the newsletter, and don't miss out.
Written by

Gautam Patil
Gautam Patil
I am a software developer with expertise in Node.js and proficiency in both SQL and NoSQL databases. My knowledge extends to various AWS services, including S3 bucket, Lambda functions, Lex, EC2, SES, and CloudWatch. In the realm of web hosting, I am well-versed in configuring and managing Nginx servers. With an unwavering curiosity and a passion for continuous learning, I am always eager to explore new technologies and dive into new tech stacks. I thrive in challenging environments that foster innovation, and my ability to adapt quickly allows me to stay at the forefront of the ever-evolving software development landscape.