An Introduction to Tables & Forms in HTML
 Tabish Iqbal
Table of contents
- <mark>Section.1:- Tables in HTML</mark>
- <mark>Spanning columns or rows</mark>
- <mark>Table with thead, tbody, tfoot, and caption</mark>
- <mark>Heading scope</mark>
- Try to create a Table like this -
- <mark>Section 2-: Forms in HTML</mark>
- What is an HTML form?
- <mark>Simple Formatting</mark>
- <mark>Different Input Types</mark>
- <mark>Summary :-</mark>

Section.1:- Tables in HTML
The HTML <table> element allows web authors to display tabular data (such as text, images, links, other tables, etc.) in a two-dimensional table with rows and columns of cells.
Simple Table Try It-
This will render a <table> consisting of three total rows (<tr>): one row of header cells (<th>) and two rows of content cells (<td>). <th> elements are tabular headers and <td> elements are tabular data. You can put whatever you want inside a <td> or <th>.
Spanning columns or rows
Table cells can span multiple columns or rows using the colspan and rowspan attributes. These attributes can be applied to <th> and <td> elements.
Table with colspan & rowspan - Try it
Note that you should not design a table where both rows and columns overlap as this is invalid HTML and the result is handled differently by different web browsers.
rowspan = specifies the number of rows spanned by a cell. The default value of this attribute is one (1). A value of zero (0) means that the cell will extend from the current row until the last row of the table (<thead>, <tbody>, or <tfoot>).
colspan = specifies the number of columns spanned by the current cell. The default value of this attribute is one (1). A value of zero (0) means that the cell will extend from the current to the last column of the column group <colgroup> in which the cell is defined.
Table with thead, tbody, tfoot, and caption
HTML also provides the tables with the <thead>, <tbody>, <tfoot>, and <caption> elements. These additional elements are useful for adding semantic value to your tables and for providing a place for separate CSS styling.
When printing out a table that doesn't fit onto one (paper) page, most browsers repeat the contents of <thead> on every page.
There's a specific order that must be adhered to, and we should be aware that not every element falls into place as one would expect.
The following example demonstrates how our 4 elements should be placed.
Previous Example with some styles-
Heading scope
<th> elements are very commonly used to indicate headings for table rows and columns, like so:
This can be improved for accessibility by the use of the scope attribute. The above example would be amended as follows:
scope is known as an enumerated attribute, meaning that it can have a value from a specific set of possible values.
This set includes:
col
row
colgroup
rowgroup
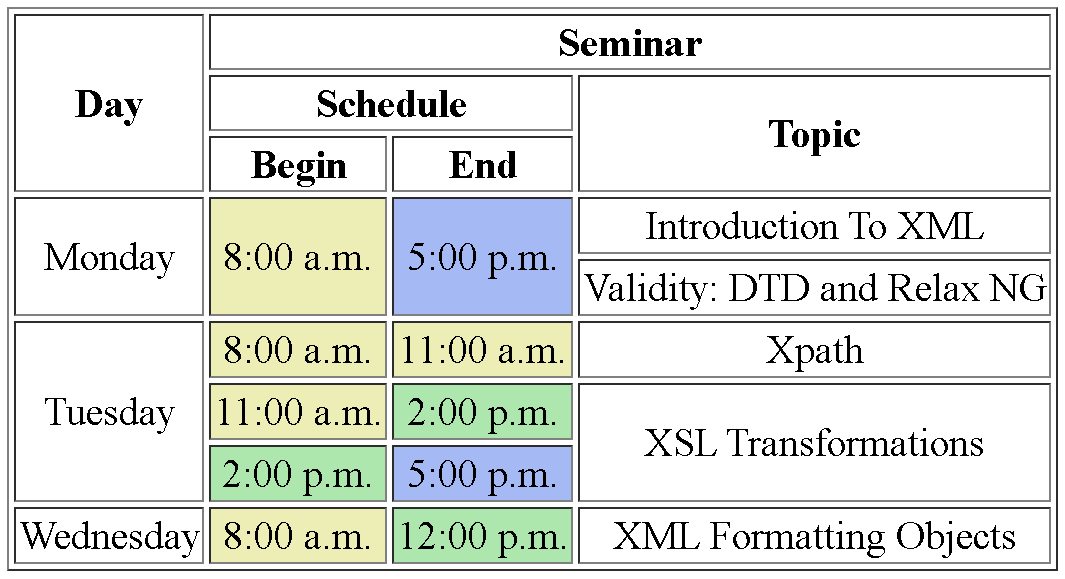
Try to create a Table like this -

Click here to get the Solution:- Github Repository
References:
https://developer.mozilla.org/en-US/docs/Web/HTML/Element/th#attr-scope https://www.w3.org/TR/WCAG20-TECHS/H63.html
Section 2-: Forms in HTML
What is an HTML form?
An HTML Form is a section of the document that collects input from the user. The input from the user is generally sent to a server (Web servers, Mail clients, etc). We use the HTML <form> element to create forms in HTML.
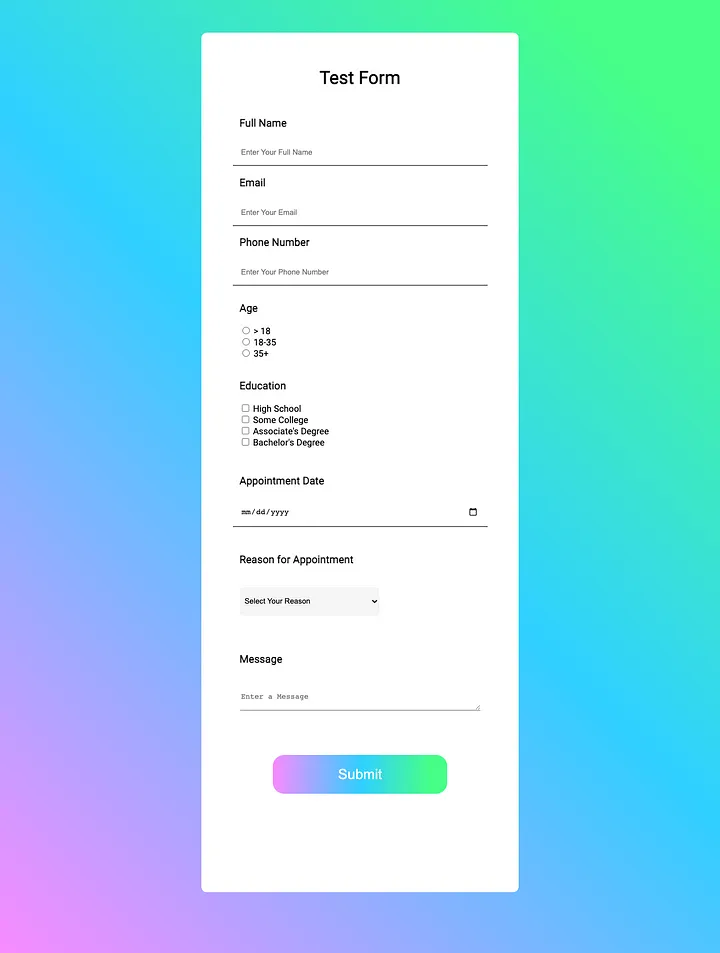
Example-1
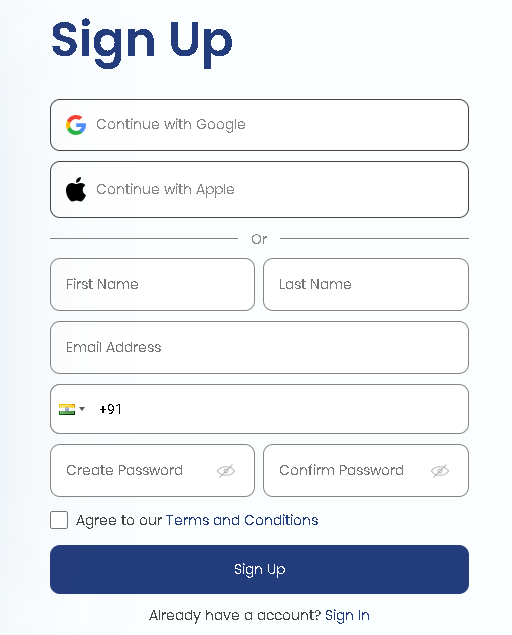
Example-2

Simple Formatting
Within the above example, we have a good amount of labels, such as “Test Form” and “Name”. These are coded using “<label>”, the text of your choice, and then “</label>”.
Finally, to add a new line after each label or input box/option, we can use “<br/>”. The following code will give us the label “Test Form” and a new line for whatever comes next.
<h1><label> Test Form </label></h1>
Different Input Types
There are many different types of inputs for HTML forms, such as a text box, large text box, dropdown menu, button, checkbox, radio, password, email, date, time, file, color, image, hidden, range, submit, reset, etc. Let's explain how each one works.
1. Simple Text Field Inputs
To get a simple text field for something like a name, use the following code and change the name attribute (“full_name”) to whatever you want to name your input.
As a general rule of thumb, you should let each input have its unique name attribute.
Placeholder is the text you in your input column before typing in the value.
2. Password Inputs
Password inputs are just like text fields, but they do not show while entering them.
For this code, we’ve added an input type as "password". In the future, we’ll be changing the type attribute to customize our input.
Again, you should change the name attribute to what you want to call your input.
3. Email Inputs
Email inputs are just like text fields, but they require the user to include an “@” symbol in their input.
For this code, we’ve added an input type as "email". In the future, we’ll be changing the type attribute to customize our input.
Again, you should change the name attribute to what you want to call your input.
4. Phone Number Inputs
The phone number input is, like the email input, a text field input but with more restrictions. This will require the user to enter 10 numerical digits (which is what the pattern attribute determines).
Here, it’ll be just like before but the type attribute will be equal to “tel”. And, again, you should change the name of what you want to call your input.
5. Radio Buttons
Radio buttons are for any multiple-choice questions with one answer.
To code these, it’ll be just like before but with the type attribute equal to “radio” and an additional value attribute.
6. Checkboxes
Checkboxes are just like radio buttons, but users are allowed to select more than one choice.
The type attribute here is “checkbox”. This will be coded just like radio buttons, except we’re giving each answer choice its name attributes.
7. Date Inputs
The date input will allow users to select a date from a pop-up calendar.
This is coded just like the email or phone number inputs, but the type attribute is “date”.
8. Dropdown Menus
Dropdown menus work like radio buttons, just with an alternate appearance. However, they are coded a little differently.
To begin, this acts as a select option rather than an input option.
Each option value attribute will be like the input value attribute before, which will be followed by the label for each choice.
Make sure each option value line starts with two additional spaces and the entire section ends with “</select>”.
To show a placeholder to let the user know what to select, we give it an option value of “disabled selected” and then add our text.
9. Large Text Field Inputs
Large text field inputs are just like simple ones but allow for more text.
Coding these are simple. Just use the above code and change the name attribute as wanted. Here, we call this a textarea rather than an input.
10. Week Inputs
The <input type="week"> allows the user to select a week and year. Depending on browser support, a date picker can show up in the input field.
11. Input Type URL
The <input type="url"> is used for input fields that should contain a URL address. Depending on browser support, the URL field can be automatically validated when submitted.
12. Input Type Time
The <input type="time"> allows the user to select a time (no time zone). Depending on browser support, a time picker can show up in the input field.
13. Input Type Search
The <input type="search"> is used for search fields (a search field behaves like a regular text field).
14. Input Type Range
The <input type="range"> defines a control for entering a number whose exact value is not important (like a slider control). The default range is 0 to 100. However, you can set restrictions on what numbers are accepted with the min, max, and step attributes:
15. Input Type Color
The <input type="color"> is used for input fields that should contain a color.
16. Input Type Image
The <input type="image"> defines an image as a submit button. The path to the image is specified in the src attribute.
17. Input Type File
The <input type="file"> defines a file-select field and a "Browse" button for file uploads.
18. Input Type Hidden
The <input type="hidden"> defines a hidden input field (not visible to a user).
A hidden field lets web developers include data that cannot be seen or modified by users when a form is submitted. A hidden field often stores what database record needs to be updated when the form is submitted.
Note: While the value is not displayed to the user in the page's content, it is visible (and can be edited) using any browser's developer tools or "View Source" functionality. Do not use hidden inputs as a form of security!
19. Input Type Month
The <input type="month"> allows the user to select a month and year.
20. Input Type Number
The <input type="number"> defines a numeric input field. You can also set restrictions on what numbers are accepted.
The following example displays a numeric input field, where you can enter a value from 1 to 5:
21. Input Type Button
<input type="button"> defines a button:
22. Input Type Submit
<input type="submit"> defines a button for submitting form data to a form handler. The form handler is typically a server page with a script for processing input data. The form handler is specified in the form's action attribute:
22. Input Type Reset
<input type="reset"> defines a reset button that will reset all form values to their default values:
Summary :-
The article is divided into two sections. In Section 1, the focus is on tables in HTML. It explains how the HTML <table> element is used to display tabular data in rows and columns. The article covers topics such as creating simple tables with header cells (<th>) and content cells (<td>), spanning columns or rows using the colspan and rowspan attributes, and using additional elements like <thead>, <tbody>, <tfoot>, and <caption> to add semantic value and style to tables.
Section 2 of the article discusses forms in HTML. It starts by introducing the HTML <form> element, which is used to collect user input. The article provides examples and explanations for different types of form inputs, including text fields, password fields, email fields, phone number fields, radio buttons, checkboxes, date inputs, dropdown menus, large text fields, and various input types like URL, time, search, range, color, image, file, hidden, month, number, button, submit, and reset.
Overall, the article serves as a comprehensive guide for working with tables and forms in HTML, covering various aspects and providing examples for better understanding.
Thank You!
for reading the article, I hope you found it informative and helpful in understanding the Tables and Forms in HTML.
If you have any further questions or need clarification on any topic discussed in the article, please feel free to ask. Happy coding and best of luck with your web development journey!
Subscribe to my newsletter
Read articles from Tabish Iqbal directly inside your inbox. Subscribe to the newsletter, and don't miss out.
Written by

Tabish Iqbal
Tabish Iqbal
I am Learning MERN Stack for developing Web & hybrid Mobile Application. I am learning currently on Frontend technologies (HTML5, CSS3, Tailwind, Javascript, and other JS libraries) and will learn Backend technologies (Mongo DB & Node JS) in a span of 6 months with great projects, keep an eye on my profile for updates. I am also skillful in C, C++ Java and Data Structures & Algorithms. Aspiring for a challenging career in Software Development as to use my learned skills and experience for best results.
