Handling Touch And Mouse Events In Cypress [Tutorial]
 Narayanan Palani
Table of contents
- Cypress UI Interaction Commands
- Cypress Trigger Command
- Mouse Down Events using Cypress
- Mouse Over Events using Cypress
- Mouse Leave Events using Cypress
- Mouse Move Events using Cypress
- Cypress Click Command
- Cypress Double Click Command
- Cypress Right Click Command
- Cypress Check/Uncheck Commands
- How to run mobile browser tests using Cypress
- Conclusion
Cypress is one of the selected-few JavaScript test automation tools that has climbed the ranks when it comes to modern web testing. Though I have extensively used Selenium, I am fascinated with the speed at which the Cypress team comes with innovative features to help developers and testers around the world. What I particularly liked about Cypress test automation is its extensive support for accessibility automation over HTML Semantic Element properties such as aria-label, etc.
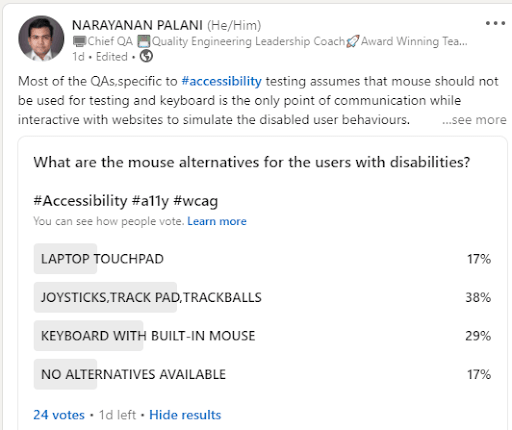
Most of the QA engineers that are inclined towards accessibility testing assume that Cypress events like mouse clicks should not be used for automation testing. As per my extensive experience in the testing field, I would like to mention that it’s incorrect to assume that the keyboard is the only point of communication. Awareness of the general public is also not accurate, as many have the notion that laptop touchpad is accessible to differently-abled users.
Mobile emulator online from LambdaTest allow you to seamlessly test your mobile applications, websites, and web apps on mobile browsers and mobile devices.
Manually testing all the mouse operations with mouse alternatives (e.g., trackpad, joystick, etc.) can be cumbersome for the dev and QA teams. Fortunately, Cypress lets you automate accessibility tests with Cypress-Axe. However, the handling of Cypress events is completely different from how events are handled in the Selenium framework. In case you are curious to know the difference between Selenium and Cypress, make sure to check out our blog on Cypress vs. Selenium comparison.
In the meantime, if you’d like to run your Cypress test scripts over a Selenium Grid online then leverage LambdaTest for your test automation.
Selenium uses the Action APIs (i.e., action.moveToelement) function to simulate the mouse behavior but comes with a huge flakiness. On the other hand, Cypress events involving peripherals like mouse, keyboards, etc., have been exceptionally handled in the framework. In this blog of cypress tutorial, I would deep dive into mouse event automation with the Cypress framework. It would help you in the efficient handling of Cypress events when running Cypress test automation scripts.
Starting your journey with Cypress Testing? Check out how you can test your Cypress test scripts on LambdaTest’s online cloud.
Cypress UI Interaction Commands
The Cypress framework provides a number of commands that let you interact or trigger some events in the DOM. These Cypress events are fired similarly as the web browser would fire. We would cover Cypress touch and mouse events and examples of how you can use them in your Cypress test scripts.
You can go through the following video to learn Cypress commands that can help you write tests that interact with the user interface of an application. However, you can also visit the LambdaTest YouTube channel for videos that will guide you through the Cypress testing journey.
A comprehensive end to end Testing tutorial that covers what E2E Testing is, its importance, its benefits, and how to perform it with real-time examples.
Get the best out of your Cypress tests with LambdaTest’s online Cypress automation tool. Check out how you can test your Cypress test scripts using LambdaTest’s online cloud.
Cypress Trigger Command
The trigger command in Cypress helps trigger an event on the DOM element. X, Y positions can also be supplied to the trigger command. Shown below is the syntax of the trigger command:
.trigger(eventName)
    .trigger(eventName, position)
    .trigger(eventName, options)
    .trigger(eventName, x, y)
    .trigger(eventName, position, options)
    .trigger(eventName, x, y, options)
You can have log, force, bubbles, timeout, and cancelable as the options in the trigger command. Here are some of the ways in which Cypress trigger command can be used to perform events on the WebElement:
cy.get('a').trigger('mousedown')
    cy.get('sample_button').trigger('mousedown', 'topLeft')
    cy.get('sample_button').trigger('mouseover', { bubbles: false })
    cy.get('sample_button').trigger('mouseup', 20, 30)
Let’s look at some of the in-depth examples that demonstrate the usage of Cypress mouse events so that you can perform the relevant mouse operations using the Cypress framework.
Mouse Down Events using Cypress
Mouse interactions such as mouse down and mouse up are some of the most common operations you would normally perform with a mouse. For demonstration, we perform a mouse down event on the Admin tab available on the OrangeHRM website.
Step Definition
When('I move mouse down on admin tab section', () => {
      homeOrangehrmPage.mousedownAdminTab()
    })
Function
mousedownAdminTab () {
        cy.xpath('//a[@id="menu_admin_UserManagement"]')
          .invoke('show')
          .should('be.visible')
          .trigger('mousedown')
      }
As seen above, the admin menu is located using the XPath locator. Once the element is located, the invoke method is used to call the JQuery method ‘show’ on the element. The corresponding WebElement should be visible.
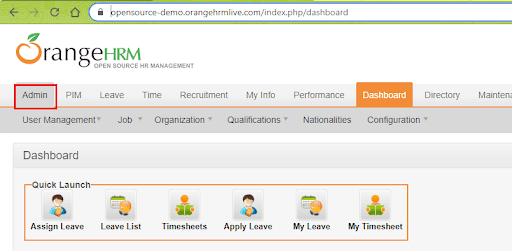
On detecting the desired element’s visibility, a mouse down event is triggered on the element.
New Selenium IDE supports cross browser testing and parallel tests for automation along with record and replay function. Here’s why you shouldn’t miss out on it.
Mouse Over Events using Cypress
Using the trigger command, you can also perform Cypress mouse over Event. The only prerequisite is that the DOM element must be in an ‘interactable’ state before this Cypress event is triggered. Interactable means that the button must be visible and should not be disabled.
To showcase the usage of Cypress mouse over event, we use the same HRM website example:
Step Definition
When('I mouseover on first row of results table of admin tab', () => {
        homeOrangehrmPage.mouseOverAdminResultTableR1C2()
    })
Function
mouseOverAdminResultTableR1C2 () {
        cy.xpath('//a[@id="menu_admin_UserManagement"]')
          .invoke('show')
          .should('be.visible')
          .trigger('mouseover')
    }
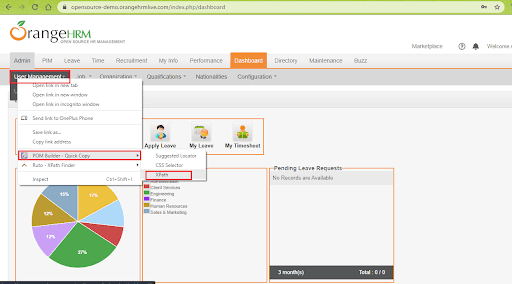
As seen above, the desired element is located using the XPath locator. Once the element is located and checked for its visibility, the mouse over event is invoked to interact with the corresponding element.
Mouse Leave Events using Cypress
Once the mouse over event is performed, mouseleave event helps in going back to the earlier stage of the UI display.
We demonstrate the mouseleave option using the OrangeHRM website.
Step Definition
When('I mouseleave on first row of results table of admin tab', () => {
        homeOrangehrmPage.mouseleaveAdminResultTableR1C2()
    })
Function
mouseleaveAdminResultTableR1C2 () {
        cy.xpath('//a[@id="menu_admin_UserManagement"]')
          .invoke('show')
          .should('be.visible')
          .trigger('mouseleave')
    }
Mouse Move Events using Cypress
If you are new to this particular mouse event, I would recommend trying out the mouse move event. Try the sample code here: https://www.w3schools.com/jsref/tryit.asp?filename=tryjsref_onmousemove
Function to perform mouse left and mouse right events:
mousActionsonDashboardGraph () {
        cy.xpath('//*[@id=\"div_graph_display_emp_distribution\"]')
          .as('graph')
          .trigger('mousedown')
          .trigger('mousemove')
          .trigger('mouseup')
          .trigger('mouseleft', { which: 1, pageX: 600, pageY: 100 })
          .trigger('mouseright', { which: 1, pageX: 600, pageY: 600 })
          .trigger('mouseleave')
    }
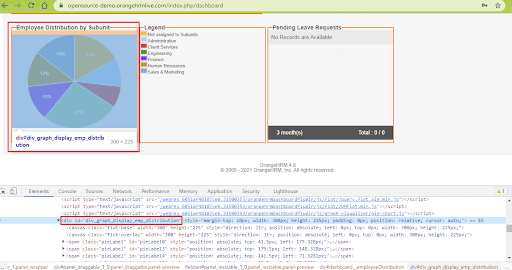
Once we are inside the Employee Distribution chart, we use the mouseleft and mouseright options offered with the trigger command to move the mouse to the desired X and Y coordinates.
Watch this video to learn how Cypress can be used to automate accessibility testing.
Through this usability testing tutorial, you will learn how usability testing is a great way to discover unexpected bugs, find what is unnecessary or unused before going any further, and have unbiased opinions from an outsider.
Cypress Click Command
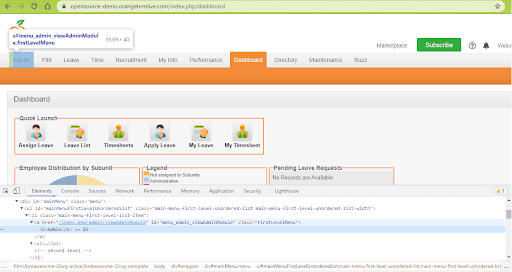
In case you want to perform a Cypress mouse event like click, you can use the .click() method offered by the Cypress framework. It lets you click on any DOM element. Like the .trigger() method, the .click() method can also be invoked in different ways.
.click()
    .click(options)
    .click(click_pos)
    .click(click_pos, options)
    .click(x, y)
    .click(x, y, options)
Click position (i.e. click_pos) could be center, topLeft, topRight, left, right, bottom, bottomLeft, bottomRight, etc. The possible values of options are log, force, multiple, and timeout.
Here is a sample demonstration of the click method in Cypress using the Orange HRM website:
const admin_tabxPath_Homepage = '//*[@id=\'menu_admin_viewAdminModule\']'
    clickAdminTab () {
        cy.xpath(admin_tabxPath_Homepage)
          .invoke('show')
          .should('be.visible')
          .click()
    }
Once the required WebElement is visible, then the click() method is used for clicking on that element.
Cypress Double Click Command
The .dblclick() method in Cypress is used for double clicking on a DOM element. Like the .click() method, the .dblclick() method can also be used in a number of ways:
.dblclick()
    .dblclick(options)
    .dblclick(dblclick_pos)
    .dblclick(dblclick_pos, options)
    .dblclick(x, y)
    .dblclick(x, y, options)
The method accepts the same options as mentioned in the .click() method.
Shown below is the demonstration of .dblclick() method that double clicks on the Admin module of the OrangeHRM website:
const admin_tabxPath_Homepage = '//*[@id=\'menu_admin_viewAdminModule\']'
    dblclickAdminTab () {
        cy.xpath(admin_tabxPath_Homepage)
          .invoke('show')
          .should('be.visible')
          .dblclick()
    }
Cypress Right Click Command
The .rightclick() method in Cypress is used for right clicking on a DOM element. It will not open context menus that are native to the web browser. The method can also be invoked in a number of ways:
.rightclick()
    .rightclick(options)
    .rightclick(click_pos)
    .rightclick(click_pos, options)
    .rightclick(x, y)
    .rightclick(x, y, options)
Shown below is the demonstration of .rightclick() method that opens up the context menu when right clicked on the Admin module of the OrangeHRM website:
const admin_tabxPath_Homepage = '//*[@id=\'menu_admin_viewAdminModule\']'
    rhtclickAdminTab () {
        cy.xpath(admin_tabxPath_Homepage).rightclick()
    }
Cypress Check/Uncheck Commands
The .check() and .uncheck() method in Cypress is used for checking and unchecking the checkboxes and radio buttons respectively. This method can also be invoked in a number of ways:
.check()
    .check(value)
    .check(values)
    .check(check_ops)
    .check(value, check_ops)
    .check(values, check_ops)
Shown below is the syntax of the .uncheck() method:
.uncheck()
    .uncheck(value)
    .uncheck(values)
    .uncheck(uncheck_ops)
    .uncheck(value, uncheck_ops)
    .uncheck(values, uncheck_ops)
The possible value of options (i.e. check_ops/uncheck_ops) are log, force, and timeout.
Shown below is the demonstration of check and uncheck methods of the Cypress framework:
const selectAll_pimTab = '//*[@id=\'ohrmList_chkSelectAll\']'
    /* Check the radio button if the tab is enabled */
    checkEmployees () {
        cy.xpath(selectAll_pimTab).not('[disabled]').check()
    }
    /* Check if the appropriate radio options are checked or not */
    allEmployeesSelected () {
        cy.xpath(selectAll_pimTab).not('[disabled]').should('be.checked')
    }
    /* Uncheck if the options are checked */
    uncheckEmployees () {
       cy.xpath(selectAll_pimTab).not('[disabled]').should('be.checked').uncheck()
    }
Apart from these methods that let you perform Cypress operations, Cypress also supports Type, Clear, and Select commands.
In this System testing tutorial, learn why System testing is important and all the intricacies of the System testing process.
How to run mobile browser tests using Cypress
All you need to do is to launch the browser and reload the page with the respective viewport of the particular mobile or tablet version I wanted to test against. Entire viewport combinations ranging from different iPhone versions, MacBook versions, iPad versions, and popular android versions are listed in Cypress documentation.
After reloading the page with a particular viewport, you just need to perform the trigger event to perform mobile interactions such as touchstart.
Feature File:
 Feature: MouseEvents verification in various compatibility models of devices

    Scenario: Mouseactions on Dashboard Tab Graph using iPhone6 Mobile
          Given I open OrangeHRM homepage
          When I SignIn as user
          When I see the page in iphone6 version
          When I perform move actions on dashboard graph
          Then text insights displayed below dashboard successfully

    Scenario: Mouseactions on Dashboard Tab Graph using iPhonexr Mobile
          Given I open OrangeHRM homepage
          When I SignIn as user
          When I see the page in iphonexr version
          When I perform move actions on dashboard graph
          Then text insights displayed below dashboard successfully

    Scenario: Mouseactions on Dashboard Tab Graph using macbook-15 device
          Given I open OrangeHRM homepage
          When I SignIn as user
          When I see the page in macbook-15 version
          When I perform move actions on dashboard graph
          Then text insights displayed below dashboard successfully

    Scenario: Mouseactions on Dashboard Tab Graph using iPad2 device
          Given I open OrangeHRM homepage
          When I SignIn as user
          When I see the page in iPad2 version
          When I perform move actions on dashboard graph
          Then text insights displayed below dashboard successfully
Step Definition to launch or reload the page with IPhone 6 viewport:
When('I see the page in iphone6 version', () => {
      homeOrangehrmPage.viewPortIphone6()
    })
Function:
viewPortIphone6 () {
        cy.viewport('iphone-6')
      },
Step Definition to launch or reload the page with IPhoneXR viewport:
When('I see the page in iphonexr version', () => {
      homeOrangehrmPage.viewPortIphonexr()
    })
Function:
viewPortIphonexr () {
        cy.viewport('iphone-xr')
      },
Step Definition to launch or reload the page with Macbook-15 viewport:
When('I see the page in macbook-15 version', () => {
      homeOrangehrmPage.viewPortmac15()
    })
Function:
viewPortmac15 () {
        cy.viewport('macbook-15')
      },
Step Definition to launch or reload the page with iPad2 viewport:
When('I see the page in iPad2 version', () => {
      homeOrangehrmPage.viewPortipad2()
    })
Function:
viewPortipad2 () {
        cy.viewport('ipad-2')
      },
Take this certification to showcase your expertise with end-to-end testing using Cypress automation framework and stay one step ahead.
Here’s a short glimpse of the Cypress 101 certification from LambdaTest:
A complete Manual testing tutorial covering all aspects of Manual testing, including strategies and best practices.
Perform Cypress Parallel Testing on LambdaTest and speed up the testing and release process. Check out how you can test your Cypress test scripts on LambdaTest’s online cloud.
Conclusion
If you are trying to master the test automation profession, you need to be a test automation architect with capabilities that include automating mouse events most smartly.
Automating mouse events and Cypress touch interactions not only reduces the workload but also facilitates helping to find more defects when small code changes are being made in the complex development code repository. Since it is difficult to perform mouse interactions every time through manual tests, automated mouse tests and getting them run through cypress-jenkins integrated tests are smarter ways to spot defects!
Subscribe to my newsletter
Read articles from Narayanan Palani directly inside your inbox. Subscribe to the newsletter, and don't miss out.
Written by
