Level - 4: Exploiting Unencrypted EBS volume Snapshots
 Goodycyb

Welcome to Level 4. We have been assigned the task of accessing the web page running on an EC2 at 4d0cf09b9b2d761a7d87be99d17507bce8b86f3b.flaws.cloud for this level.
Creating a Profile with Access key credentials
Now let's create a profile with the access key credentials:
access_key: AKIAJ366LIPB4IJKT7SA
secret_access_key: OdNa7m+bqUvF3Bn/qgSnPE1kBpqcBTTjqwP83Jys
Type the command on your terminal: aws configure --profile <any-name-of-your-choice>
NB: For this lab, the profile name used is "flaws_cred"

Next, we need to retrieve the information associated with the access credentials.
The command aws --profile flaws sts get-caller-identity provides details such as:
Account: The AWS account number associated with the credentials.
UserId: The unique identifier of the IAM user or AWS service linked to the credentials.
Arn: The Amazon Resource Name (ARN) that uniquely identifies the IAM user or AWS service.
From the previous step, we were able to create a profile using the access key credentials gotten from level-3. Once you are done, Run the command on your terminal
aws --profile <name-you-created> sts get-caller-identity
Once again for this lab, the profile name is
flaws_cred

Note the Account ID: 975426262029
- Moving forward, it is worth noting that from the level-4 instruction “a snapshot of an EC2 instance was made shortly after nginx was set up on it”

Exploring EC2 backups associated with the account ID Discovered
Now let's look for the EC2 backups associated with the account ID.
Use the command
aws ec2 describe-snapshotswhich provides detailed information about the snapshots associated with the EC2 environment. Info such as snapshot details, including their unique identifiers (IDs), creation time, volume ID, size, and other relevant information.Type the command:
aws --profile <your-created-name> ec2 describe-snapshots --owner-id 975426262029 --region us-west-2
NB: In this lab
your-created-namefor the profile is called “flaws_cred”
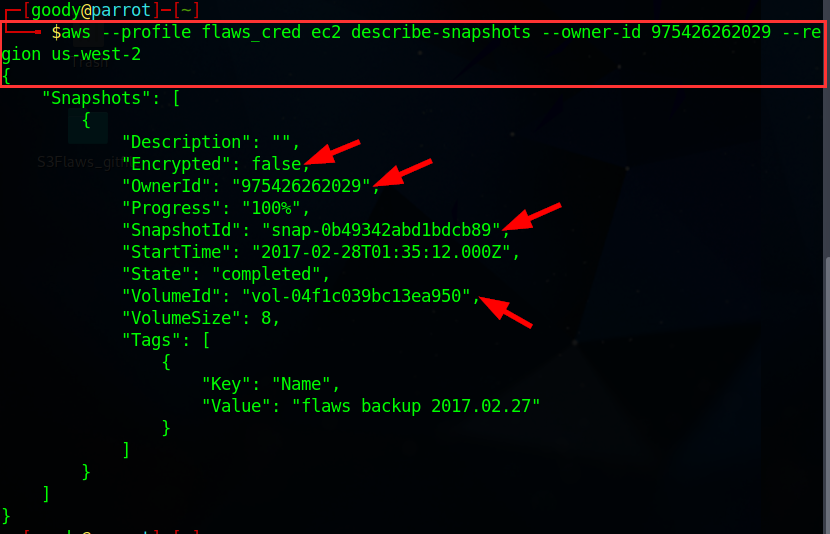
- From the Result provided as shown above, you will notice that the snapshot Encryption is set to False, which means it is not encrypted.
NOTE: This snapshot is tied to the OwnerId that we specified.
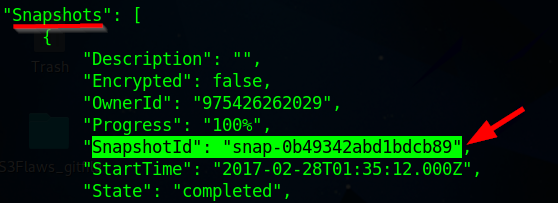
OwnerId: 975426262029 || Snapshot-Id: snap-0b49342abd1bdcb89 details, which will be used later in the labNow let's list snapshots associated with the AWS EC2 Environment in us-west-2 region using the command:
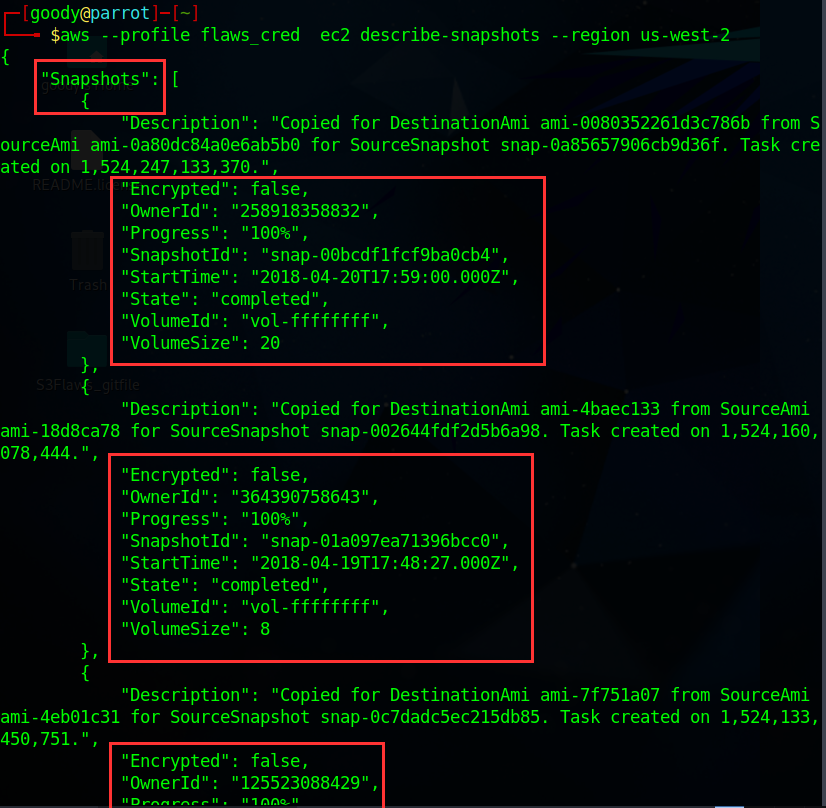
aws --profile <your-created-name> ec2 describe-snapshots --region us-west-2
NB: You will get a long list of snapshots with different OwnerId Numbers. Also this snapshots are likely daily backups which can be restored by any one because most of them are not encrypted.
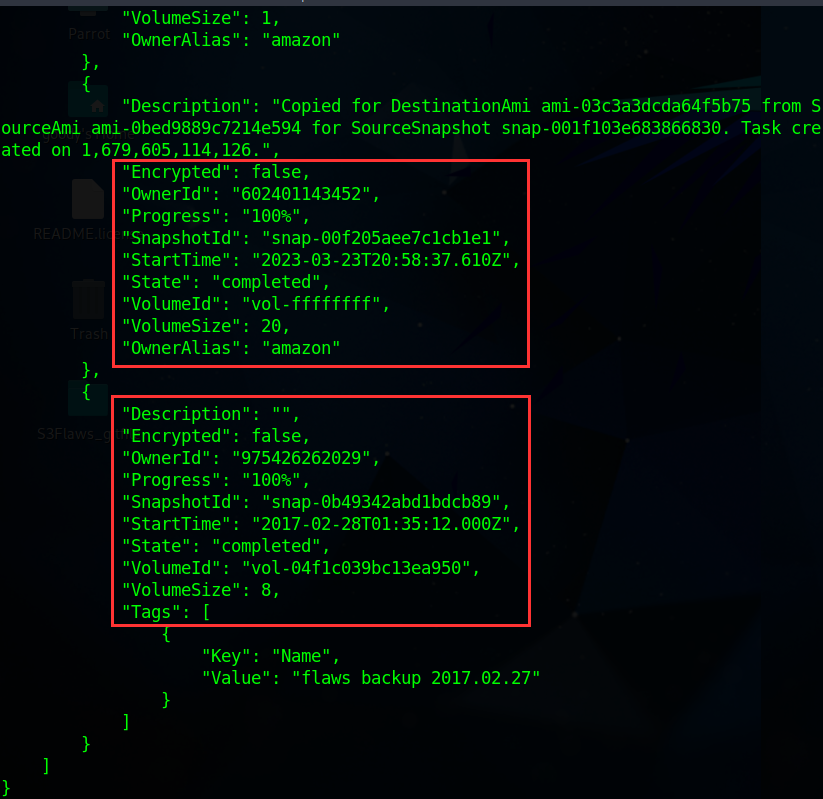
Now Back to the snapshot of owner-id 975426262029 what we are majorly concerned with for this level.
Since the snapshot of the owner-id 975426262029 isn’t encrypted, we can attach the EBS snapshot to any EC2 instance of our choice and access the data contained within the snapshot as if it were a regular disk volume connected to the instance. This process is called Mounting a snapshot ID.
By mounting a snapshot, we can retrieve or restore data from a previous point in time, perform data analysis or recovery operations, or use the snapshot as a basis for creating new instances or volumes.
Mounting Snapshot to EC2 Instance
Creating an IAM user account
Create an IAM user account and attach AdministratorAccess permissions
Create access key credentials for the IAM user account
Create a profile on AWS CLI with the IAM User access key credentials
Mount snapshot ID on us-west-2 on Aws CLI
Verify the EBS snapshot and Launch the EC2 instance
Step-1: Create an IAM user account with Administrator Access permission
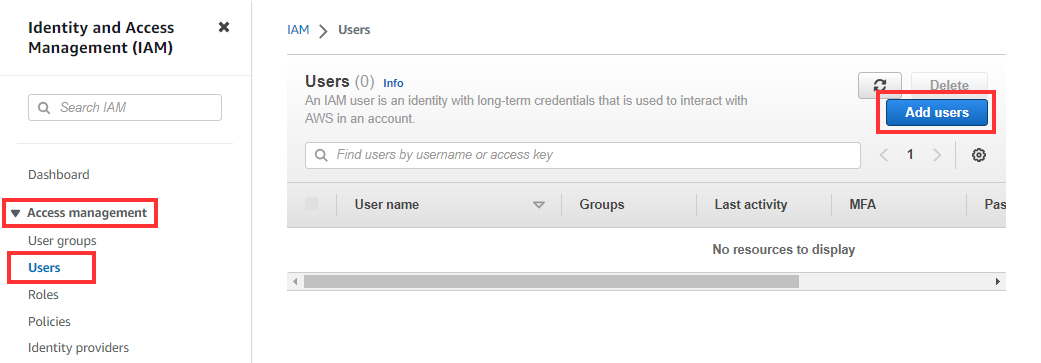
- Navigate to the IAM dashboard on your AWS console and from the left-hand side, under Access Management, click on “Users” and then click Add user
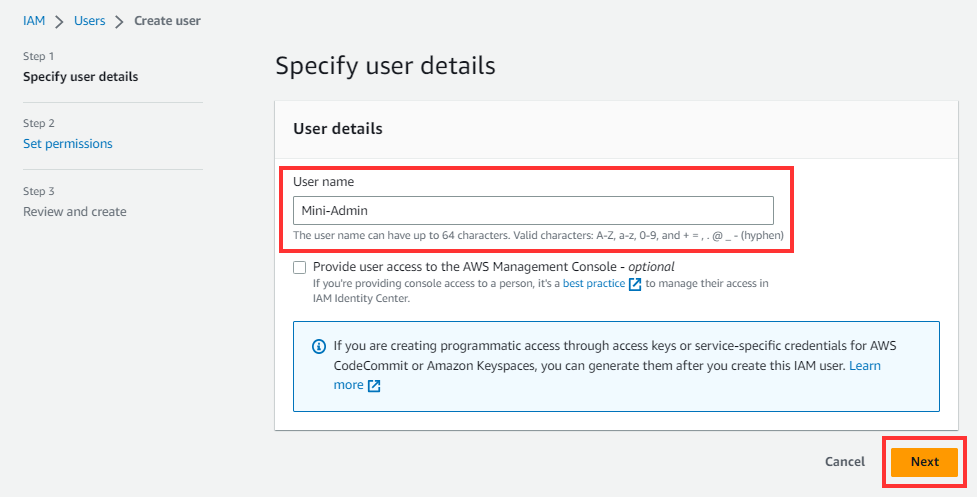
- Give it a name of your choice. In this lab, the name is given as Mini-Admin, then click Next
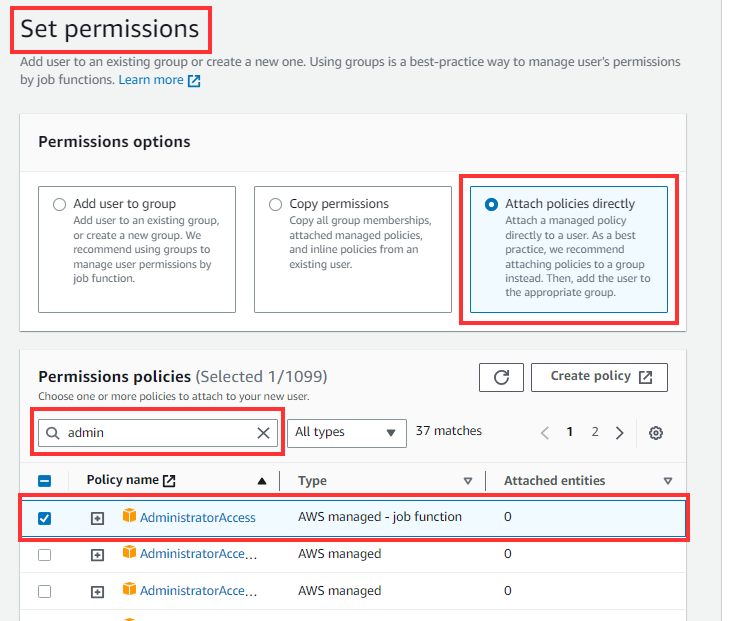
Under Set Permissions, click “Attach policies directly”. Then under “Permission Policies” search for “AdministratorAccess” and check the box.
Once done, scroll down and click Next.
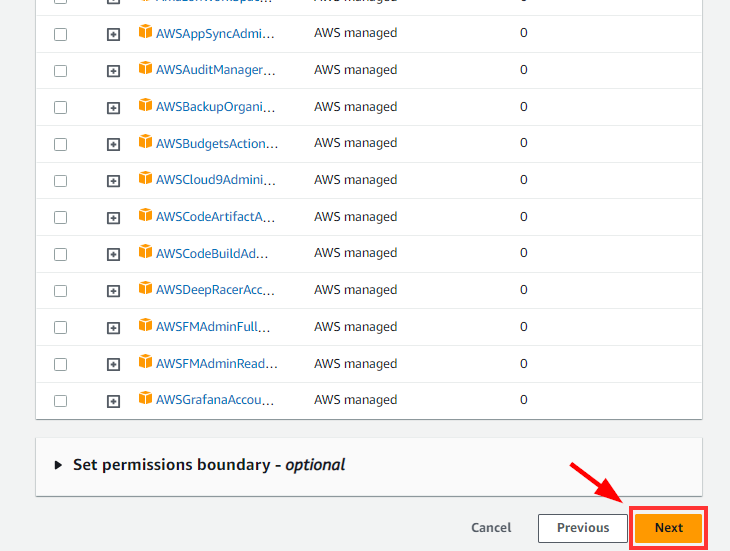
Review and click on “Create User”
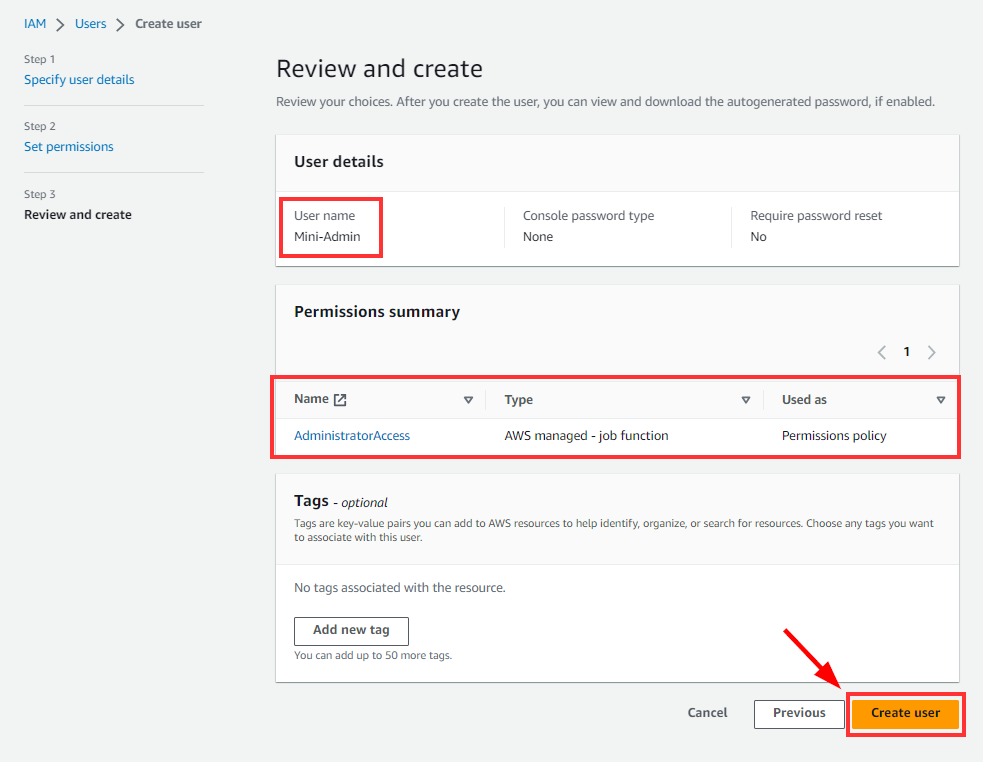
Step -2: Create access key credentials for the IAM user account created
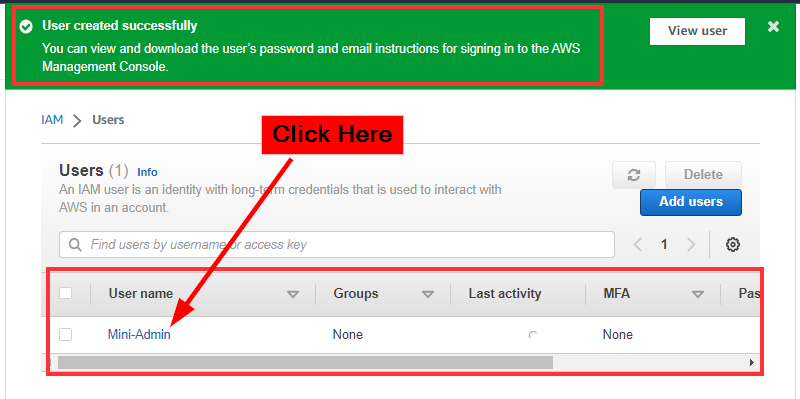
- Now that we have a “Mini-Admin” account created, now we create access key credentials.
⇒ click on “Mini-Admin”
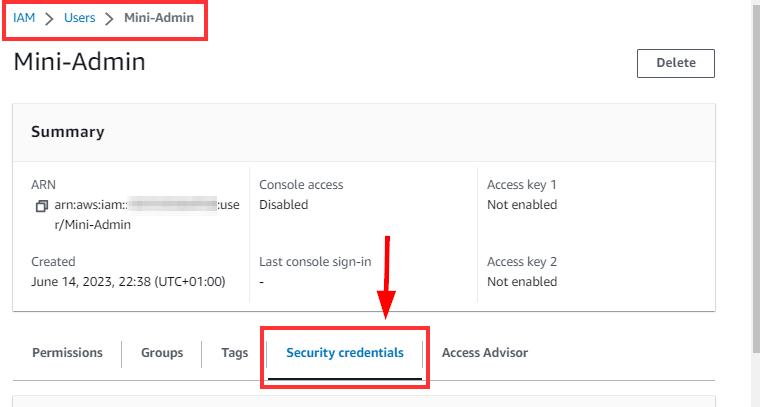
- On Mini-Admin Page, click on the Security credentials Tab.
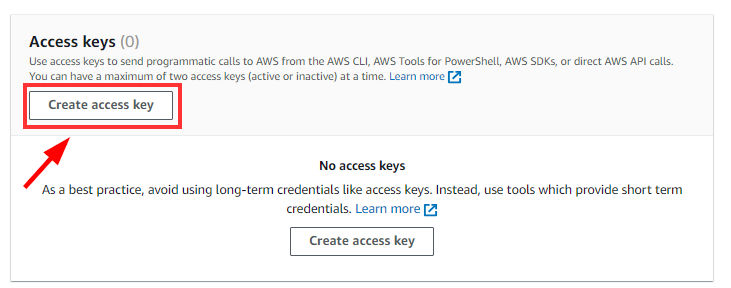
- Scroll down and click on “Create Access Key”
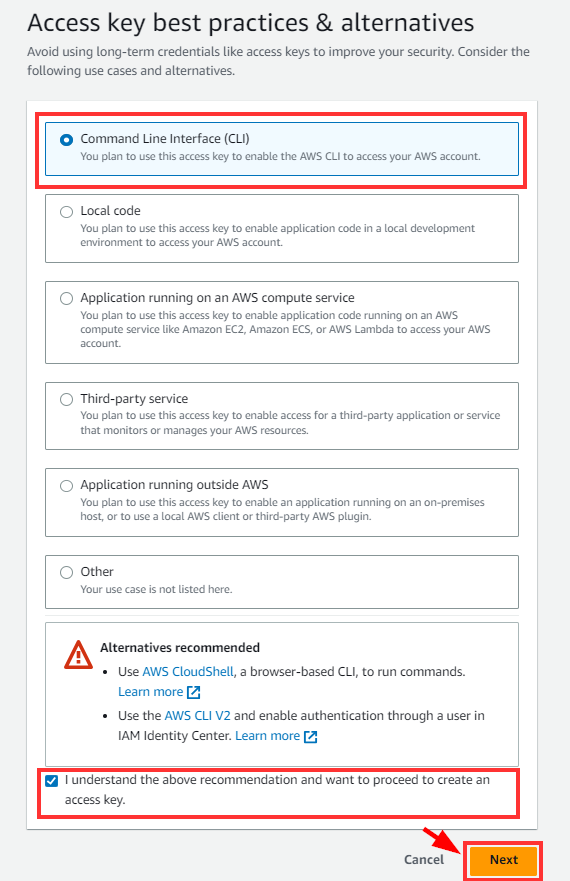
- On the “Create Access Key” page, check the radio option “Command Line Interface (CLI)” scroll down to the bottom and check the box, “ I understand the above recommendation and want to proceed to create an access key.” Then click Next
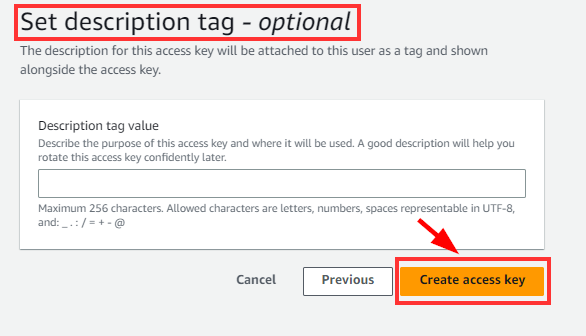
On the Set description tag - optional, you can leave it blank and then click on “Create access key”
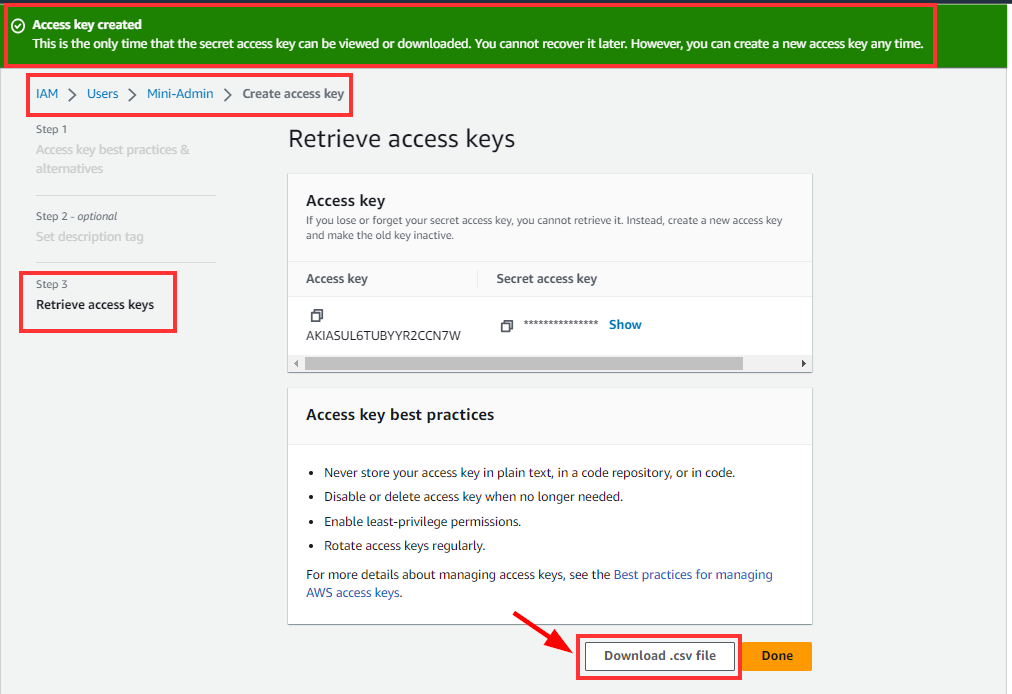
On the “Retrieve access keys” page, download the .csv file and click Done
Step-3: Create a profile on AWS CLI with the IAM User access key credentials
Now, navigate to your Linux terminal and type the command:
aws configure —profile <any-name-of your-choice>and supply the access key and access secret key from the .csv file you downloaded from the previous step.NB: Note the name of the profile you choose
For this lab, the profile name is
flaws_Ec2
Step-4: Mount snapshot ID on us-west-2
On your Linux Terminal, type the command:
aws --profile flaws_Ec2 ec2 create-volume --availability-zone us-west-2a --region us-west-2 --snapshot-id snap-0b49342abd1bdcb89
NB: Replace profile name with the name you created
--profile <your-created-name>
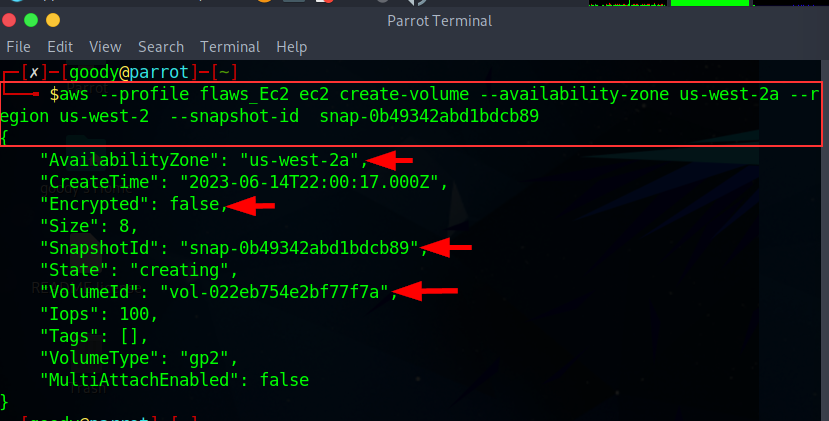
Thus, you have created an EBS volume from the snapshot-id snap-0b49342abd1bdcb89 on your Aws Account in region us-west-2.
Step-5(I): Verify the EBS snapshot and Launch EC2 instance
- Now, let's check on the AWS console for the Mounted Snapshot on us-west-2a
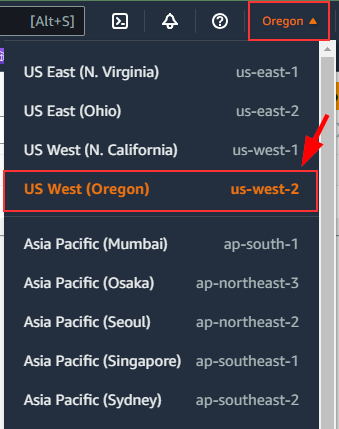
Make sure you change your region to US-WEST-2 on your AWS console.
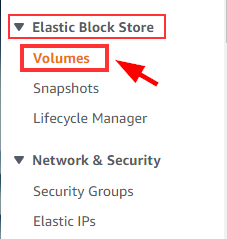
Navigate to EC2 on the Aws console and on the left plane, Under Elastic Block Store, click on “Volumes”

You will notice that the command created the EBS volume Snapshot. You can compare it with the Snapshot-Id as shown below.
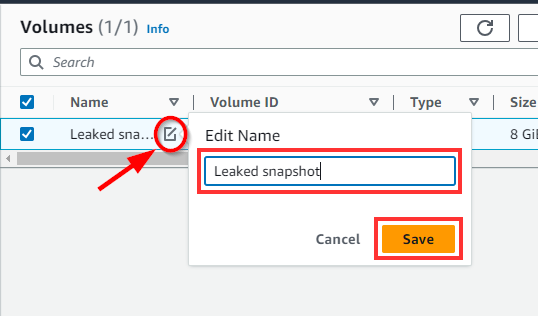
Let Name the volume by clicking on the icon then give it a name of your choice. then Save.
Step-5 (II): Launching an Ec2 Instance from the Leaked Snapshot
On the left plane, Under instances, click instance then click “Launch Instances”

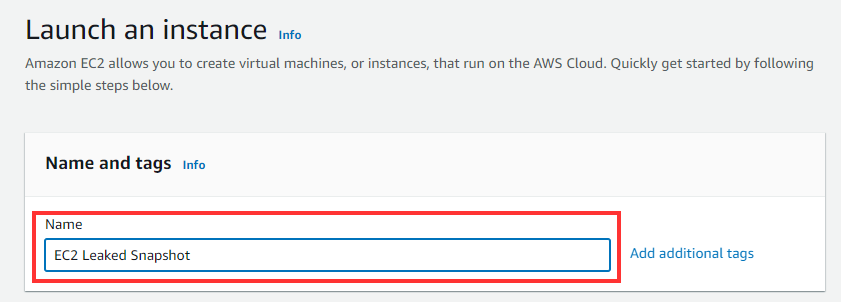
on Launch an instance page, give it a name. in this lab, the name is “EC2 Leaked Snapshot”
Next, under Amazon machine image, choose “Amazon Linux 2023 AMI” (free tier eligible)
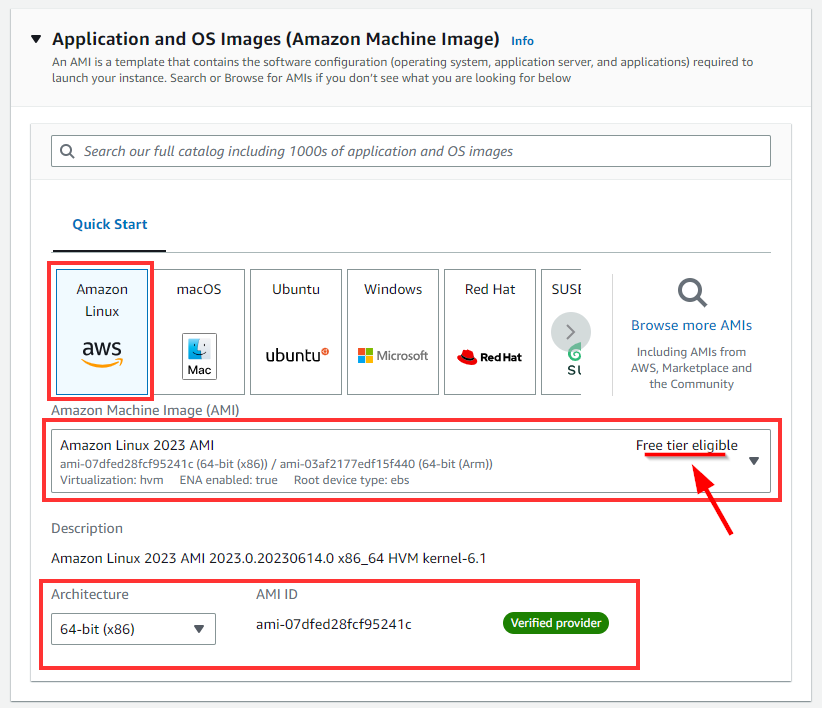
Under the Instance Type section, retain default as t2.micro (free tier eligible)

Under the key pair Section, click Create key pair

Give the “Key pair name” any name of your choice and NOTE the name, Here in this lab, it is named “Ec2-keys”, Select RSA as the key pair type and select .pem for Private key file format. Once done, click on Create key pair.
NB: we selected .pem because we will use Linux but you can select .ppk if you use windows and familiar with the putty software.
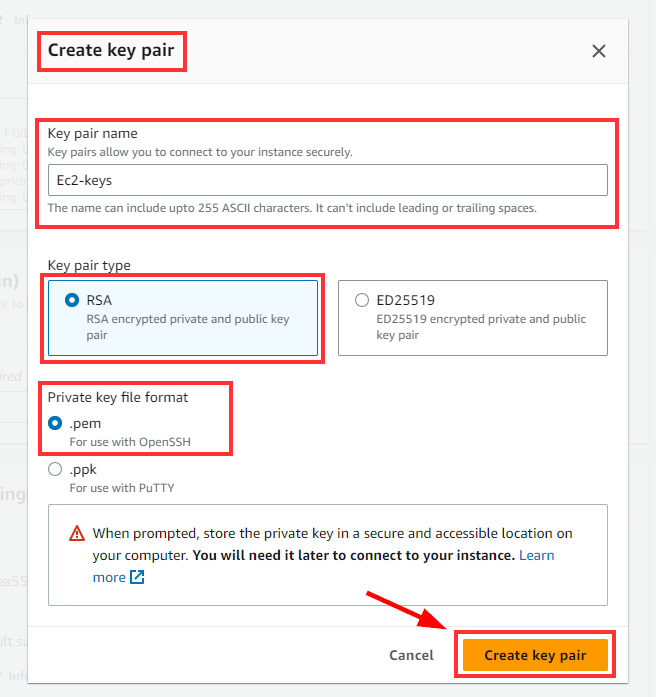
NOTE: A window pop-up to save the created key pair. Ensure you save it

Retain Network Settings as Default
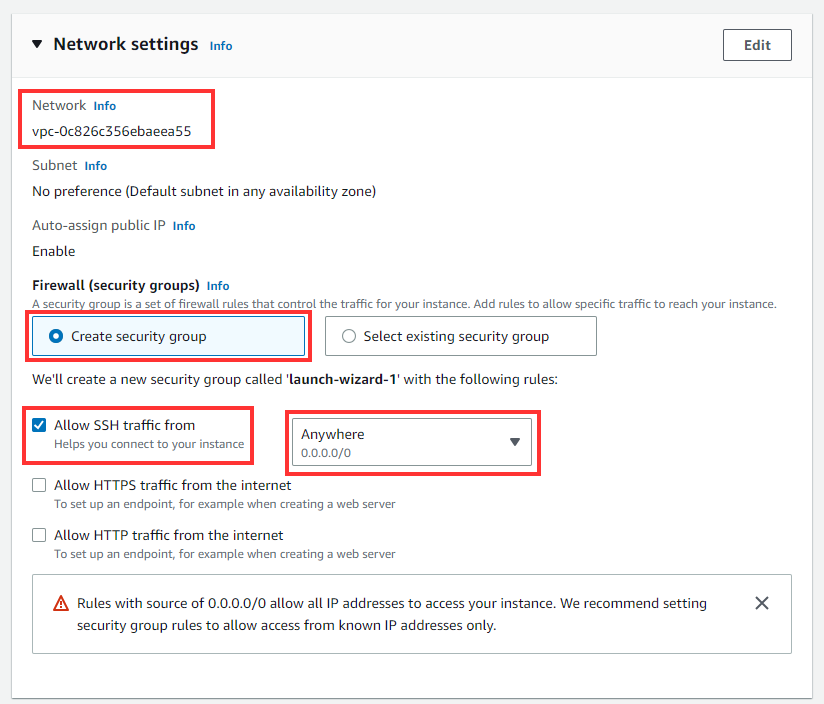
Next, Under Configure Storage, click Add New volume

- Set Device name as “dev/sdf”, Encrypted to “Not encrypted”. Under snapshot, find the
snapshot-id snap-0b49342abd1bdcb89. Retain all other default settings.
NB: The search for the
0b49342abd1bdcb89will take a while (2-4mins)
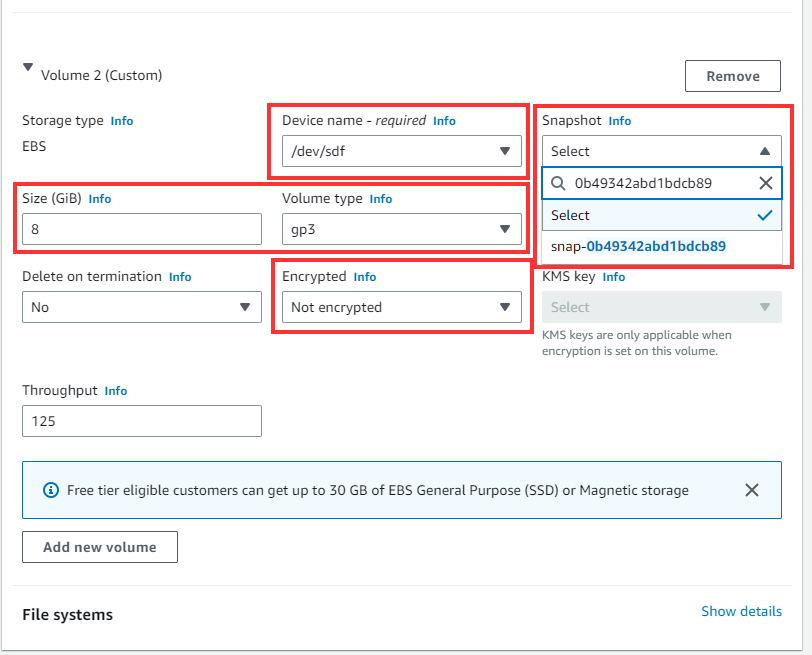
- Retain any other settings as default, scroll down, review, and Launch the instance
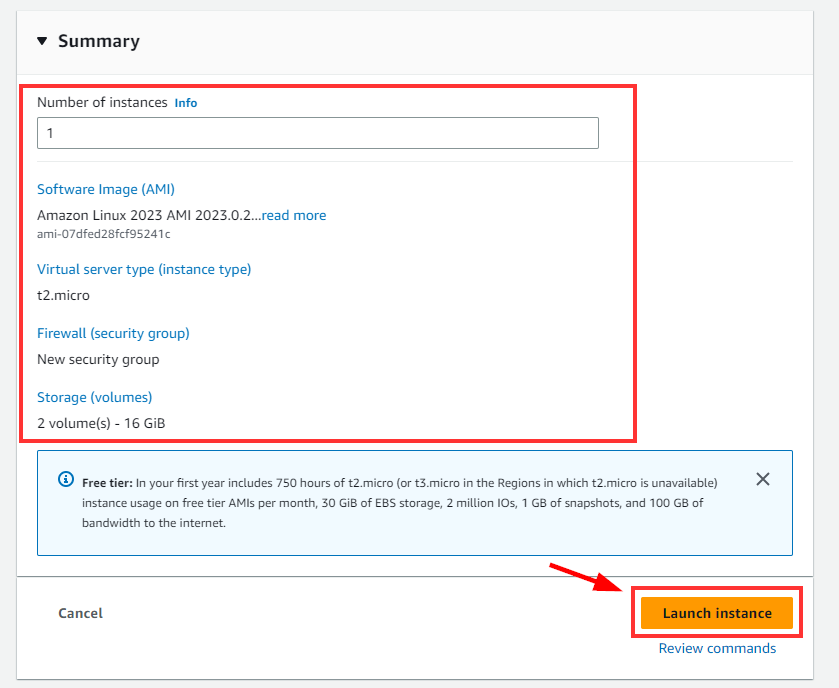
Thus, the EC2 instance is successfully created.

SSH into the newly created EC2 Instance
First, let's get the IP address of the EC2 Instance, Click on the Instance ID

Copy the Public IP of EC2 Leaked Snapshot

Next, Make sure the EC2 key pair is on your Linux (Parrot or Kali) Desktop as shown in the previous steps.
SSH simply means Remote access via terminal or CLI
On Linux terminals, type the command to
ssh -i Ec2-keys.pem ec2-user@18.237.115.252
From the above output, we have denied permission to access the EC2-keys.pem.
Problem: we got denied permission because of the Read, Write & Execute permission of the file "Ec2-keys.pem"
Solution: we need to change the permission for EC2-keys.pem to have only read permissions under the owner's permission. Recall in linux (Owner, groups, users)
⇒ on Linux Desktop type: ls -la this command gives information about hidden files as well as permission for files on the Desktop. Thus we can check for EC2-keys.pem.

As shown above, EC2-keys.pem has permissions from owner(7), groups(6) and users (6).
Hence, there needs to be a restriction to the file permission to read only for file owner and then remove all permissions for groups and users.
Therefore, to change the permission for EC2-keys.pem file, Type the command “**chmod 400”**

From the result, as shown in the image above, you will notice that the command set the file to read-only for the owner.
- Now, let's try to SSH again using the same command
ssh -i Ec2-keys.pem ec2-user@18.237.115.252since the file permission for EC2-keys.pem has changed to read-only.
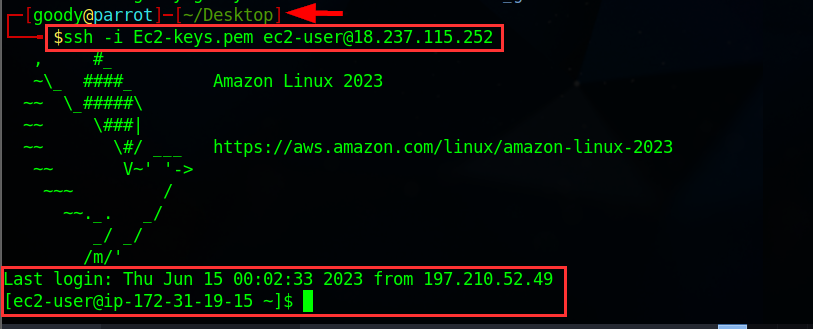
- Now, we have access to the created EC2 instance, let list drives (EBS) available using the command
lsblk
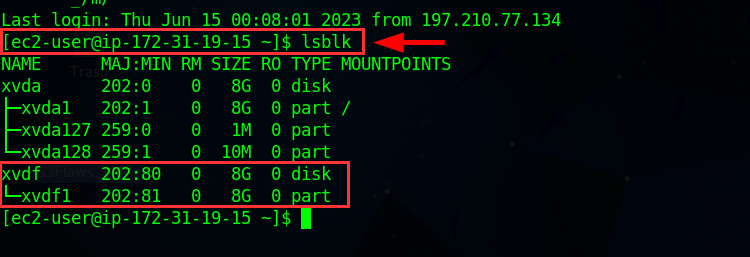
- Let view drive information for
xvdf1.Using the commandsudo file -s /dev/xvdf1

The output of the command indicates that /dev/xvdf1 is a partition formatted with the ext4 file system.
- Now, we mount
/dev/xvdf1Using the commandsudo mount /dev/xvdf1 /mnt

The command mounts the file system located on /dev/xvdf1 to the Mount point /mnt
Summary of the command
sudo mount /dev/xvdf1 /mntWhen executed with root privileges (
sudo), the command mounts the file system located on/dev/xvdf1to the directory specified by/mnt. After successful execution, the contents of the file system will be accessible at the mount point/mnt.
- Now we view the mount point
/mntusing the commandls /mnt

- From the image above, we have directories that contain credentials that can be used to access the Web service. Let's Discover interesting files within the
/home/ubuntu
NB: Don’t forget we are trying to log in to the web service http://4d0cf09b9b2d761a7d87be99d17507bce8b86f3b.flaws.cloud/
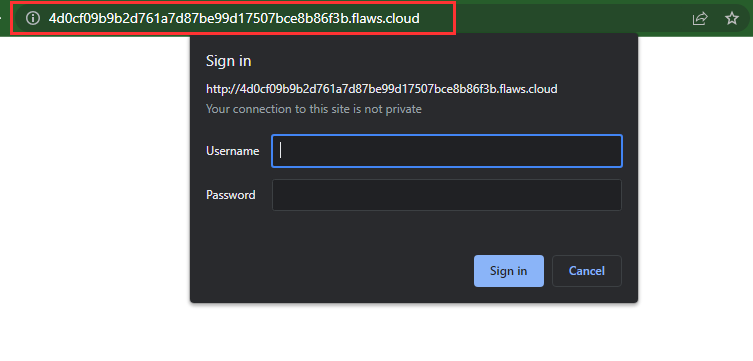
- On your Linux terminal, navigate to
/home/ubuntu
Follow the commands as shown in the image below
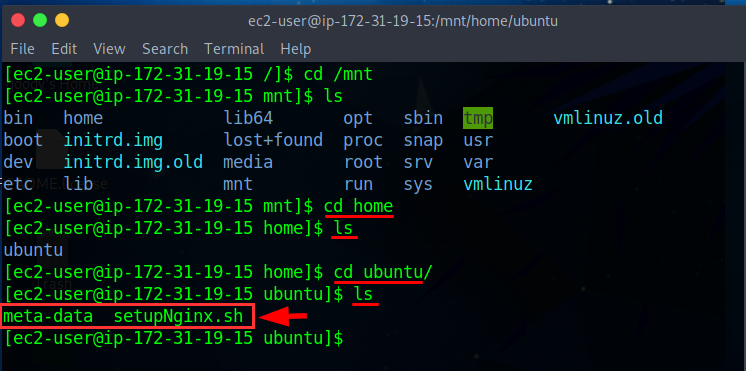
- In the
/home/ubuntudirectory, let's check the content in the two files.
a) Cat (open) what is inside the meta-data file
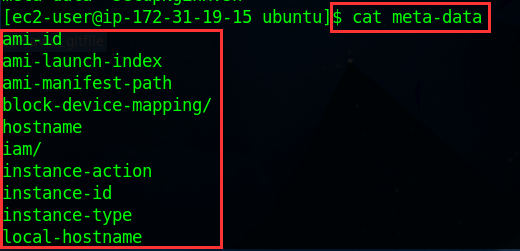
⇒ It contains a list of meta-data and nothing interesting.
b) cat into setupNginx.sh

The content contained within the setupNginx.sh contain a command of a new entry to the .htpasswd file located at /etc/nginx/.
Accessing Web Service with Discovered Credentials
This command contains the username "flaws" and the corresponding password "nCP8xigdjpjyiXgJ7nJu7rw5Ro68iE8M”
- Now, let's try the login details on the web service http://4d0cf09b9b2d761a7d87be99d17507bce8b86f3b.flaws.cloud/
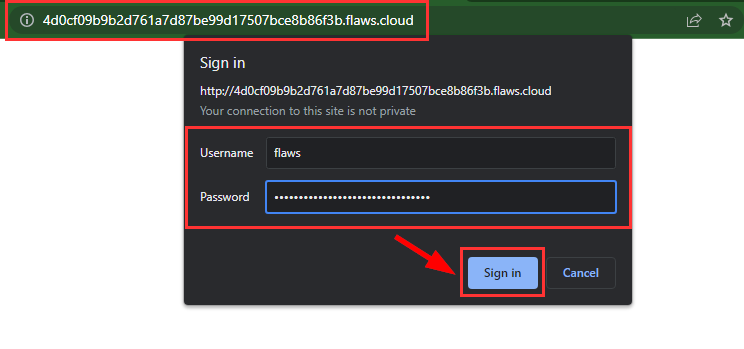
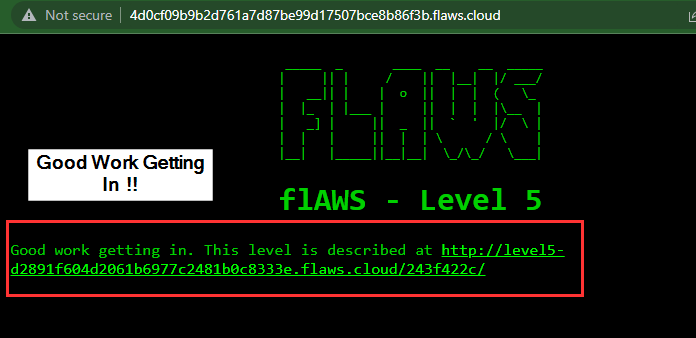
Congratulations on reaching the next level! 🎊🎉 You've successfully advanced to the next stage of your journey on flaws.cloud. Well done!
Lesson learned
AWS allows you to create snapshots of EC2 instances and databases, such as RDS. The primary purpose of this feature is to facilitate backups. However, some individuals resort to using snapshots as a means to regain access to their own EC2 instances when they forget their passwords. Unfortunately, this practice also opens up the possibility for attackers to gain unauthorized access to sensitive data. Normally, snapshots are restricted to the account owner. However, a potential attack scenario involves an attacker obtaining an AWS key that grants them privileges to manipulate EC2 instances, including starting/stopping them and then using that key to create a snapshot of an EC2 instance. By utilizing this snapshot, the attacker can launch an EC2 instance within your environment and gain access to the data stored on that volume. As with any backups, it is crucial to exercise caution in safeguarding them.
Summary
We utilized the access key credentials acquired from level-3 to establish a profile on AWS CLI, enabling us to retrieve an unencrypted EBS backup snapshot of an EC2 instance. Subsequently, we mounted the snapshot on our AWS account and initiated an EC2 instance, connecting it to the mounted snapshot to retrieve the data within. The access keys were discovered within the data stored in the snapshot, and they were used to access the EC2 web service portal.
Deleting Resources Used
- To delete an EBS volume, go to the Elastic Block Store section and click on "Volumes." Select the volumes you want to delete by checking the boxes next to them. Then, at the top right corner, click on "Action" and choose "Delete.”
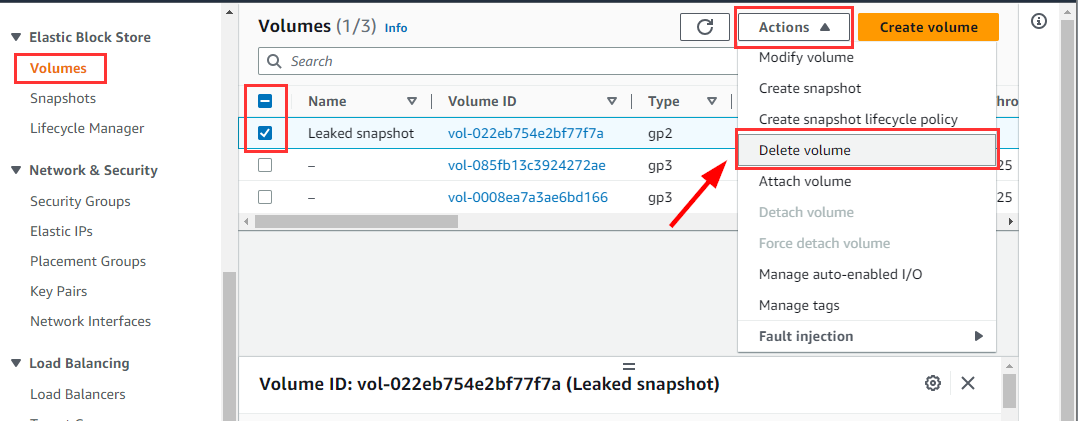
Repeat same step for other Volumes until no Volume is found there.
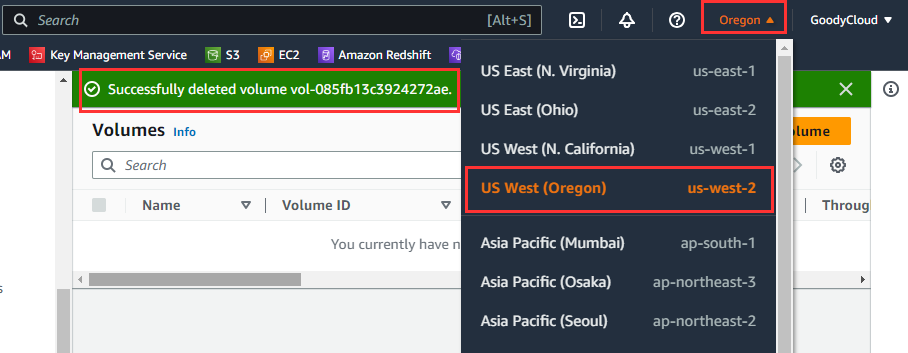
NB: To ensure proper deletion of the created volumes, please make sure that you are currently in the "us-west-2" region.
- To delete an EC2 instance, go to the EC2 dashboard and click on "Instances" under the "Instances" section. Check the box next to the instance you want to delete. Then, in the top right corner, click on "Instance state" and select "Terminate.”

NB: Terminated instances remain visible after termination (for approximately one hour).

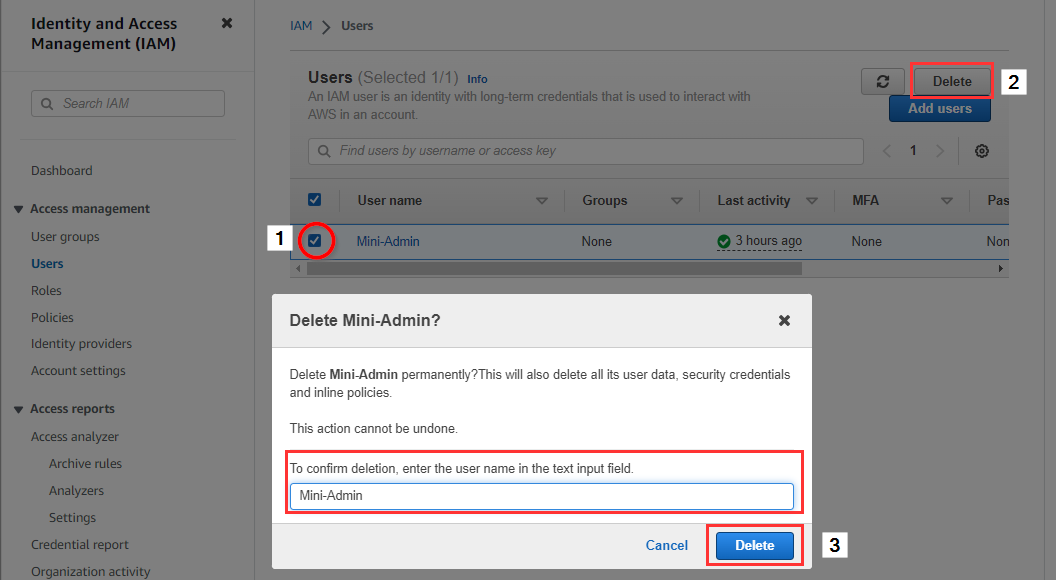
- To delete an IAM user account named "Mini-Admin," or any IAM name you created, navigate to the IAM User dashboard, select "Users" under Access Management, and check the box next to the user. Then, click on "Delete" at the top right corner.
- To delete a key pair from the EC2 dashboard, go to the "Network & Security" section and click on "EC2 Key Pairs." Select the name of the key pair you wish to delete. Then, at the top right corner of the page, click on "Action" and select "Delete.”

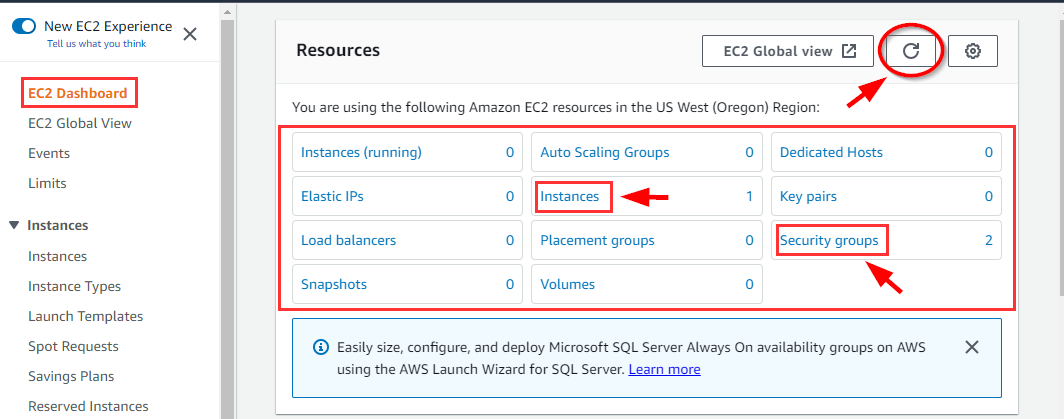
- To know what is left to delete, navigate to EC2 Dashboard and refresh
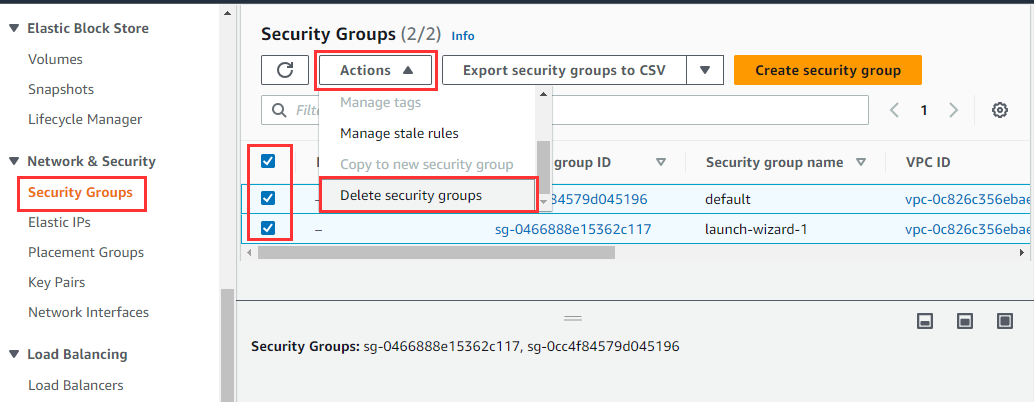
- To delete a security group, go to the "Network & Security" section and click on "Security Group." Check the boxes next to the security group(s) you want to delete. Click on "Action" at the top of the page, scroll down the menu, and choose "Delete Security Group.”
- To delete VPC resources automatically created while launching the EC2 instance. Navigate to VPC Dashboard.
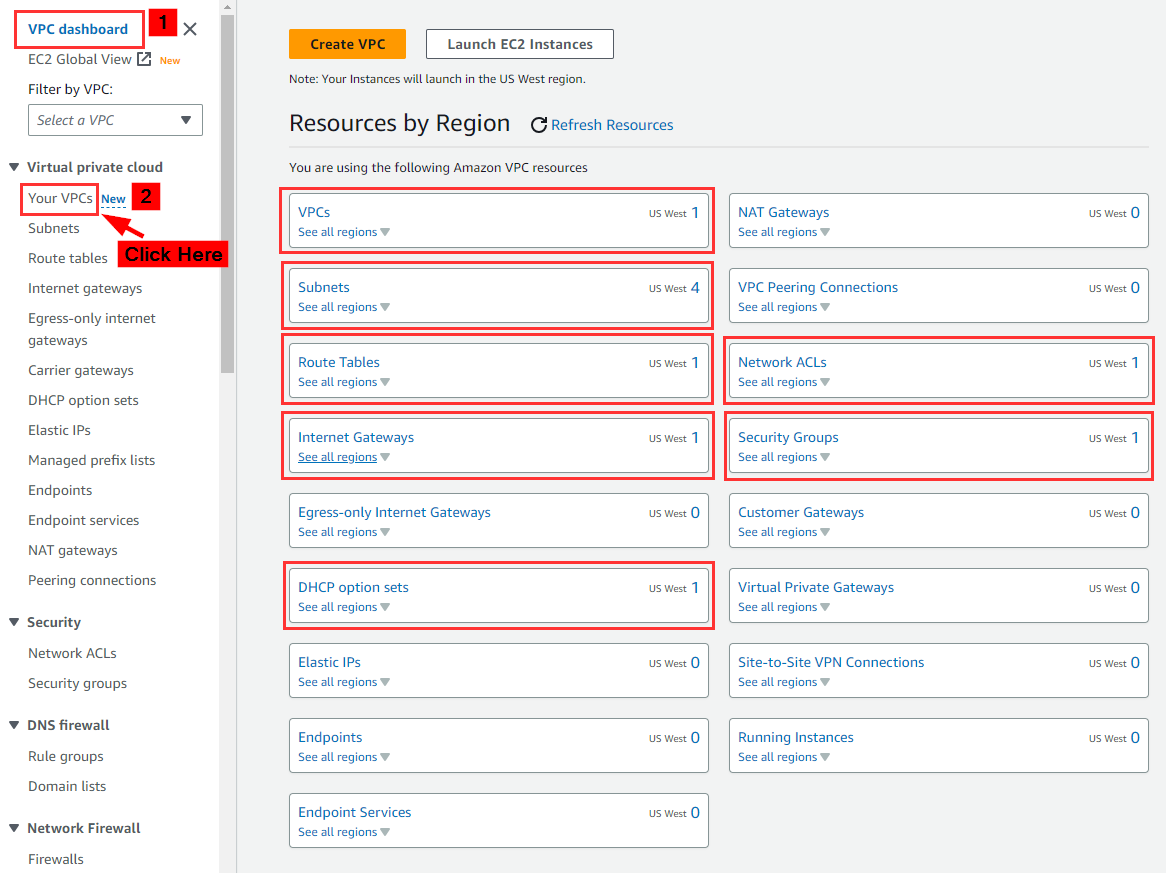
NB: They must be all zero. Also, make sure you are in US-WEST-2 region
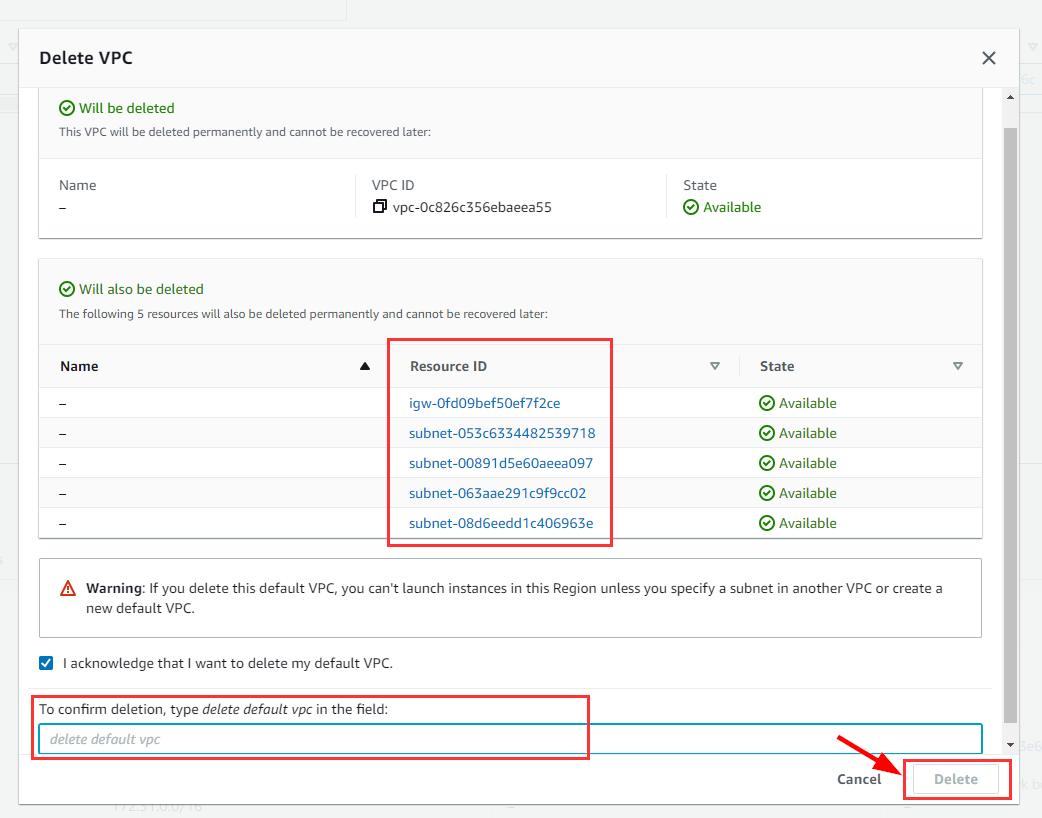
- Click VPC and Delete all attached resources

Lastly, click on the DHCP option sets from the left plane under Virtual private cloud and delete the resource in it.

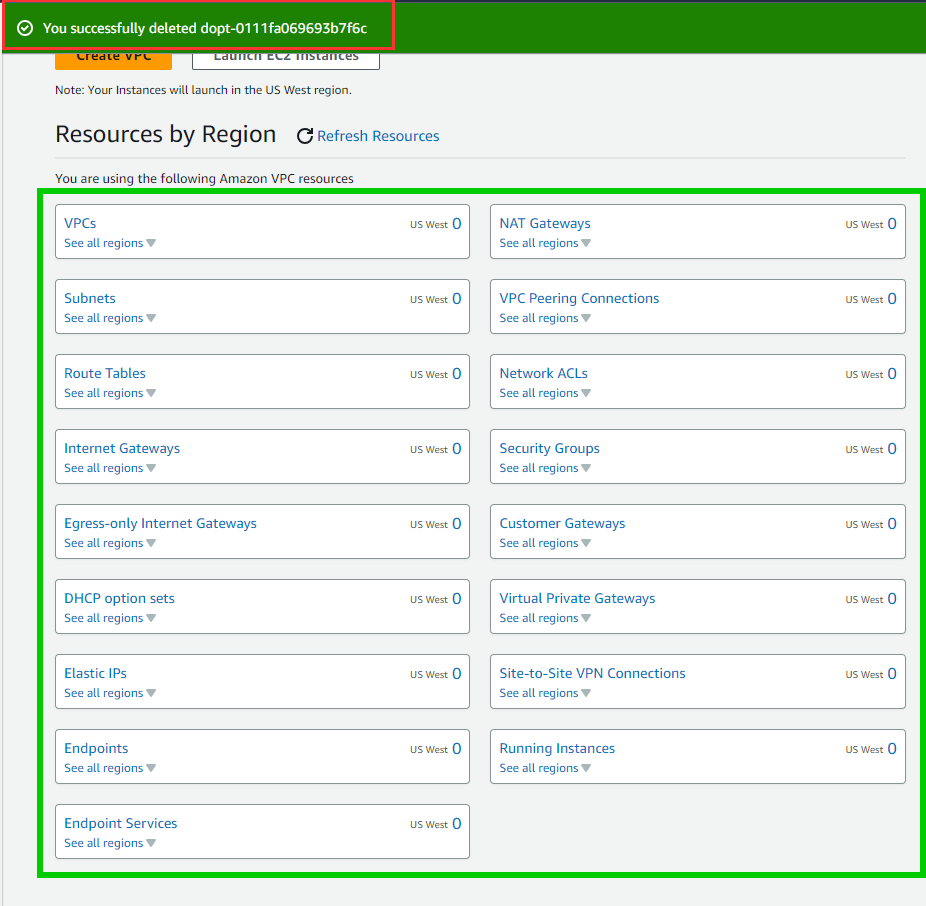
Now, We have all created VPC resources used in this lab deleted.

Level 5 🎌Getting Close !! 🚓
Subscribe to my newsletter
Read articles from Goodycyb directly inside your inbox. Subscribe to the newsletter, and don't miss out.
Written by

Goodycyb
Goodycyb
Hey there! 👋🏾 I'm Goody, a Cloud Threat Researcher by Day 🌞 and a Cloud Security Content Engineer by Night🌜. Join me on my journey as I explore the realm of Threat Detection in Cloud Security.