Level Up Your App Security: Implementing Firebase App Check in React Native
 Otaku Tech Odyssey
 Table of contents

What is Firebase App check ???
In short, Firebase App Check is a security feature that protects your API resources from abuse and unauthorized access. It prevents fraudulent activities and enhances backend security. By verifying client requests, Firebase App Check ensures only legitimate clients can access your APIs.
Why Firebase App check?
Simply put, It seamlessly integrates with Firebase and offers easy debugging during development. Implementing Firebase App Check is straightforward, and it provides flexibility for different platforms. Safeguard your backend resources with Firebase App Check and mitigate fraud effectively.
If you want to know more about it I will be listing down a few Links at the bottom of the blog where you can read about it more, as this blog is more about Implementing Firebase app check using react native.
Let's Get Started!
This implementation is more about protecting your Custom Backend Services with Firebase App check-in React Native [Client side].
STEP 1:
Before starting I expect that the “@react-native-firebase/app” module is already set up and installed.If not then Get Started by following the documentation.
STEP 2:
After completing the above step, I would like you to install @react-native-firebase/app-check package using the following command:
# Install the app-check module yarn add @react-native-firebase/app-check
Note:*App Check requires you set the minimum iOS Deployment version in*
ios/Podfileto11.0or greater.[*To check the minimum iOS deployment version open XCODE => Open your Project => Click on General => Minimum Deployments*].

Image: 1
Note:*
You may have Xcode compiler errors after including the App Check module, specifically referencing linker problems and missing directories.*You may find excluding the
i386architecture via an addition to theios/Podfilepost_installhook like the below works:
installer.aggregate_targets.each do |aggregate_target|
      aggregate_target.user_project.native_targets.each do |target|
        target.build_configurations.each do |config|
          config.build_settings['ONLY_ACTIVE_ARCH'] = 'NO'
          config.build_settings['EXCLUDED_ARCHS'] = 'i386'
        end
      end
      aggregate_target.user_project.save
    end
STEP 3:
Make sure that all the Firebase libraries you are using are on the same versions, If not, update your packages as Firebase recommends it, As it might cause build issues or runtime crashes if not done:

Image: 2
After updating your Firebase libraries your “/package.json” file will look something like this in :
    "@react-native-firebase/analytics": "^17.4.1",
    "@react-native-firebase/app": "^17.4.1",
    "@react-native-firebase/app-check": "^17.4.1",
    "@react-native-firebase/crashlytics": "^17.4.1",
    "@react-native-firebase/dynamic-links": "^17.4.1",
    "@react-native-firebase/messaging": "^17.4.1",
    "@react-native-firebase/perf": "^17.4.1",
    "@react-native-firebase/remote-config": "^17.4.1"
STEP 4:
Now let's get down to writing the code, so first import your “firebase-app-check” library:
import { firebase } from '@react-native-firebase/app-check';
STEP 5:
Let's Start by initializing the App Check module from Firebase using “firebase.app check()” as follows:
const appCheck = await firebase.appCheck();
STEP 6:
Then, we must configure the react-native-firebase custom provider; for that first obtain one, then configure it according to the providers you want to use on each platform as follows:
const rnfbProvider = appCheck.newReactNativeFirebaseAppCheckProvider();
rnfbProvider.configure({
  android: {
    provider: __DEV__ ? 'debug' : 'playIntegrity',
    debugToken: 'some token you have configured for your project firebase web console'
  },
  apple: {
    provider: __DEV__ ? 'debug' : 'appAttestWithDeviceCheckFallback',
    debugToken: 'some token you have configured for your project firebase web console'
  }
});
Note: App Check providers are like security guards for your app. They help verify if the requests coming to your app’s backend are from trusted sources or not.
STEP 7:
So once you have the custom provider configured, then theApp Check module is initialized by calling appCheck.initializeAppCheck() and pass the configured provider. The isTokenAutoRefreshEnabled option is set to true, which enables automatic token refreshing.
Note:*
The token which gets generated has an expiration time called TTL (Time To Live), which you can set in the Firebase console. To Avoid manual refreshing of the token we set the value of “*isTokenAutoRefreshEnabled” as true.
await appCheck.initializeAppCheck({
  provider: rnfbProvider,
  isTokenAutoRefreshEnabled: true
});
STEP 8:
Next, appCheck.getToken() is called to retrieve the App Check token.
const appCheckTokenFB = await appCheck.getToken();
You can also verify AppCheck is working by logging a response from the token server:
try {
  const { token } = await appCheck.getToken(true);

  if (token.length > 0) {
    console.log('AppCheck verification passed');
  }
} catch (error) {
  console.log('AppCheck verification failed');
}
STEP 9:
After all the above steps are completed you would now be able to generate a token.
The obtained App Check token is sent through an API (any API which you provide from your backend), to your backend service, which will then verify whether the token received from the API is valid or not and return a value to the client.
To know more about Implementing Backend side validation please click here!
STEP 10:
After we receive a response from the backend API regarding whether the token is valid or not, you should decide what to do with the users having a valid or an invalid token.
Note:*
If the backend returns a response as a valid token then you can consider the device is legit/unrooted, but if the backend returns a response as an invalid token then the device is a compromised device/rooted.*
STEP 11:
Here’s how the overall code will look like after you have completed all the mentioned steps above:
const firebaseAppCheckToken = async () => {
    try {
      const appCheck = await firebase.appCheck();

      const rnfbProvider = appCheck.newReactNativeFirebaseAppCheckProvider();

      rnfbProvider.configure({
        android: {
          provider: __DEV__ ? 'debug' : 'playIntegrity',
          debugToken: 'xxxx-xxxx-xxxx'
        },
        apple: {
          provider: __DEV__ ? 'debug' : 'appAttestWithDeviceCheckFallback',
          debugToken: 'xxxx-xxxx-xxxx'
        }
      });

      await appCheck.initializeAppCheck({
        provider: rnfbProvider,
        isTokenAutoRefreshEnabled: true
      });

      const appCheckTokenFB = await appCheck.getToken();

      const [{ isTokenValid }] = await sendTokenToApi({
        appCheckToken: appCheckTokenFB.token
      });

      if(isTokenValid){
        // Perform Action for the legal device
      }else{
        // Perform Action for illegal device
      }

    } catch (e) {
      // Handle Errors which can happen during token generation
      console.log(e);
    }
  };
Note:*
If you want to test the following feature in debug mode in your real device then you would require “debugToken” to generate the token in debug build.*
How To Get Debug Token To Test Feature in debug mode in your real device?
First Open https://firebase.google.com and click on firebase console:

Image: 4
Then go inside your Firebase project, there you will find the App Check option inside Build,and then click on the Apps tab:

Image: 5
There you would find your apps of different environments, go to the debug build app and open the options menu:
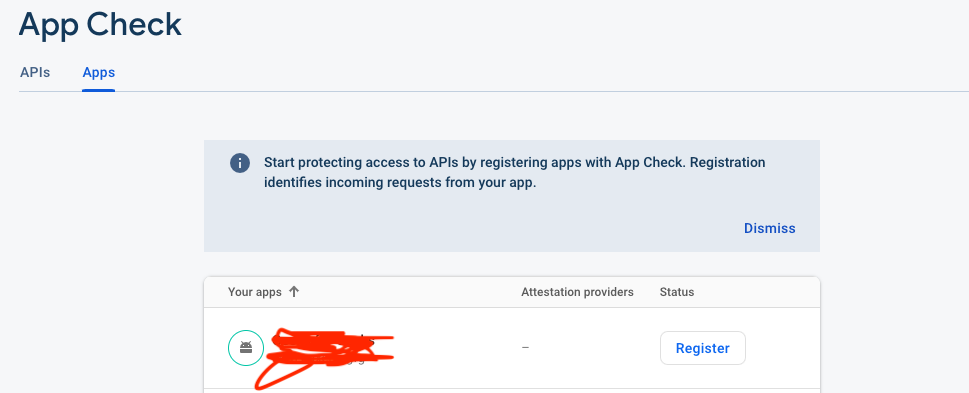
Image: 6

Image: 7
On clicking the menu option you will see the “manage debug token” option, click on that and then you will get a pop-up, where you can generate a debug token, copy and save the generated debug token and use it in the code:

Image: 8

Image: 9
And add the token in the code :
Note:*
You need to generate separate tokens for both Android and ios debug builds.
It is recommended to not share the debug token with anyone outside your company and also recommended to store the debug token inside a “.env” file and use it.*If you find the issue for generating debug token on iOS/other iOS issues even after following the steps you might find this useful: https://firebase.google.com/docs/app-check/ios/debug-provider
rnfbProvider.configure({
        android: {
          provider: __DEV__ ? 'debug' : 'playIntegrity',
          debugToken: 'Add the generated token here'
        },
        apple: {
          provider: __DEV__ ? 'debug' : 'appAttestWithDeviceCheckFallback',
          debugToken: 'Add the generated token here'
        }
      });
By following the provided code snippet and leveraging App Check’s features, you can enhance your app’s security and safeguard user data.
And that's it guys the firebase app check implementation is ready to go Live!!✌️
Here are a few links which might help you to know more about how it works:
Subscribe to my newsletter
Read articles from Otaku Tech Odyssey directly inside your inbox. Subscribe to the newsletter, and don't miss out.
Written by
Otaku Tech Odyssey
Otaku Tech Odyssey
Exploring the frontiers of EdTech as a software engineer with 2 years of exp, specialising in React Native. Sharing insights and expertise through my tech blog